Single Sign-On (SSO):Identity Providers
In the Appendix, you will learn how to configure Identity Provider (IDP) and the navigation to fetch the required IDP configurations for AutomationEdge SSO Setups. The configurations may include some the following for OpenID Connect as well as SAML protocols:
• Identity Provider Issuer.
• Identity Provider Endpoints (Authorization, Token, End Session Endpoints).
• Login redirect URIs Your web application must host a route that Identity Provider sends information to when a user signs in. Redirect URL must be an absolute URI, i.e. https://host:port/aeui/. Redirect URL in aeui portal must be the same as Redirect_URI the Identity Provider.
• Logout redirect URIs.
• Client ID (The public identifier for apps).
• Client Secret (the secret is known only to the application and the authorization server). The configuration additionally includes the following for SAML protocols.
• CSA Certificate (.crt) for SAML IDP configuration.
• Keystore File/ Keystore Alias/Keystore Password for SAML AE configuration. The following topics discuss the configurations for each Identity Provider and protocol. AE initiated SSO with Okta using OpenID Connect The topic shows how to get the required parameters and key configurations to set up AutomationEdge SSO with Okta. Following are the required parameters for Okta Single Page Application (SPA):
• Identity Provider Issuer
• Identity Provider Endpoints
• Login/Logout redirect URIs
• Client ID
• Client Secret: The parameter is also required for the Okta web application.
To configure Okta Identity Provider and fetch the required parameters:
-
Go to Okta login page. Enter your login username and password.
-
Click Sign In. The Okta landing page appears.
-
On the landing page, complete the following steps: i. Click the Applications tab, and then select Applications in the list. The Applications page appears. iii. On the Applications page, click Add Application. The Add Application page appears. iv. On the Add Application page, click Create New App.
-
In the Create a New Application Integration dialog:
i. In the Platform list, select Single Page App (SPA), and then choose OpenID Connect.
AutomationEdge SSO with Okta supports Web or Single Page App (SPA) applications.
ii. Click Create. The Create OpenID Connect Integration page appears.
-
In the Create OpenID Connect Integration page, enter SPA configuration details, as required. For example, Application name: My SPA.
-
Click Save. The application with all the parameters is created.
-
Click Back to Application. The app appears on the Applications page.
-
On the Applications page, click the application link for which you want to fetch the parameters for SSO configuration. For example, the application, My SPA.
To fetch the parameters for SSO configuration:
-
On the selected application page, click the Assignments tab. Click Assign, the list appears.
-
In the list, select Assign to People, and then map the Okta user to the AE user. The assigned AE users appear in the Assignments Assign People list.
-
Click the General tab and the General Settings page appears. Enter the Login redirect URIs and the Client ID details.
Make sure that the login and logout URLs are the same. For example, https://AutomationEdge:{Port}/aeui.
-
On the Applications page, click Security. The options appear.
-
In the options, click API, and then click Authorization Servers tab Default link. The default link page appears.
-
In the Settings tab, click the Metadata URI link. The JSON file appears.
Summarizing the steps to fetch Endpoints JSON, in the Okta Developer Console, go to Security - API - Authorization Servers. In the Name column, select the default link, and then click the Metadata URL link to view the Endpoints JSON.
- In the Authorization Servers tab Default link, copy the Metadata URI and paste it in a new browser window. Edit the URL and replace oauth-authorization-server with opened-configuration. Copy the metadata and paste it in the Import from json dialog in AEUI.
For details about Import from json dialog, see Settings Single Sign-On section in the AutomationEdge User’s guide.
- In Okta, click Claims tab - Add Claim, and then enter a name for the claim and configure the claim details. The values expression for the list of claims used in AutomationEdge may change for different Identity Providers (IDP). The following table shows the claims for Okta IDP:
| Name | Values (case sensitive) |
|---|---|
| uniqueId | user.username |
| firstName | user.firstName |
| lastName | user.lastName |
| emailAddress | user.email |
uniqueId, firstName, and lastName are mandatory attributes. Therefore, you must enter a value for the attributes.
This is Okta Expression Language syntax to generate values derived from attributes in Universal Directory and app profiles. To validate an expression, use the Token Preview tab.
Okta(IDP) initiated SSO to AE using OpenID Connect
In the topic, we demonstrate setups in Okta and AutomationEdge for IDP initiated SSO for OpenID Connect.
Setups in Okta
In the section you will learn about the setups in Okta. To configure setups in Okta for IDP initiated SSO for OpenID Connect:
- Log on to Okta. The Getting Started page appears.
- Click the Applications tab Applications option. The Applications page appears.
- On the page, click Add Application. Choose the Web tile and create a Web application, for example, My Web App.
- Click Next. The Application Settings page appears.
- On the page, configure the application settings. Add the following details:
- Application Name: for example, My Web App
- Login redirect URI: for example, the base URL for aeui in the form
https://{host}:{port}/aeui - Logout redirect URI: for example, the base URL for aeui in the form
https://{host}:{port}/aeui
Login redirect URI and Logout redirect URI should be the same for AE.
- Click Done. The Web application, My Web App appears.
- Scroll down to the General Settings tab, and then click Edit next to the tab. Select all the checkboxes, as required.
Initiate login URI is important here; it is the Login redirect URI + /#/sso-login?orgCode=(Your TENANT orgCode).
For example,
https://127.0.0.1:8443/aeui/#/sso-login?orgCode=TENANTCLOUD - Click Save. The changes are saved.
At the end of the configuration, you will see an App Embed link. If you copy and paste this link in the browser, it will invoke IDP initiated SSO flow.
To add claim:
-
On My Web App, go to the Assignments tab. Search for users you want to assign to the application.
-
Assign the users and then click Save. The details are saved.
-
Click Go Back and on the page, click API Authorization Servers. The default link appears.
-
Click the default link and open the Settings page. Click the Metadata URI link. The Metadata opens in XML format.
-
Click on the Claims tab. Click Add Claim, enter a Name for the claim and configure the claim details. The values expression for the list of claims used in AutomationEdge may change for different Identity Providers (IDP). The following table shows the claims for Okta IDP:
| Name | Values (case sensitive) |
|---|---|
| uniqueId | user.username |
| firstName | user.firstName |
| lastName | user.lastName |
| emailAddress | user.email |
| orgCode | OrgCode |
uniqueId and orgCode are mandatory attributes. Therefore, you must enter a value for the attributes. You can also enter the firstName, lastName, and emailAddress for a complete profile view. This is Okta Expression Language syntax to generate values derived from attributes in Universal Directory and app profiles. To validate an expression, use the Token Preview tab.
Setups on AutomationEdge and Single Sign-On
In the section you will learn about the AutomationEdge setups.
To configure setups in Okta for IDP initiated SSO for OpenID Connect:
-
You may import the contents of Metadata URI to set up Single Sign-On in AutomationEdge.
-
Create an SSO user in AutomationEdge mapping it to an IDP user with permissions on the IDP application.
-
In the Applications General tab, locate App Embed Link URL. Copy the URL.
-
Type the App Embed URL in the browser. You are redirected to AutomationEdge with IDP initiated SSO. Or Switch to Okta Classic UI view.
-
In the Okta Class UI view, click My Apps. Your app appears on the page.
-
Click on your application, for example, My Web App.
-
Click on the app. You will be taken to the AutomationEdge with IDP initiated SSO.
AE initiated SSO with Okta using SAML
Okta Identity Provider supports OpenID Connect and SAML protocols. In the topic, we demonstrate configurations to set up AutomationEdge SSO with Okta using the SAML protocol. We will also showcase how to get the required parameters for AutomationEdge – Keycloak Single Sign-On Settings. Get the following parameters from IDP configuration: • Identity Provider Metadata (store in descriptor.xml). • Client ID • Redirect URIs For AE SSO configurations we need: Keystore file, Keystore Alias, Keystore Password For IDP SSO configurations we need: Certificate file (.crt)
To generate Self Signed or CA Certificate, see Keystore and Certificate Generation
To configure Identity Provider – Okta SAML application:
-
Access the Okta login page, enter the sign-in details, and then click Sign in. A list of available applications appears.
-
On the top, right-corner, click Admin, and then enter the code from Okta Verify App that you received on your mobile. The Get Started with Okta page appears.
-
Click the Applications tab and select Applications from the list. The Get Started - Applications page appears.
-
Click Add Application. The Add Application page appears.
-
On the page, click Create New App. Enter a name for the application, for example, AE SAML APP.
We are creating a Web application with Sign on method SAML.
- Click Next, and then enter the following SAML field details:
- Specify the Redirect URL for Single sign on URL.
- Specify Audience URI. Make sure that Audience URI same as the sign on URL.
- Set Name Id format to Transient and the application username to Okta Username.
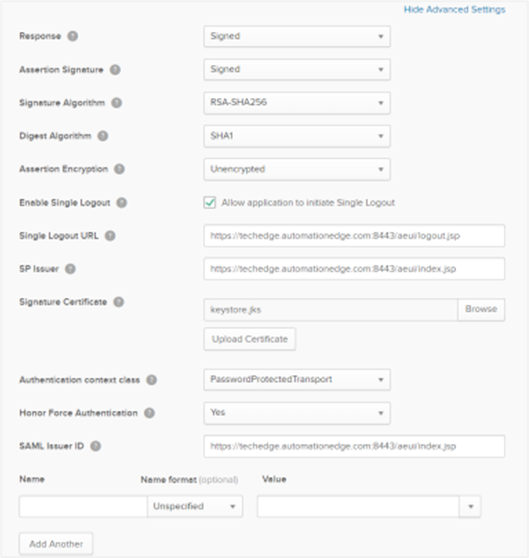
- Click Show Advanced Settings. Enter additional Okta configurations in the Advanced Settings, as required:
• Set the Response to Signed as it will sign the response after successful login.
• Assertion Signature needs to be Signed.
• The signature algorithm is RSA-SHA256; even in the backend, we are using this algorithm to sign the login request.
• Set the digest algorithm to SHA1.
• Set Assertion encryption to Unencrypted.
• Check the Enable single logout as we are supporting logout as well. In the Single logout URL specify the logout URL.
• Set the SP issuer the same as the Single sign-on URL. As we are signing the xml we need a certificate for it.
• You can browse and upload the certificate.
• Even in the SAML Issuer id should be the same as the single sign on URL.
• Provide the same values in the following fields:
- Single Sign on URL
- Audience URL
- SP issuer
- SAML issuer ID • Browse for a Signature Certificate and click Upload.
To generate Self Signed or CA Certificate, see Keystore and Certificate Generation.
AutomationEdge claims: AutomationEdge supports the following claims:
| Name | Values (case sensitive) |
|---|---|
| firstName | user.firstName |
| lastName | User.lastName |
| emailAddress | User.email |
| Username | User.login |
There is no change in the GROUP ATTRIBUTE STATEMENTS.
-
Click Next, and then click Finish. The configuration is complete.
-
To fetch the Client ID for SAML Okta: i. Click the General tab and scroll to the App Embed Link section. ii. Copy the Client ID from the Embed Link URL.
-
To create the descriptior.xml: i. Click Application - (Your Application Name) - Sign On. ii. Click the highlighted link to get the descriptor details. iii. Save the descriptor details into an xml file called descriptor.xml.
-
To assign the web SAML application to users: i. Click Assignments - Assign. ii. Search for the people to whom you want to assign the application to and click Assign. The application is assigned to the selected user.
-
To configure Single Sign-On in AutomationEdge UI: i. Sign on to AE UI and click Settings - Single Sign-On. The Single Sign-On page appears. ii. Fetch and enter the field details, and then click Save. The details are saved.
- To generate Keystore, see Keystore and Certificate Generation.
- AutomationEdge username Kerry is mapped to Okta username kerry.jones@automationedge.com.
- You can now sign-in to AE UI through the SSO link on the log on page. The first time you connect to Okta for SSO, the Okta login page appears. Enter the username mapped to an AutomationEdge user in the organization.
Okta (IDP) initiated SSO for AE using SAML
The topic describes the setups in Okta and AutomationEdge for IDP initiated SSO with SAML. Setups in Okta The section describes the steps for setups in Okta for IDP initiated SSO with SAML.
To proceed with setups in Okta for IDP initiated SSO with SAML:
- Sign-in to Okta. The Getting Started page appears.
tip
Change the UI from Developer Console to Classic UI.
- Click the Applications tab, and then Applications. The Applications page appears.
- On the page, click Add Application. The Add Application page appears.
- Click Create New App. In the Create a New Application Integration dialog, select Web Platform and SAML 2.0.
- Click Create. In the Create SAML Integration page, enter a name for the application you want to create, for example, MySamlApp.
- Click Next and configure the application details.
i. Specify the Single sign on URL.
iii. Click Show Advanced Settings and enter the following details:tip
The Audience URI is the same as the Single sign on URL. ::: ii. In the Name ID format field, select Transient and in the Application username field, select Okta username. Add Application name, Login redirect URI, and the Logout redirect URI.
tipLogin redirect URI and Logout redirect URI should be the same for AE, and it is the base URL for aeui.
- Response: Select Signed as it will sign the response after successful login.
- Assertion Signature: Select as Signed. The signature algorithm is RSA-SHA256; we use the algorithm to sign the login request in the backend.
- Digest Algorithm: Select as SHA1.
- Assertion Encryption: Select as Unencrypted.
- Enable Single Logout: Select the checkbox to allow the application to initiate single logout as well.
- Single Logout URL: Enter the logout URL.
- SP Issuer: Enter the same URL as the Single sign on URL.
- Signature Certificate: As we are signing the Request Descriptor xml file we need a certificate for it. Browse and upload the certificate, see section Keystore and Certificate Generation To generate the certificate. Even the SAML Issuer ID provides the same value as the Single sign on URL.
The following fields have the same values: • Single Sign on URL • Audience URL • SP issuer • SAML issuer ID
- Add Attributes / Claims. The following table lists the attributes / claims for Okta IDP for SAML app.
| Name | Values (case sensitive) |
|---|---|
| firstName | user.firstName |
| lastName | user.lastName |
| emailAddress | user.email |
| username | user.login |
| orgCode | OrgCode |
- The value expression for the list of claims used in AutomationEdge may change for different Identity Providers (IDP). The table below shows the Attributes / Claims for Okta IDP for SAML App.
It is mandatory to specify values for username and orgCode. It is preferable to provide values for firstName, lastName and emailAddress Attributes for a complete profile view. This is the Okta Expression Language syntax to generate values derived from attributes in Universal Directory and app profiles. To validate an expression, use the Token Preview tab. To add more attributes, click Add Another. There are no configurations required in the GROUP ATTRIBUTE STATEMENTS.
- Scroll down and click Next, and then click Finish. The configuration is complete.
Fetch the Descriptor file and Client ID for AE SSO setup
In the section, you’ll learn to fetch a descriptor file and client ID to be used in the AE SSO setup.
To fetch a descriptor file to be used in the AE SSO setup:
- On the Applications page, click MySamlApp. The configurations appear.
- On the application page, click Sign On tab. The Settings section appears.
- Click Identity Provider metadata. The Metadata.xml file opens in a new tab. Right-click anywhere in the file and click Save As. Save the file as metadata.xml.
Use the file as the Descriptor file when setting up AE SSO.
To fetch the client ID to be used in the AE SSO setup:
- Click General tab. Scroll down to the App Embed Link section and get the Client ID. The Client ID is part of the Embed Link and is highlighted.
Copy the Embed Link URL and paste in the browser. The IDP initiated SSO flow is invoked after completion of all the configurations.
- On Okta Classic UI, click MyApps tab. MySamlApp appears on the page.
As discussed in the next sections, you may click on the App for Single sign on to AE (redirects to the AEUI Home page) once all the settings are complete.
Assign Okta users to SAML app In the section, you will learn how to assign Okta users to SAML app. To assign Okta users to SAML app:
- Go back to the Applications tab. The MySamlApp appears.
- On My Web App page, click the Assignments tab. The Assign Applications page appears.
- On the page, click Assign Apps to People tab. The Application section appears.
- Select the following checkboxes: i. Under Applications, select the checkbox next to the application, that is, MySamlApp. ii. Under People, select the checkbox next to the user. For example, Thomas Astebro. iii. Click Next and then search for other users you want to assign to the app to. The user details appear. iv. Click Save and then Go Back. The Assign Applications page appears. v. Click the Confirm Assignments tab. Review the assignment and click Confirm Assignments. The assigned user details appear. And the Okta setups for IDP initiated SSO with SAML app is complete.
Setup on AE Tomcat server for SAML apps
In the section, you will learn how to setup on AE Tomcat Server for SAML apps.
To setup on AE Tomcat server:
-
Stop Tomcat server and then go to: /webapps\aeui\WEB-INF folder. For example, D:\AutomationEdge\tools\apache-tomcat-9.0.36\webapps\aeui\WEB-INF. The Web.xml file is available.
-
Edit the xml file. Comment
<http-method>POST</http-method>, which comes after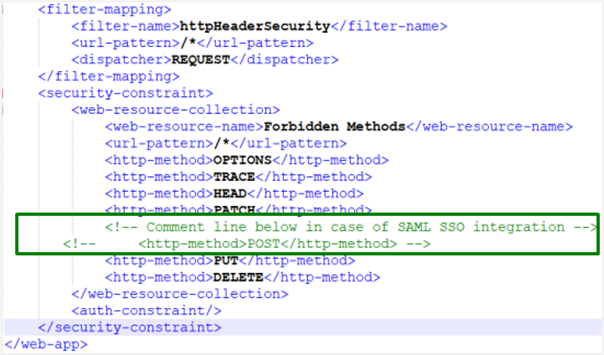
-
Restart the Tomcat server. The setups on the AE Tomcat server for SAML apps is complete.
Setups on AE UI for Single Sign-On using SAML
In the section, you will learn the AutomationEdge setups. To setup on AE UI for Single Sign-On using SAML:
- Configure Single Sign-On in AutomationEdge.
For SAML app, the Import option is not used to fetch Metadata URI.
- Create an SSO user in AutomationEdge, mapping it to an IDP user with permissions on the IDP application.
Invoke IDP (Okta) initiated SSO using SAML
In the section, you will learn how to invoke IDP (Okta) initiated SSO using SAML. To invoke IDP (Okta) initiated SSO using SAML:
-
In the Applications General tab and then go to App Embed Link URL.
-
Copy-paste or enter the URL from the Embed Link field in the browser. You are redirected to AutomationEdge with IDP initiated SSO. Or In Okta Classic UI, click My Apps. You can see your app in the list. Click the application. You are redirected to AutomationEdge with IDP initiated SSO. When you sign-out of AE, you are also logged out IDP (Okta) due to the Single Logout URL setting. The process of IDP initiated SSO is complete.
AE initiated SSO with Keycloak using OpenID Connect
Keycloak Identity Provider supports OpenID Connect protocols. In the topic, you will learn about the required parameters and some key configurations to set up AutomationEdge SSO with Keycloak. Following are the required parameters for Keycloak IDP SSO configuration in AutomationEdge: • Identity Provider Issuer • Identity Provider Endpoints (Authorization, Token & End Session Endpoints) • Login redirect URIs • Client ID
To setup Keycloak IDP SSO configuration in AutomationEdge:
-
Access the Keycloak portal. The Login page appears.
-
Enter the login credentials and click Log In. The landing page appears.
-
In the left navigation pane, Click Realm Settings - Add realm. Enter the details and add a realm, if not added.
-
In the left navigation pane: i. Click Clients - Clients page - click Create. The Add Client page appears. ii. Enter the following field details:
Field name Description Client ID* Enter a unique client ID. For example, Library. Client Protocol Select appropriate protocol and access type as public. Root URL Specify a valid redirect URL. For example, https://Automationedge:{Port}/aeui.iii. Click Save. The details are saved. In the Settings tab, you may keep the default values or change, as per your need. iv. Click the Mappers tab. The details page appears. v. Click Create. The Create Protocol Mapper page appears. vi. Enter the following details to create claims:
Field name Description Protocol Displays the protocol you are using. For example, openid-connect. Name Enter a name of the claim. For example, uniqueId. Mapper Type Select the type of mapper from the list. For example, User Attribute. User Attribute Enter a name for the user attribute. For example, uniqueId. Token Claim Name Enter a token claim name. For example, uniqueId. vi. Click Save. The mapper details are saved. vii. Complete creating the following Mappers (Claims) for JWT (Access) token; to be used by Service Provider (in this case AutomationEdge).
Name User Attribute Token Claim Name uniqueId uniqueId uniqueId firstName firstName firstName lastName lastName lastName emailAddress emailAddress emailAddress Username Username Username orgCode orgCode orgCode
Create four mappers in the Client.
-
In the left navigation pane: i. Click Users Users page Lookup tab. The details page appears. ii. Click Add user and enter the following details:
- First Name
- Last Name
tipTo set user credentials, go to the Credentials tab and choose a password; we have used password for the rest of the article. Turn off the Temporary flag unless you want the user to change the password on the first login. :::
iii. Click Save. The user is created successfully.
iv. Click the Attributes tab. The details page appears.
v. Enter the following details:
| Key | Value |
|---|---|
| uniqueId | (username) |
| firstName | (first-Name) |
| lastName | (last-Name) |
| emailAddress | (email) |
| username | (username) |
| orgCode | (AE tenant org code) |
It is mandatory to specify actual values for the first three attributes: uniqueId, firstName, and lastName.
- In the left navigation pane: i. Click Clients, and then click on the Library link. The Clients page appears. ii. Fetch the Client ID and Valid Redirect URI and then go back to the Realm Settings menu. iii. Fetch the Client ID and Valid Redirect URI and then go back to the Realm Settings menu. In the Endpoints field, click OpenID Connect Endpoint Configuration. You can fetch the authorization_endpoint key value and other Endpoints from the Endpoints JSON.
On AutomationEdge UI, you can now complete configurations under Settings → Single Sign-On; by entering the values or importing the endpoints authorization file. Create an SSO user in AutomationEdge UI. The username should be the same as the uniqueId of an IDP user. Logon to AE through the SSO link and you’ll be redirected to sign in through the Keycloak login page. The user logged in is the same as the uniqueId of the IDP (Keycloak) user.
AE initiated SSO with Keycloak using SAML
Keycloak Identity Provider supports OpenID Connect and SAML protocols. In the topic, you’ll learn how to configure the set up AutomationEdge SSO with Keycloak using the SAML protocol. In addition, you’ll also learn how to get the required parameters for AutomationEdge – Keycloak Single Sign-On Settings. Get the following parameters from the IDP configuration:
• Identity Provider Metadata (store in descriptor.xml)
• Client ID
• Redirect URIs For IDP SSO configurations you need:
• Keystore file, Keystore Alias, Keystore Password Additionally, for IDP SSO configurations you need:
• Certificate file (.crt)
To generate Self Signed or CA Certificate, see Keystore and Certificate Generation
To configure Keycloak:
- Login Keycloak Identity Provider portal.
- On the Home page, click on the Administration Console.
- Add Realm if not added. We already have a Realm named master.
- Go to the Clients section and click Create.
- Enter the following details:
i. Give a name to the Client - “AE_SAML_Library”.
ii. Select appropriate Client Protocol in this case SAML.
iii. Set Client SAML Endpoint (valid redirect URIs). iv. Click Save. ‘Success! The Client has been created’ message appears. - On the page with more Settings, you may change the configurations, as required. Click Save.
| Field Name | Value |
|---|---|
| Enabled | On |
| Consent Required | off |
| Login Theme | |
| Client Protocol | Saml |
| Include AuthnStatement | off |
| Include OneTimeUse Condition | off |
| Sign Documents | On |
| Optimize REDIRECT signing key lookup | off |
| Sign Assertions | off |
| Signature Algorithm | RSA-SHA256 |
| Saml Signature Key Name | None |
| Canonicalization Method | EXCLUSIVE |
| Encrypt Assertions | off |
| Client Signature Required | off |
| Force POST Binding | off |
| Front Channel Logout | off |
| Force Name ID Format | off |
| Name Id Format | transient |
| Root URL | |
| Valid Redirect URIs | http://(aeui-server)/aeui/index.jsp |
| Base URL | |
| Master SAML Processing URL | |
| IDP Initiated SSO URL Name | |
| IDP Initiated SSO Relay State | |
| Assertion Consumer Service | https://Automationedge:port/aeui/index.jsp |
| Logout Service Post Binding URL | https://Automationedge:port/aeui/logout.jsp |
Use the Valid Redirect URL after successful login to the IDP. We are using post binding in our application. So the ‘Assertion Consumer Service’ and the ‘Logout service Post Binding URL’ should have valid URLs. Redirect URL and Assertion Consumer Service root URL should be the same.
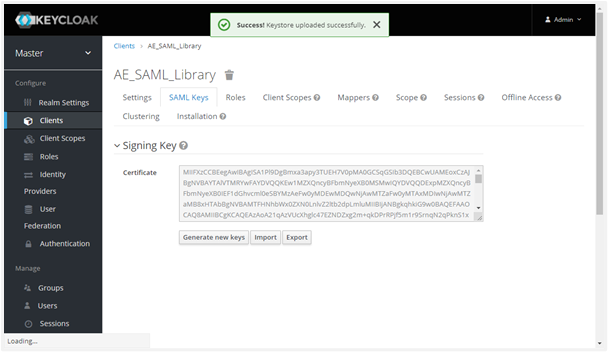
Upon save a Success message appears as follows. 7. Now go to the SAML Keys tab, and then click Import. Select Archive format at Certificate PEM from the drop-down list.
To generate Self Signed or CA Certificate, see Keystore and Certificate Generation.
Click Select file to browse your certificate file. Click Import. Upon import, the ‘Keystore uploaded successfully’ message appears, as follows:
- Next, we will enable some built-in Protocol Mappers and create a new Protocol Mapper. In the Client menu, click on the Mappers tab. In the same client setting section, move on to Mapper click on Add Builtin. Include the built-in email, givenName and surname by enabling the checkbox next to them. The selected built in protocol Mapper attributes are now available under the Mappers tab. We got the three attributes only left with the username attribute. Click Create button to open the Create Protocol Mapper for creating the username claim. Set the Name, User Attribute, Friendly Name, SAML Attribute Name as username and Mapper Type to User Attribute. Next, click on Save.
SAML Attribute name for all mappings must match username, firstName, lastName, emailAddress.
Create a new hardcoded attribute mapping for orgCode as shown in the following screenshot:
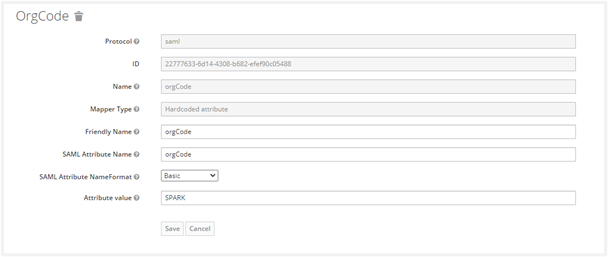
The Attribute value must be organization code of AE tenant. It creates the Client Protocol Mapper for username claim successfully.
The Protocol Mappers (claims) for the Client is now as follows:

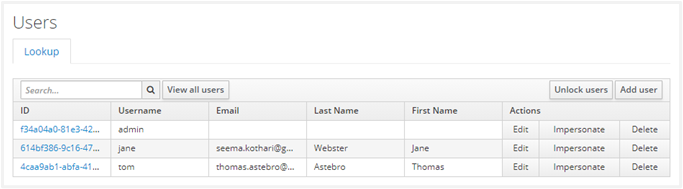
Add User If the user is not in the realm, the following are steps to view and add new users:
-
Navigate to the Users menu in the left navigation pane.
-
Click on View all users.
-
Following is the current list of users:
-
Click Add User button to create a new user. Specify the First Name, Last Name and Email. Configure User details. Click Save.
Upon saving, it creates a user and generates an ID, as seen below, with a success message. To set user credentials, go to the Credentials tab and choose a password. Turn off the Reset Password- “Temporary” flag unless you want the user to change the password on the first login.
Now we will set the Protocol Mapper user attributes provided in the table below for this user.
| Key | Value |
|---|---|
| username | (username) |
| firstName | (firstname) |
| lastName | (lastname) |
| emailAddress | (email) |
Click Attributes tab to add the following four attributes for the user. Provide the actual values in the Value field.
It is mandatory to specify actual values for the first three attributes: uniqueId, firstName, and lastName. In Keycloak, you can check for descriptor.xml in the realm setting as shown in the following screenshot:
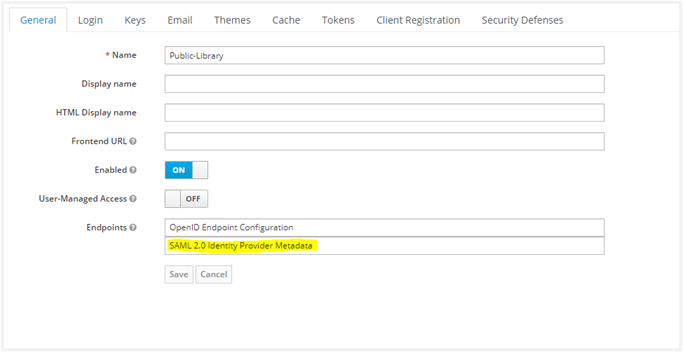
- Fetch parameters for AutomationEdge SSO Settings Next, we wish to fetch the Client ID, Redirect URLs. Click on the Clients link in the left Navigation menu. Click on the Client link in the list (in this case, AE_SAML_Library). Get the Client ID. Get the Valid Redirect URLs by scrolling further down. Navigate to the Realm Settings. Click on SAML 2.0 Identity Provider Metadata. An XML file opens. Save the information in a descriptor.xml file.
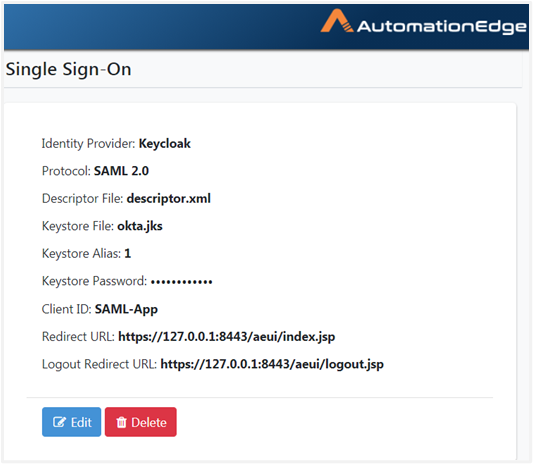
Thus, we have seen how to get Identity Provider descriptor file, Keystore Alias, Keystore Password, Client ID and Redirect URL required for SSO Settings in AutomationEdge. On AutomationEdge UI, you can now complete configurations under Settings Single Sign-On. The Single Sign-On Settings on AutomationEdge are visible as follows:
To generate Self Signed or CA Certificate, see Keystore and Certificate Generation.
Create an SSO user in AutomationEdge UI. Map the username to a unique IDP user.
AE initiated SSO
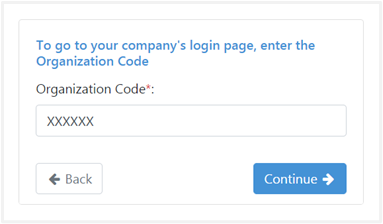
Now Sign in with the SSO link on AutomationEdge UI. Provide the Organization Code.
 The first time you log in with SSO, it redirects you to the Keycloak login page (Make sure you log in with the correct user).
If you are already logged in with another user, you need to log out and log in with this user.
](/platform/aeug/8.1/assets/images/keyCloak2-8d898a39033e84fa960c84e32cd275e3.png)
You logged in to AutomationEdge. Note that the user logged in is the same as the uniqueId of the IDP (Keycloak) user ‘tom’. The process of configuring Keycloak and AutomationEdge for SSO using OpenID Connect protocol for Web applications is complete.
AE initiated SSO with ADFS using OpenID Connect
ADFS Identity Provider supports OpenID Connect and SAML protocols. The topic demonstrates some key configurations to set up ADFS and fetch the required parameters for AutomationEdge SSO.
• Identity Provider Issuer
• Identity Provider Endpoints (Authorization, Token & End Session Endpoints)
• Login redirect URIs
• Client ID
- Open ADFS console and go to Application Group. Click on Add Application Group.
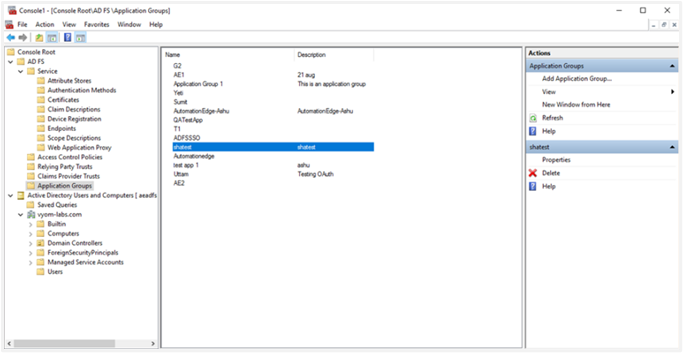
- Type a Name for a new Application Group. We shall provide the name ‘Automationedge’.
- Select Web browser accessing a web application as the Client-Server application template.
](/platform/aeug/8.1/assets/images/openId2-7ef103589d5419dd136c5d8b69702ab2.png)
- Add Application Group Wizard starts. The Welcome step automatically generates a new Client Identifier (used for Client ID in AutomationEdge SSO configuration). You may change it, but it is not necessary. Copy the Client Identifier.
- In the Redirect URI section, add all the URLs for AutomationEdge as the client application. Click Next.
](/platform/aeug/8.1/assets/images/openId3-0efadb8e112353069b7ad85b85aa848d.png)
-
Permit everyone is selected in the Apply Access Control policy step, but you may choose as needed. Click Next.
-
Review settings in the Summary step and click the Next button.
-
‘The Application Group has been successfully created’ message appears in the Complete step. Click Close.
-
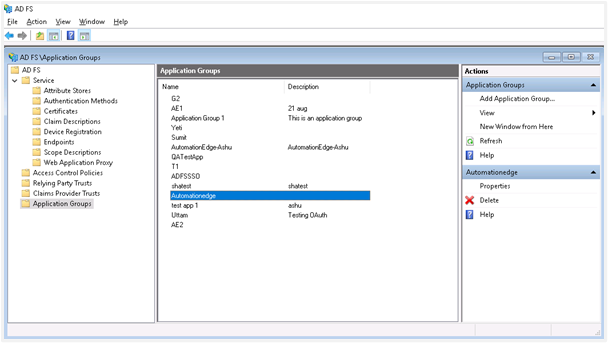
You can now see the ADFS console. The new Application Group lists in the Application Groups interface.
-
Select the Application Group you want to configure and click on Properties.
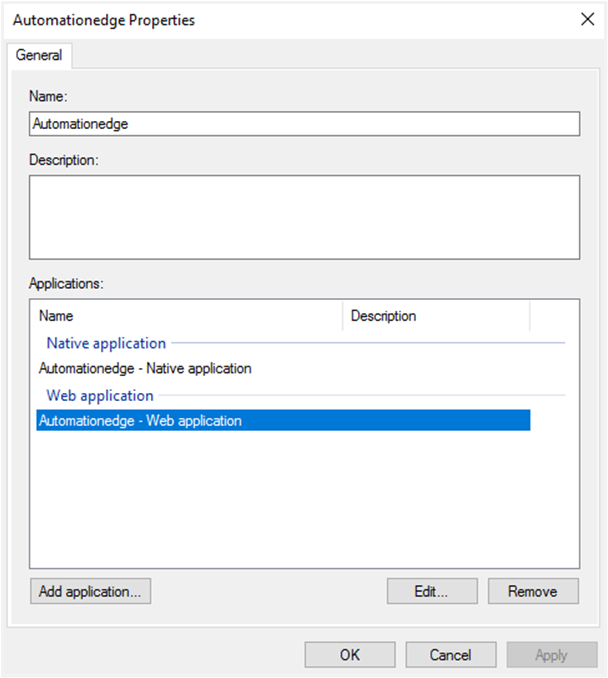
- The newly created Application Group’s Properties window opens. The Application Group wizard has created the two Applications for Client Application and Server.
- Now select the ‘Automationedge’ Web Application as follows for additional configurations. Click Edit.
- Add Claims for the Access Token. Keep the Notes and Access control policy tab as they are.
- Go to the Issuance Transform Rules tab, which is empty! Once you see the windows like in the snapshot below, click the Add Rule button. Select the ‘Send LDAP Attributes as Claims’ and add the LDAP Attributes as follows:
| LDAP Attribute | Outgoing Claims |
|---|---|
| E-Mail-Addresses | emailAddress |
| SAM-Account-Name | uniqueId |
| Given-Name | firstName |
| Surname | lastName |
It is mandatory to map LDAP attributes to the three outgoing claim types: uniqueId, firstName, and lastName.
- Click Next.
](/platform/aeug/8.1/assets/images/openId6-4d9d3b8a37c897baee84bc804e84476d.png)
- For AutomationEdge Web Application Configurations, finally click on Client Permissions. In our case, we have selected the following three scopes: OpenID Connect: request use of the OpenID Connect authorization protocol;
- After selecting Client Permissions, click OK.
- Next, add a user to the ADFS server Active Directory. Following are the steps for Adding a new user to the ADFS server Active Directory. In the ADFS console click on Active Directory Users and Computer Navigate to Organization - User - New - User
Provide details of the user to be created.
](/platform/aeug/8.1/assets/images/openId7-38a5325b61c2d199c9a2cdbb6f4360ad.png)
-
After user creation, to fetch the Identity Provider Endpoints (Authorization, Token and End Session Endpoints) in ADFS, complete the following steps:
i. Open Windows Power Shell and type the command: Get-AdfsEndpoint
ii. Search for OpenID Connect Discovery.
iii. Copy the Full URL (e.g.
https://xxxxx.com/adfs/.well-known/OpenIDConnect-configuration)iv. Open the URL to get the Endpoints text in JSON format, as seen in the following image:
](/platform/aeug/8.1/assets/images/openId8-81bd3e5fb05601fefad979758be4d0f8.png)
The ADFS configurations and fetching desired parameters for AutomationEdge SSO is complete. You may now create an AutomationEdge SSO user mapped to the newly created user in ADFS Windows Server Active Directory for AutomationEdge initiated Single Sign-On.
AE initiated SSO with ADFS using SAML
ADFS Identity Provider supports OpenID Connect and SAML protocols. In the topic, you’ll learn the configurations to set up AutomationEdge SSO with ADFS using the SAML protocol. In addition, you’ll understand how to get the required parameters for AutomationEdge – Keycloak Single Sign-On Settings. Get the following parameters from the IDP configuration:
• Identity Provider Metadata (store in descriptor.xml)
• Client ID
• Redirect URIs In addition, for IDP SSO configurations you need:
• Keystore file, Keystore Alias, Keystore Password In addition, for IDP SSO configurations you need:
• Certificate file (.crt)
To generate Self Signed or CA Certificate, see Keystore and Certificate Generation.
To configure ADFS for SAML:
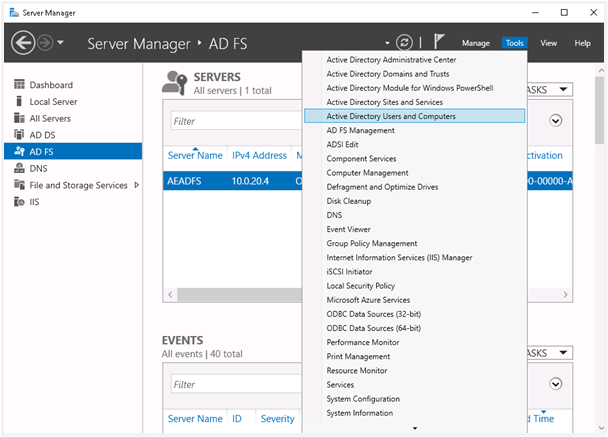
- In Window Server 2016, go to the Server Manager section and click the Tools tab. In the Tools tab, select AD FS Management.
](/platform/aeug/8.1/assets/images/confSaml-ce20f4d99ba77af09d8d853470034ddd.png)
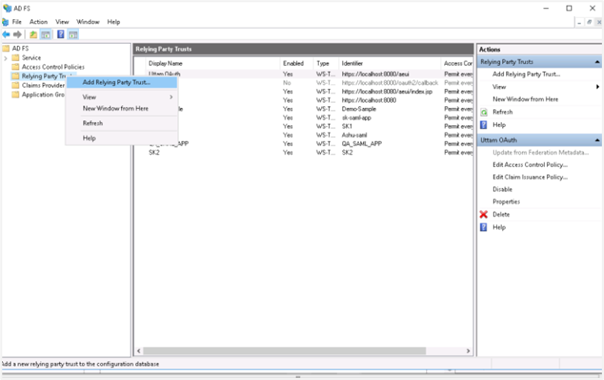
- Under the ADFS folder, right-click on Relying Party Trusts and select Add Relying Party Trust…
-
In the Add Relying Party Trust Wizard: i. Click Claims aware and then click Start. ii. In the Select Data Source section, select Enter data about the relying party manually and then click Next.
](/platform/aeug/8.1/assets/images/adfs2-3e1bbb1c09459c002941bfb5963c4bb4.png)
iii. In the Specify Display Name section, enter the display name for the relying party trust name, which will display after the configurations, and then click Next.
tipIn the Configure Certificate section, click Next, as you’ll configure the certificate later.
iv. In the Configure URL section:
- Select Enable support for the SAML 2.0 WebSSO protocol.
- In service URL, enter the redirect URL. If you are using AE redirect URL, then
https://Automationedge:Port/aeui/index.jsp. Make sure you are using https because ADFS needs secure communication. Click Next.
v. In the Configure Identifiers section, enter the same relying trust display name, and then click Add. The display name is added to the Relying party trust identifier field.
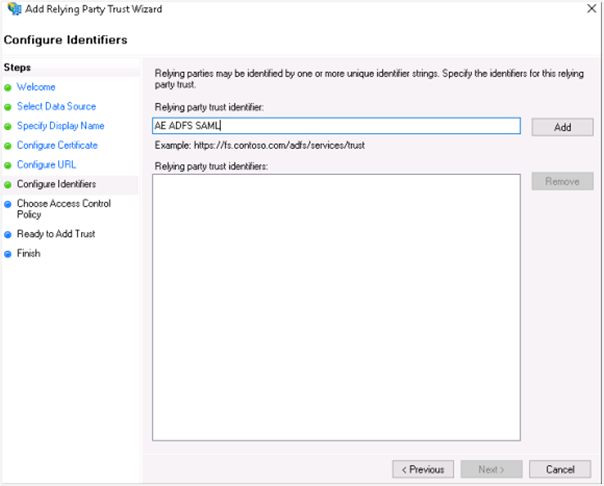
vi. Click Next. In the Choose Access Control Policy section, select the access control policy that you want to use. Select Permit everyone policy.
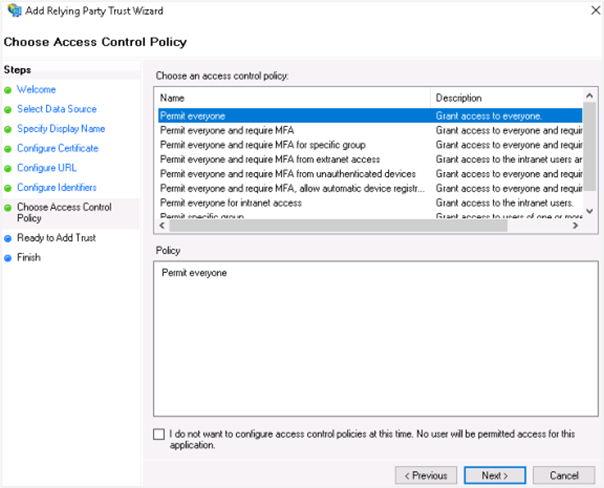
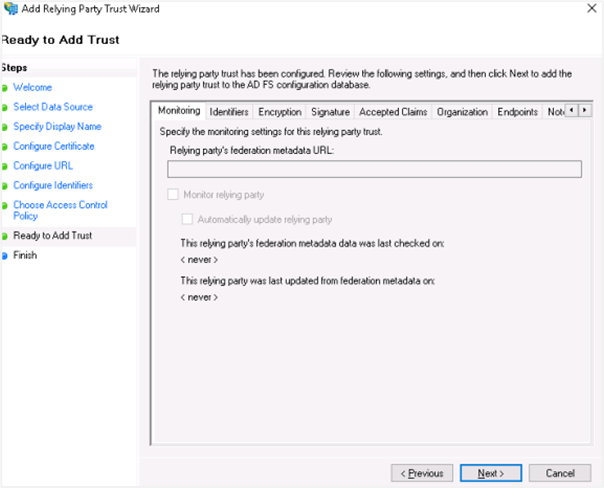
vii. Click Next. In the Ready to Add Trust section, review the settings and click Next.
viii. In the Finish section, as we still need to configure claims and upload a certificate, select Configure Claims issuance policy for the application checkbox.
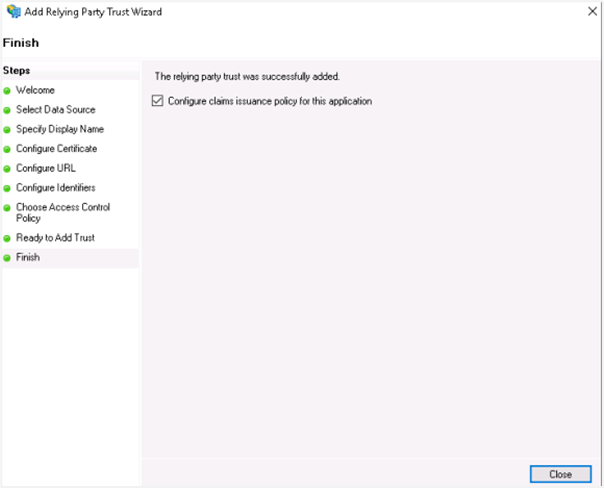
ix. Click Close. The wizard is closed.
-
Add Claim Issuance Policy i. Add claims for the party trust. Highlight your party trust and click Edit Claim Issuance Policy.
](/platform/aeug/8.1/assets/images/claim-b28639c5a5dd7a5dc7337c44b093e567.png) ii. On the Issuance Transform Rules tab, click Add Rule. The Add Transform Claim Rule Wizard appears.
ii. On the Issuance Transform Rules tab, click Add Rule. The Add Transform Claim Rule Wizard appears.
](/platform/aeug/8.1/assets/images/claim2-ba91cfb8061c060d25adbebad965dc89.png)
- Rule 1
In the Select Rule Template window, select Send LDAP Attributes as Claims from the Claim rule template list, and click Next.
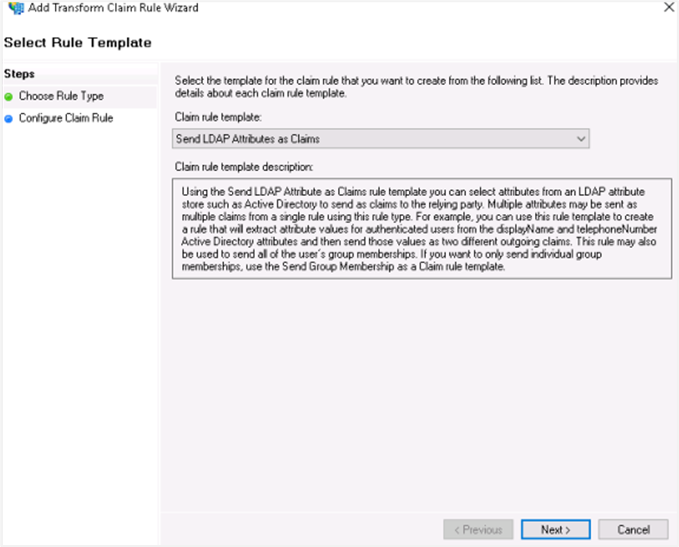 In the Attribute store list, select Active Directory and enter a name for the claim in Claim rule name box.
](/platform/aeug/8.1/assets/images/confRule-0d5741ab40a64a8fb45f34c4becaef9b.png) Use the following attribute mapping:
Use the following attribute mapping:LDAP Attribute Outgoing Claims User-Principal-Name username E-Mail-Addresses emailAddress Given-Name firstName Surname lastName Click Finish.
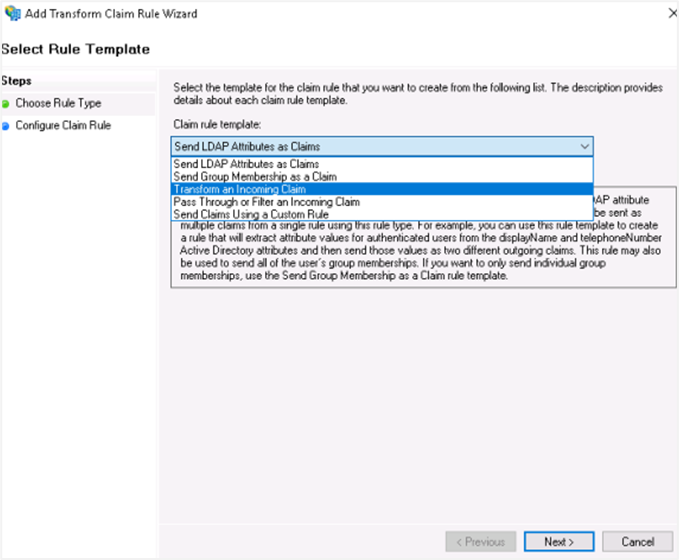
- Rule 2
Add another claim for the party trust. Follow step 4 (i) and (ii) In the Select Rule Template window, select Transform an Incoming Claim from the Claim rule template list, and click Next.
Select the following field details: Incoming claim type: UPN Outgoing Claim type: Name ID Outgoing name ID format: Transient Identifier.
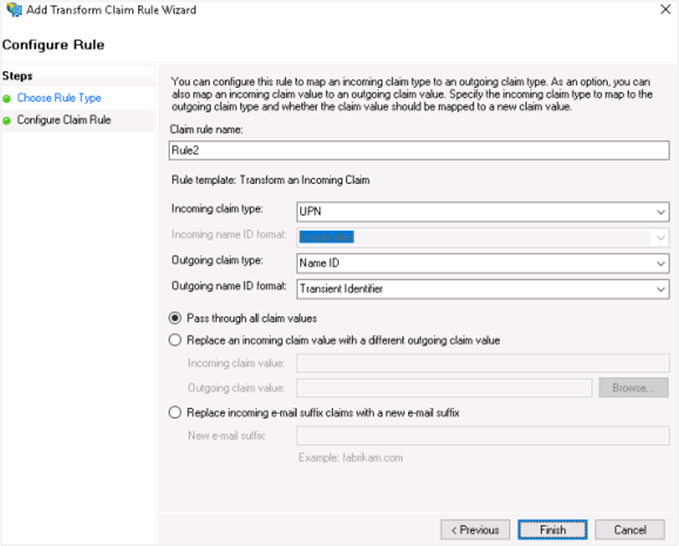
Click Finish. You can see the two rules you created.
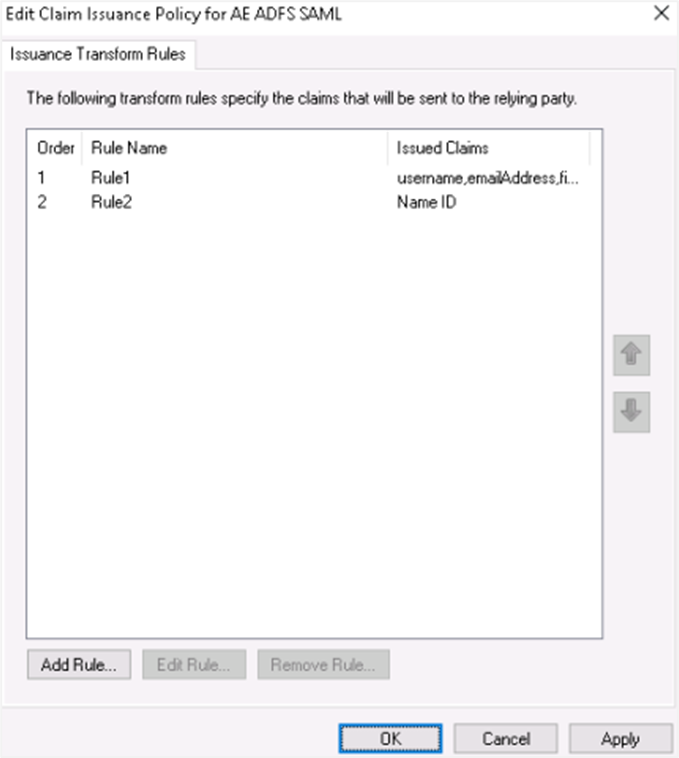 tip
tipYou can edit the rules, if required.
-
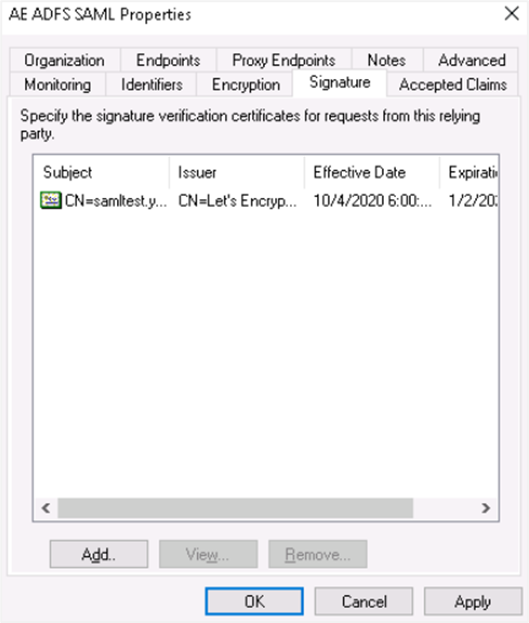
Upload RSA Certificate for Relying Party Trust i. Open the Windows Server Manager console and open the ADFS tool. Right-click on your Relying Party Trust and select Properties. ii. Click the Signatures tab. In the tab view, click Add and browse for the RSA certificate.
tipTo generate Self Signed or CA Certificate, see Keystore and Certificate Generation
](/platform/aeug/8.1/assets/images/selfSigned-1fa2b769e685aa49a0ac2b8fec8e12dd.png)
iii. The RSA certificate is uploaded and then click Apply. The certificate is applied.
-
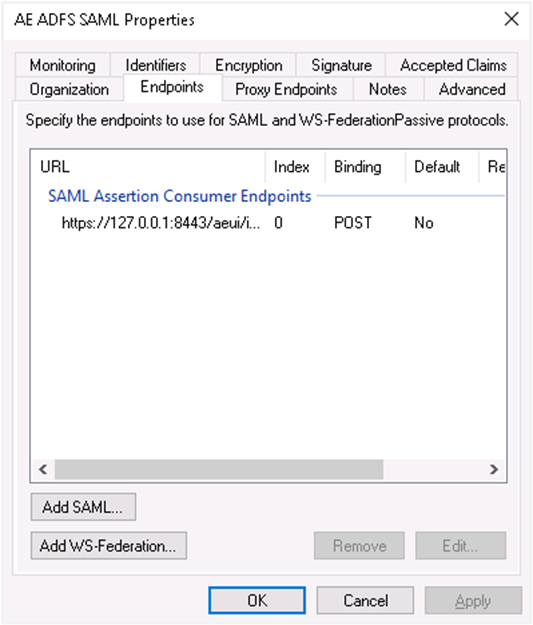
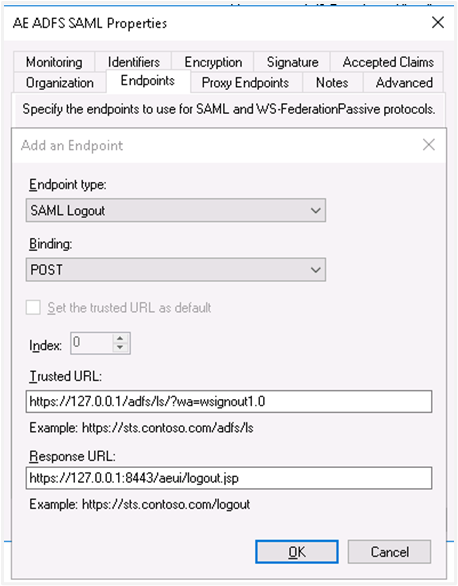
Endpoints i. Click the Endpoints tab and click on Add SAML...
ii. Select the endpoint type to SAML Logout, under binding go for post. Internally we are using post binding for logout requests. For the Trusted URL, create a URL using:
- The web address of your AD FS server
- The ADFS SAML endpoint you noted earlier
- The string
'?wa=wsignout1.0'For example, the URL can be:https://sso.yourdomain.tld/adfs/ls/?wa=wsignout1.0In the response URL section, specify the redirect after logout, for example,https://automationedge.port/aeui/logout.jsp
iii. Click on OK. The Endpoints configuration appears as follows:
iv. Click Add WS-Federation.

v. Add
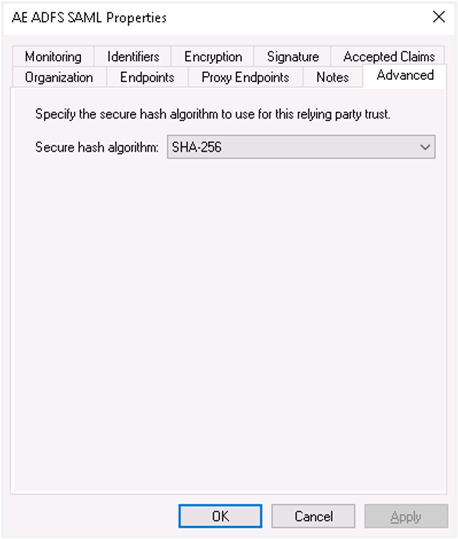
https://sso.yourdomain.tld/adfs/ls/as a trusted URL and click OK.vi. In the Advanced tab, make sure SHA-256 is specified as the secure hash algorithm.
-
Upload RSA certificate in AD FS:
To generate Self Signed or CA Certificate, see Keystore and Certificate Generation.
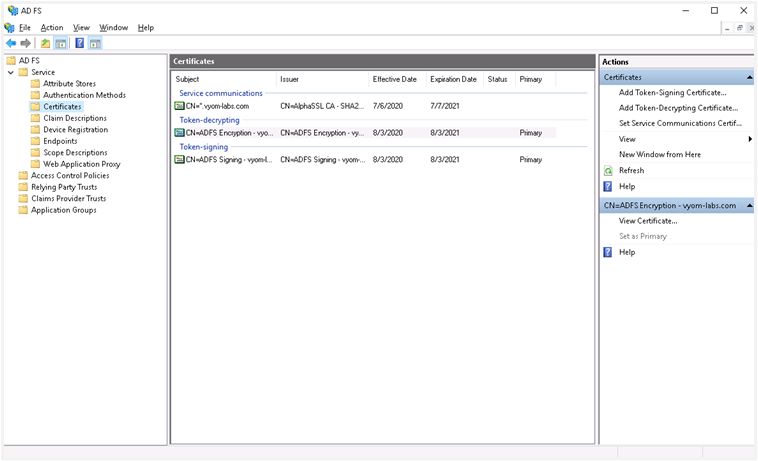
i. On AD FS console lookout for Certificate and move on to Add Token Signing Certificate. Upload the certificate.
ii. If there are multiple certificates uploaded, mark an appropriate certificate as the primary certificate for signing. Right-click on the Certificate and select the option ‘Set as Primary’.
-
descriptor.xml:
i. To get descriptor.xml, you need to open PowerShell and type the following command: Get-AdfsEndpoint
ii. Scroll a little and search for Protocol: Federation Metadata.
iii. Copy the Full URL and paste it into the browser for federation details. Copy the XML data into a file and save it as descriptor.xml.
iv. Single Sign-on configuration in AutomationEdge requires descriptor.xml.

-
Create User
i. You may use an existing user or create a new user mapped with AutomationEdge user for SSO.
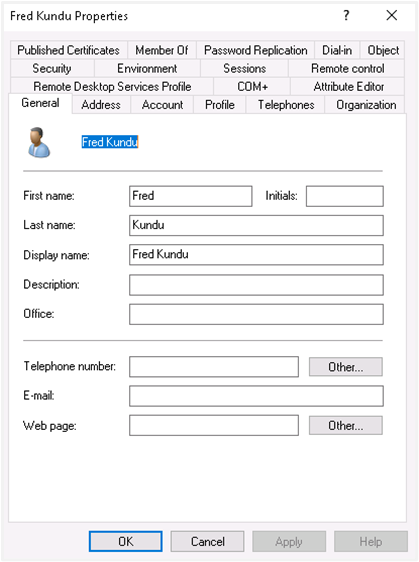
ii. In Windows Server Manager under Tools, select Active Directory Users and Computers.
iii. Configure the new user with General and Account tabs as displayed in the following image:

AutomationEdge SSO Configuration
-
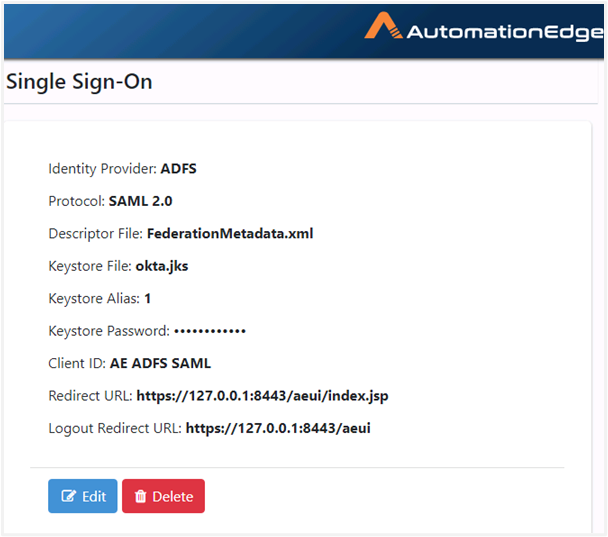
Single Sign-On is configured under the AutomationEdge Settings tab, as follows:
 tip
tipTo generate Self Signed or CA Certificate, see Keystore and Certificate Generation.
-
An AutomationEdge SSO user is visible as seen in the following image:
-
On the AutomationEdge Login page, click ‘Sign In with SSO’.
-
Specify the organization code as follows:
](/platform/aeug/8.1/assets/images/ssoConf3-1485e5f085abd75af11e1cf17ab03c73.png)
-
It takes you to the ADFS login page the first time you log in.
-
The AE Home page appears after logging on.
Keystore and Certificate Generation
The topic discusses the following methods of certificate generation. You may choose the method as per your need.
• Generate Self-Signed Certificate
• Generate CA signed Certificate
Generate Self-Signed Certificate
Generate a self-signed Certificate for xml signature verification purposes.
A Java KeyStore (JKS) is a repository for security certificates – either authorization certificates or public key certificates – plus corresponding private keys used in SSL encryption. Use a tool for public/private key generation.
• keytool is one of the utilities to generate a new public/private keypair in the default keystore file. Oracle has a good reference at the URL - https://docs.oracle.com/cd/E19798- 01/821-1841/gjrgy/
Complete the following steps:
• Execute the keytool command to generate a new keypair in the keystore file with keysize 2048, signature algorithm SHA256withRSA and storetype PKCS.
• The generated keystore file contains both private and certificate information. For IDP we need only certificate information, so extract the certificate information from the keystore file by executing the export command. Execute the command to export the keystore (keystore.jks) to extract the certificate information into a file (.crt); ensure that you add the same alias and password used for keystore generation.
• Upload the generated file keystore.jks file on AE UI SSO configuration settings. And the certificate information file, for example, client.crt file on IDP configuration settings.
Generate CA Signed Certificate Configure Tomcat with TLS(HTTPS). For details, see:
• Apache Tomcat documentation, https://tomcat.apache.org/tomcat-9.0-doc/index.html
• Apache Tomcat SSL/TLS Configuration, https://tomcat.apache.org/tomcat-9.0-doc/ssl-howto.html
During TLS configurations, generate a new keypair in the keystore file keysize 2048, signature algorithm SHA256withRSA and storetype PKCS.
Upload the generated file keystore.jks file on AE UI SSO configuration settings and the issued certificate file (.crt or any file type supported by IDP) on IDP configuration settings.