Appendix: Publish Workflows
In the Appendix, you will learn how to publish Process Studio workflows or processes to AutomationEdge. The following instances are included in the Appendix:
Publish to Development instance
Process Studio projects can be published to AutomationEdge using the following options:
Process Studio Publish -> Create
OR
Process Studio Publish -> Update
The following sections discuss Process Studio Publish (Create & Update) options to publish AutomationEdge workflow on a Development instance.
Publish workflow through Create option
In the exercise, we will publish a project (Sales Revenue) using the Process Studio Publish -> Create option.
To publish an AutomationEdge workflow using Process Studio Publish option:
-
In the Process Studio complete the following steps:
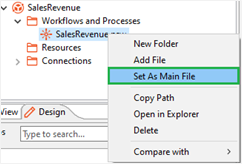
i. Select and right-click on the workflow you want to publish and in the contextual menu, select Set As Main File. The selected workflow or process is set as the main file of the project.
OR
Through /Project Name/ -> Edit Project option, open the Edit Project dialog. Set main workflow or process.
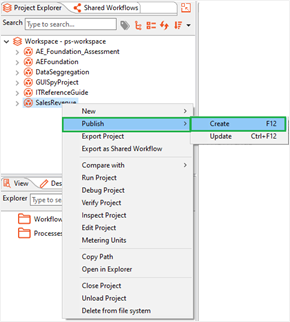
ii. In the Project Explorer, select and right-click on the Sales Revenue project. In the contextual menu, select Publish -> Create.
iii. In the Publish confirmation (psp/psw) dialog, select the Add resource file(s) to ZIP archive checkbox if there are any supporting .xls, .txt, .csv, or so on, and then click Yes. If there are no supporting files for the project, then keep the checkbox clear.
iv. In the Workflow Details dialog:
- Enable Assisted for Attended workflows.
- Enable RDP enabled if working on Controller Agent machine.
- If you wish to Set default values as Configuration parameter values, enable the check box.
noteIt automatically detects workflows that should execute sequentially else if one of the sequential automation workflows is running as non-sequential, and the workflow terminates, then all the subsequent requests remain in New state.
The workflow is not sequential. :::
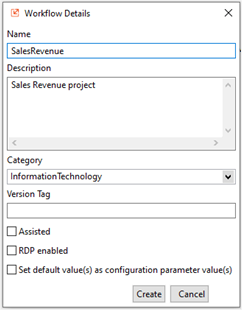
v. Click Create. The workflow is published to the AE UI.
-
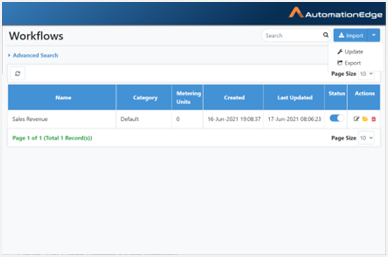
Sign in to AE UI instance to which you have uploaded the workflow. The workflow appears in the Workflows page.
-
In the Actions column, click
 . For details about workflow configurations, see Edit workflow configuration.
 -
After all the updates are completed, toggle the switch to activate the workflow.
-
Assign workflows to Agents. For details, see Assign and edit workflow assignments to Agents.
-
After assigning the Agents, you can execute the workflows through the Catalogue. For details, see Work with Catalogue.
-
You can monitor the requests. For details, see Work with Requests.
Export from Development instance
Once a workflow works satisfactorily on a Development instance, it’s usually exported and uploaded on UAT. A workflow can be exported from the development instance and then imported to UAT or Production (Enterprise/Subscription) instances, although AutomationEdge recommends importing it to a UAT server.
The exported workflow is self-contained, that is, it has all the .psp, and .psw it needs and all the supporting files required for execution.
To export one or more Workflows:
-
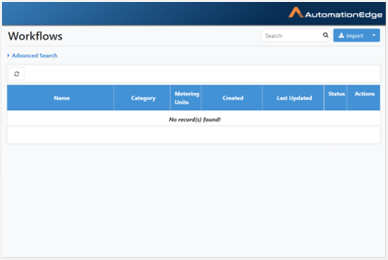
In the menu, click Workflows → Workflow List. The Workflows page appears.
-
Click the arrow next to the Import button on the top right corner. From the list, click Export.
-
You may view the file structure and contents of the workflow zip being exported by clicking the folders icon in the Actions column. Users can see and verify if the zip for export contains valid files.
-
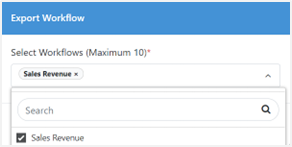
Select a workflow or workflows to export. Enable checkboxes next to workflows to be exported.
-
The chosen workflows are now visible in the selected workflows.

Import to UAT instance
Import button on Workflow menu supports import of a zip file exported from DEV instance or other instances of AutomationEdge.
A project exported from Process Studio cannot be imported or updated directly on an AutomationEdge instance.
Once a workflow works satisfactorily on the Development instance, it’s usually uploaded on UAT. A workflow can be exported from the development instance and then imported to UAT or Production (Enterprise/Subscription) instances, although usually imported to the UAT server, one workflow at a time. Import the workflow as exported from Development instance.
To import the workflow on the UAT instance:
-
Login to UAT instance.
-
Navigate to the Workflows -> Workflow List. In the Workflows page, click Import.
-
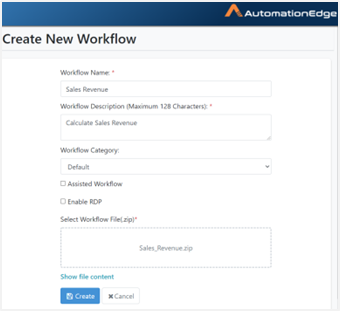
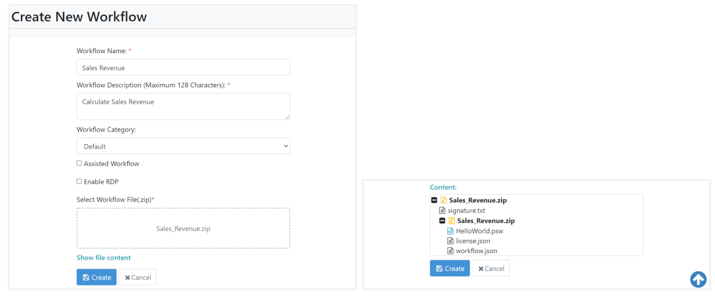
The Create New Workflow page appears. Provide configuration details. Browse and upload the exported zip file from the Development instance under the Select Workflow file (.zip).
-
Click Show file content to see the contents of the zip file to import. Click Create.
-
Fill in the basic workflow configuration details.
-
Fill in the email notifications configuration settings and click Save. Workflow updated successfully message appears.
-
You may now Activate the workflow. The process of importing a workflow to a UAT instance is complete.
Export from UAT instance
Once a workflow works satisfactorily on the UAT instance, it’s usually uploaded on the Production instance. A workflow can be exported from the UAT instances and imported to Production (Enterprise/Subscription) instances. Export workflows on UAT instances as 'Verified' workflows to signify thorough testing on the UAT instance.
The exported workflow is self-contained, that is, it has all the .psp, .psw, and all the supporting files required for execution.
To export a workflow from the UAT instance:
-
In the menu, click Workflows -> Workflow List. The Workflows page appears.
-
Click the arrow next to Import. Click Export.
-
Select workflows from the list.
-
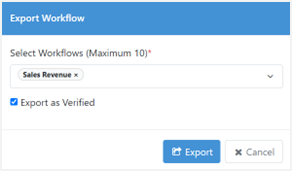
Select the Export as Verified checkbox to export the workflow as verified. The Export as Verified checkbox option is only available on a UAT instance. Hence, workflows present in the UAT instance only can be exported as 'Verified' workflows. Test a workflow thoroughly on the UAT instance before exporting it at ‘Verified’.
-
Import a verified workflow in the Production instance.
-
Select the workflows you wish to export by clicking on the check boxes. In this case, we have selected Sales Revenue.
-
Enable the Export as Verified checkbox. Click Export.
-
Workflow Exported Successfully message appears. The process of exporting workflows from an UAT instance is complete.
Import to Production (Enterprise or Subscription) instance
Import on the Workflows page supports the import of a zip file exported from an instance of AutomationEdge.
A project exported from Process Studio cannot be imported or updated directly on an AutomationEdge instance.
Once a workflow works satisfactorily on the UAT instance, it is exported from UAT and imported on the Production (Enterprise/Subscription) instance. Export workflows as verified from the UAT instance to import verified workflows on Production instance.
Import the workflow zip exported from UAT Instance. The process to import the workflow is the same as discussed for Import to UAT instances.
To import the workflow on the Production instance:
-
Logon to a production instance (Enterprise or Subscription).
-
In the menu, click Workflows -> Workflow List. The Workflows page appears.
-
Click Import. The Create New Workflow page appears.
-
Provide desired details. Browse the exported zip file from the UAT instance. You can see the file contents by clicking the Show file content link. Click Create.
-
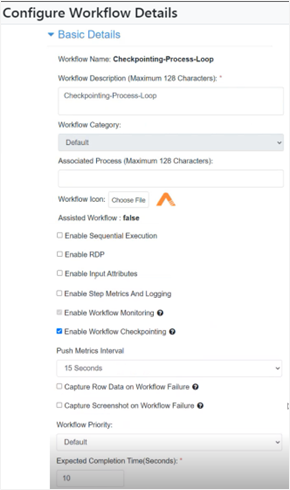
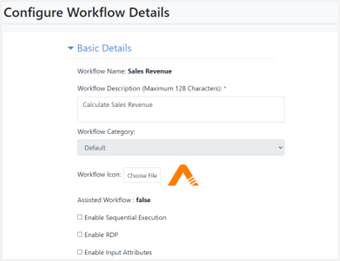
The Configure workflow details page appears. Provide basic details as follows:
-
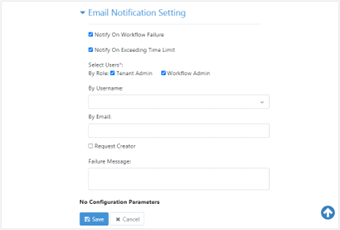
Provide Email Notification Setting as required. Provide values appropriately, as shown below for Email Notification Settings. Click Save.
-
‘Workflow updated successfully’ message displays. The workflow is now visible in the workflow list as a verified workflow.
-
The workflow is now visible in the workflow list. Activate the workflow by clicking on the Active toggle.
The workflow can now be assigned to an Agent, and once assigned, the workflow is visible in the catalogue. Give workflow permissions to users or user groups. Execute the workflow from the Catalogue and monitor it on the Requests menu, as discussed for the UAT server in the previous sections.