Work with Workflows
Workflows are automation processes that are created by you. You need to use the Process Studio to create the workflows, which are then published to the AE server. For details about the Process Studio, see the Process Studio User’s Guide.
A workflow consists of steps and / or entries that you can invoke to automate real-life processes by executing the tasks.
In the chapter, you’ll learn about how to assign workflows, create inspection rules for workflows, schedule the workflows, and so on.
Workflow List
Workflows are automation processes that invoke workflows to automate real-life processes by executing the tasks. A workflow consists of steps that help in designing a workflow.
Use the feature to activate, edit, export, import, or update the workflows that are published.
-
You can assign up to 300 workflows (minimum workflow 0 – maximum workflows 300) to an Agent. If you want to assign more than 300 workflows, you can do so only through the internal properties file, that is, the application.properties and assign a maximum of 999 workflows.
-
For details about how to publish workflow, see the Process Studio User's Guide.
The topic includes the following sections:
View workflow details
You can view the published workflow details.
To view the workflow details:
-
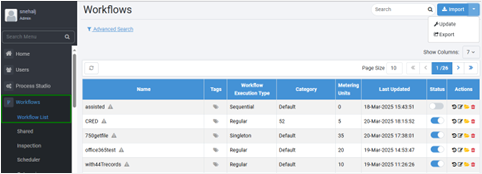
In the menu, click Workflows → Workflow List. The Workflows page appears.
-
View the following field details:
Field name Description Name Displays the name of the workflow. Tags Displays the tags added to the workflow. Workflow Execution Type Displays the type of workflow execution, that is, execution can be:
- Sequential
- Regular
- SingletonCategory Displays the category to which the workflow belongs. Metering Units Displays the number of step metering units consumed by the workflow. Created Displays the date and time when the workflow was first created. Last Updated Displays the date and time when the workflow was last updated. File size Displays the size of the input or output files which are included in the workflow.
NOTE: If there are multiple files in the workflow, then each file size is displayed individually.Status Toggle the switch to activate or deactivate the workflow. note-
If there are any plugins that are not assigned, then a message listing the missing plugins appears. You can assign the missing plugins and activate the workflow.
-
If a workflow is published with warnings, then it appears in the Workflows page as follows:
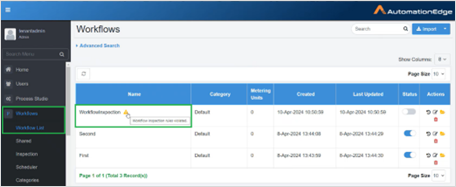
Click the warning icon. The Violated Inspection Rules dialog appears.
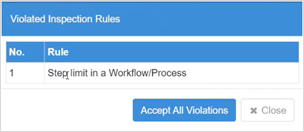
Click Accept All Violations. If you are using your own workflow then you cannot accept the violations. However, if the workflow was published by another user, then you can accept the violations and use the workflow
-
-
In the Actions column, you can:
-
Click
 to view the workflow version history.
 -
Click
 to edit the workflow configurations. For details, see Edit workflow configuration.
 -
Click
 to view the workflow files.
-
Click
 to delete the workflow.
noteYou can find workflows using search or advanced search features. For details about how to use the feature, see Common Activity section.
-
Edit workflow configuration
You can edit the workflow configuration, if required.
To edit workflow configuration:
-
In the Actions column, click
. The Update Workflow page appears.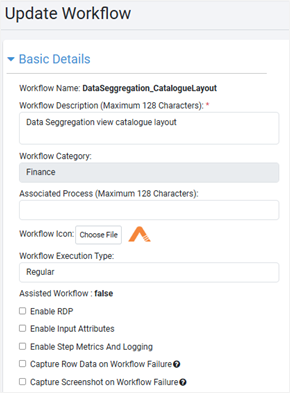
-
Modify the following field details:
Field name Description Basic Details Workflow Name* Displays the name of the workflow. Workflow Category Displays the category to which the workflow belongs. Associated Process (Maximum 128 characters) Modify or enter the name of the process you want to associate with the workflow. Workflow Icon Click Choose File and browse and select the image for the workflow. Workflow Execution Type Select the type of execution you want to assign to the workflow. Available execution types are:
- Regular: Select the option to execute the workflow in a non-sequential manner. The workflow which runs in parallel manner. For example, data massaging workflow runs in a non-sequential manner.
- Sequential: Select the option to execute the workflow in a sequential manner. For example, web Gui workflow runs in a sequential manner.
- Singleton: Select the option to execute the workflow in a singleton manner. Only a regular workflow can be marked as Singleton. When a workflow is marked as Singleton, the AE server ensures that only one instance of that workflow runs on an Agent at any given point in time, regardless of its non-sequential nature. This setting is useful in scenarios where there is a dependency between workflow requests, ensuring that a new request waits for the previous workflow to complete before executing.
Important:
- Requests from two or more different workflows marked as Singleton can run in parallel with the same agent (assuming there are enough threads to run these requests).
For example, let’s assume that you have workflows W1, W2 and W3 which are marked as Singleton. You execute each of these workflows once on the same agent having 4 threads. In this case, W1, W2 and W3 will run in parallel with the same agent.
- Multiple requests from a single workflow marked as Singleton can run in parallel with the different agents.
For example, let’s assume that you have workflow W1 which is marked as ‘Singleton’. You execute this workflow on two different agents at any given point in time, then this workflow can run in parallel with the different agents.
- Requests from two or more different workflows marked as Sequential cannot run in parallel on the same agent.
For example, let’s assume that you have workflows W1, W2 and W3 which are marked as ‘Sequential. You cannot execute these workflows on the same agent simultaneously.Assisted Workflow Displays if the workflow is an assisted workflow or not.
Assisted Workflow: true Or Assisted Workflow: false.
The workflow will be executed as assisted workflow only. The workflow will be unavailable to run on regular Agents.
While updating a Workflow, one will not have the option to switch between assisted and unassisted Workflow.
Also, when a Workflow is marked as assisted, it automatically becomes sequential.Enable Sequential Execution Select the checkbox for the workflow’s sequential execution.
Only one sequential workflow can run on an agent.
If one of the automation workflows with these steps is running as non-sequential, and the workflow terminates, then all the subsequent requests remain in New state.
During Publish, Process Studio marks workflows with the following steps as sequential.
- Robot Handling step
- Capture Screenshot step
- Desktop steps
- GUI Automation Windows steps
- Surface Automation steps
- AS400
- Auto IT
Mainly UI workflows are marked as sequential workflows. The non-UI workflows can run in parallel.
It automatically selects the Enable Sequential Execution checkbox for sequential workflows on the AutomationEdge UI workflow edit page. The workflow can be considered auto-sequential otherwise clear the checkbox.Enable RDP Select the checkbox to start an RDP session of Agent machine to which workflow is assigned on the Controller Agent machine.
When Is RDP Enabled is checked, Is Sequential Execution is automatically checked since RDP is generally required for sequential workflows that need an active screen.
Agent must be running to request RDP for RDP Enabled workflows and execute the workflows.
However, make sure no console session or RDP session is active.
For requisite Windows, Policy Changes for Is RDP Enabled workflows see, Apply Windows Remote Desktop policies for RDP enabled workflows.
Use cases for Is RDP enabled workflows:
- Idle Timeout:
Since RDP Session is taken only for workflow execution, the idle timeout on the Agent machine should match the max execution of the workflow.
- Reconnect:
RDP Session will try to reconnect to the Agent VM during workflow execution if the reason for disconnecting is other than the normal disconnect event initiated from the Agent VM.
- Controller Shutdown: When the controller is shut down, it won’t close the Active RDP sessions since workflow execution is active.
- Workflow Hangs/Infinite execution:
If a Desktop Workflow hangs, it needs to be terminated manually, and then the RDP session is closed by Agent. Till this happens, No other RDP based workflow will be able to run on the Agent.
- Workflow execution initiation timeout:
In case the RDP session does not get connected within a specific time (2 mins), the workflow request fails for this reason.
- Banners:
Usually, there are banners when a user logs in to a machine. For example, This Server is Property of …. The banners will need to be disabled to use Automatic login.Enable Input Attributes Enable checkbox to display Additional Input Attributes in the Parameter Form displayed during workflow execution from AutomationEdge Catalogue. These are to capture additional information. Enable Step Metrics And Logging Select the checkbox if you want the logging details of the workflow or process and step or entry to be made available in the Request page. Enable Workflow Monitoring Select the checkbox if you want to enable the workflow monitoring feature. Enable Workflow Checkpointing Select the checkbox if you want to activate the workflow checkpointing feature.
For details, see Workflow Checkpointing.Push Metrics Interval Select the duration after which the data is pushed into metrics and the Workflow Monitoring table or graph view is refreshed. The interval duration can be 15 seconds to 10 minutes. Capture Row Data on Workflow Failure Select the checkbox if you want to view the workflow failure details. Capture Screenshot on Workflow Failure Select the checkbox if you want to view the screenshot of the error. Auto Delete Input Files Select the checkbox if you want to automatically delete the input files after execution of workflow.
NOTE: If this setting is enabled, the request input files are deleted from the server storage (AE_HOME) after a successful execution. If the execution fails, the files are kept until the restart validity of request, so that they can be used again after restart. After this period, a midnight job deletes the files.Workflow Priority View workflow priority in the workflow Edit mode.
With this feature, prioritize workflow requests. Priority can be set on workflows so that workflow requests execute according to the priority.
The field for priority supports three priorities Low, Default and High. Set its value to Low, Default or High, in the workflow editor. Set the priority while creating or updating workflow configuration.
Set the priority, and all the requests submitted after that run with the priority. Change of the workflow priority after Request submission is not allowed.
It processes high priority workflow requests before low and default priority requests. Default priority requests process before low priority requests. Among the Requests with the same priority, it processes Requests in a ‘First In First Out’ manner.
To use the workflow priority feature, enable priority in the ActiveMQ configuration.
To enable priority, perform the following changes in activemq.xml present in ActiveMQ's conf folder.
Add prioritizedMessages="true" property for policyEntry queue=">" tag.<destinationPolicy><br/> <policyMap><br/> <policyEntries> <br/> <policyEntry queue=">" prioritizedMessages="true"/> <br/> </policyEntry> <br/> ...
Restart ActiveMQ and the server after this change.Expected Completion Time (seconds) Specify the expected time to complete a workflow from the time it is triggered. This field is Mandatory. Maximum Completion Time (seconds) Specify the maximum time to complete a workflow from the time it is triggered. The field mandatory. Clean-up Requests older than(Hours) Mark requests in New status older than the number of hours provided as Expired.
NOTE: If you enter request clean-up duration more than that set by the System Administrator than you will see an error message. For example: If the System Administrator has set the time as 2 hours and you enter 3 hours, an error message informing you of the same appears.
However, you can enter time lower than 2 hours or equal to 2 hours in the field, for example 1 hour and this timeline is applied for the clean-up requests.Email Notification Setting: Set up the email notification parameters as follows:
Prerequisite: SMTP server configuration by Admin.Notify On Workflow Failure/Termination/Expiry Enable checkbox to notify selected users on workflow failure or termination or expiry. Notify On Exceeding Time Limit Enable checkbox to notify selected users on workflow exceeding the time limit. Select user: By Role: Notify all users with the selected role. Admin Enable checkbox to notify all Admins. Workflow Administrator Enable checkbox to notify all Workflow Administrators. By Username: Provide a list of usernames to be notified. By Email: Provide a list of email addresses to be notified. Request Creator Enable checkbox to notify request creator. Failure Message Write a free text Failure Message for the notification. Tags Tags help in faster search of workflows.
If tags are added when you published the workflow through Process Studio, then you will see them in the list. For details, see Create a new project in Process Studio User Guide.
However, you can also add tags through the AE UI.
In the Values field, enter the tag that you want and put a comma or press space tab. The tag is added.
NOTES:
- If you do not enter space or comma after the tag, then the tag is not saved.
- You can add a maximum of five tags.
After saving the changes to the workflow, the tag icon appears as in the Tags field. To view the tags, click the tag list appears.
Important:
- The tags added through AE UI to the published workflow are not updated to the Process Studio.
- Similarly, updated tags from Process Studio do not get updated on UI when you publish the workflow through Publish → Update option from Process Studio to AE UI.Configuration Parameters Set workflow configuration parameters while defining them for use in workflow execution. Typically, configuration parameters contain details for connecting to external servers.
Configuration parameters can be String, File, Boolean, Number, Integer, Date and Credential. It has a Boolean Picker for dates. For other types, it provides the corresponding type of validation.
NOTES: While creating input/output process parameters, please use the internal parameter${Internal.Entry.Current.Directory}to assign the current working directory of the ‘Process Studio process’ as the directory containing the input and output files.
For parameter data types on UI, see Parameter data types on UI.
To see the parameter description, hover the mouse over . For details on how to add the parameter description, see the Create a workflow section in the Process Studio User’s Guide.
 -
Click Save. The updated details are saved.
noteToggle the switch to activate the workflow.
Parameter data types on UI
In the section, you’ll learn about the supported data types for workflow parameters and the corresponding UI Control types. These apply to configuration and runtime parameters except the File data type, which is for runtime parameters only.
Example of Configuration Parameters in the Workflow Configuration:
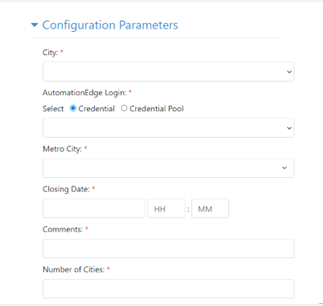
The UI controls for configuration and runtime parameter data types except File, which is available only for runtime parameters.
- Checkbox (Boolean) If a configuration parameter is of type Boolean, it appears as a checkbox to enable or disable. The following screenshot shows Boolean data as a checkbox.
![]()
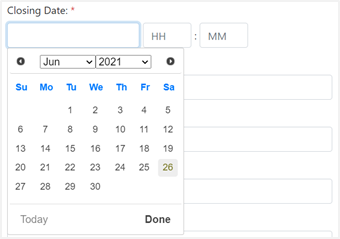
- Text Box (Date) Date value can be selected from the picker for date-time, as follows:
- Text Box (String) Provide a string value in a text box.

- Text Box (Integer, Number) Provide an Integer or Number in a text box.

- Text Box (File) Click Choose File to browse a file at runtime and click Upload.
- Single Selection List (List) Select a single value from a Single Selection List.

- Single Selection List (Credential) If a configuration parameter is of type Credential, it shows radio buttons for Credential and Credential Pool. Select a radio button for Credential or Credential Pool, the corresponding list appears. If a Credential belongs to a Credential Pool, it does not appear in the Credential list.

- Combo Box (List) On AEUI, select a single Checkbox or enter a custom value in the field.

- Radio Button (List) Select a radio button from the radio button list.

- Multiple Selection List (List) Enable checkboxes to select multiple values.

Workflow Checkpointing
After creating workflows or processes in the Process Studio, you publish them on the AE server.
The workflows and processes published on the AE server are called AE workflows
On AE server, execute the AE workflows through AE Catalogue or schedule the execution. A request is generated, which is available on the Requests page.
Sometimes a request execution fails, and you need to raise a new request to resume the job. The Workflow Checkpointing feature allows you to restart the request execution through the Requests page.
The feature allows you to resubmit a failed request only if AE workflow’s main file is a process (.psp) file.
-
The feature is available only if ae.workflow.monitoring.enabled property in ae.properties is set to true.
-
A single AE workflow can consist of multiple Process Studio workflows or processes, which are called through Process Studio executors. The Process Studio executors enable combining the workflows or processes into a single AE workflow. You can define one main workflow or process which is considered as an entry point while executing an AE workflow. Following combinations are allowed in Process Studio:
-
Process calling Workflow
-
Process calling Process
-
-
You cannot resubmit child workflows or processes.
To work with Workflow Checkpointing
-
In the menu, click Workflows → Workflow List page, and then click
next to the workflow for which you want to enable the feature. The Update Workflow page appears. -
In the page, select the Enable Workflow Checkpointing checkbox. The Workflow Checkpointing feature is now active.
-
Click Save. The details are saved.
-
Generate the workflow request through Catalogue and then go to Requests → Request List. The Requests page appears.
-
In the Requests page, view the status of the request. If the request has failed, then you will see the following:

Id: If the Workflow Monitoring feature is enabled the request ID appears with a link, for example,
 . Else, the request ID appears as plain text, for example,
  .note
.noteTo directly go to table view in the Workflow Execution Metrics page, click the request ID link in the Requests page. For example, click
. And, to go directly to graph view, click  . For details, see Workflow Monitoring.
Status: If the request fails, then the status appears as follows:
 .
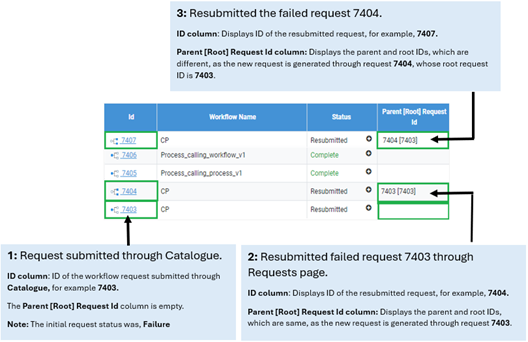
.Parent [Root] Request Id: The column displays the parent and root request Id. The Parent Request Id is the request ID through which you have resubmitted the request, and the Root Request Id, is the request ID of the first request that was submitted.
For understanding the column, see the following image:
-
Click
 to resubmit the request. The process opens in Graph view.
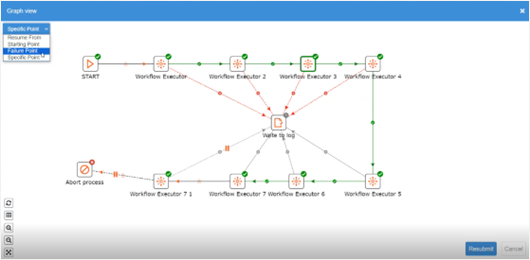
-
In the Graph view, click in the resume from list, select the point from which you want to resume the execution. The available options are:
i. Starting Point: The execution starts from the default starting point.
tipIf metrics data is unavailable for the workflow, then only this option is available in the list.
ii. Specific Point: The workflow execution resumes from the point of your choice.
iii. Failure Point: The workflow execution resumes from the point where the previous execution had failed.
-
Click Resubmit. A new request is created and is listed in the Requests page.
noteYou will be unable to resubmit a failed request:
- after 48 hours.
- if metrics of the request is unavailable.
- if the process is modified.
Additional information
-
To resume workflow from the previous state, you need a snapshot of PS Variables, and traditional Process Studio variables and along with execution metrics, snapshot data will also get stored.
-
In the metrics table the snapshot is stored in the serialized format (JSON). One more column is added in the metrics table to store the snapshot data.
-
Snapshot data will be stored in encrypted format.
To view the workflow execution metrics, click Requests → Workflow Monitoring. The Workflow Execution Metrics page appears. For workflow monitoring feature details, see Workflow Monitoring.
Maintain workflow versions
You can maintain up to three workflow versions through AEUI. The feature enables you to have the option of using any one of the workflows, as required.
The section contains the following sub-section, View and maintain workflow versions.
View and maintain workflow versions
You can view the workflow versions through the Actions column.
-
You can maintain only three versions of the workflow in AEUI.
-
The most recently updated version will be the default working workflow version.
For example, if Version 3 is the most recently updated version, then it will be shown as the Current version of workflow, which will be in use.
To view the version details:
-
In the menu, click Workflows → Workflow List page, and then in the Actions column click
next to the workflow. The Version History page appears.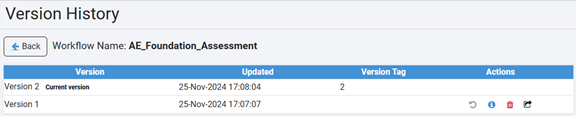
-
View the following details:
Field name Description Version Displays the available versions of the workflow. Upload Displays the date when the version was uploaded. Version Tag Displays the version tag, if any. -
In the Actions column:
noteThe Actions column options are unavailable for the current version of the workflow.
- Click
 to change the version.
noteBefore changing the version, you must make the workflow inactive.
-
Click
 to view the details of the version.
-
Click
to delete the workflow. -
Click
 to export the workflow as a zip.
- Click
To maintain workflow versions:
-
In the Process Studio, update a workflow, for example add or delete a step, or change names of files or step name, using the Publish → Update option.
-
To maintain a version, ensure that the workflow also exists on the AE UI.
-
In the menu, click Workflows → Workflow List. The Workflows page appears.
-
In the Actions column, click
. The Version History page appears. -
In the page, view the versions of the workflow. The recently updated version will have a Current version label against it.
-
Whenever the workflow is updated, from Process Studio → Publish → Update or from AEUI → Workflows → Update option, the version is incremented. The updated version becomes the active workflow.
-
Enter the following field details:
-
Select Workflow: Select the updated workflow you want to upload. The field is mandatory.
-
Version Tag: Provide a unique version number to the workflow, which will enable ease of analysis and / or restoration, if required.
-
Select Workflow File(zip): Choose the zip file of the selected workflow. The field is mandatory.

-
If there are three versions of a workflow already available, and you update the workflow to the AEUI Server then the first version is automatically deleted from the server.
For example, there are Version 1, Version 2, and Version 3 workflow on the AEUI Server, and you add Version 4 to it, then Version 1 gets deleted automatically from the server.
-
Restore listed version of workflow as the current version
You can restore any of the other two versions as your current version, if required.
You can restore a version only if the status of the workflow is Inactive.
To restore listed version of workflow as the current version:
-
In the menu, click Workflows → Workflow List. The Workflows page appears.
-
On the page, in the Actions column click
next to the workflow. The Version History page appears. -
On the page, in the Actions column click
 . A message asking you to confirm restoration of the selected version appears.
 -
Click Restore. The selected version is now the current version.
 note
noteWhen you restore the workflow to a specific version, for example, Version x, then all the versions that were created after Version x are automatically deleted after its restoration.
For example, if you select to restore workflow Version 1 as the current version then, both, Version 2 and Version 3, are automatically deleted.