Set (policy) Configurations
In the topic, you’ll learn about the Login Policy, Password Policy, and Login Session Control configuration for AutomationEdge login. Password policy can be set and modified by an Admin at Tenant level.
The topic contains the following sections:
View tenant policy configurations
When you log on to AE for the first time you will see the default settings. You can modify the details as required and view the details.
To view the configuration details:
-
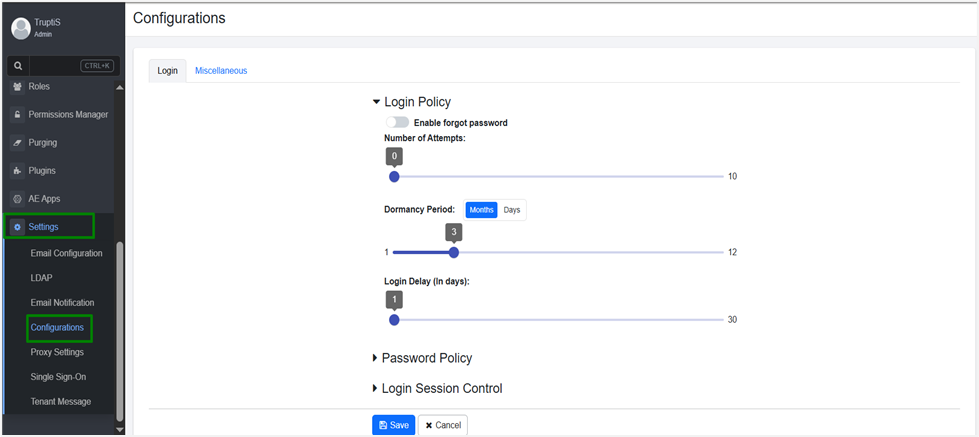
In the menu, click Settings → Configurations. The Configurations page appears and has two tabs Login and Miscellaneous.
-
Click the respective tabs and then click the links to view the respective policy details:
- Login tab:
- Login Policy: View the configured number of login attempts.
- Password Policy: View the password policy configuration.
- Login Session Control: View the concurrent login configuration.
- Miscellaneous tab, view the other details.
Note:For field details, see Modify tenant policy configurations
- Login tab:
Modify tenant policy configurations
You can modify the policy configuration in the Login and Miscellaneous tabs, as required.
To modify the Login configuration details:
-
In the menu, click Settings → Configurations. The Configurations page appears and has two tabs Login and Miscellaneous.
-
Click Login Policy and toggle the Enable forgot password switch to enable user to reset the forgotten password. And, then set the following details:
Field Name Login Policy Note:
You can also configure the maximum limits for the Login Policy, as per your organization’s security requirements. In the ae.properties file:
- login-policy.upper-limit.number-of-attempts: 10
- login-policy.upper-limit.dormancy-period: 12
- login-policy.upper-limit.login-delay: 30Enable forgot password Toggle the switch to allow users to reset forgotten passwords, if required. Number of Attempts Drag the switch between zero to ten (0-10) and set the number of attempts to sign-in to the application.
The default attempt limit is 0, that is, there is no limit on the number of wrong password attempts.
The user is notified of the remaining attempts whenever they log in with the wrong password. Once the user reaches the unsuccessful login attempt limit the user account is locked.
The locked user account can be unlocked only by the Admin, by setting the new password. AutomationEdge sends the new password to the user email if:
- User registration has an email Id.
- SMTP configuration is available for the tenant.
- Email Notification is enabled for password change.
Else, the user needs to contact the Admin.
Note: NATIVE users need to change the password after the user is unlocked. However, the LDAP users need not reset the password.Dormancy Period (In months) If an account has had no activity for a long period, then the state of the account changes to Dormant. The dormancy period helps identify inactive users or processes to improve security, optimize resources, and ensure compliance.
You can configure the dormancy period in days or months, which allows flexibility based on business needs.
To set the dormancy period:
- If Months is selected, drag the slider between 1 and 12.
- If Days is selected, drag the slider between 1 and 365.
The minimum period you can set is 1 day.
User accounts are marked Dormant during the nightly job.
Note: • User accounts are marked Dormant during the nightly job.
• An Admin can change the state by enabling or disabling it, or it is automatically disabled.Login delays (In days) When a locked or disabled or dormant user account is enabled, the user needs to log on at the earliest so that the user state changes to Active.
To set the period, drag the switch between one to thirty (1-30). The minimum setting for login is one day.
The default login delay is one day. Therefore, the user should log in to the account on the same day else the account is automatically disabled again. However, if the configuration is changed the user needs to log on to the application within the set period so that the user is not disabled again. -
Click Password Policy, and toggle the switches for the respective fields:
Field Name Password Policy Note:
You can also configure the maximum limits for the Password Policy, as per your organization’s security requirements. In the ae.properties file.
- password-policy.upper-limit.password-validity-months: 12
- password-policy.upper-limit.password-history: 30
- password-policy.upper-limit.max-length-password: 30
- password-policy.upper-limit.min-length-password: 20Password Expiry (In months) Set the value for password expiry between zero and twelve (0-12).
The default password expiry value is 0, that is, there is no password expiry.
The policy forces the user to change their passwords within the duration set by the Admin. User must change their password within the period; otherwise, it forces to change password. Users will be notified before 15 days, seven days, one day and on the day of password expiry, at the time of login.Password History Set the value of the field. Password Complexity Password Complexity comprises the following five attributes:
- Minimum Length: Set the value for Minimum Length between six and twenty (6-20). The default value is 6.
- Maximum Length: Set the value for Maximum Length between six and twenty (6-20). The default value is 6.
Note:
If you want you can modify the password-policy.upper-limit.max-length-password value in the ae.properties file, ensure that you also update the maxLengthOfPassword value in the aeui-config.properties file.
For example:
In ae.properties, add:
password-policy.upper-limit.max-length-password = 20
In aeui-config.properties, add:
maxLengthOfPassword = 20
- Minimum Uppercase: Set the value for Minimum Uppercase in between zero and seventeen (0-17). The default value is 1, that is, there must be at least one uppercase letter.
- Minimum Lowercase: Set the value for Minimum Uppercase in between zero and seventeen (0-17). The default value is 1, that is, there must be at least one lowercase letter.
- Minimum Special Characters: Set the value for Minimum Uppercase in between zero and seventeen (0- 17). The default value is 1, that is there must be at least one Special Character [@,#,$,&,_].
- Minimum Digits: Set the value for Minimum Digits in between zero and seventeen (0-17). The default value is 1, that is there must be at least one Digit. -
Click Login Session Control, and enter the following field details:
Field name Login Session Control Note:
If you have configured the Concurrent Login details in the ae.properties file (for details see, Installation guide prior to release 8.0.3), then you will have to reconfigure the details through the AE UI.Control Option Select from any of the following option to configure for concurrent logins to AE:
- Allow Multiple Sessions: The default configuration. If the option is selected, a user can login concurrently and have multiple active sessions at the same time.
- Prevent New Sessions: If the option is selected, the user will be unable to log on to a new session if a session is already in progress. If a session is active and a user tries to login again then an error message appears.
- Invalidate Old Sessions: If the option is selected, then the user will log out of the current active session and will log into the new session.User Exception List Select the tenant users for whom you don’t want to allow concurrent logins. -
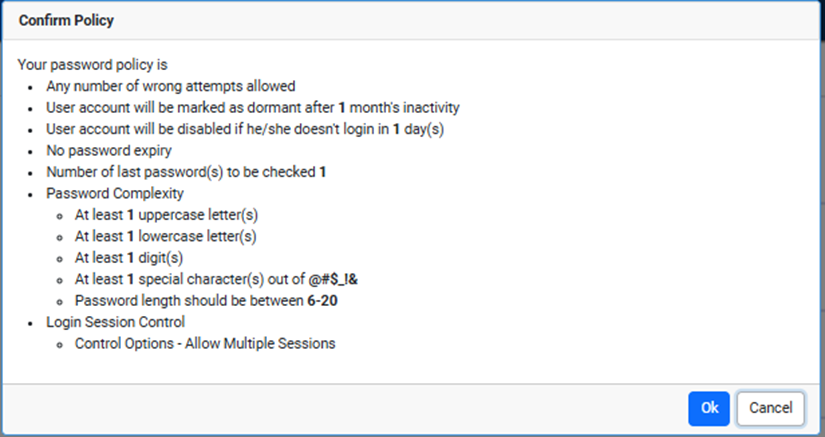
Click Save. The details are saved, and the Confirm Policy dialog appears.
-
Click Ok. The login policy details are saved.
To modify the Miscellaneous details:
-
In the menu, click Settings → Configurations. The Configurations page appears and has two tabs Login and Miscellaneous.
-
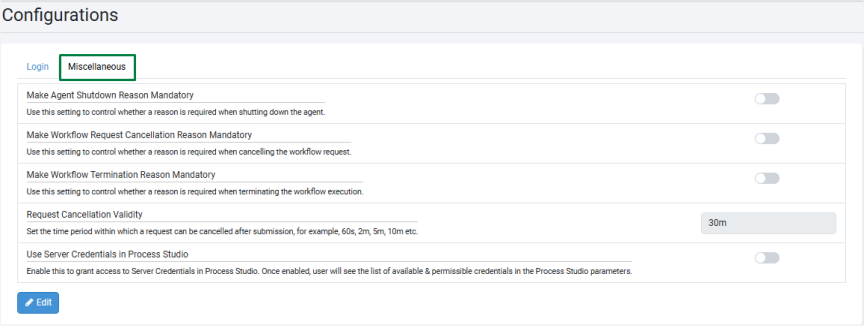
Click the Miscellaneous tab. The details page appears.
-
Click Edit. Modify the details, as required:
Field name Description Make Agent Shutdown Reason Mandatory Toggle the switch if you want to control whether a reason is required when shutting down the agent. Make Workflow Request Cancellation Reason Mandatory Toggle the switch to control whether a reason is required when cancelling the workflow request. Make Workflow Termination Reason Mandatory Toggle the switch to control whether a reason is required when terminating the workflow execution. Request Cancellation Validity Enter the time within which a request can be cancelled after submission. For example, 60s, 2m, 5m, 10m, and so on. Use Server Credentials in Process Studio Toggle the switch to grant access to AE Server Credentials in the Process Studio. For details, see the Process Studio User’s guide. Workflow Monitoring Refresh Interval Enter the time in minutes to refresh the workflow monitoring view automatically. 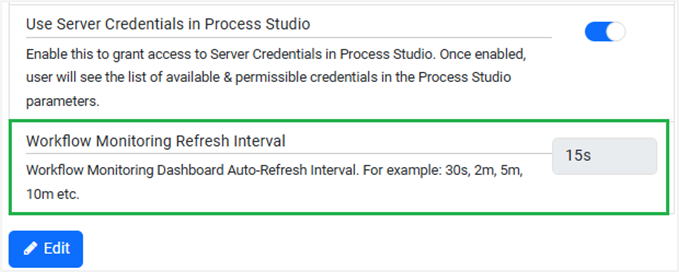
Notes:
- The minimum time you can configure for auto-refreshing the view is one (1) minute.
- The field is available only if the Workflow Monitoring feature is enabled. -
Click Save. The details are saved.