Work with Plugins
System Administrator manages plugins. Admin has view-only access to plugins except the option to set plugin properties.
Known issue: Plugins are not syncing in the Process Studio due to time difference between the Process Studio and AE server.
View plugins
You can view the plugin details and plugin steps.
To view plugin details:
-
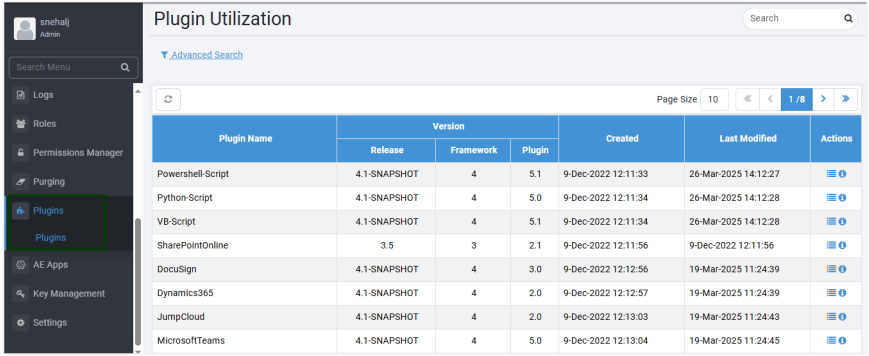
In the menu, click Plugins → Plugins. The Plugin Utilization page appears.
-
View the following field details:
Field Name Description Plugin Name Displays the name of the plugin. Version: Release Displays the AutomationEdge Plugin Release version. Framework Displays the Process Studio Framework version on which of the plugin. Plugin Displays the plugin version. Created Displays the date of plugin creation. Last Modified Displays the date the plugin was last modified. To work with Actions icons: On the Plugin Utilization page, in the Actions column:
-
Select a plugin and then click
 . The selected plugin’s step details appear.
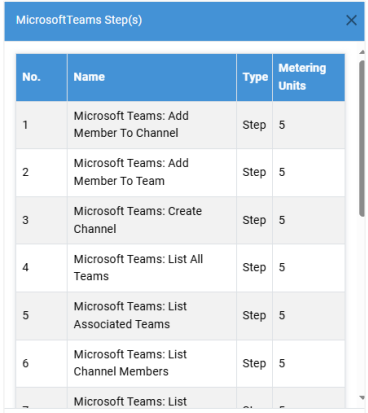
View the following field details:
Field name Description No Displays the serial number of the step. Name Displays the name of the plugin step. Type Displays if the plugin has steps and / or entries. Metering Units Displays the units of steps or entries consumed in a workflow or process. Click
 . The dialog closes.
 -
Select a plugin and then click
 . The plugin’s workflow utilization details appear.
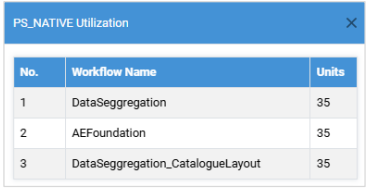
View the following field details:
Field name Description No Displays the serial number of the step. Workflow Name Displays the name of the workflow in which the plugin step or entry is used. Units Displays the step units utilized in each workflow.
Note:
The step units add up as consumption of License step units.Click
. The dialog closes.
-
Configure plugin properties
You can configure properties of some plugins at two levels, Tenant and Agent.
To configure plugin properties:
-
On the Plugin Utilization page, in the Actions column, click
 . The plugin configuration dialog appears.
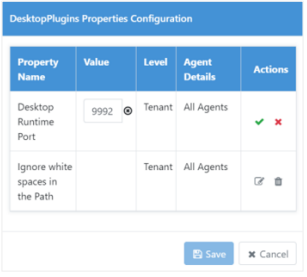
-
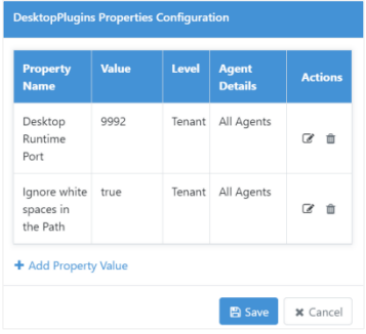
View and / or enter the following field details:
Field name Description Tenant level property configuration Property Name Displays the name of property for which you can configure the details. For example:
- <plugin> Runtime Port
- Ignore white spaces in the pathValue In the Actions column, click  and enter the value for the property. For example, for:
- <plugin> Runtime Port: Enter the port number.
- Ignore white spaces in the path: Select true or false.
In the Actions column, click to confirm the value.
Level Displays the level at which the property is applied. For example, Tenant indicates that the updated property will be applicable to all users of the tenant. Agent Details Displays the property is applied to all agents of the tenant. -
Click Save. The details are saved and applied at Tenant level to all agents of the tenant.
-
To configure properties at Agent level:
Note:Between property configuration at Tenant and Agent level, properties configured at Agent level will be applicable for the plugin.
-
Click + Add Property Value. A row to add property appears.

-
Select or enter the details for the respective fields, and then click
. The details are saved. -
Click Save. The details are saved and applied at Agent level to the selected agent of the tenant.
-