Configure Single Sign On (SSO)
AutomationEdge supports Single Sign-On using an Identity Provider. The following protocols are supported:
- OpenID Connect (OIDC)
- SAML
In the topic, you will learn the steps to configure Single Sign-On. In particular, the following configuration is for Okta SPA (Single Page Application) with OIDC.
In addition, you will also learn the configuration aspects of the following Identity Providers:
- Keycloak and ADFS with OIDC
- SAML for Okta, Keycloak, and ADFS
Configure AE Single Sign-On for OpenID Connect (OIDC)
In the topic, you will learn toconfigure Single Sign-On by importing endpoint configurations.
- In the topic, you will use Okta as the Identity Provider for SPA (Single Page Application).
- You can follow the same steps to configure Okta or Keycloak or ADFS for OIDC protocol.
To configure AE Single Sign-On for OpenID Connect (OIDC) by importing JSON endpoints:
-
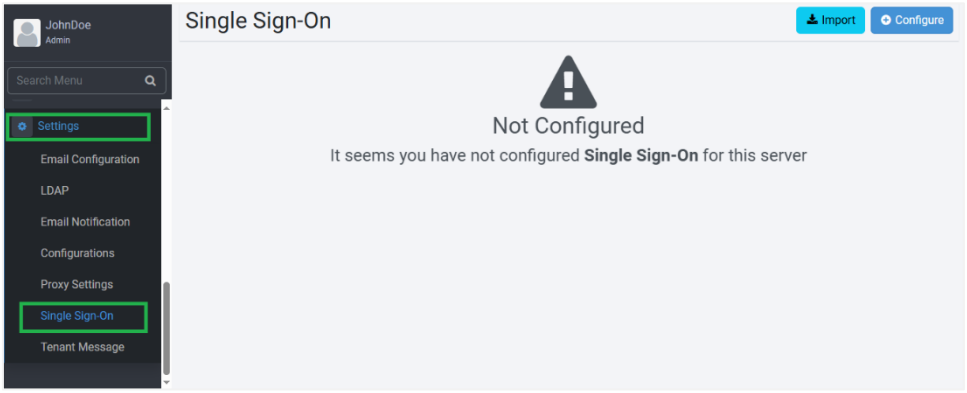
In the menu, click Settings → Single Sign-On. The Single Sign-On page appears.
-
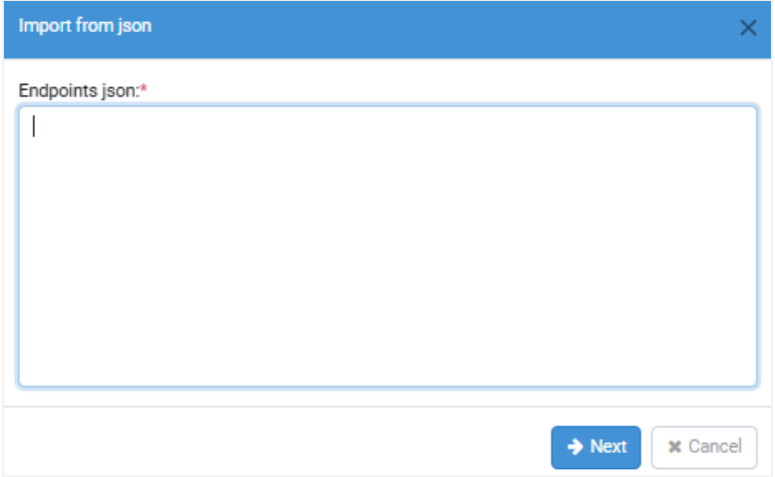
Click Import. The Import from json dialog appears.
-
Paste the JSON in the Endpoints JSON field. See the following Endpoints JSON sample:
Sample Endpoints JSON
{"issuer":"https://dev-371272.okta.com/oauth2/default","authorization_endpoint":"https://dev-371272.okta.com/oauth2/default/v1/authorize","token_endpoint":"https:/ /dev-371272.okta.com/oauth2/default/v1/token","registration_endpoint":"http s://dev-371272.okta.com/oauth2/v1/clients","jwks_uri":"https://dev-371272.okta.com/oauth2/default/v1/keys","response_types_supported":["c ode","token","id_token","code id_token","code token","id_token token","code id_token token"],"response_modes_supported":["query","fragment","form_post","ok ta_post_message"],"grant_types_supported":["authorization_code","impli cit","refresh_token","password","client_credentials"],"subject_types_s upported":["public"],"scopes_supported":["OpenID Connect","profile","email","address","phone","offline_access"],"token_ endpoint_auth_methods_supported":["client_secret_basic","client_secret _post","client_secret_jwt","private_key_jwt","none"],"claims_supported ":["ver","jti","iss","aud","iat","exp","cid","uid","scp","sub"],"code_ challenge_methods_supported":["S256"],"introspection_endpoint":"https: //dev-371272.okta.com/oauth2/default/v1/introspect","introspection_endpoint_ auth_methods_supported":["client_secret_basic","client_secret_post","c lient_secret_jwt","private_key_jwt","none"],"revocation_endpoint":"htt ps://dev-371272.okta.com/oauth2/default/v1/revoke","revocation_endpoint_auth_me thods_supported":["client_secret_basic","client_secret_post","client_s ecret_jwt","private_key_jwt","none"],"end_session_endpoint":"https://dev-371272.okta.com/oauth2/default/v1/logout","request_parameter_supported ":true,"request_object_signing_alg_values_supported":["HS256","HS384", "HS512","RS256","RS384","RS512","ES256","ES384","ES512"]}
For details about Endpoint JSON, see Appendix: About SSO Identity Providers
-
Click Next. The Single Sign-On page appears with the endpoint details in the respective fields.
 Notes:
- Ensure all mandatory details are filled in the page. For field explanation, see Configure SSO using Configure option.
- In case of Okta for Web application, Client Secret field is mandatory.
- Keycloak supports OpenID Connect (OIDC) and SAML protocol.
- For details on how to fetch configuration values in Okta, Keycloak, and AFDS, see Appendix: About SSO Identity Providers.
-
Click Save. The details are saved.
Configure SSO with Configure option for OpenID Connect
In the topic, you will lean to configure SSO using the Configure option.
To configure SSO with Configure option for OpenID Connect:
-
In the menu, click Settings → Single Sign-On. The Single Sign-On page appears.
-
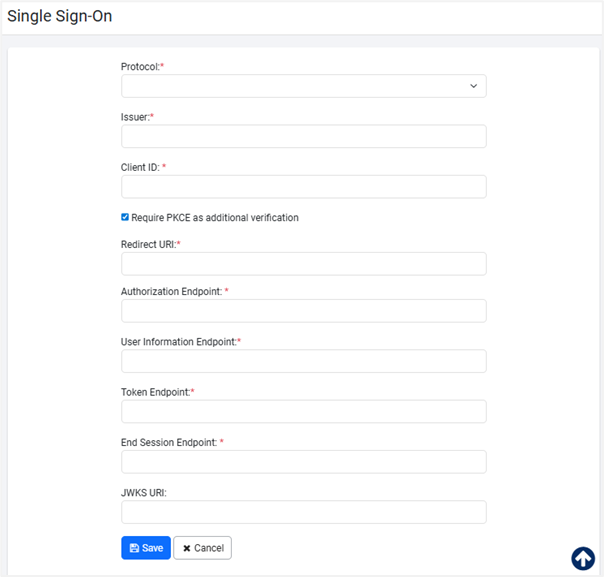
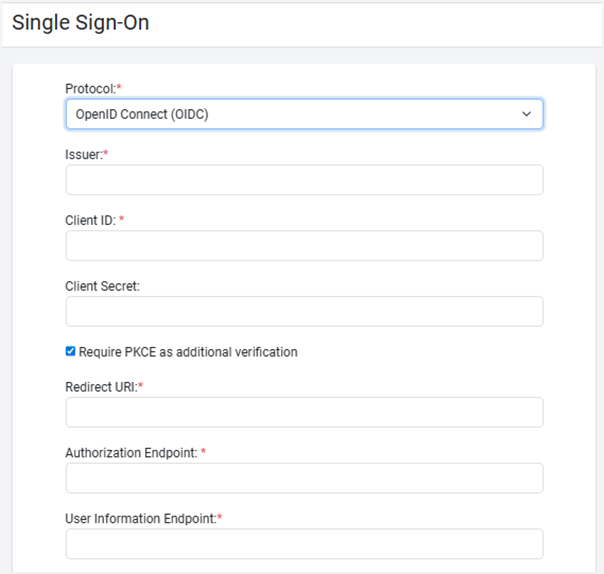
Click Configure. The Single Sign-On fields appear.
-
Enter the following field details:
Field name Description Protocol* Select the Single Sign-On protocol from the list. For example, select OpenID Connect. The available options are:
- None (SSO configuration cannot be saved with None Protocol)
- OpenID Connect
- SAML 2.0Issuer* Enter the Identity Provider base URL. For example, https://dev-371272.okta.com/oauth2/defaultin case of Okta;
Note:
Get the URL from the Endpoints URL or Identity Provider portal.Client ID* Enter the public identifier for apps. Client Secret Enter the password. The password is known only to the application and the authorization server. Require PKCE as additional verification Select the checkbox if you want additional verification when signing in to the application. Redirect URI* Enter the URL which your web application must host so that Identity Provider sends information to when a user signs in. the Redirect URL must be an absolute URI, that is, https://host:port/aeui/.
Redirect URL in the AE application’s SSO configuration page must be the same as redirect_uri in Identity Provider portal.
Note: SSO authentication is supported only for secure sites (HTTPS), either with a domain name or IP address.
For example,https://mydomain:8443/aeuiorhttps://10.51.4.161:8443/aeui
An HTTPS environment in IE11, Chrome browser and Firefox support SSO functionality.Authorization Endpoint* Enter the Identity Provider Authorization Endpoint in the form of a URL. For example, in Okta - https://dev-371272.okta.com/oauth2/default/v1/authorize.
IDP generates Authorized Code and sends it to the AutomationEdge server.User Information Endpoint* Enter the endpoint provided by IDP to retrieve user information. If the endpoint is missing from the IDP JSON then Claims needs to be added manually to the IDP. Token Endpoint* Enter the token endpoint. The token endpoint is an IDP URL containing the Token parameter, which AE can use.
Steps to enter the token endpoint:
1. AE server uses the Authorized Code from Authorization Endpoint to request Token from IDP.
2. Token Endpoint, for example,https://dev-371272.okta.com/oauth2/default/v1/tokenuses the Authorized Code sent back from AE server, generates Token and sends the Token to AutomationEdge Server.End Session Endpoint* Enter the endpoint to logout from IDP. For example, https://dev-371272.okta.com/oauth2/default/v1/logout.JWKS URI Displays the URL that is used to verify the token received from IDP. *Indicates mandatory field.
Notes:- You may obtain the Identity Provider authorization endpoint, Redirect URL and Client ID from the configurations in the Identity Provider.
- In case of Okta for Web application, Client Secret field is mandatory.
- Keycloak supports OpenID Connect (OIDC) and SAML protocol.
- For details on how to fetch configuration values in Okta, Keycloak, and AFDS, see Appendix: About SSO Identity Providers.
-
Click Save. The SSO configuration is saved successfully.
Configure AE Single Sign-On for SAML
In the topic, you will learn to configure Single Sign-On with SAML. For SSO with SAML, you need to do some changes at the backend in Tomcat before starting the configuring the details.
You can follow the same steps to configure Okta or Keycloak or ADFS for SAML protocol.
To change the configurations in AutomationEdge backend:
Before configuring on AutomationEdge UI, perform some changes in Tomcat. We send SAML requests from SP (Service Provider), i.e. AE-Engine, to IDP, and after authorization, IDP sends a response. The response sometimes may have a big header. The current tomcat configuration cannot handle such a big header, and we need to increase the header size.
In the Tomcat Directory, look for the config Folder. Open the server.xml to change the header size. Check which connector you are using and increase the size of maxHttpHeaderSize="65536".
<Connector port=”8080” protocol=”HTTP/1.1”
connectionTimeout=”20000” maxHttpHeaderSize="65536"
redirectPort="8443"/ >
Make some changes in the webapps aeui folder. If we are using the SAML protocol, we need to comment on the POST request.
To comment the POST statement in the file:
-
Go to Tomcat home/Webapps/aeui/WEB-INF web.xml.
-
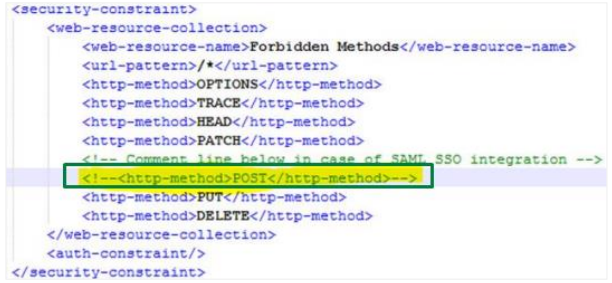
Open web.xml. Search for and comment the following in the file <http-method>POST</http-method>. For details, see the following screenshot:
To configure on AutomationEdge UI:
-
In the menu, click Settings → Single Sign-On. The Single Sign-On page appears.
-
Click Configure. The Single Sign-On fields appear.
-
Enter the following field details:
Field name Description Protocol* The Single Sign-On protocols supported are:
- None (SSO configuration cannot be saved with None Protocol)
- OpenID Connect
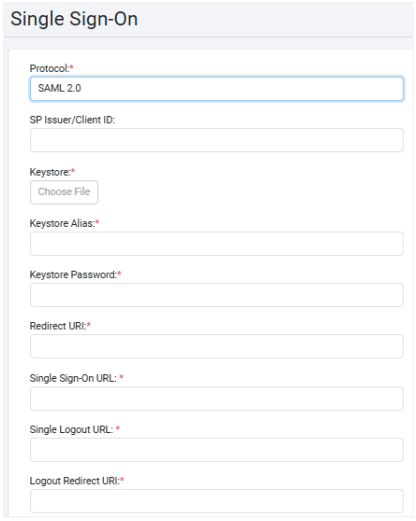
- SAML 2.0
Select SAML 2.0SP Issuer/Client ID Enter the SP Issuer value for Okta.
For Keycloak/ADFS, enter the Client ID.Keystore* Select and upload the Keystore file, .jks.
Through the field you will share public and private keys with AE, which is for xml signature verification. Upload the Keystore file (.jks) here; it is mandatory.Keystore Alias* Enter the alias you provided while generating Keystore. Keystore Password* Enter the password. The password is known only to the application and the authorization server. Redirect URL* Enter the URL which your web application must host so that Identity Provider sends information to when a user signs in. the Redirect URL must be an absolute URI, that is, https://host:port/aeui/.
Note:
SSO authentication is supported only for secure sites (HTTPS), either with a domain name or IP address.
For example,https://mydomain:8443/aeuiorhttps://10.51.4.161:8443/aeui
An HTTPS environment for IE11, Chrome browser and Firefox support SSO functionality.Single Sign-On URL* Copy and paste the Identity Provider Single Sign-On URL from the IDP site. Single Logout URL* Copy and paste Identity Provider Single Logout URL from the IDP site. Logout Redirect URL* Enter the logout redirect URL. For example, https://mydomain:8443/aeui/logout.jsporhttps://10.51.4.161:8443/aeui/logout.jsp.
On logout from the SSO application, you will log out of the application as well as IDP.End Session Endpoint* Enter the endpoint to logout from IDP. For example, https://dev-371272.okta.com/oauth2/default/v1/logout.JWKS URI Displays the URL that is used to verify the token received from IDP. *Indicates mandatory fields.
Important:For details about creating a descriptor file, Keystore and to fetch Redirect URIs, Client ID for the required Identity Provider, see see Appendix: About SSO Identity Providers.