Workflows
Workflows are automation processes; invoke workflows to automate real-life processes by executing the tasks. A workflow consists of steps that help in designing a workflow.
Table 6.1: Workflow Menu Description
| Sub-Menus | Description |
|---|---|
| Workflow List | Using this sub-menu, you can add new workflow, search, edit, delete, activate, and deactivate workflow. |
| Shared | Using this sub-menu, you can share workflows with users of a tenant. When users share workflows, which allows other users of the tenant to reuse the workflows in their projects. |
| Inspection | Using this sub-menu, you can configure rules for workflows. |
| Scheduler | Using this sub-menu, you can add, search, edit,delete, activate, deactivate and transfer workflow schedules. |
| Categories | Using this sub-menu, you can create workflow categories and move workflows to different categories. |
| Credentials | Using this sub-menu, you can create, edit and delete credential pools and credentials. You can also move credentials to credential pools. |
| Holiday Calendar | Using this sub-menu, you can add a new calendar, update, renew, copy, or delete the calendar. |
| ROI Configuration | Using this sub-menu, provide measurement metrics at two levels, for the cost and time saved, had the task been performed manually,instead of using automation. The information is used to generate Dashboard reports. |
Publishing Workflows: General Flow
Following is the general flow to publish Process Studio Processes/Workflows to AutomationEdge.
-
Publish to Development Instance
-
Export from Development Instance
-
Import to UAT Instance
-
Export from UAT instance
-
Import to Production (Enterprise or Subscription) instance
Publish to Development Instance
Workflows: Publish Project from Process Studio
Process Studio projects can be published to AutomationEdge using the following options,
-
Process Studio Publish 🡪 Create or
-
Process Studio Publish 🡪 Update
The following sections discuss Process Studio Publish (Create & Update) options to publish AutomationEdge workflow on a Development instance.
Publish: Create
In this exercise, we will publish a project (Sales Revenue) using the Process Studio Publish🡪Create option. Following are the steps to publish an AutomationEdge workflow using Process Studio Publish option,
-
Open Sales Revenue Project in Process Studio.
-
Select File menu and click Publish and then on Create option.
-
Alternately, right-click on the project to be published, as seen below.
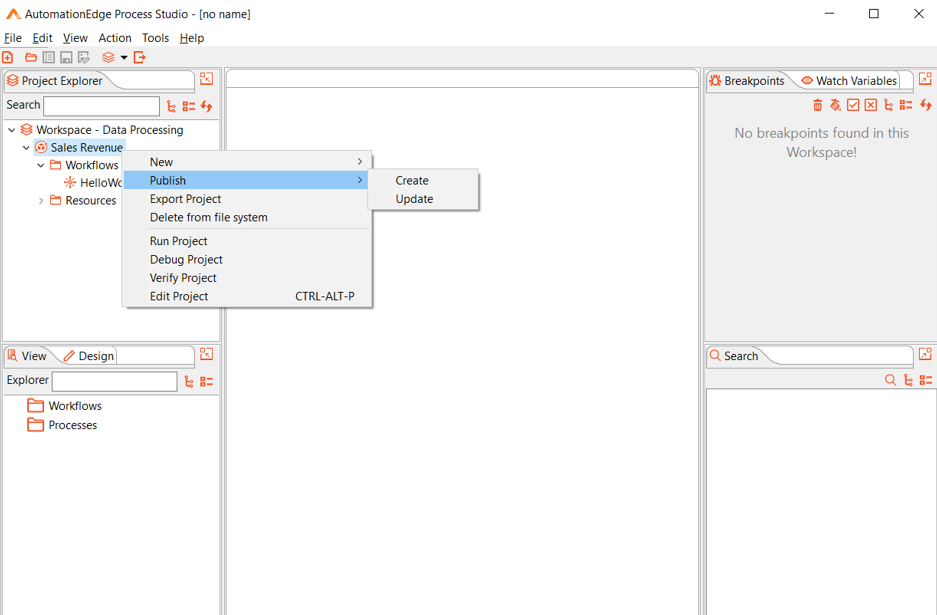
Figure 6.1: Publish Sales Revenue Project
-
When you publish a project, you need to set the main file by editing the project. It is self-evident when the project has multiple processes/workflows, where you need to select the parent process/workflow as the main workflow/process by editing the project.
-
If you do not set the main file you receive an error message popup message.
-
To set the Main workflow/process, right-click the project and select Edit Project.
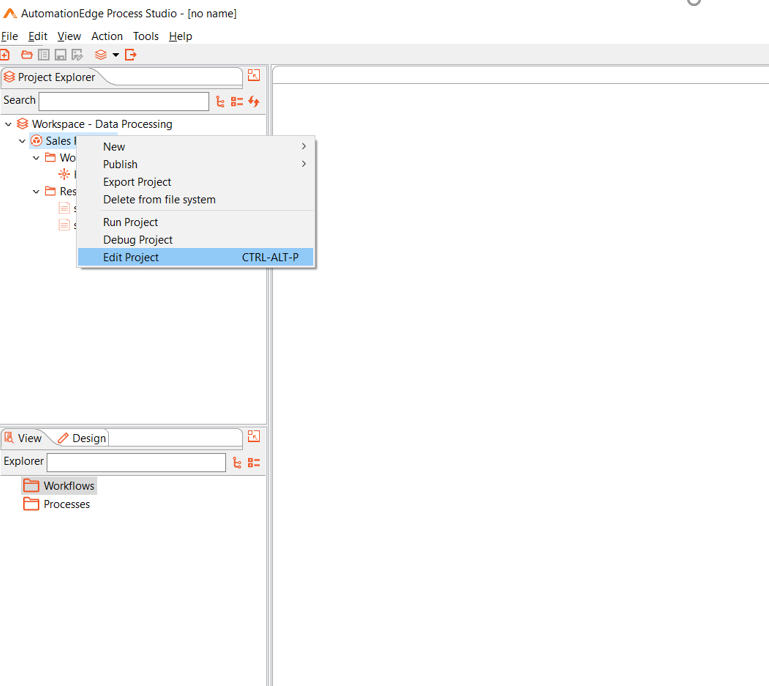
Figure 6.2: Edit Project
- In the Main workflow/process field, browse your main workflow/process as seen below.
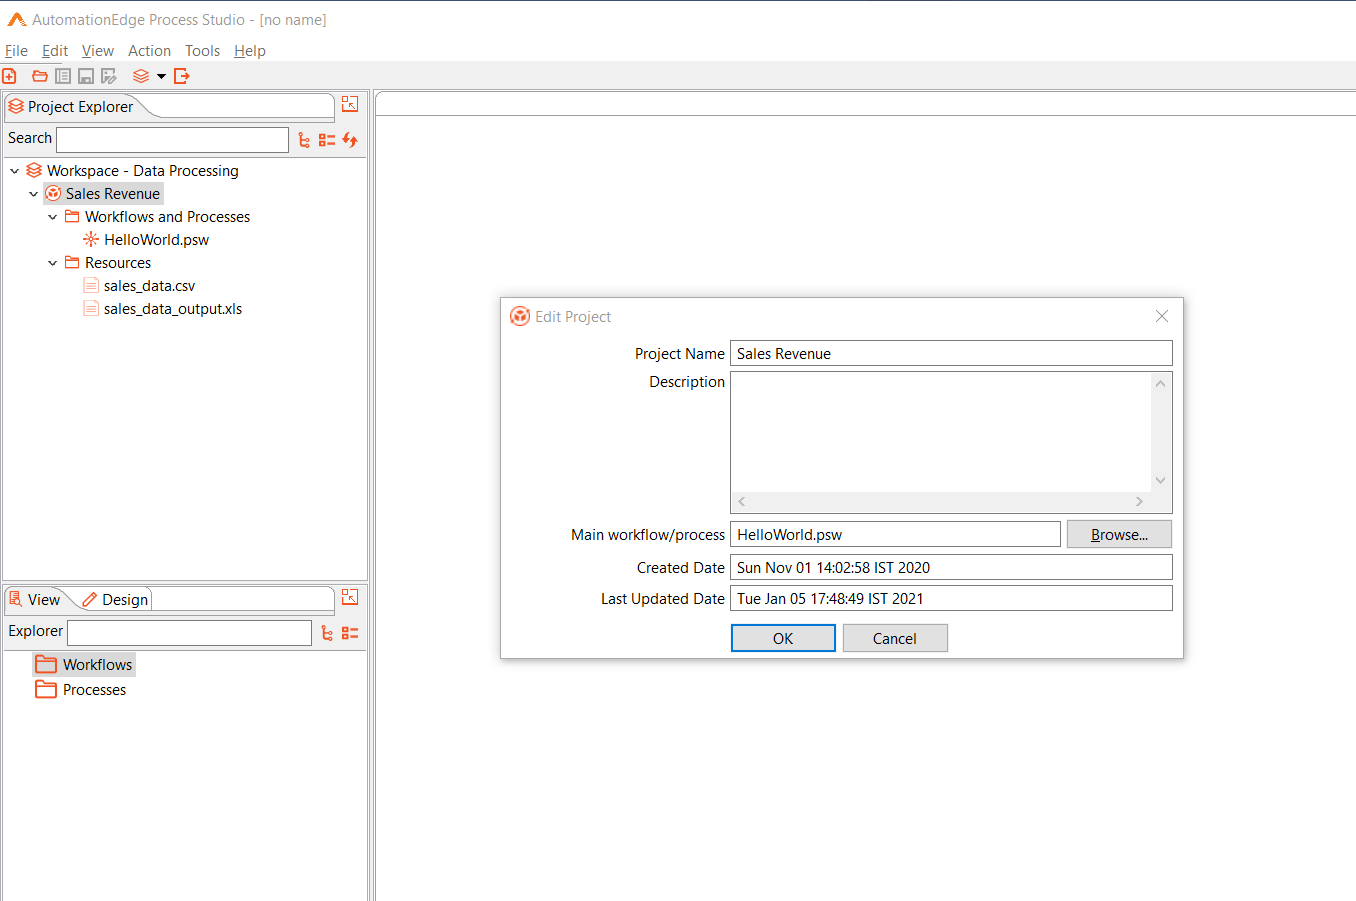
Figure 6.3: Set Main workflow/process
-
If you have a Process and multiple workflows, open the parent Process or parent Workflow and go to the respective tab.
-
Once again, go back to the Publish🡪Create option under the File menu.
-
If you have not saved the password, the AutomationEdge connection Details dialog appears. Provide the password.
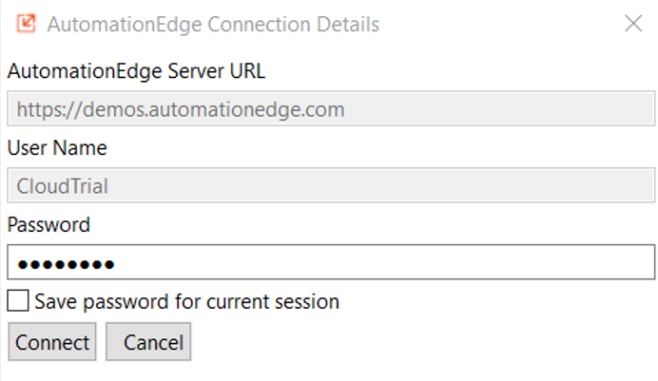
Figure 6.4: AutomationEdge Connection
- A pop-up message appears warning that you must select a parent process(psp) or workflow(psw) as the case may be to export all the linked psp/psw files into a zip. Acknowledge the message.
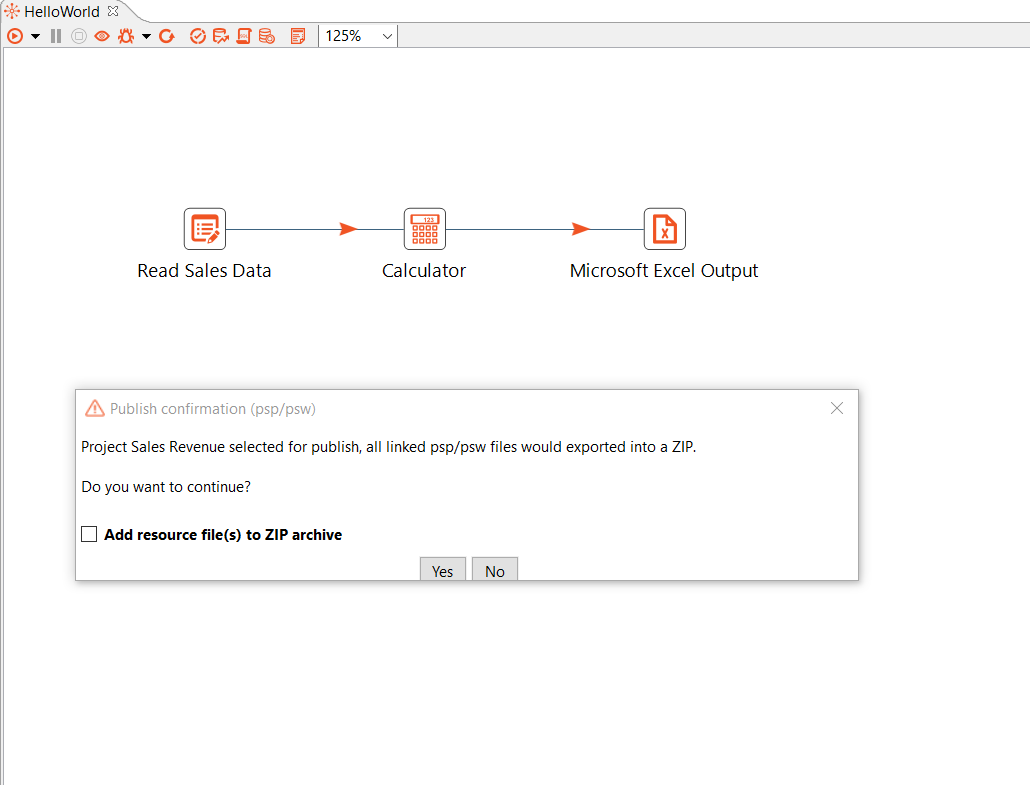
Figure 6.5: Publish Confirmation
-
In case you check 'Add supporting files to zip archive,' a corresponding popup appears. In this case, there are no supporting .csv, .txt, .xlsx or other files. Leave 'Add supporting files to zip archive' unchecked and click Yes.
-
A Workflow Details pop up appears with details as seen below.
-
Enable Assisted for Attended workflows
-
Enable RDP enabled if working on Controller Agent machine.
-
If you wish to Set default values as Configuration parameter values, enable the check box.
Note: It automatically detects workflows that should execute sequentially (else, if one of the sequential automation workflows is running as non-sequential, and the workflow terminates, then all the subsequent requests remain in New state). This workflow is not sequential.
- Click Create.
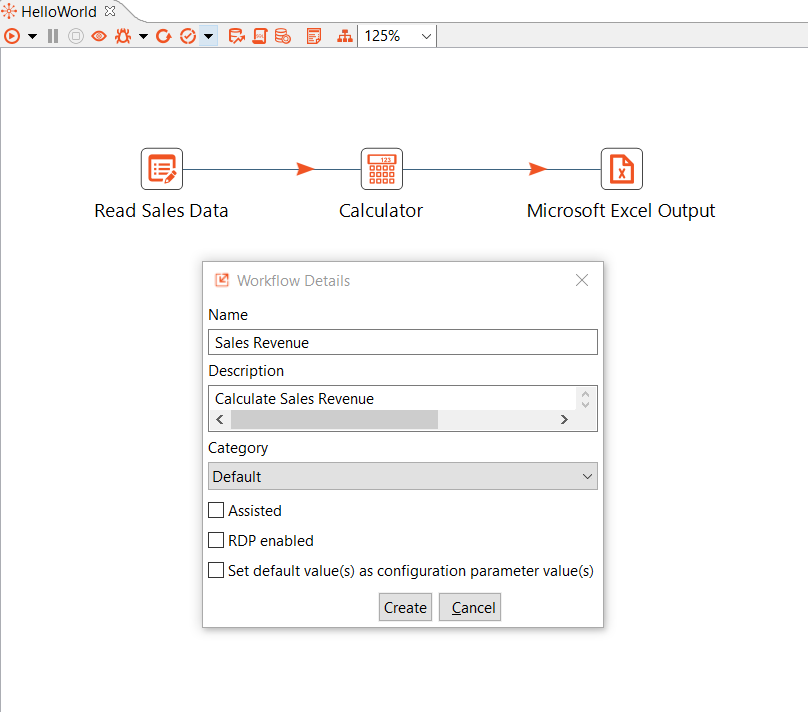
Figure 6.6: Workflow Configurations
For a detailed description of Workflow, configuration fields refer to Table 6.2: Add Workflow Details Field Description
- A pop-up message appears showing Workflow created successfully, and publish operation is completes.

Figure 6.7: Workflow created pop-up message
-
Now log on to the AutomationEdge instance on which you created the workflow. In the Workflow List menu, you can see the newly published Sales Revenue workflow.
-
At this point, you cannot yet activate the workflow. Hover over the Activate toggle switch to see the message Workflow not configured yet.
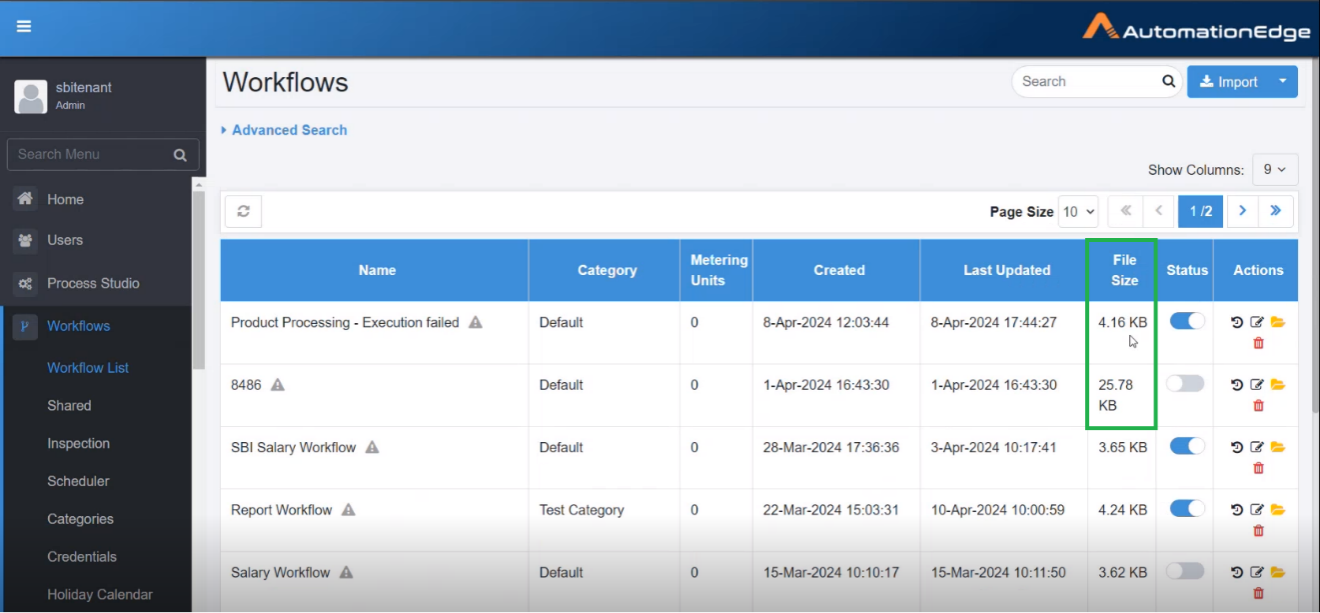
Figure 6.8: View newly published workflow
If there are any plugins that are not assigned, then a message listing the missing plugins appears. You can assign the missing plugins and activate the workflow.
If a workflow is published with warnings, then it appears in the Workflows page as follows:
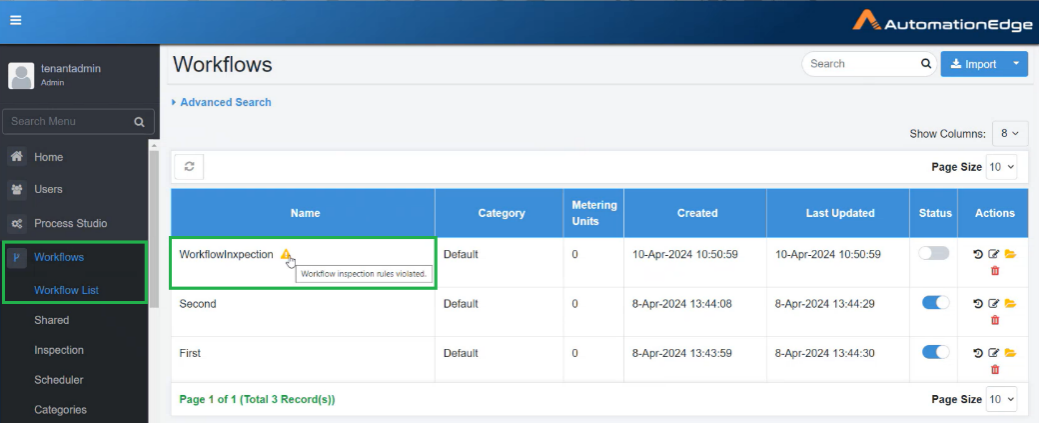 Click the warning icon. The Violated Inspection Rules
dialog appears.
Click the warning icon. The Violated Inspection Rules
dialog appears.
 Click Accept All Violations. If you are using your own workflow then you cannot accept the violations. However, if the workflow was published by another user, then you can accept the violations and use the workflow.
- Click the edit icon in the Actions column to complete workflow configuration. As seen below, most of the basic details are present. Unlike Process Studio, the Enable Sequential Execution checkbox is visible in workflow configurations. Since this is not a GUI Automation workflow, the checkbox is unchecked.
- Select the Enable Step Metrics and Logging checkbox if you want the logging details of workflow / process and step / entry to be made available in the Request page.
- Select the Capture Row Data on Workflow Failure and Capture Screenshot on Workflow Failure checkboxes if you want to view the workflow failure details and screenshot of the error.
- If the Email Notification is set, then the users will receive emails with attachments, notifying them of the error.
- To generate error files properly, ensure you are not running entries in parallel.
- To avoid overwriting of error files, ensure workflows and processes have unique names.
- Parameters with encrypted values will be logged as plain text in Process_name_Error_Data.csv if child workflow fails.
- If any step / entry fails due to initialization error, then no data is logged for that workflow / process. The error capturing options are being rolled out in phases. Phase 1 of the feature is rolled out in the current release. In Phase 1, the feature is supported in a few plugins.
- Additionally, configure Expected Completion Time, Maximum Completion Time, Cleanup Requests older than and Manual Execution time.
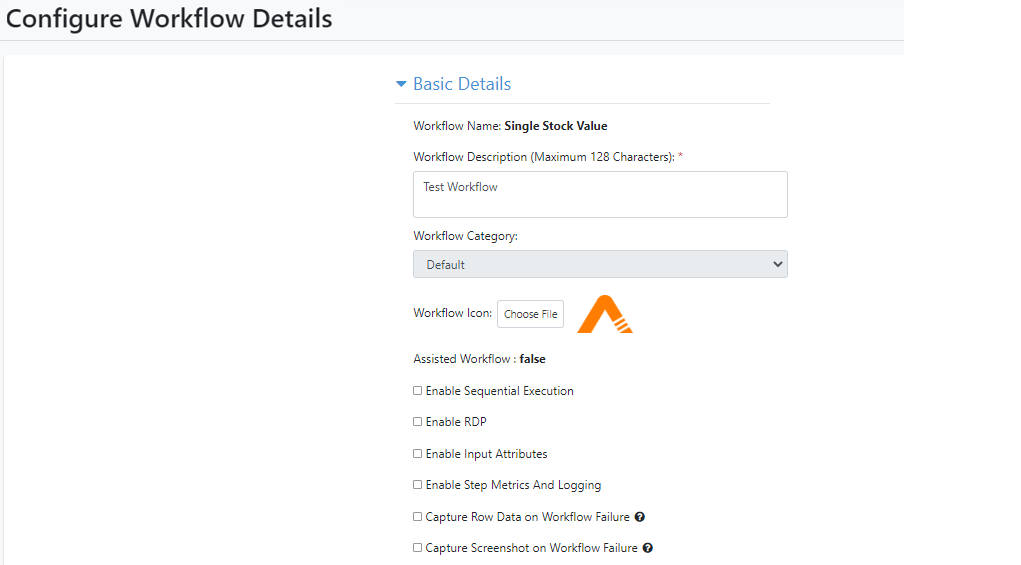
Figure 6.9: Configure basic workflow details
- Configure Email Notification Setting and click save. Table 6.2: Add Workflow Details Field Description
| Field Name | Description |
|---|---|
| Basic Details: | |
| Workflow Name | Specify workflow name. This field is Mandatory. |
| Workflow Description | Specify workflow description. This field is Mandatory. |
| Workflow Category | Select the workflow category from the drop-down list. |
| Associated Process (Maximum 128 characters) | Enter the name of the process you want to associate with the workflow. |
| Workflow Icon | Browse to upload an icon for workflow. |
| Assisted Workflow | Enable this checkbox to execute this workflow as an assisted workflow only. The workflow will not be available to run on regular Agents.While updating a Workflow, one will not have the option to switch between assisted and unassisted Workflow. Also, when a Workflow is marked as assisted, it automatically becomes sequential. |
| Enable Sequential Execution | Enable the checkbox for the workflow’s sequential execution. Only one sequential workflow can run on an agent (If one of the automation workflows with these steps is running as non-sequential, and the workflow terminates, then all the subsequent requests remain in New state). During Publish, Process Studio marks workflows with the following steps as sequential.- Robot Handling step - Capture Screenshot step - Desktop steps - GUI Automation Windows steps - Surface Automation steps - AS400.- Auto IT Mainly UI workflows are marked as sequential workflows. The non-UI workflows can run in parallel. It automatically selects the Enable Sequential Execution checkbox for sequential workflows on the AutomationEdge UI workflow edit page. The workflow can be considered auto-sequential otherwise, uncheck it.In this example, the workflow does not have one of these steps; hence it will not be sequential. |
| Enable RDP | Enable checkbox to start an RDP session of Agent machine to which workflow is assigned on the Controller Agent machine.When ‘Is RDP Enabled’ is checked, ‘Is Sequential Execution’ is automatically checked since RDP is generally required for sequential workflows that need an active screen.Agent must be running to request RDP for RDP Enabled workflows and execute the workflows.However, make sure no console session or RDP session is active.For requisite Windows, Policy Changes for ‘Is RDP Enabled’ workflows refer to the section: Windows Remote Desktop policies for RDP enabled workflows.Use cases for Is RDP enabled workflows - Idle Timeout:Since RDP Session is taken only for workflow execution, the idle timeout on the Agent machine should match the max execution of the workflow. - Reconnect:RDP Session will try to reconnect to the Agent VM during workflow execution if the reason for disconnect is other than the normal disconnect event initiated from the Agent VM. - Controller Shutdown:When the controller is shut down, it won’t close the Active RDP sessions since workflow execution is active. Workflow Hangs/Infinite execution:If a Desktop Workflow hangs, it needs to be terminated manually, and then the RDP session is closed by Agent. Till this happens, No other RDP based workflow will be able to run on the Agent.- Workflow execution initiation timeout:In case the RDP session does not get connected within a specific time (2 mins), the workflow request fails for this reason.- Banners: Usually, there are banners when a user logs in to a machine, (e.g. This Server is Property of …..)These banners will need to be disabled to use Automatic login. |
| Enable Input Attributes | Enable checkbox to display Additional Input Attributes in the Parameter Form displayed during workflow execution from AutomationEdge Catalogue. These are to capture additional information. |
| Enable Step Metrics And Logging | Select the checkbox if you want the logging details of the workflow or process and step or entry to be made available in the Request page. |
| Enable Workflow Monitoring | Select the checkbox if you want to enable the workflow monitoring feature. |
| Enable Workflow Checkpointing | Select the checkbox if you want to activate the workflow checkpointing feature. |
| For details, see Workflow Checkpointing. | |
| Push Metrics Interval | Select the duration after which the data is pushed into metrics and the Workflow Monitoring table or graph view is refreshed. The interval duration can be 15 seconds to 10 minutes. |
| Capture Row Data on Workflow Failure | Select the checkbox if you want to view the workflow failure details. |
| Capture Screenshot on Workflow Failure | Select the checkbox if you want to view the screenshot of the error. |
| Workflow Priority | View workflow priority in the workflow Edit mode.With this feature, prioritize workflow requests. Priority can be set on workflows so that workflow requests execute according to the priority.The field for priority supports three priorities Low, Default and High. Set its value to Low, Default or High, in the workflow editor. Set the priority while creating or updating workflow configuration. Set the priority, and all the requests submitted after that run with the priority. Change of the workflow priority after Request submission is not allowed.It processes high priority workflow requests before low and default priority requests. Default priority requests process before low priority requests. Among the Requests with the same priority, it processes Requests in a ‘First In First Out’ manner. To use the workflow priority feature, enable priority in the ActiveMQ configuration. To enable priority, perform the following changes in activemq.xml present in ActiveMQ's conf folder.Add prioritizedMessages="true" property for policyEntry queue=">" tag. Restart ActiveMQ and the server after this change. |
| Expected Completion Time (seconds) | Specify the expected time to complete a workflow from the time it is triggered. This field is Mandatory. |
| Maximum Completion Time (seconds) | Specify the maximum time to complete a workflow from the time it is triggered. This field is Mandatory. |
| Clean-up Requests older than(Hours) | Mark Requests in ‘New’ status older than the number of hours provided as “Expired”.Note: If you enter request clean-up duration more than that set by the System Administrator than you will see an error message. For example: If the System Administrator has set the time as 2 hours and you enter 3 hours, an error message informing you of the same appears.However, you can enter time lower than 2 hours or equal to 2 hours in the field, for example 1 hour and this timeline is applied for the clean-up requests. |
| Email Notification Setting: | Prerequisite: SMTP server configuration by Admin Set up the Email Notification parameters below, |
| Notify On Workflow Failure | Enable checkbox to notify selected users on workflow failure. |
| Notify On Exceeding Time Limit | Enable checkbox to notify selected users on workflow exceeding the time limit. |
| Select user: | |
| By Role: | Notify all users with a role, |
| Admin | Enable checkbox to notify all Admins. |
| Workflow Administrator | Enable checkbox to notify all Workflow Administrators. |
| By Username: | Provide a list of email addresses to be notified. |
| Request Creator | Enable checkbox to notify request creator. |
| Failure Message | Write a free text Failure Message for the notification. |
| Configuration Parameters | Set workflow configuration parameters while defining them for use in workflow execution. Typically, configuration parameters contain details for connecting to external servers.Configuration parameters can be String, File, Boolean, Number, Integer, Date and Credential. It has a Boolean Picker for dates. For other types, it provides the corresponding type validation. |
| Buttons: | |
| Save | Save configured workflow details. |
| Cancel | Cancel configuring workflow. |
-
Workflow updated successfully message appears.
-
Activate Activate the workflow by clicking the activate toggle switch.
-
The process of publishing workflow to AutomationEdge (Development instance) using the Publish🡪Create option in Process Studio is complete.
Workflow Checkpointing
After creating workflows or processes in the Process Studio, you publish them on the AE server.
Note: The workflows and processes published on the AE server are called AE workflows.
On AE server, execute the AE workflows through AE Catalogue or schedule the execution. A request is generated, which is available on the Requests page.
Sometimes a request execution fails, and you need to raise a new request to resume the job. The Workflow Checkpointing feature allows you to restart the request execution through the Requests page. The feature allows you to resubmit a failed request only if AE workflow's main file is a process (.psp) file.
Important:
-
The feature is available only if ae.workflow.monitoring.enabled property in ae.properties is set to true.
-
A single AE workflow can consist of multiple Process Studio workflows or processes, which are called through Process Studio executors. The Process Studio executors enable combining the workflows or processes into a single AE workflow. You can define one main workflow or process which is considered as an entry point while executing an AE workflow. Following are the combinations allowed in Process Studio:
-
Process calling Workflow
-
Process calling Process
-
-
You cannot resubmit child workflows or processes.
To work with Workflow Checkpointing:
-
Go to Workflows → Workflow List page, and then click
 next to the workflow for which you
want to enable the feature. The Update Workflow page appears.
next to the workflow for which you
want to enable the feature. The Update Workflow page appears. -
In the page, select the Enable Workflow Checkpointing checkbox. The Workflow Checkpointing feature is now active.
Note: The Workflow Monitoring checkbox is automatically selected, if unselected. -
Click Save. The details are saved.
-
Generate the workflow request through Catalogue, and then go to Requests → Request List. The Requests page appears.
-
In the Requests page, view the status of the request. If the request has failed, then you will see the following:
 Id: If the Workflow Monitoring feature is enabled the request ID appears with a link, for example,
 ![]() . Else, the request ID appears as plain text, for example,
. Else, the request ID appears as plain text, for example, ![]() Note: To directly go to table view in the Workflow Execution Metrics page, click the request ID link in the Requests page.For example click! . And, to go directly to graph view,click ! . For details, see Workflow Monitoring.
Note: To directly go to table view in the Workflow Execution Metrics page, click the request ID link in the Requests page.For example click! . And, to go directly to graph view,click ! . For details, see Workflow Monitoring.
Status: If the request fails, then the status appears as follows:![]() Parent [Root] Request Id: The column displays the parent and
Parent [Root] Request Id: The column displays the parent and
root request Id. The Parent Request Id is the request ID through
which you have resubmitted the request, and the Root Request Id,
is the request ID of the first request that was submitted.For understanding the column, see the following image:
-
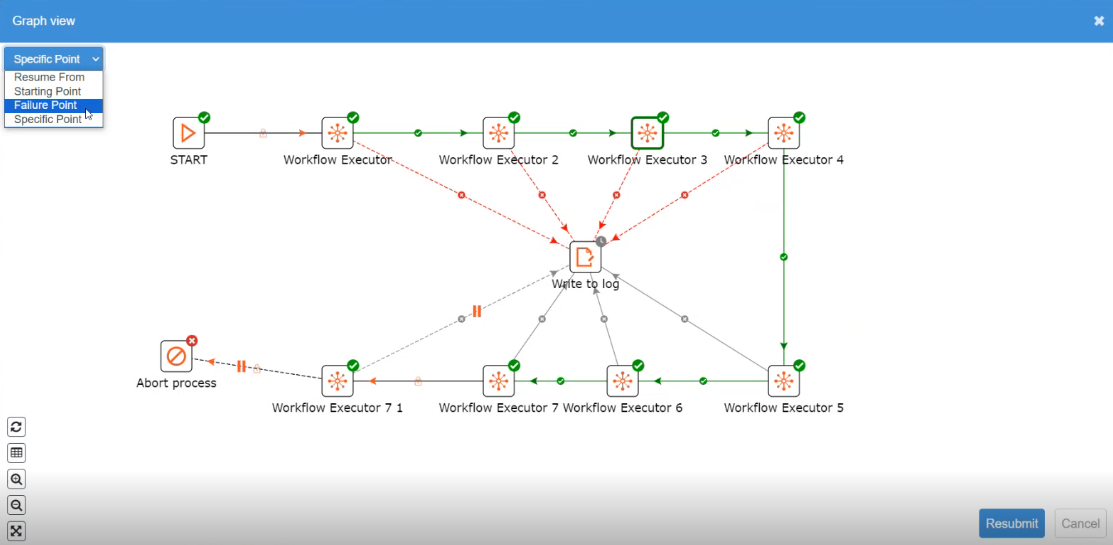
Click
 to resubmit the request. The process
opens in Graph view.
to resubmit the request. The process
opens in Graph view.
-
In the Graph view, click in the resume from list, select the point from which you want to resume the execution. The available options are:
a. Starting Point: The execution starts from the default starting point.
Note: If metrics data is unavailable for the workflow, then only this option is available in the list.b. Specific Point: The workflow execution resumes from the point of your choice.
c. Failure Point: The workflow execution resumes from the point where the previous execution had failed.
-
Click Resubmit. A new request is created and is listed in the Requests page.
Note: You will be unable to resubmit a failed request:a. after 48 hours.
b. if metrics of the request is unavailable.
c. if the process is modified.
Additional information:
-
To resume workflow from the previous state, you need a snapshot of PS Variables, and traditional Process Studio variables and along with execution metrics, snapshot data will also get stored.
-
In the metrics table the snapshot is stored in the serialized format (JSON). One more column is added in the metrics table to store the snapshot data.
-
Snapshot data will be stored in encrypted format.
Note: To view the workflow execution metrics, click Requests→Workflow Monitoring. The Workflow Execution Metrics page appears. For workflow monitoring feature details, see Workflow Monitoring.
Parameter data types on UI
This section discusses the supported data types for workflow parameters and the corresponding UI Control types. These apply to configuration and runtime parameters except the File data type, which is for runtime parameters only.
Following is a sample Configuration Parameters section in the Workflow configuration.
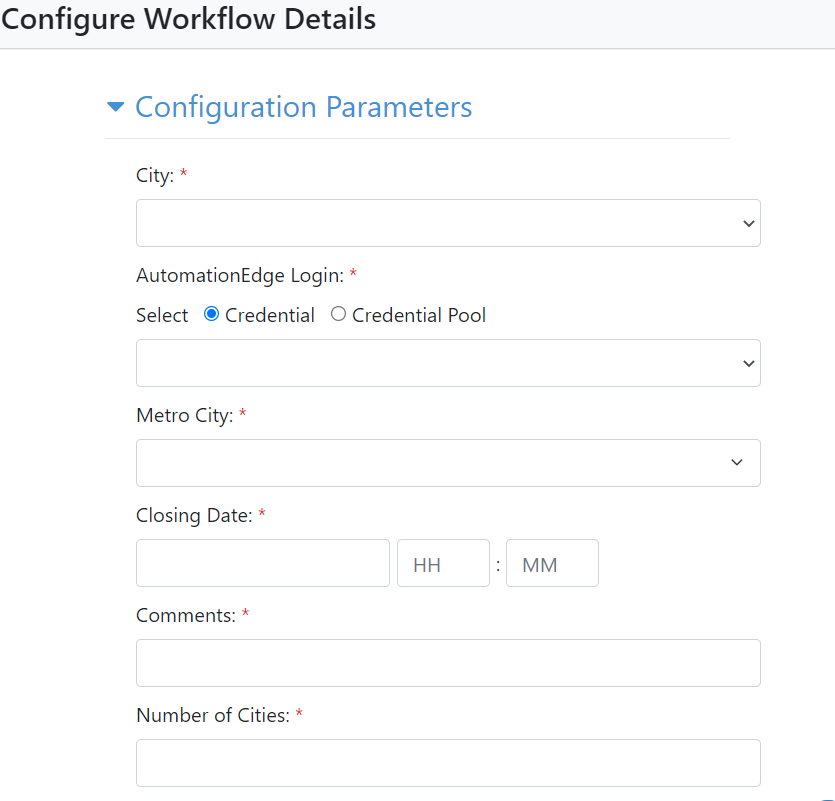
Figure 6.10: Configuration Parameters
Note: In the Search box, enter the name of credential or credential pool you want to fetch.
The following are the UI controls for configuration and runtime parameter data types (except File, available only for runtime parameters).
- Checkbox (Boolean)
If a configuration parameter is of type Boolean, it appears as a checkbox to enable or disable. The following is a screenshot of sample Boolean data as a checkbox.
![]()
Figure 6.11: Checkbox for Boolean (True/False)
- Text Box (Date)
Date value can be selected from the picker for date-time, as shown below.
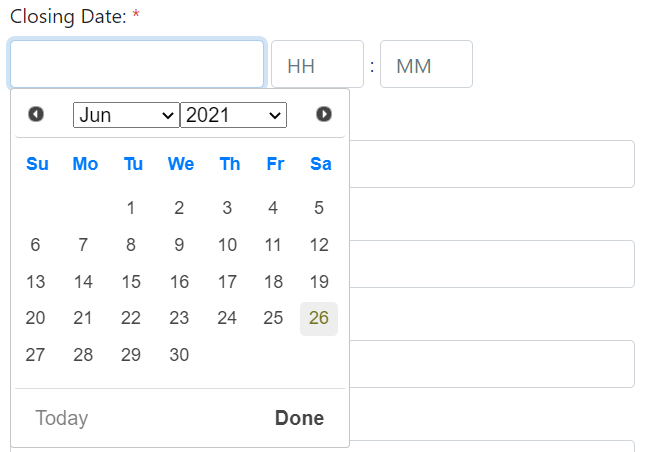
Figure 6.12: Picker for date-time
- Text Box (String)
Provide a string value in a Text Box.

Figure 6.13: Text box for string
- Text Box (Integer, Number)
Provide an Integer or Number in a Text Box.

Figure 6.14: Text box for Integer and Number
- Text Box (File)
Click Choose File button to browse a file at runtime and click the Upload button.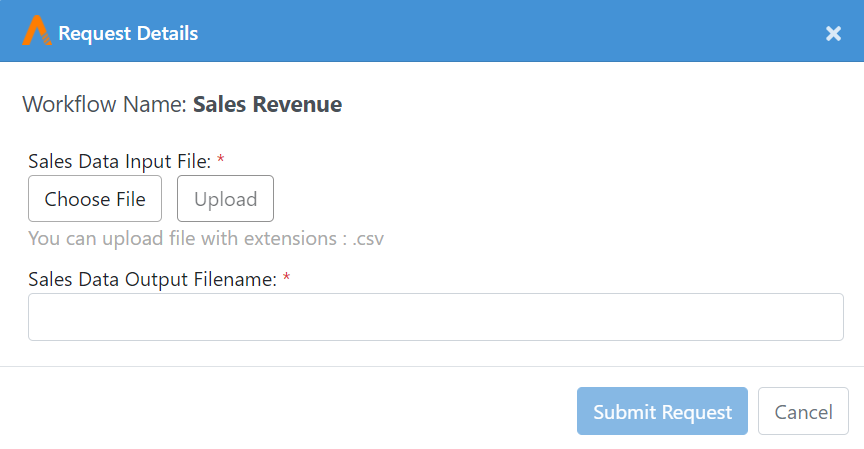
Figure 6.15: Choose file at runtime
- Single Selection List (List)
Select a single value from a Single Selection List.
Figure 6.16: Single Selection List
- Single Selection List (Credential)
If a configuration parameter is of type Credential, it shows radio buttons for Credential and Credential Pool. Select a radio button for Credential or Credential Pool, the corresponding dropdown list appears. If a Credential belongs to a Credential Pool, it does not appear in the Credential drop-down list.
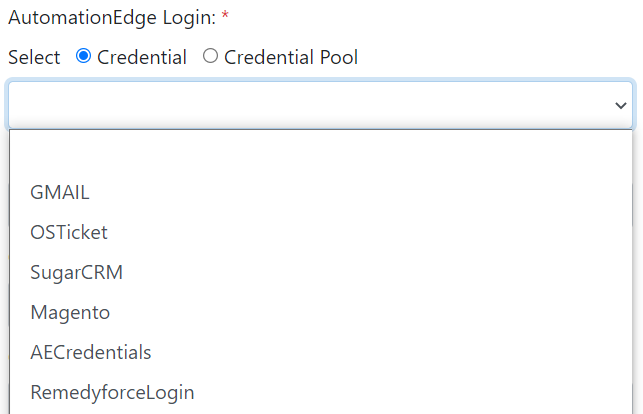
Figure 6.17: Radio Buttons for Credential and Credential Pool
- Combo Box (List)
On AEUI, select a single Checkbox or enter a custom value in the field.
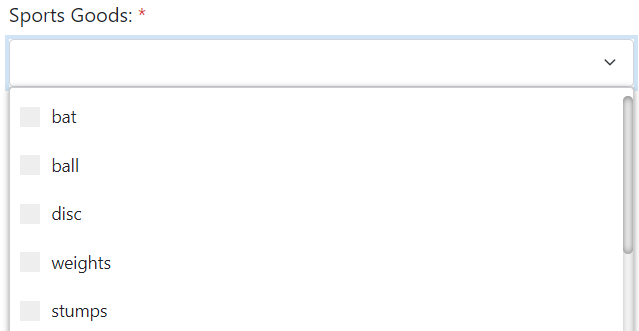
Figure 6.18: Select a single value or provide a custom value
- Radio Button (List)
Select a radio button from the radio button list.

Figure 6.19: Select a Radio Button
- Multiple Selection List (List)
Enable checkboxes to select multiple values.
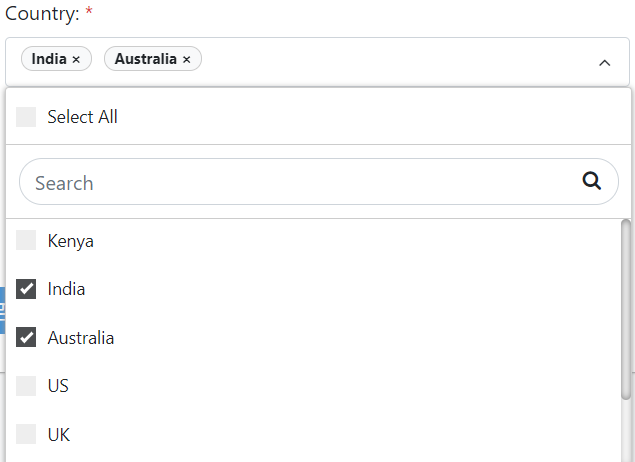
Figure 6.20: Select multiple values
Also, refer to the section Parameters in the AutomationEdge_R7.7.3_ProcessStudio_User_Guide for more details.
We discussed the Publish🡪 Create option to create a workflow (Sales Revenue) on the Development instance. Now, complete the life cycle of exporting from Development instance, importing to UAT instance,exporting from UAT and finally importing to a Production instance.
Maintaining workflow versions
You can maintain up to three workflow versions through AEUI. This feature enables you to have the option of using any one of the workflow as required.
To view the versions, in the Workflows page, click
![]() in the Actions column.
in the Actions column.

Figure 6.21: Workflow page view
The workflow versions appear in the Version History page.

Figure 6.22: View multiple versions
- You can maintain only three versions of the workflow in AEUI.
- The most recently updated version will be the default working workflow version. For example, if Version 3 is he most recently updated version then it will be shown as the Current version of workflow, which will be in use.
To maintain the workflow version, follow the steps below:
- In the Process Studio, update a workflow, for example add or delete a step, or change names of files or step name, using the Publish 🡪 Update option.
To maintain a version, ensure that the workflow also exists on the AEUI Server, else see Publish: Create on how to publish a workflow for the first time.
-
Sign in to the AEUI, and in the menu, click Workflows 🡪 Workflow List, and then click
 in the Actions column. The Version History page appears.
 -
In the page, view the versions of the workflow. The recently updated version will have a Current version label against it.
-
On the Version History page, in the Actions column:
-
Click
 to delete a version.
 -
Click
 to export the workflow into a zip.
 -
Click
 to view the details of the workflow.
-
- Whenever the workflow is updated, from Process Studio Publish Update or from AEUI Workflows Update option, the version is incremented. The updated version becomes the active workflow.
- Enter the following field details:
- Select Workflow: Select the updated workflow you want to upload. This is a mandatory field.
- Version Tag: Provide a unique version number to the workflow, which will enable ease of analysis and / or restoration, if required.
- Select Workflow File(zip): Choose the zip file of the selected workflow. This is a mandatory field.
- If there are three versions of a workflow already available, and you update the workflow to the AEUI Server then the first version is automatically deleted from the server. For example, there are Version 1, Version 2, and Version 3 workflow on the AEUI Server, and you add Version 4 to it, then Version 1 gets deleted automatically from the server.
Restoring listed version of workflow as the current version
You can restore any of the other two versions as your current version, if required.
Note: You can restore a version only if the status of the workflow is Inactive.
To restore listed version of workflow as the current version:
-
In the Workflows page, select a workflow for which you want to restore the version.
-
In the Status column, switch the toggle to Inactive state.
-
In the Workflows page, click
 in the Action column. The Version History page
appears.
in the Action column. The Version History page
appears.
Figure 6.23: View multiple versions
-
In the Version History page, click
 . A message asking you to confirm
restoration of the selected version appears.
. A message asking you to confirm
restoration of the selected version appears. -
Click Restore. The selected version is now the current version.
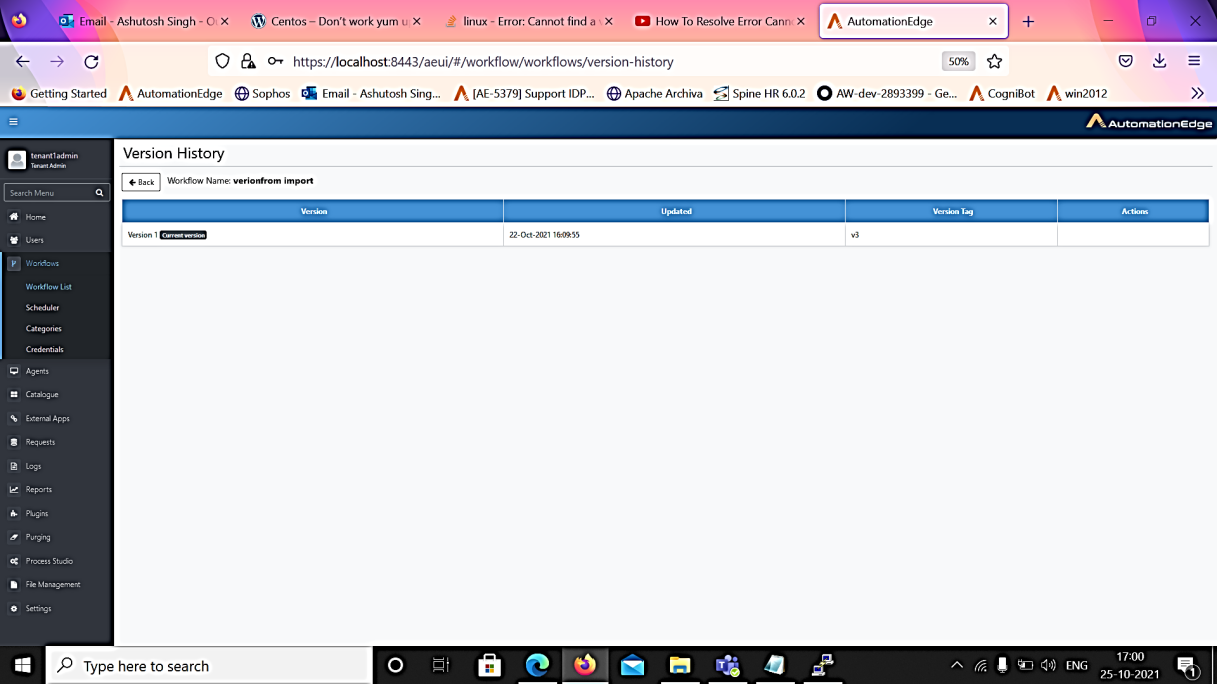
Figure 6.24: View multiple versions
When you restore the workflow to a specific version, for example, Version x, then all the versions that were created after Version x are automatically deleted after its restoration.For example, if you select to restore workflow Version 1 as the current version then, both, Version 2 and Version 3, are automatically deleted.
Setup, Execute Sales Revenue on Development Instance
Workflows: Workflow Assignment to Agent
You can assign up to 300 workflows (minimum workflow 0 -maximum workflows 300) to an Agent. If you want to assign more than 300 workflows, you can do so only through the internalproperties file, that is, the application.properties and assign a maximum of 999 workflows.
- Click Agents menu. Click the Workflow Assignment sub-menu.
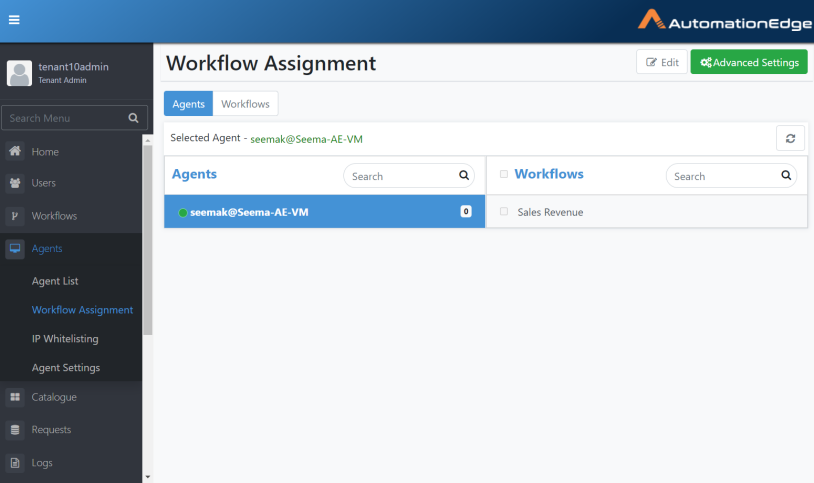
Figure 6.25: Assign Workflow to Agent
-
Select an Agent. Click the arrow key on the right for the Agent.
-
You can now see the list of available workflows.
-
Click Edit to modify the workflow assignments to Agent.
-
Now you may enable the checkbox next to Sales Revenue. Click Save.
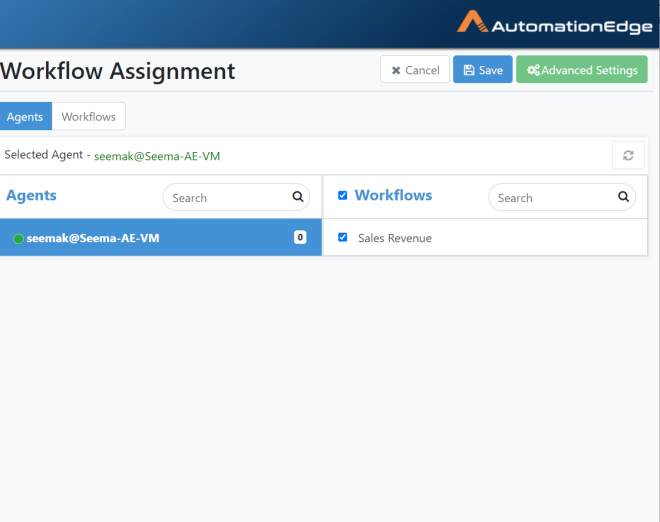
Figure 6.26: Click Edit and Enable workflows to assign to Agent
- A pop-up appears to Confirm the Assignment. Acknowledge the message.
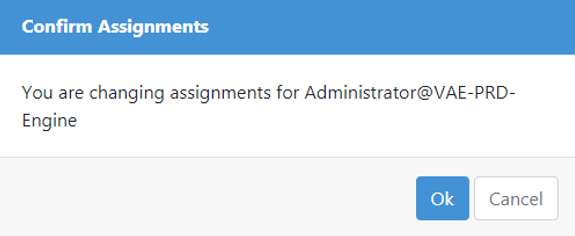
Figure 6.27: Acknowledge Assignment
- The Workflow Assignment saves successfully.
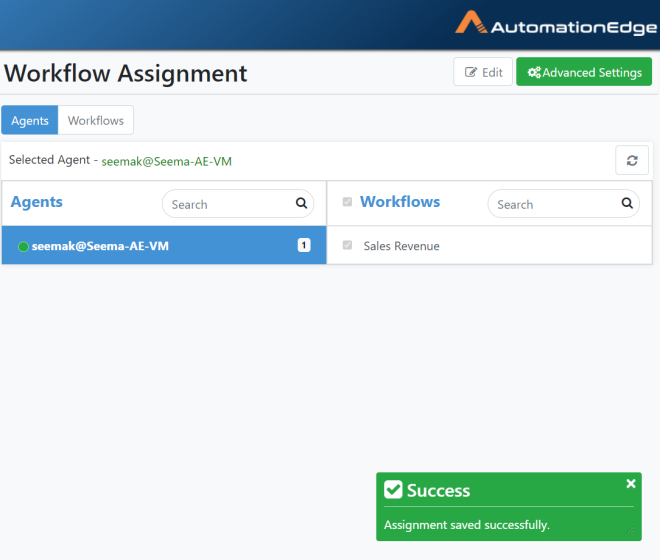
Figure 6.28: Assignment saved successfully
-
Go to Catalogue menu. The workflow is now visible in the catalogue.
-
Click the Sales Revenue workflow icon.
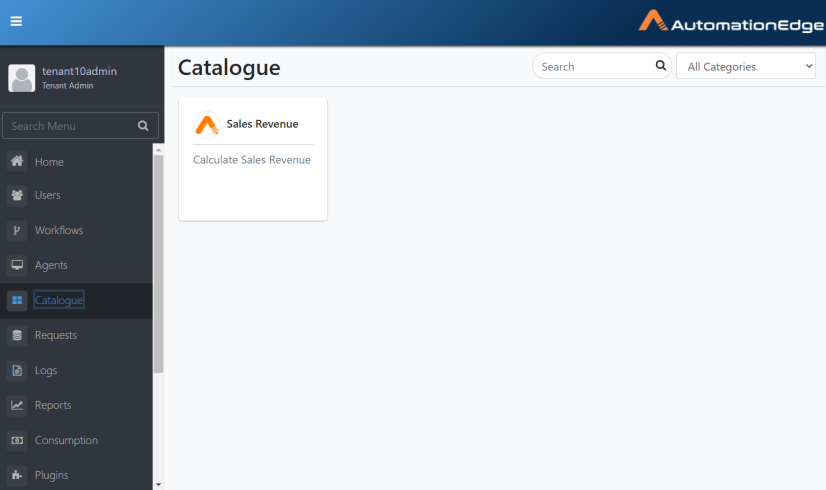
Figure 6.29: Workflow on Catalogue
- Along with other Workflows, assisted Workflows will also appear on the User's catalogue page if the User has execution permissions on them and the User has at least one Assisted Agent registered.
Along with other Workflows, assisted Workflows will also appear on the User's catalogue page if the User has execution permissions on them and the User has at least one Assisted Agent registered.
Executing Workflows
Assign permissions to the workflow, see Permissions.
Now execute the workflow from the Catalogue.
- Navigate to the Catalogue menu. Click on the Sales Revenue tile.
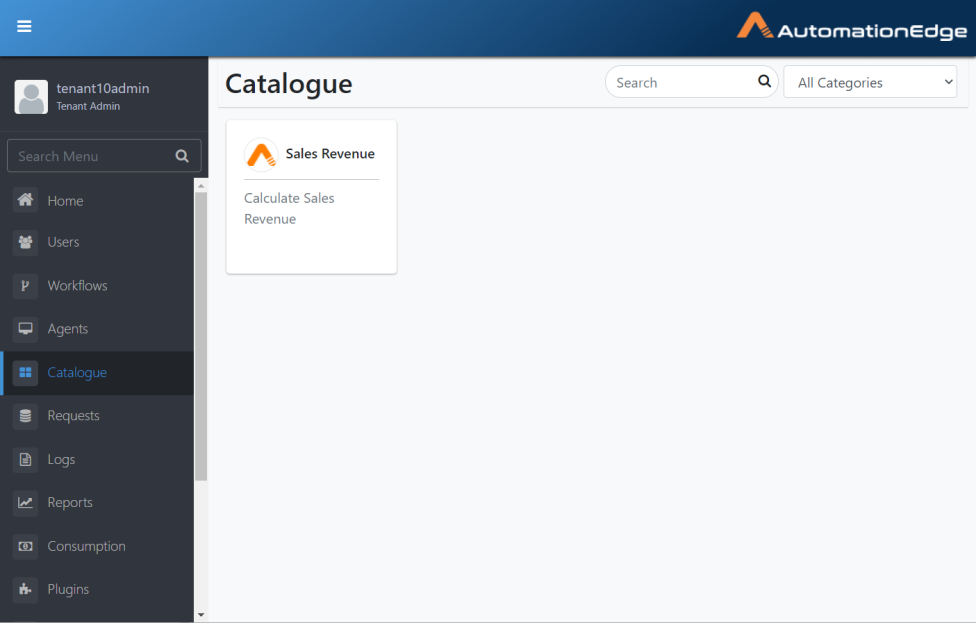
Figure 6.30: Catalogue
-
Calculate Sales Revenue; Request Details Parameters form appears.
-
Sales Data Input file is a parameter of type file. Click Choose File button to browse and select the file. As per Process Studio process parameters, file extensions allowed are .csv for this file.
-
Click the Upload button. Provide a name for the Sales Data Output file. Click Submit Request.
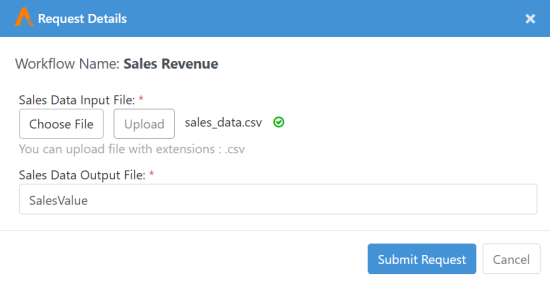
Figure 6.31: Choose and Upload input file
- Acknowledge the pop-up for successful request submission. Note the Request ID.
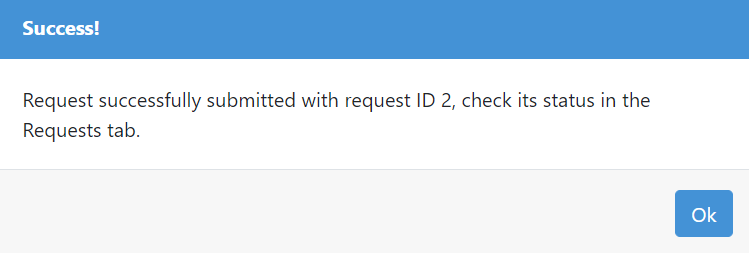
Figure 6.32: Submit Request from Catalogue
Monitor Requests
Monitor workflow execution on the Requests menu.
-
Click the Requests menu. Identify your workflow.
-
The screenshot below shows Sales Revenue completed successfully.
-
You may download the output file sales_output.xls.
-
The screenshot below shows the downloaded file in the bottom left corner.
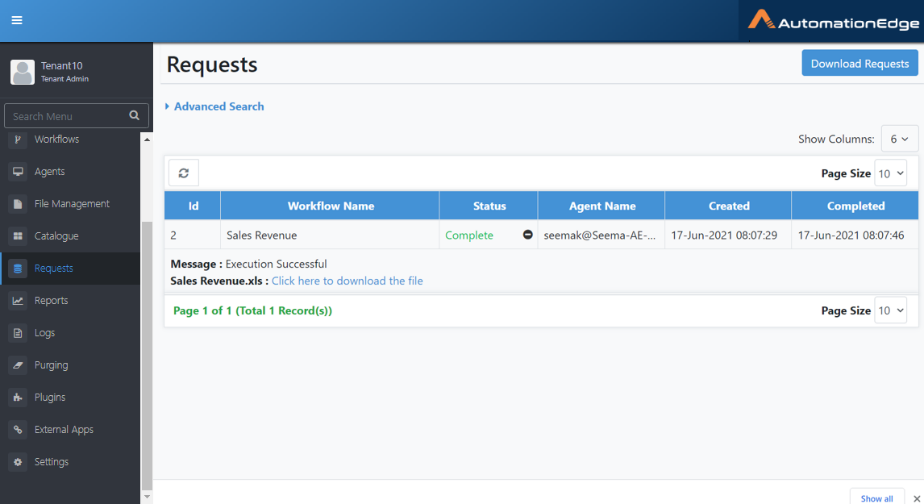
Figure 6.33: Downloaded output file
- Following is a screenshot of the output file.

Figure 6.34: Output file
-
The AutomationEdge server sends the email with the file attachment to the target users.
-
Publishing and executing Sales Revenue Workflow on AutomationEdge server is complete.
Workflows: Export from Development Instance
Once a workflow works satisfactorily on a Development instance, it's usually exported and uploaded on UAT. A workflow can be exported from the development instance and then imported to UAT or Production (Enterprise/Subscription) instances, although AutomationEdge recommends importing it to a UAT server.
The exported workflow is self-contained, i.e. it has all the .psp, and .psw it needs and all the supporting files required for execution.
Following are the steps to export one or more Workflows,
-
Go to the Workflows🡪 Workflow List menu.
-
Click the arrow next to the Import button on the top right corner. From the drop-down list, click Export.
-
You may view the file structure and contents of the workflow zip being exported by clicking the folders icon in the Actions column. Users can see and verify if the zip for export contains valid files.

Figure 6.35: Export Process Studio Workflow
-
Select a workflow or workflows to export.
-
Enable check boxes next to workflows to be exported.

Figure 6.36: Export Workflow Window
- The chosen workflows are now visible in the selected workflows.
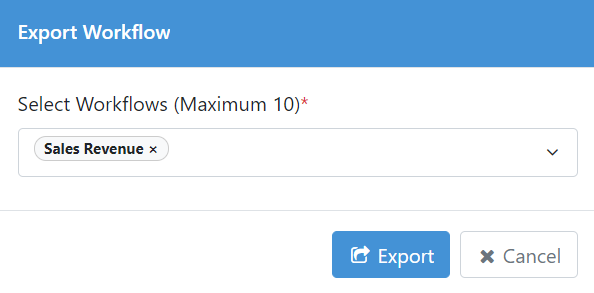
Figure 6.37: Choose Workflow to Export
Workflows: Import to UAT Instance
Import button on Workflow menu supports import of a zip file exported from DEV instance or other instances of AutomationEdge.
A project exported from Process Studio cannot be imported or updated directly on an AutomationEdge instance.
Once a workflow works satisfactorily on the Development instance, it's usually uploaded on UAT. A workflow can be exported from the development instance and then imported to UAT or Production (Enterprise/Subscription) instances, although usually imported to the UAT server, one workflow at a time.
Import the workflow as exported from Development Instance. Following are the steps to import the workflow on the UAT instance.
-
Login to UAT instance
-
Navigate to the Workflows menu. The Workflow list menu is chosen by default. Click the Import button.
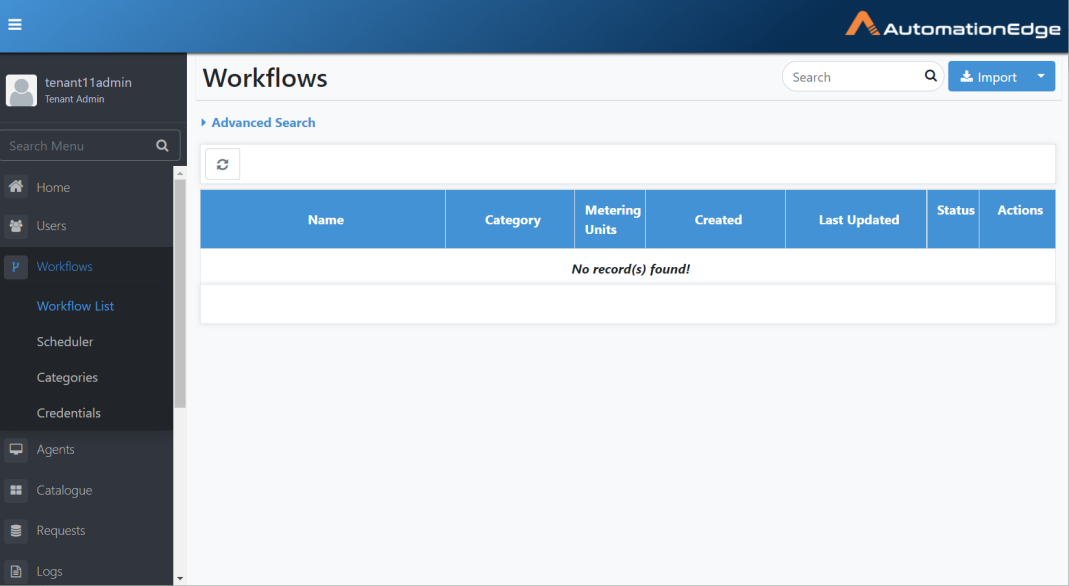
Figure 6.38: Import Workflow
- The Create New Workflow page appears as seen below. Provide configuration details. Browse and upload the exported zip file from the Development instance under the Select Workflow file (.zip).
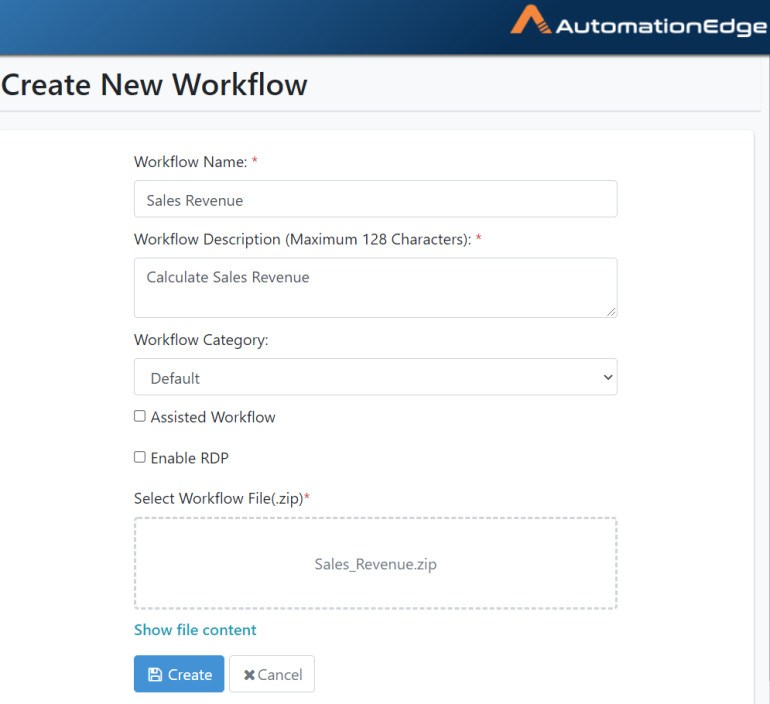
Figure 6.39: Create New Workflow Configurations
-
Click Show file content above to see the contents of the zip file to import. Click Create.
-
Fill in the basic workflow configuration details.
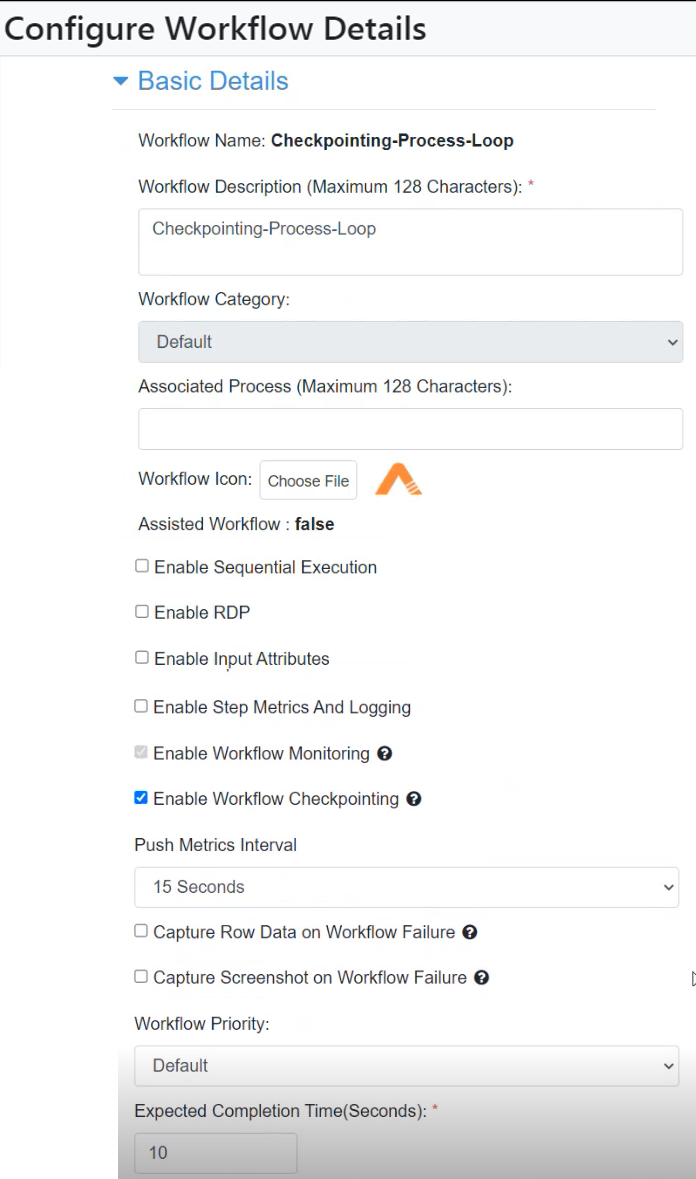
Figure 6.40: Workflow Basic Configuration
- Fill in the email notifications configuration settings and click Save. Workflow updated successfully message appears.
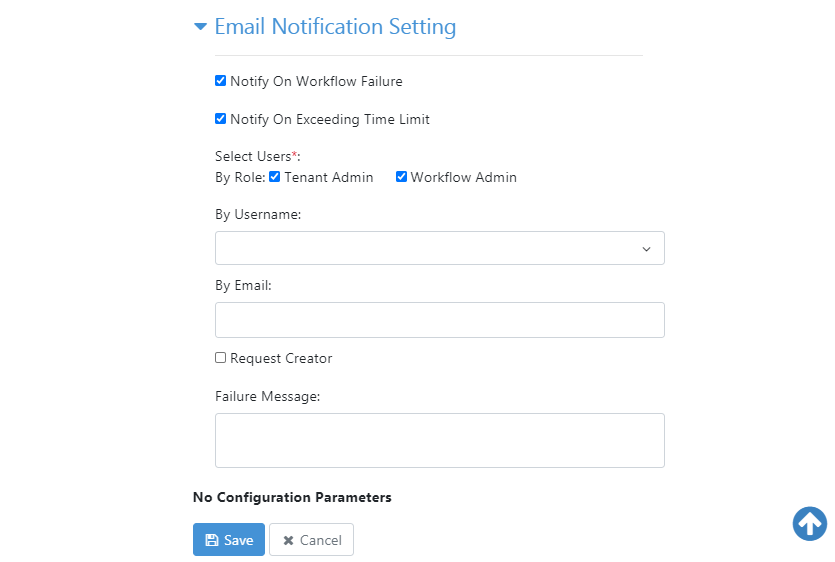
Figure 6.41: Workflow Email Notification configuration
- You may now Activate the workflow.
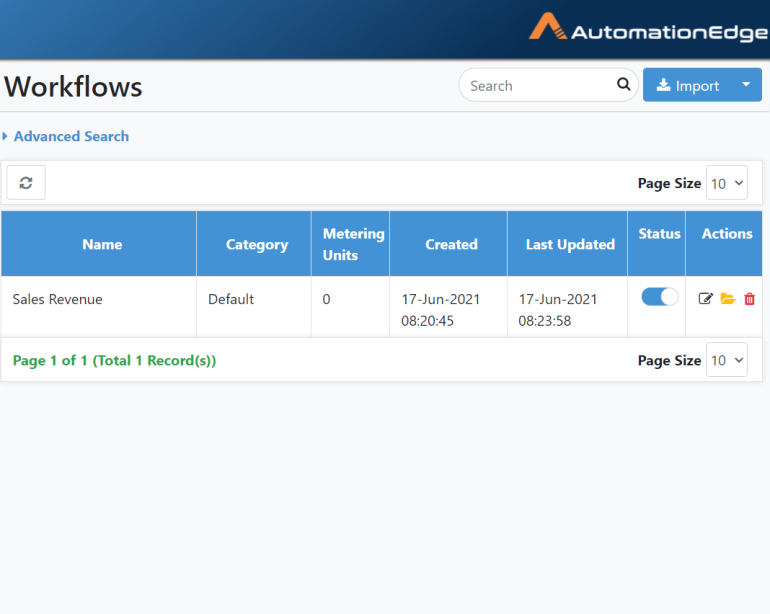
Figure 6.42: Newly imported Sales Revenue on UAT instance
- The process of importing a workflow to a UAT instance is complete.
Workflows: Export from UAT Instance
Once a workflow works satisfactorily on the UAT instance, it's usually uploaded on the Production instance. A workflow can be exported from the UAT instances and imported to Production (Enterprise/Subscription) instances. Export workflows on UAT instances as 'Verified' workflows to signify thorough testing on the UAT instance.
The exported workflow is self-contained, i.e. it has all the .psp, .psw, and all the supporting files required for execution. This section discusses the steps to export a workflow from the UAT instance.
-
Log in to a UAT instance.
-
Navigate to the Workflows 🡪 Workflows List menu.
-
Click the arrow next to the Import button. Click Export.

Figure 6.43: Export Option
-
Select workflows from the dropdown menu.
-
You have the option to enable Export as a Verified checkbox. Enable the Export as Verified checkbox to export the workflow as verified. This Export as Verified checkbox option is only available on a UAT instance. Hence, workflows present in the UAT instance only can be exported as 'Verified' workflows. Test a workflow thoroughly on the UAT instance before exporting it at 'Verified'.
-
Import a verified workflow in the Production instance.
-
Select the workflows you wish to export by clicking on the check boxes. In this case, we have selected Sales Revenue.
-
Enable the Export as Verified checkbox. Click Export.
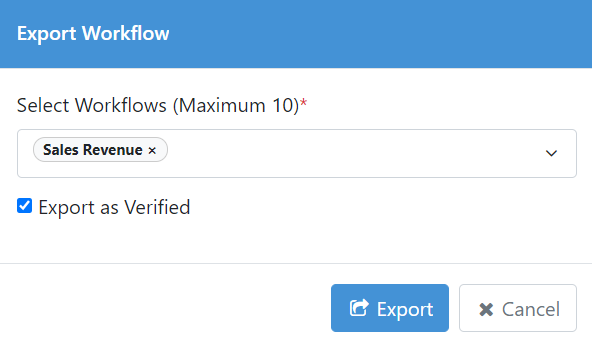
Figure 6.44: Workflow to Export as Verified
- Workflow Exported Successfully message appears.
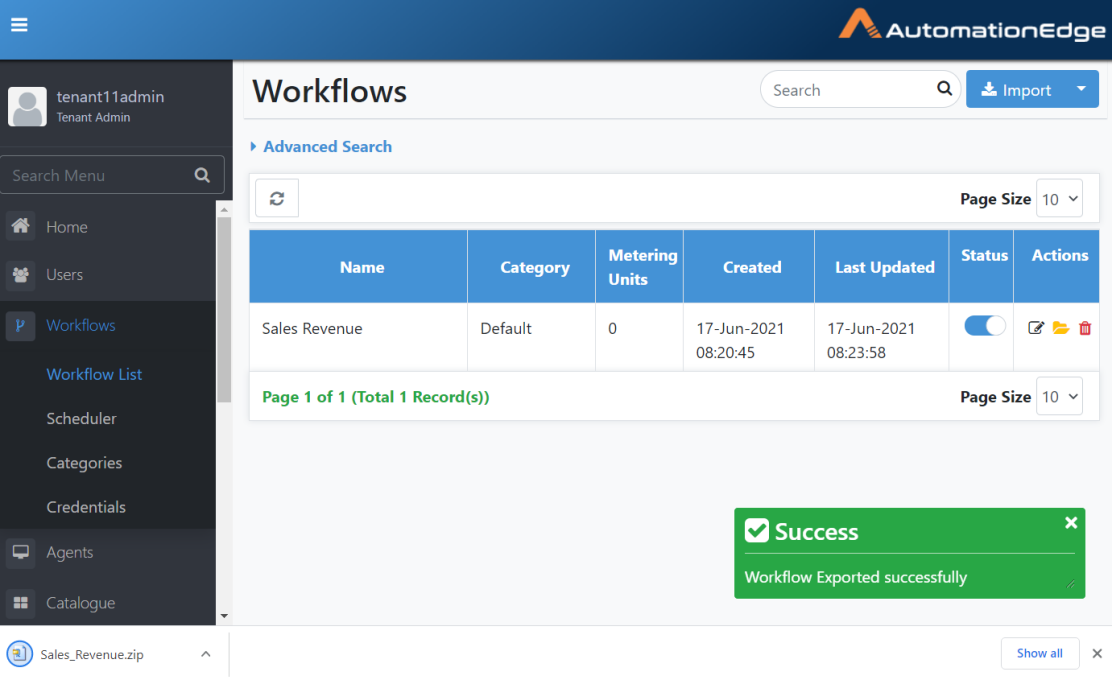
Figure 6.45: Workflow exported successfully
- The process of exporting workflows from an UAT instance is complete.
Workflows: Import to Production Instance
Import button on the Workflow menu supports the import of a zip file exported from an instance of AutomationEdge.
A project exported from Process Studio cannot be imported or updated directly on an AutomationEdge instance.
Once a workflow works satisfactorily on the UAT instance, it is exported from UAT and imported on the Production (Enterprise/Subscription) instance. Export workflows as verified from the UAT instance to import verified workflows on the Production Instance.
Import the workflow zip exported from UAT Instance. The process to import the workflow is the same as discussed for Import to UAT instances. Following are the steps to import the workflow on the Production instance.
-
Logon to a production instance (Enterprise or Subscription)
-
Click the Workflows menu. Workflows List menu is selected by default.
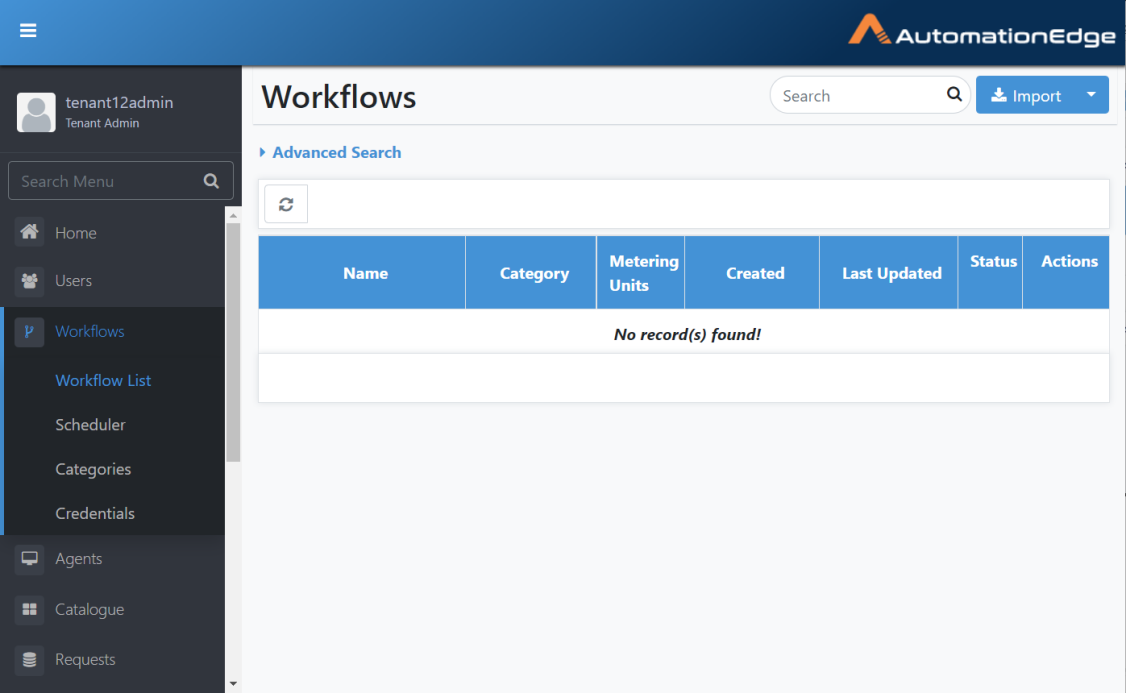
Figure 6.46: Workflow Menu
-
Click the Import button. The Create New Workflow page appears.
-
Provide desired details. Browse the exported zip file from the UAT instance. You can see the file contents by clicking the Show file content link. Click Create.
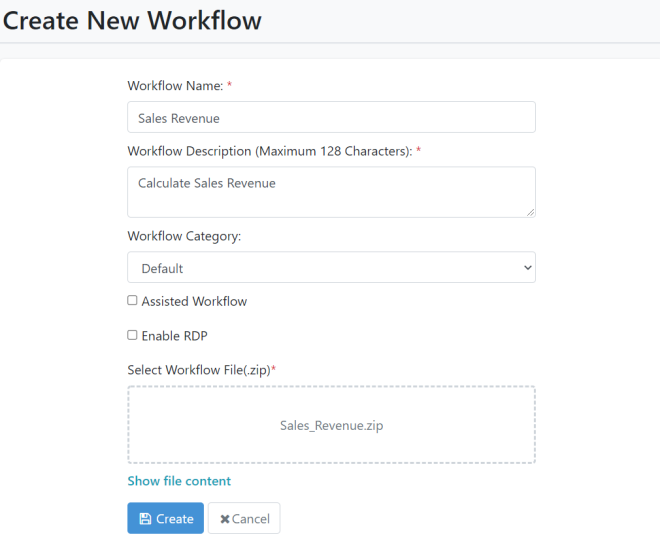
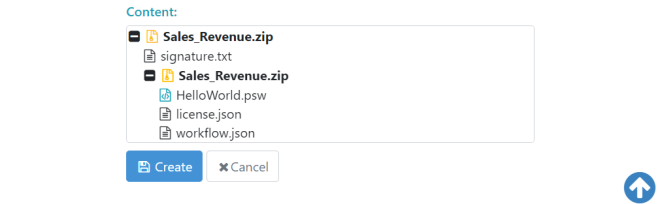
Figure 6.47: Import and Configure Process Studio Workflow
- The Configure workflow details page appears. Provide basic details as shown below.
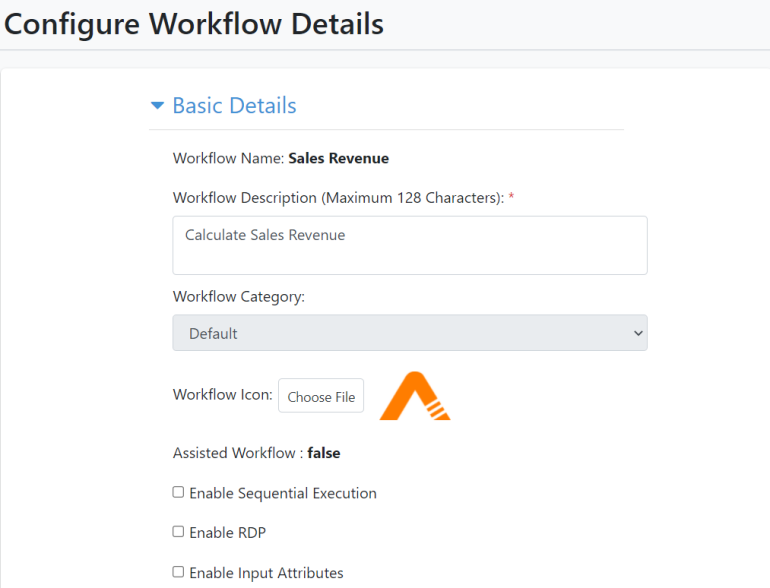
Figure 6.48: Workflow Basic Details
-
Provide Email Notification Setting as shown below.
-
Provide values appropriately, as shown below for Email Notification Settings. Click Save.
Figure 6.49: Configure Workflow Email Notification Settings
-
'Workflow updated successfully' message displays. The workflow is now visible in the workflow list as a verified workflow.
-
The workflow is now visible in the workflow list. Activate the workflow by clicking on the Active toggle.

Figure 6.50: Verified workflow imported to the Production instance
The workflow can now be assigned to an Agent, and once assigned, the workflow is visible in the catalogue. Give workflow permissions to users or user groups. Execute the workflow from the Catalogue and monitor it on the Requests menu, as discussed for the UAT server in the previous sections.
Workflows: Maintain
Workflows: Update
There are two ways to update Process Studio workflows,
-
Update Workflows from Process Studio using Publish option
-
Update Workflows with Update option on Workflows List Menu
The sections below discuss both of the ways to update AutomationEdge workflows.
Update Workflows from Process Studio using Publish option
In the previous section, we completed publishing a workflow for the first time with Publish🡪Create option to AutomationEdge. To make updates to the workflow, use the Publish🡪Update option.
Following are the steps to update AutomationEdge Workflows directly from Process Studio using Publish🡪Update option.
- Open Sales Revenue process in Process Studio as seen below.

Figure 6.51: Open workflow in Process Studio
-
If you have a Process and multiple workflows, open the parent Process or parent Workflow and go to the respective tab.
-
In this case, we have only one workflow; hence we have selected the HelloWorld workflow.
-
Select File menu and click Publish and choose the Update option.

Figure 6.52: Update workflow using Publish Update option
- If you have not saved the password, the AutomationEdge connection Details dialog appears. Provide the password.
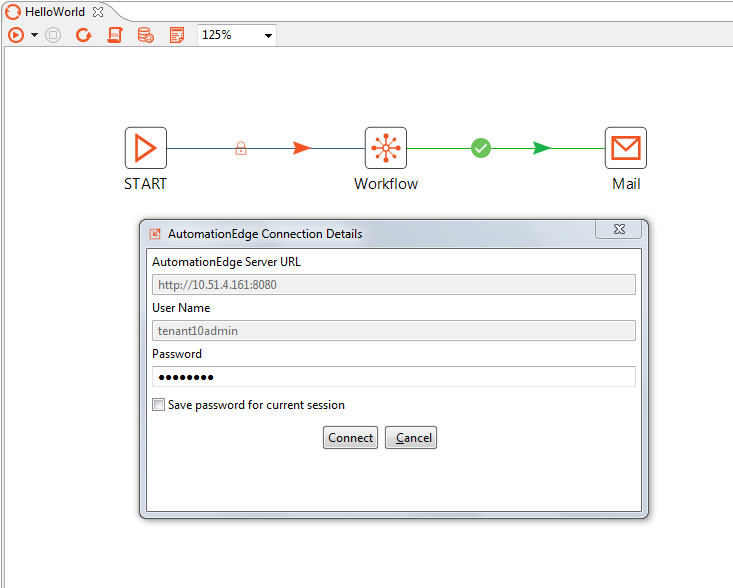
Figure 6.53: Connect to AutomationEdge Server
-
A pop-up message appears warning that you must select a parent process(psp) or workflow(psw) as the case may be to export all the linked psp/psw files as a zip. Acknowledge the message.
-
In this case, there are no supporting .csv, .txt, .xlsx or other files. Leave 'Add supporting files to zip archive' unchecked and click Yes.
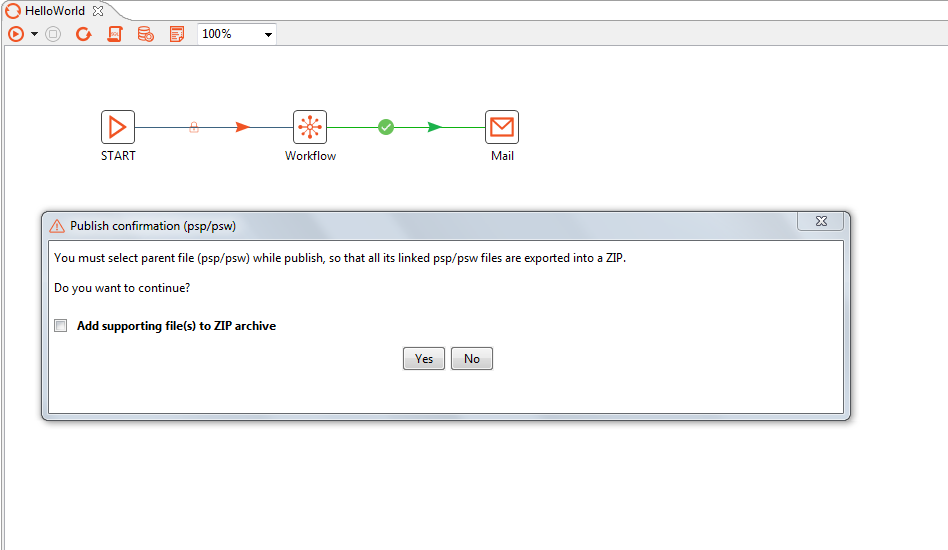
Figure 6.54: Optionally Add supporting files
- You may check the Add Supporting files to the Zip archive to add additional or supporting files to the zip.
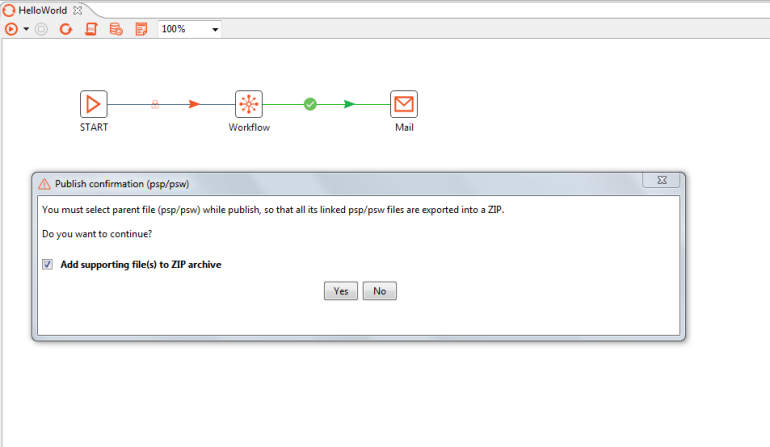
Figure 6.55: Check to add supporting files to zip
-
In case you check 'Add supporting files to zip archive', a corresponding popup appears.
-
In this case, we have selected the input file sales_data.csv. Click Add to Destination and then the Add button below. However, this is for demonstration purposes only. sales_data.csv is only an input file and not a supporting file, hence optional.
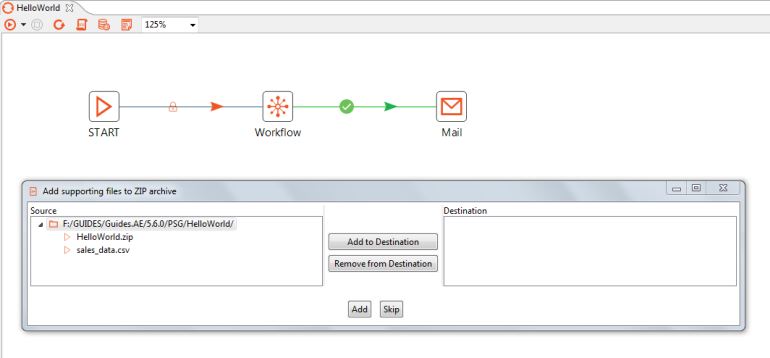
Figure 6.56: Choose the files to add to zip
- A Workflow Details pop up appears with details as seen below.
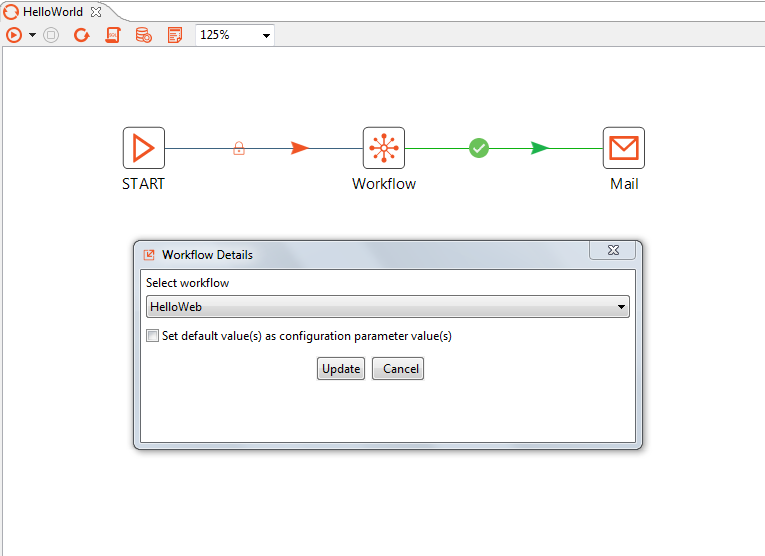
Figure 6.57: Workflow configurations
-
Select the workflow to update from the drop-down list.
-
If you do not see the workflow in this list, click More... in the drop-down list, and locate your workflow. You may use the Filter box to search narrow the list. Click OK.
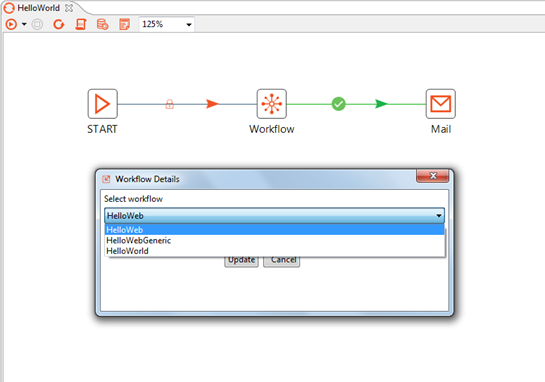
Figure 6.58: Select workflow to update
-
You may check optional parameters as desired. Parameters such as Assisted, Sequential and RDP enabled are inherited from the published workflow and not visible here.
-
If you wish to 'Set default value(s) as configuration parameter value(s) enable check box.
-
Click Update.

Figure 6.59: set configuration parameters default values
- A pop-up message appears showing Workflow updated successfully.
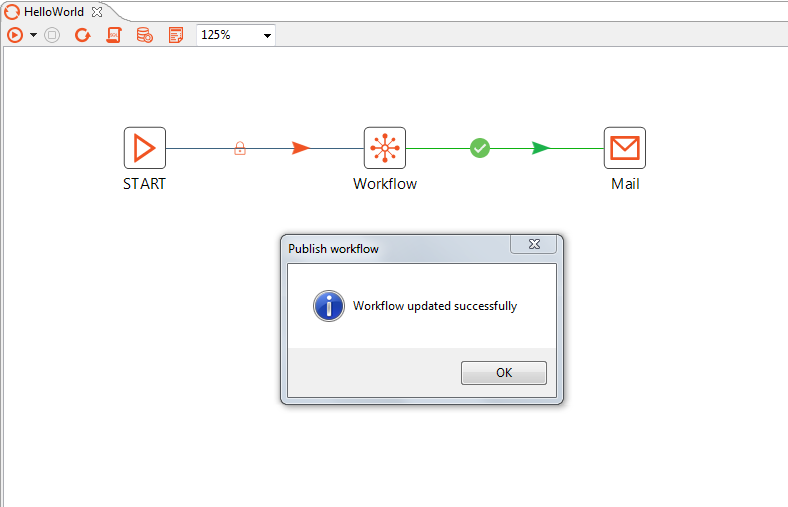
Figure 6.60: Workflow updated successfully
- Now log on to the AutomationEdge instance. In the Workflow List menu, you can see the updated Sales Revenue workflow.
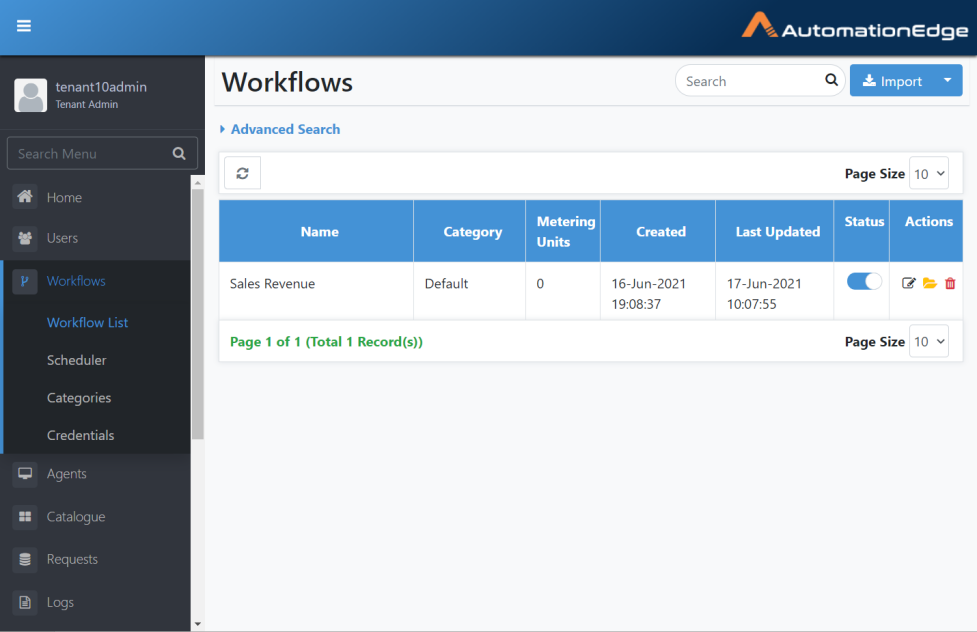
Figure 6.61: Updated workflow on AutomationEdge UI
- If you wish to update workflow configuration, click the edit icon in the Actions column. It retains the basic details as before the update. Make any desired changes.
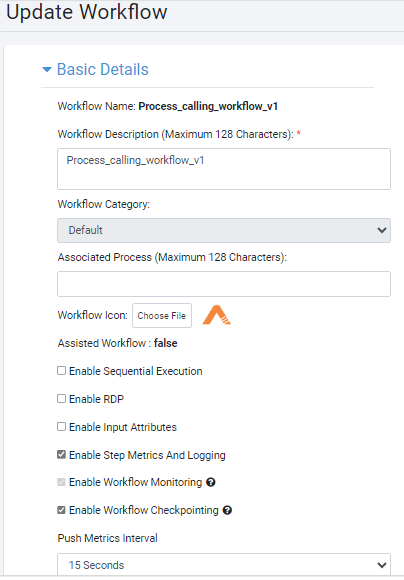
Figure 6.62: Edit to Configure workflow details
- Configure Email Notification Setting and click Save. Workflow updated successfully message appears.
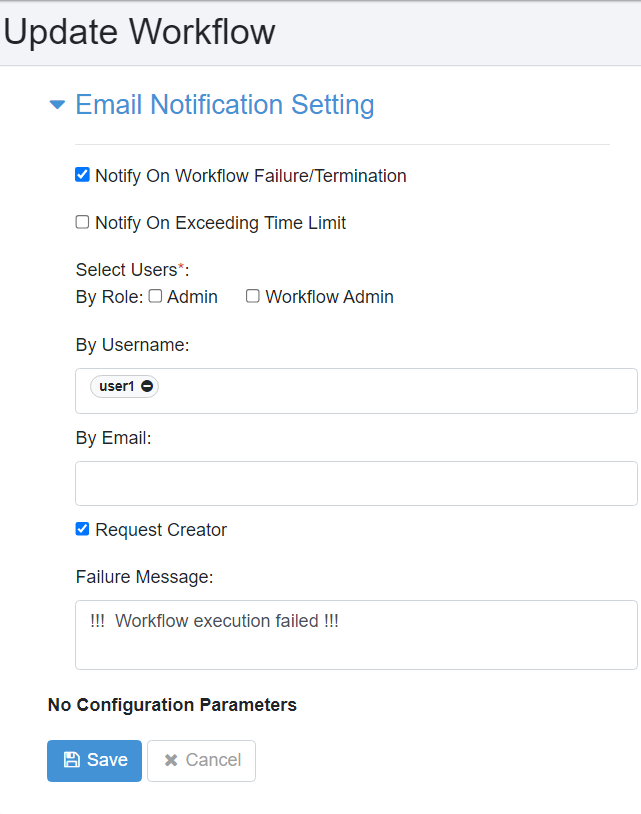
Figure 6.63: Configure Notification Settings
In addition to receiving notification emails when a workflow fails, the user will also receive a notificationemail if the user terminates a workflow through the Requests page. However, the configured failure message appears only in the Failure notification emails.
Update Workflows with Update option on Workflows List Menu
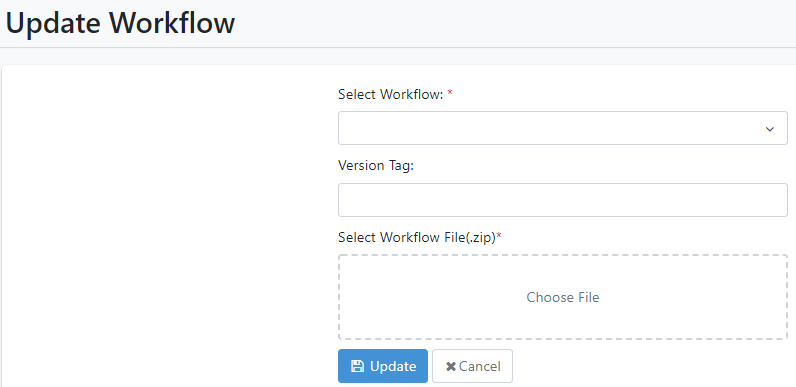
Following are the steps to update AutomationEdge Workflows using the Update option on the Workflows List menu. Update workflows with a workflow zip exported from an AutomationEdge instance. You cannot use Workflows exported from Process Studio to update AutomationEdge workflows.
- Log in to AutomationEdge as a Admin or Workflow Administrator user. Go to the Workflows menu. Click the arrow on the 'Import' button. Select Update.
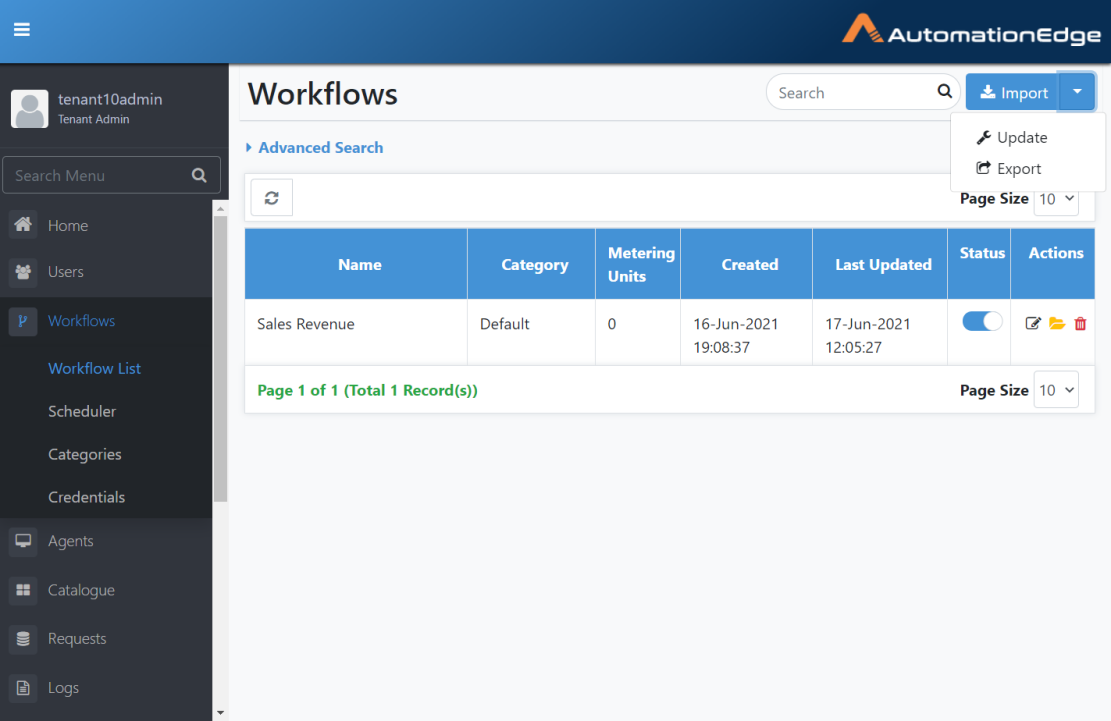
Figure 6.64: Update Process Studio Workflow
-
The following screen appears. Click Select Workflow. Search for the workflow or enable the checkbox next to the workflow you wish to update. Sales Revenue is selected as shown below.
-
Browse for a workflow zip file exported from an AutomationEdge instance. Click Update.
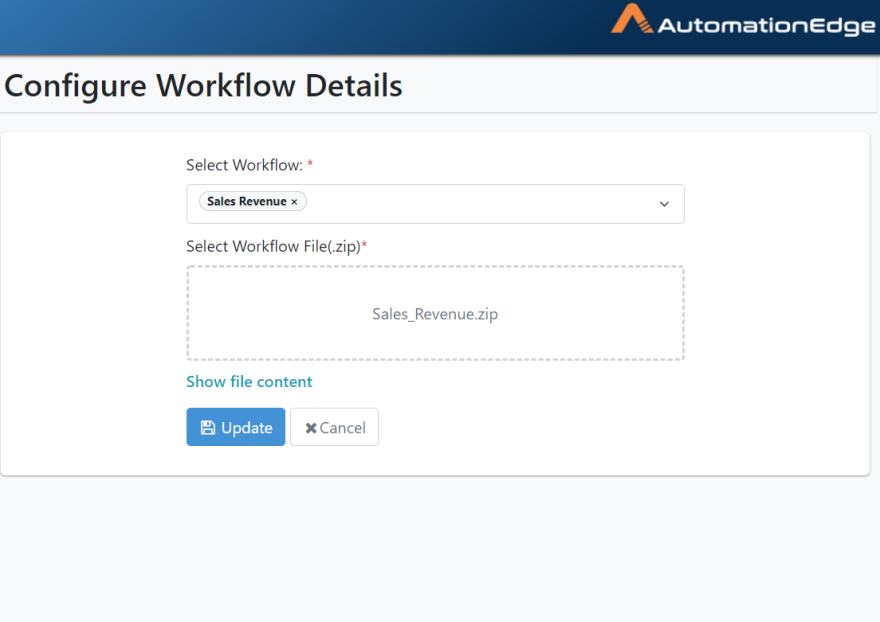
Figure 6.65: Select Workflow and the Workflow zip
- Make changes to the Configure Workflow Details page as desired.
Figure 6.66: Configure Workflow Basic Details
- Make changes to Email Notification Setting as desired and click Save. Workflow updated successfully message appears.
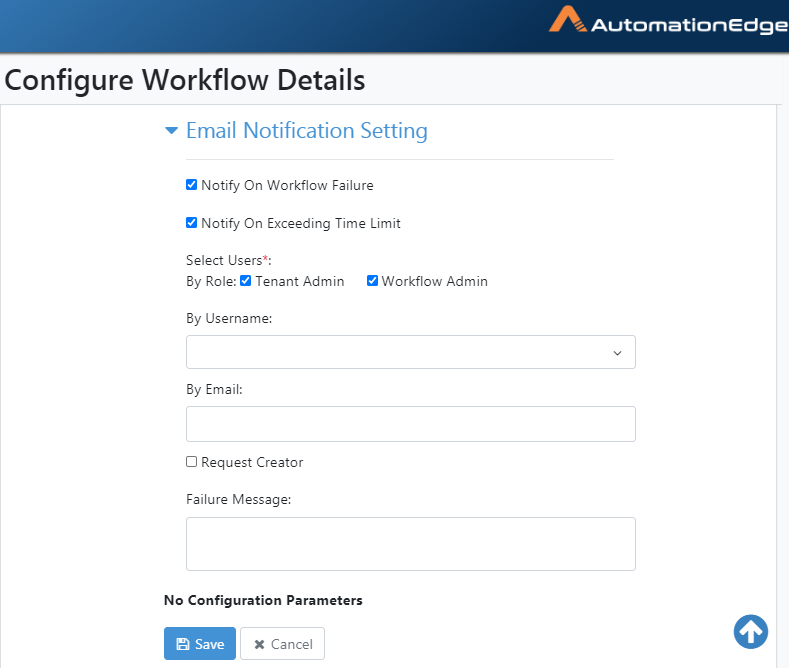
Figure 6.67: Configure Workflow Notification Setting
Workflows: View
To view the workflows created on the AutomationEdge server,
-
Navigate to the Workflow 🡪 Workflow List menu.
-
View the complete list of workflows on this Workflows Page.
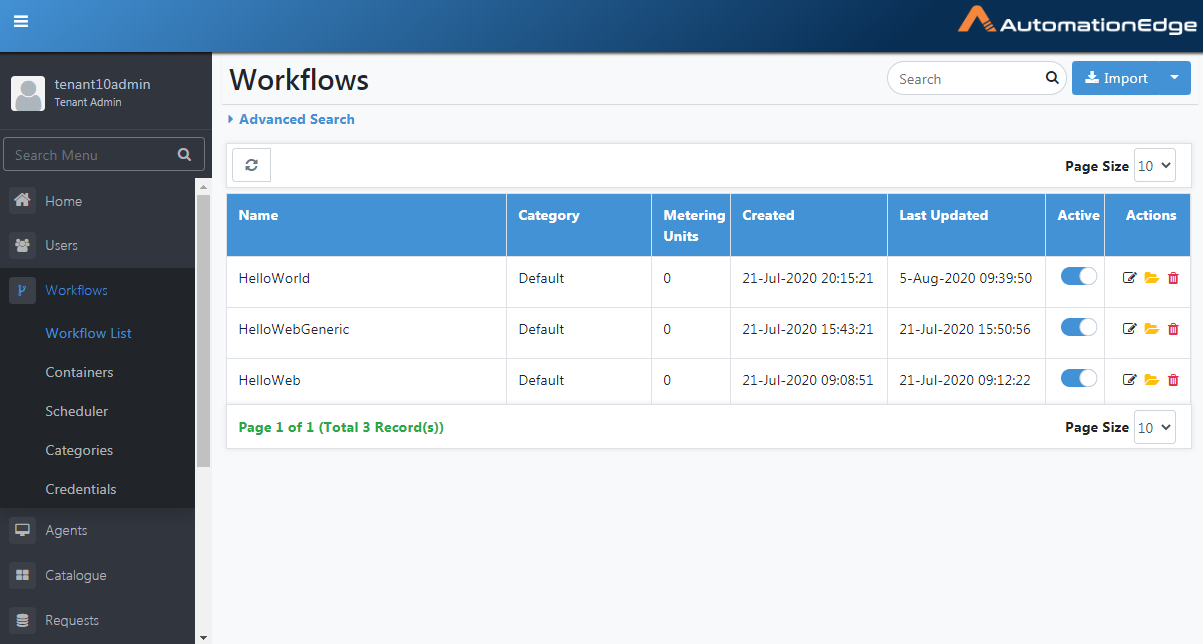
Figure 6.68: View Workflow List
| Field Name | Description |
| Name | Displays workflow name.|
| Category | Displays workflow category. |
| Metering Units | Displays the number of step metering units consumed by the workflow |
| Created | Displays workflow creation date & time |
| Last Updated | Displays the last updated date of the workflow |
| File Size | Displays the size of the input or output files which are included in the workflow. Note: If there are multiple files in the workflow, then each file size is displayed individually. |
| Active | Toggle to activate or deactivate workflows. |
| Actions: | |
| Edit( ![]() ) | Click to edit workflow configurations. |
| Show workflow files(
) | Click to edit workflow configurations. |
| Show workflow files(![]() ) | Click to display workflow files.|
| Delete(
) | Click to display workflow files.|
| Delete(![]() ) | Click to delete the workflowflow. |
) | Click to delete the workflowflow. |
Workflows: Search
- Type a string in the Search Box to filter the workflow list.

Figure 6.69: Search String
Workflows: Advanced Search
To search workflows using Advanced Search:
-
Navigate to Workflows🡪 Workflow List.
-
Click Advanced Search. Choose a column to set a filter condition.
-
The search options for Name and Category are the same as shown for Category below.
-
Select a criterion from the drop-down list.
-
Provide the desired search phrase.
-
Click the Add Filter button to add the filter. You can add more filters, if required.
-
Click Search. The search result based on the filter criteria is displayed.
-
Click Remove Filters to clear the filter criteria.
The table below summarizes the column names and corresponding comparators available for Advanced Search for Workflows.
Table 6.3: Advanced Search filter criteria
| Column | Comparator | Value |
|---|---|---|
| - Name | - equal to | Specify a Value for the Column and Criterion |
| - Category | - not equal to | |
| - like | ||
| - begins with | ||
| - ends with | ||
| - Created | - exact date | Specify a Value for the dates based on the Comparator selected. |
| - before | ||
| - after | ||
| - in between | ||
| - not in between | ||
| - Status | - equal to | Specify a Value for the status based on the |
| - not equal to | Comparator selected. |
Workflows: Actions
Perform actions on AutomationEdge workflows,
-
Navigate to the Workflows🡪Workflow List sub-menu.
-
The workflow list is displayed, the Actions column shows icons for four actions, discussed in the sections below.
-
Version History ()
-
Edit (
 )
) -
Open File (
 )
) -
Delete (
 )
)
Workflow: Edit
Edit Process Studio workflows. Following are the steps to edit workflows,
- Click the Edit icon
(
 ) corresponding to the workflow you
wish to edit.
) corresponding to the workflow you
wish to edit.
Figure 6.70: Selecting Workflow to Configure
-
Update the details. The editable fields are Workflow Description, Workflow Icon, Is Sequential Execution, Expected Completion Time (seconds), Maximum Completion Time (seconds) and Configuration Parameters
-
Click Save to save the updated workflow details.
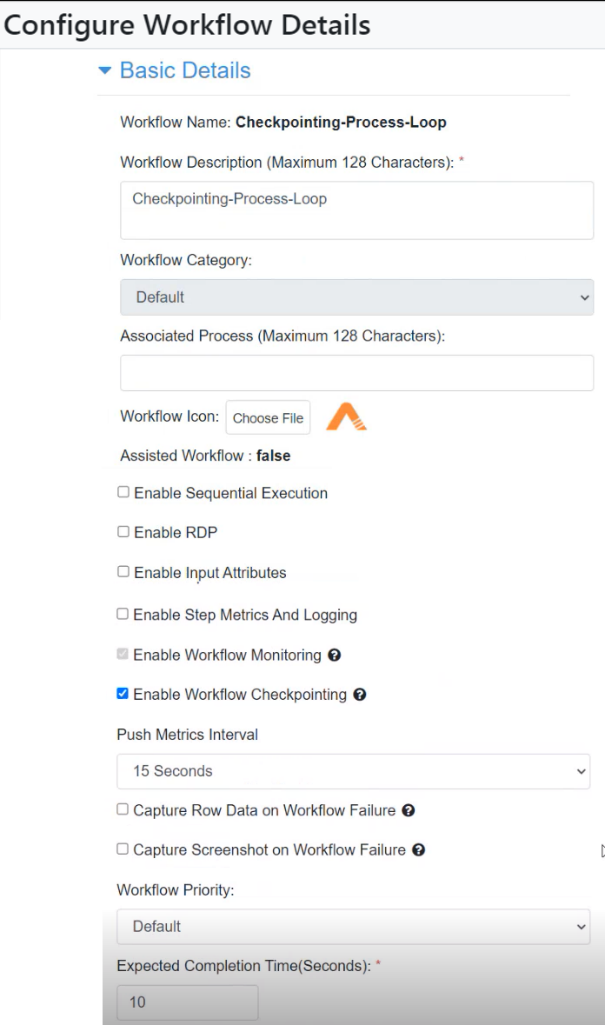
Figure 6.71: Configure Workflow Basic Details
-
Email notification settings Notify on Workflow Failure and Notify On Exceeding Time Limit can be enabled. Once enabled, additional fields are available.
-
Notify users by roles such as enabling Tenant Admin and Workflow Admin roles. Provide a list of usernames in the By Username field, a list of email addresses in the By Email field or notify the Request Creator by enabling the Request Creator checkbox. Provide the failure messages in the text box.
-
The process parameters are seen in the Configuration Parameters section.
Note: While creating input/output process parameters, please use the
internal parameter \${Internal.Entry.Current.Directory} to assign the
current working directory of the 'Process Studio process' as the
directory containing the input and output files. Click Save.
- Configure Workflow Email Notification Setting as below.
Figure 6.72: Configure Workflow Notification Settings
- Workflow updated successfully message displays as shown below.
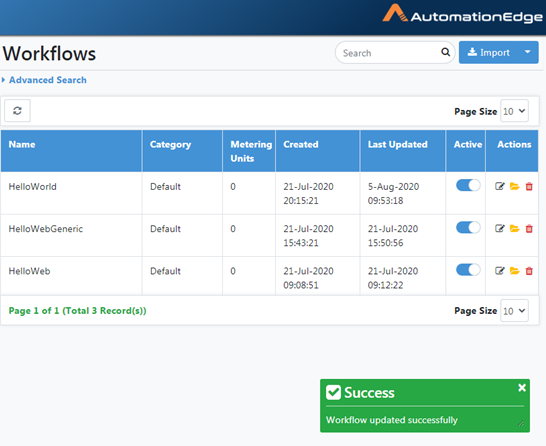
Figure 6.73: Workflow Update Message
Workflows: View File Structure
To view a workflow file structure,
-
Navigate to the Workflows🡪Workflow List
-
Click on the Show workflow files in the Actions column.

Figure 6.74: Show Workflow files
- A pop-up showing the contents of the workflow zip is seen below.
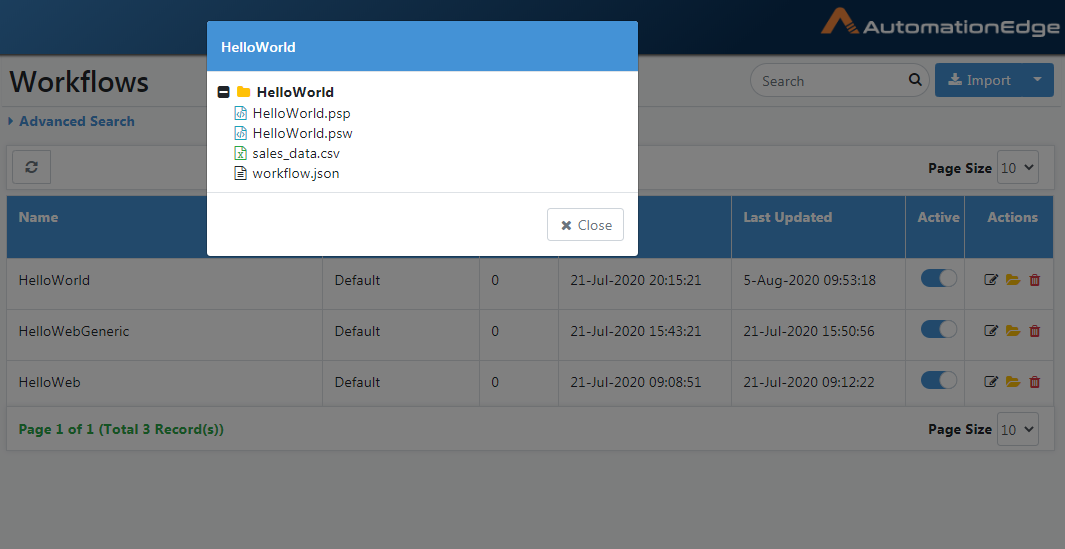
Figure 6.75: Workflow zip files
Workflows: Delete
To delete workflow:
-
Click Workflows.
-
Click on a Configured Workflows.
-
Click the delete icon (
 ) corresponding to the workflow to
delete.
) corresponding to the workflow to
delete.
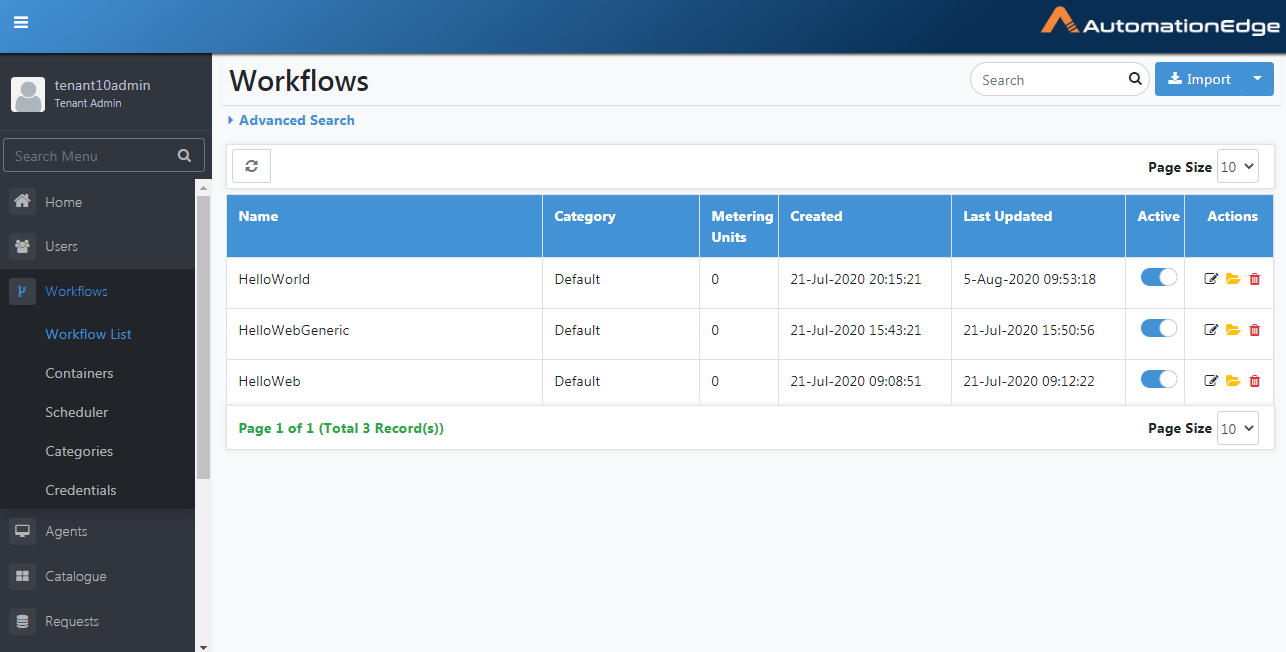
Figure 6.76: Select Workflow to delete
- Click Delete to confirm deletion of the workflow

Figure 6.77: Confirmation of Deletion of Workflow
Note: If requests have been submitted for the workflow, a message appears, cannot delete workflow as requests have been submitted for the workflow.
-
Delete workflows only if there are no Request submissions for them.
-
A Workflow deleted successfully message displays upon deletion.
Workflows: Features/Permissions for other Users
Table 6.4: Workflows Features
| Feature/Role | Admin | Workflow Administrator | User Administrator | Agent Administrator | Tenant User* | Activity Monitor |
|---|---|---|---|---|---|---|
| Add New Workflow | ✔ | ✔ | - | - | - | - |
| Process Studio Workflow | ✔ | ✔ | - | - | - | - |
| Advanced Search | ✔ | ✔ | - | - | ✔ | - |
| Activate Workflow | ✔ | ✔ | - | - | - | - |
| Edit Workflow | ✔ | ✔ | - | - | ✔ | - |
| Delete Workflow | ✔ | ✔ | - | - | - | - |
| Create/Edit/Delete Category | ✔ | ✔ | - | - | - | - |
| Move workflow to other categories | ✔ | ✔ | - | - | ✔ | - |
| Assign Permissions to Workflows | ✔ | - | ✔ | - | - | - |
| Scheduler:Add/Activate/Edit/Delete | ✔ | ✔ | - | - | ✔ | - |
*Tenant users can use the AutomationEdge features depending on Read, Write or Execute permissions granted to the users or their user group on workflows.
If the tenant user has effective write permissions on the workflow, the Edit icon is enabled.