Agents
An Agent is a piece of software that works on behalf of the AutomationEdge Engine and executes workflows or acts as an Agent Controller. Agents provide scalability to AutomationEdge as Agents can be deployed on multiple machines and harness the processing power of several machines. However, each physical/virtual can have one Agent. In the case of Windows Server OS, each user can have one Agent.
Table 7.1: Categories of Agents
| 1. | Controller Agents |
|---|---|
| 2. | Assisted Agents |
Agents and Assisted Agents tabs are accessible on the Agents menu by default. The Controller Agent tab is visible if you enable Controller in the properties file (refer to Tab: Controller Agents).
The following sections describe the Agent categories and Agent types.
Tab: Agents
On this tab, you can view the Agent details and the number of threads being executed by the Agent.
Ensure that the hardware supports running of configurable multithreaded Agents.
View Agents
Under the Agents menu, go to the Agents tab. There are two tabs: 'Agents' and 'Assisted Agents' present. 'Agents' tab is selected by default. Set up Controller for the current Tenant to see the third tab for 'Controller'; go to the tab to see and manage Controller Agents.
Use this page for Agent monitoring and view and edit Agent details, as seen in the below snapshot; and described in the table below.
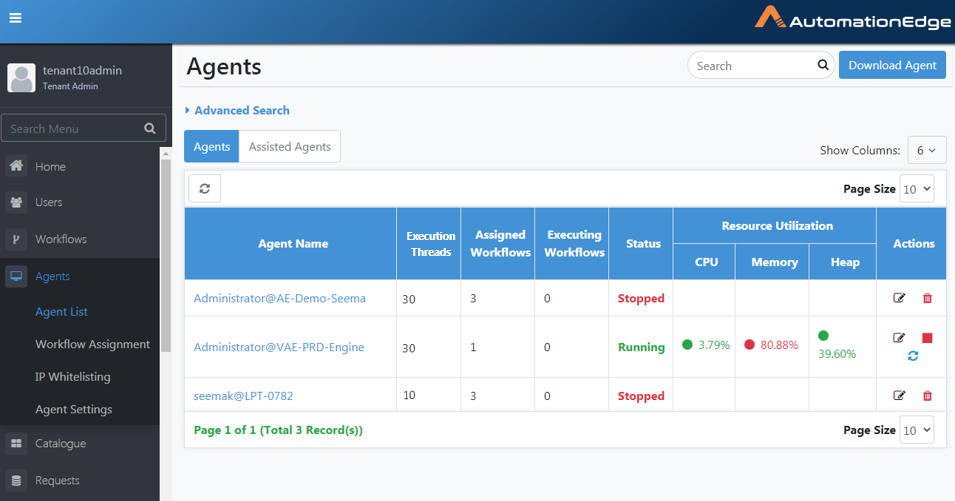
Figure 7.1: View Agents
The table below explains the Agent fields.
Table 7.2: Agent Details Table
| Field Name | Description | |
|---|---|---|
| Agent Name | Displays the name of the Agent Hover over Agent Name to see the Agent details highlighted in red below, including Agent Name, IP, hostname, Mac Address, and JRE details - JRE version and whether the agent is using bundled JRE. | |
| Execution Threads | Displays the number of work threads being executed by the Agent. | |
| Assigned Workflows | Displays the number of Workflows assigned to the Agent; Assisted Workflows are not part of number as there is no option for Assisted Workflows assignment to Agents. | |
| Executing Workflows | Displays the number of Requests in execution | |
| Status | Displays the status of the Agent: Pending Update, Running, Stopping, Unknown, Updating, or Stopped. Pending Update: Status indicates that the Agent is informed about the updates and will not accept any new requests. In addition, if executions are in-progress, then the updates will start after the executions are completed. Note: The status appears as a badge next to the Running status.Stopping: Status indicates that shutdown or stop of the agent has been initiated on the agent. The status will remain so till the ongoing executions are completed. Unknown status occurs when the server is not sure about the status of the agent due to factors such as abrupt shutdown or network failure. Upgrading: Status indicates that agent is auto-upgrading itself. The cases when an agent goes to UPDATING state are, | |
| - When the agent is upgrading itself from an older version to a newer version, if an Agent needs to update and there are workflows already executing on Agent, then the Agent status changes to Updating, remains in the state and waits for the workflow execution completion. Once the execution is complete, the Agent updates, you can hover over the Updating status to see the details, such as workflow execution in progress. | ||
| - When workflow assignments are changed | ||
| - When plugin assignments are changed | ||
| - When Workflows/plugins are updated | ||
| - When agent mode is changed | ||
| If you see Stopped (Out of Memory) status, then increase the minimum and maximum value of the aeagent.jvm.xmx.option property in the application.properties file. | ||
| Resource Utilization | The following Resource Utilization parameters are captured and displayed on AutomationEdge UI: CPU, Memory, Disk Space and JVM Parameter (Heap size). | |
| CPU | Displays CPU usage in percentage | |
| Memory | Displays memory usage in percentage | |
| Heap | Displays Heap usage in percentage | |
| Actions: | ||
| Edit ( | - Click the pencil icon to edit the Agent Name, Execution Threads,Enable Debug logs and JVM Settings.- Click JVM Settings to expand the option. - Select/ Clear the checkbox to enable JVM GC Options.- JVM Options will allow you to specify JVM arguments with which agent is launched.- Eg: most commonly used are heap size -Xms1024m -Xmx2048m 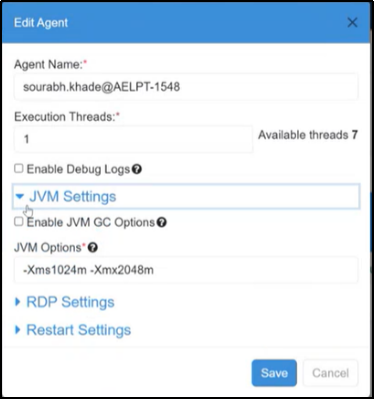 | |
| Expand restart Settings. By default, the 'Use Tenant Level Settings' checkbox is selected for Agent Restart set in the menu option Agents->Agent Settings->Agent Restart Time. | ||
 | ||
| Else, you may uncheck the 'Use Tenant Level Settings' and 'Enable Agent Restart' checkbox is displayed. | ||
 | ||
| Enable the 'Enable Agent Restart' checkbox to see the Agent Restart Time option. Provide desired restart time. | ||
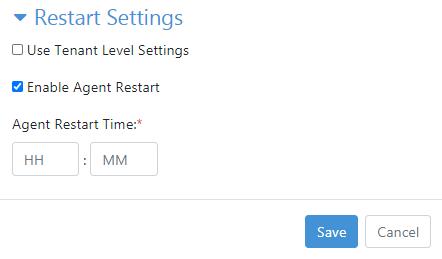 | ||
| Note: Agent restart features in not supported on Linux based OS | ||
| Stop ( | Stop icon is visible if the Agent status is Running or Unknown. | |
| Click to stop and end all activities of a Running Agent and change its status to Stopped. Or click to mark an Agent in Unknown status as Stopped. | ||
| Delete( | When an agent status is Stopped, then the delete icon is visible. You can delete an agent only when it is in the 'Stopped' status. Deleting an Agent removes its record from the server database. Hence, you cannot start the deleted agent. Restart( | |
| Note: Agent restart features in not supported on Linux based OS | ||
| Start( | If an Agent is down, a Start option is visible, and the Start icon is disabled; Assign Agent to one or one controller to enable it. For details, please refer to the section: Agents**:** Controller Assignment. The Start option starts the Agent on the Controller Agent machine. The icon colour is grey when it is disabled and green when enabled. |
In the Edit Agent dialog, you can select the following checkboxes, if required:
- Enable JVM GC Options: Selecting the checkbox will ensure that the heap memory used by the Agent for processing a heavy workload is freed post the executions. If the setting is changed, then the Agent is restarted.
- Enable Debug Logs: Selecting the checkbox will start debug log download, which will contain detailed information about workflow executions Both, Enable JVM GC Options and Enable Debug Logs options, are also available for Assisted Agents. For more details, see Agent Settings.
When you change the values using the edit option and save them, the agent will restart automatically. After restarting, the agent will use the new values you have saved.
Agent Monitoring
Agent Monitoring page displays Resource Utilization by the Agents graphically.
Following are the features of Agent Monitoring.
-
Agent captures Resource Utilization information periodically (every minute) and sends it to the server every 15 minutes; it retains it for thirty days.
-
The following Resource Utilization parameters are captured and displayed on AutomationEdge UI: CPU, Memory, Disk Space and JVM Parameter (Heap size).
-
The Agent Monitoring screen depicts Resource Utilization as pie charts and line charts.
-
The page has radio button options to display Agent Monitoring for different time intervals.
Following are the steps to display the Agent Monitoring page.
- Navigate to the Agent menu. Click on an Agent Name link to navigate to the Agent Monitoring page for that Agent.
Figure 7.2: Agent Name is clickable
-
The Agent Monitoring dashboard for Agent Name Administrator@VAE-PRD-Engine appears as below.
-
This dashboard below displays Agent Monitoring for seven days by choosing the '7 Days' radio button.
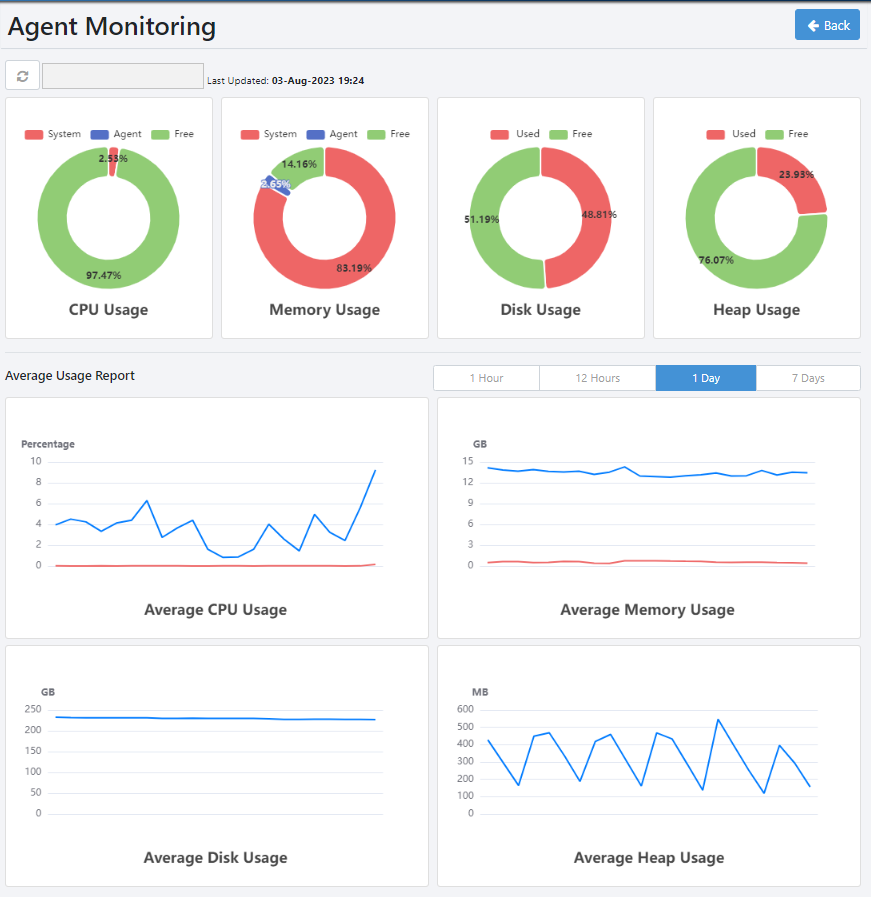
Figure 7.3: Agent Monitoring
Agent: Download and Startup
An Agent can be downloaded from the AE server and installed on available computers (either Windows or Linux OS). The agent connects to the server (using the same URL specified in the URL setting under System Administrator) and is assigned workflows for running.
To download an agent:
-
Navigate to the Agents menu.
-
Click the Download Agent button on the top right corner.
(Note: Admins and Agent Administrators can download Agents if the System Administrator has set the 'Server URL' in the Settings menu.)
- The Download Agent dialog appears.
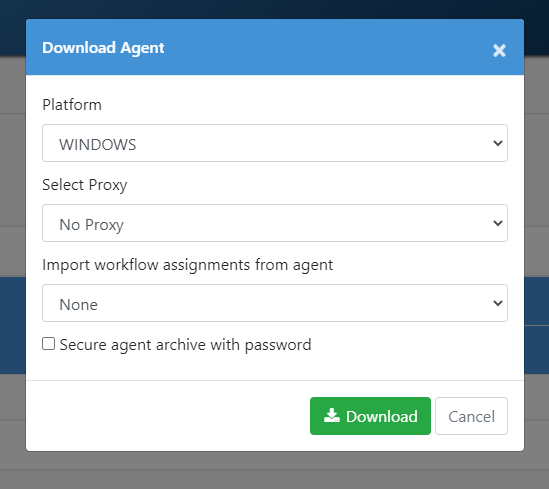
Figure 7.4: Downloading Agent
- Select Proxy and Authentication Type fields from the corresponding drop-down lists. The table below explains the list values.
Table 7.3: Agent level Proxy configurations
| Field Name | Description |
|---|---|
| Select Proxy | During Agent download, you can use Automatic Configuration or set Static Proxy by providing Proxy protocol (http/https), host, port or set Dynamic Proxy (base on PAC file from URL). During Agent download, the Agent inherits the Tenant level proxy settings. You may overwrite it. The proxy settings at the Agent level will take precedence over that set at the Tenant level. The following options are available in the drop-down list for Select Proxy. You may overwrite the Proxy set at the Tenant level or set proxy afresh during Agent Download from the drop-down list. |
| 1. No Proxy Select No Proxy if a proxy is set at the system level, and you do not want to use that. | |
| 2. Automatic Configuration Select Automatic Configuration if you wish to auto-detect the proxy configuration from "Internet Options" settings, if any, and use it. | |
| 3. Proxy Server Select the Proxy server to set a Static Proxy. You can now provide static Proxy details, Protocol (http, https), Host (e.g. 10.51.5.30 and Port (e.g. 3128)). | |
| If you have set a static proxy at the Tenant level, a Proxy details popup window appears with static proxy details pre-configured. | |
| You can add exceptions to bypass the proxy details, if required. | |
| When adding exceptions, you must ensure the following: | |
| - Port numbers are not added along with the host name. | |
| - Only semicolon (;) is used as separator and spaces are not allowed in exception entry. | |
| - Only domain names are used and are not prefixed with www or http:/https:. For example, automation.com. | |
| Note: Non-proxy host list now supports regular expression. For example, *.automationedge.com will bypass proxy for demo.auomationedge.com and onedemand.automationedge.com. | |
| 4. PAC Choose this option to set a Dynamic Proxy and provide the PAC file URL (e.g. https://10.51.5.30/proxy.pac) to set the Dynamic Proxy. | |
| If you have set a dynamic proxy at Tenant level, the Proxy details popup window appears with dynamic proxy details PAC file from URL pre-configured. | |
| 5. For Automatic Configuration and both Static Proxy and Dynamic (PAC file URL), Proxy details are stamped into a file proxy-config.properties and packaged into agent zip on click of Download button. | |
| Authentication Type | For Automatic Configuration, Proxy Server and PAC Proxy options, the following three Authentication Types are available. |
| - None | |
| - Simple or | |
| - Domain | |
| 1. None Leave Authentication type to none when Proxy settings do not need authentication. | |
| 2. Simple If proxy settings in "Internet Options" need authentication, select Authentication type- Simple from the dropdown list and provide a username and password. | |
| For Simple Authentication Type, you need to provide a Username (e.g. scott.tiger etc.) and password. | |
| 3. Domain If the Authentication type is a domain, you need to provide Domain (e.g.xxxx.com) in addition to username and password. | |
| Platform | The two platforms allowed in the drop-down list are WINDOWS or LINUX |
| Download proxy configuration file | A proxy configuration in the Agent Downloa UI stamps the values into a file proxy-config.properties. |
| You may download the file by clicking the 'Download proxy configuration file' link; if you click the Download button, the proxy-config properties file is packaged into agent zip and placed under <AGENT-HOME>/conf directory. | |
| Download the file and manually copy it to the Agent machine when there are changes in proxy details. | |
| In the case of the Server upgrade with a new Proxy configuration, there are two scenarios. If the agent is running, Proxy details are updated, and manually copy the proxy-config.properties file, but if the Agent is in the stopped state, then the new proxy details are updated in the Agent | |
| - | During upgrades, Agents acquires Tenant level Proxy settings, if any. Following are the corrective actions for the two scenarios, |
| Upgrades | - Agents may be without any Proxy Settings, but Agent gets Tenant level proxy settings during the upgrade. Users need to delete the proxy configuration file from the Agent file system. |
| - The Agent may be using custom Proxy Settings(different from Tenant level settings); but, in case of an upgrade, Agent gets Tenant level Proxy Settings, User's need to download custom proxy settings again and copy to the Agent file system. | |
| Import workflow assignments from agent | Select the agent from which you want to import the workflow assignments. |
| Include workflow and plugin files in the downloaded zip | Select the checkbox if you want to include the following artefacts in the agent zip: |
| - Workflow definition files (psw/psp) | |
| - Plugin files (jars) | |
| - Files uploaded for assigned workflows via File Management | |
| - Files uploaded for plugins via File Management | |
| Secure agent archive with password | Select the checkbox if you want to provide a password for the agent zip file. |
| Password | Specify the password for the agent zip file. |
| Note: The field is available if the Secure agent archive with password checkbox is selected. |
Selecting to download the existing agent's workflow assignments and the corresponding artefacts allows the new agent to be readily available for executing the workflows. Changes made to one agent at an individual level does not impact the another agent, even if they have same workflows assigned to them. For example, if both, Agent1 and Agent2 are assigned Workflow1, and the user assigns another workflow, Workflow2 to Agent1, then there is no change in Agent2.
-
Provide Proxy Server details if required, as explained in the table above and click Download.
-
Allow pop-ups for this site if required.
-
The following screen shows the Pop-up blocker that may appear in the Chrome browser. Click the first radio button to allow pop-ups.
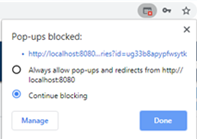
Figure 7.5: Pop-up blocker in Chrome
- The following screen shows the Pop-up blocker that may appear in the Firefox browser. Click the first option to Allow pop-ups.
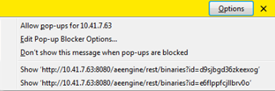
Figure 7.6: Pop-up blocker in Firefox
-
It downloads the Agent zip.
-
Unzip the downloaded file and extract an agent.
-
Copy the downloaded zip to one or more machines where you want to run the agent; and unzip it there.
-
It creates an unzipped ae-agent directory.
-
Double-click on aeagent.exe. The agent is registered with the server and becomes available for assigning workflows.
Running of agents using the aeagent.exe is available for Windows only. For running agents on Linux, run startup.sh file. For more details, see steps 14-16. When an agent starts, you will see a notification with the name of the agent. For example,

Notifications and tray features are not available in Linux.
- Run ae-agent/bin/startup.sh file (for Linux) from the command prompt as shown below. The Agent will register itself with the server and be available for assigning workflows as described in the next section.
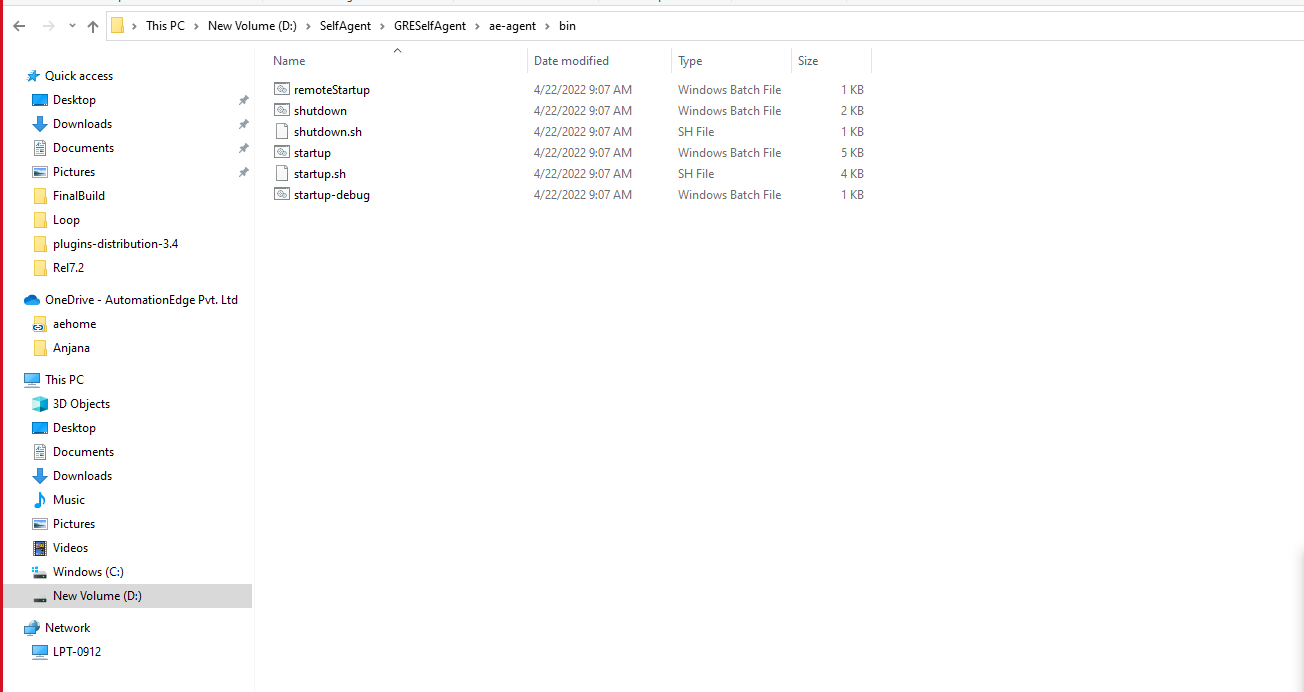
Figure 7.7: Agent bin directory
-
Type cmd in the Windows explorer address bar and press keyboard enter.
-
In the Command Prompt, type startup.bat. Press Keyboard Enter. Starting Agent from command prompt is the recommended way rather than double-clicking on startup.bat.
Once Start-up is complete, view Agents in UI. You can see the Agent status as Running for the first registered Agent in the list.
By default, Agent always registers with one execution thread. Once registered, you can edit the Agent execution thread count, provided your license has provision for these modes.
- To stop an Agent Run ae-agent/bin/shutdown.bat or ae-agent/bin/shutdown.sh file (for Windows and Linux respectively) preferably from the command prompt.
If you run the startup.bat file, the command prompt will not be visible and the Agents will run in the background. To view the command prompt, run ae-agent/bin/startup-debug.bat file.
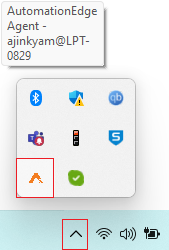
Agent tray icon
After the agent is started, the agent tray icon appears in the system tray.
The agent tray icon is not supported on Linux.
Click the agent tray icon, and the menu appears.

| Menu | Description |
|---|---|
| Agent Name | Displays the name of the agent, which you can refer to when performing agent actions. |
| View Log | Click to view the agent log files. |
| Restart Agent | Click to restart the agent, if required. |
| Stop Agent | Enter the reason for stopping the Agent. Click to stop the agent, if required. 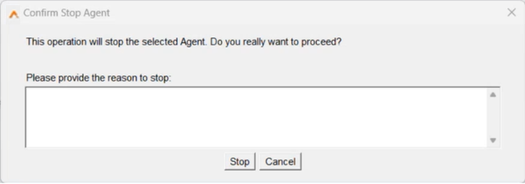 |
| About | Click to view the agent details, such as: |
| - Type: Displays the type of agent. | |
| - Path: Displays the path of the agent. Click to go to the agent folder. | |
| - Server Url: Displays the path of the AE UI | |
| server. Click the Url to sign in to AE UI. | |
| - Tenant OrgCode: Displays the tenant's organization code. |
Run Agents as a Windows service
You can also run Agents as a Windows service. Running Agents as a service allows you to start the agents automatically and you need not start them manually.
The safest way to manually install the service is to use the provided service.bat script.
Prerequisite: You need Administrator rights on the server to install or uninstall Agent as a Windows service. Limitations: If you run agents as a Windows service, then:
- Workflows with a combination of SAHI and GUI automation (Windows or applet) plugins will not work.
- We recommend not using new Web GUI plugin (extension based) to create a workflow, as these workflows may not work as expected.
- Workflows with Manual Intervention plugin will not work.
- Workflow having the Capture Webpage step from the Web GUI [Classic] plugin will not work.
To install agent as a service:
Important: The user account you are using to register or start the agent as a service must have Modify permissions on the AGENT_HOME directory and the subdirectories and files.
- Open the command prompt and run the command prompt (cmd.exe) as Administrator.
- Change directories to AGENT_HOME\bin.
- Type service.bat install to create the Windows service. The install command creates a Windows service called aeagent-service. The default display name and description of the service is AE-Agent.
Use the Windows Services management console to start and stop the service.
- There is a second optional parameter that allows you to specify the internal name of the service, service.bat install uat-agent.
Recommendation: We recommend that the service’s internal name must not have any spaces or special characters. The name must only contain alphabets, digits, hyphen.
Very important: By default, the account name of the installed service is Local Service. Change the default account name with the name with which you want to register your Agent. To modify the details, open Services → select the service (agent) → Properties → Log On → Log On As and change the name of the account. DO NOT start the service without changing the Log On As account with the user account.
- In the General tab, select the Startup Type as Automatic.
To uninstall agent as a service:
- Open the command prompt and run the command prompt (cmd.exe) as Administrator.
- Change directories to AGENT_HOME->bin, run service.bat uninstall to remove the Windows service. OR If it has been installed with the non-default name, then run service.bat uninstall (service_name) to remove the Windows service.
Agents: Memory Settings
Additional JVM Params in Agent Startup
Following are the java Memory settings for Agents in startup.bat by default.
| Heap Settings | -Xms1024m -Xmx2048m |
|---|---|
| MaxMetaspace Setting | -XX:MaxMetaspaceSize=128m |
| Memory per thread | -Xss=1MB |
If workflows require more or less memory, change the settings in startup.bat or startup.sh. Once you restart the Agent with the new Memory settings that suffice workflow requirements, it should complete successfully.
Following is a rough formula for Total Memory calculations: Total Max memory = [-Xmx] | [-XX:MaxMetaspaceSize] number_of_threads * [-Xss]
Agents vs Assisted Agents
Agents can be downloaded and run by a Admin or Agent Administrator. Agents can run any workflows assigned to them. If you assign a workflow to multiple Agents, AutomationEdge randomly assigns the workflows to Agents for execution. Hence, it cannot predict which Agent and which machine/VM the workflow runs. Many times, Agents run on VMs not attended actively. Typically, the Workflows run without any manual intervention, so it does not matter which Agent/machine the workflow runs and hence Agents suffice the need.
For workflows that need manual intervention, such as 'captcha/OTP/Enter some run-time values', workflows should run on the machine whose user can fulfil the intervention request. For this to happen, an Agent should also run on the said user machine, and the workflows should be assigned to that one Agent only that runs on that user machine.
Assisted Agents fulfil this requirement. Assisted Agents provide built-in support for running workflows on user-specific Agents. Assisted Agents are owned by users and run Assisted Workflows for which the owner has requisite (Read/Write/Execute) permissions. An Assisted Agent can run all Assisted Workflows for which the owner of the Assisted Agent has permission.
Tab: Assisted Agents
Tenant User, Workflow Administrator and the Admin can download 'Assisted Agent' from the AutomationEdge server. This Agent will be similar to the usual Agent except for the following:
-
The owner of an Assisted Agent is the User who downloads it.
-
Assisted agents can execute only assisted workflows.
-
Any user can register only up to one Assisted Agent with the server.
-
Assisted Agents can run only sequential Workflow's.
-
It is not required to assign assisted Workflow to any Agent as and they are assigned automatically by the server. Users need to get the execute permissions on the assisted workflow to run.
-
Along with other Workflows, assisted Workflows will also appear on the User's catalogue page if the User has execution permissions and the User has at least one assisted Agent registered.
-
Assisted Workflow can run only if the User's Agent has the Running status; otherwise, the User will get an appropriate error message.
-
Assisted workflows cannot run as a schedule.
Maintain Assisted Agents
Assisted Agents: View
Navigate to the Agents 🡪Agents menu.
There are three on the Agents page for Agent Monitoring for the Admins and the Agent Administrators. Two tabs: 'Agents' and 'Assisted Agents', are visible by default. Set up Controller for the current Tenant to view the third 'Controller' tab; click the tab to see and manage Controller Agents.
Select the 'Assisted Agents' button. This page is for Assisted Agent monitoring. View Assisted Agent details as seen in the figure and described in the table below.
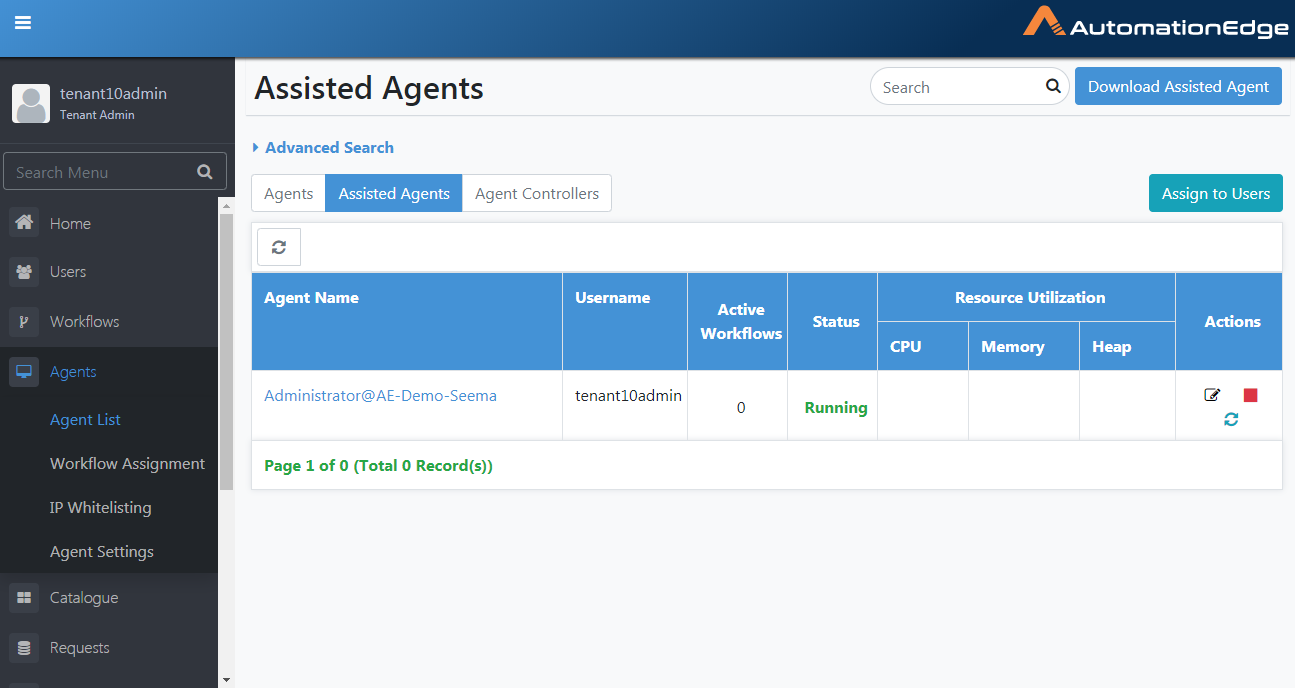
Figure 7.8: Assisted Agent Monitoring
The table below explains the fields in the Agents view,
Table 7.4: Agent Details Table
Assisted Agent: Download and Startup
Assisted Agents can be downloaded from the AE server and installed on available computers (either Windows or Linux OS). The agent connects to the server (using the same URL specified in the URL setting under System Administrator) and gets workflows for running. Admin, Tenant user, Workflow Administrator can download and Run Assisted Agents.
Assisted Agent: Assign Users
To download an Assisted Agent:
-
Go to the Agents menu. Agent Menu is visible to Admins and Agent Administrators. Login with Admin or Agent Administrator users.
-
There are three buttons visible.
i. Agents: This tab is visible by default. Agents can be started/stopped/deleted.
ii. Assisted Agents: Click this tab to see Assisted Agents of all the Users. Administrator Users will be able to view, stop or delete these Agents.
iii. Agent Controllers: To view this tab on the UI, set enableController=true in TOMCAT_HOME\webapps\aeui\aeui-config.properties property file. Click the tab to see and manage Controller Agents.
-
Click Assisted Agents tab.
-
Currently, we can only see an 'Assign to Users' button. There is no 'Download Assisted Agent' button seen. It means that no user in the current Tenant is assigned permission for Assisted Agents.
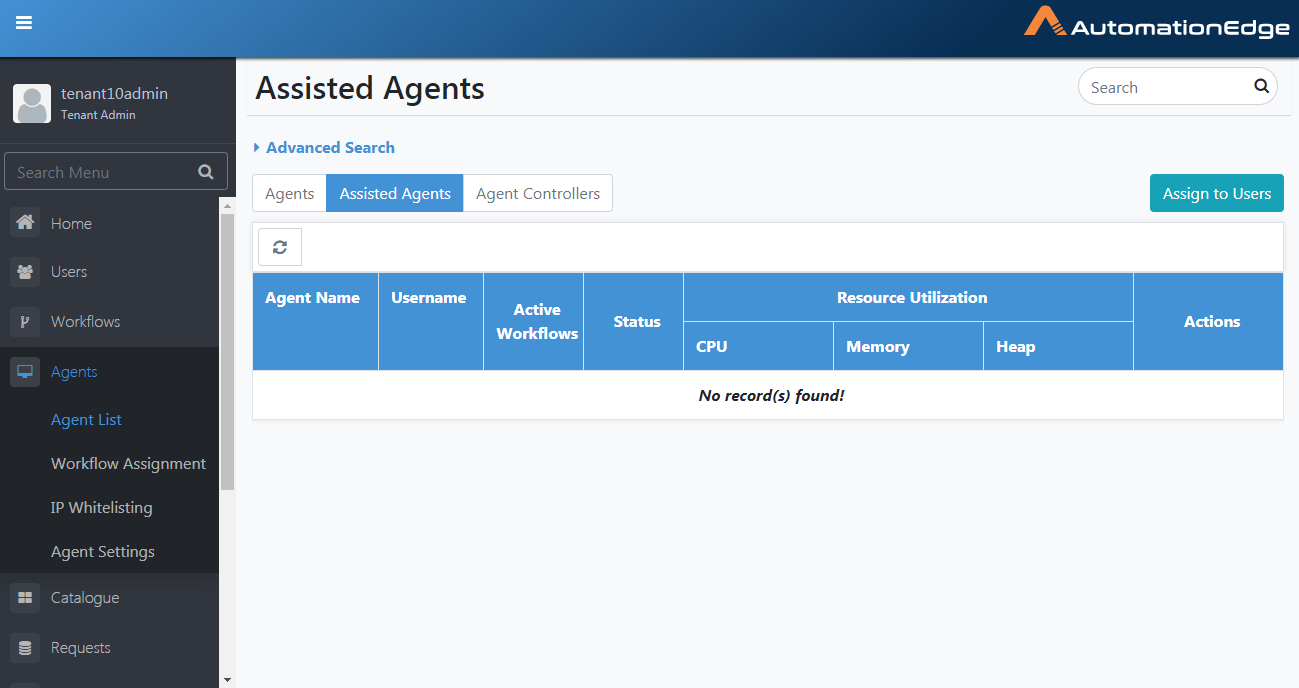
Figure 7.9: Assisted Agents Tab
- Click the Assign to Users button as shown in the screenshot below to give permissions to users for using Assisted Agents. The Admin can see the users available.
The Administrator(Tenant3 Admin) is selected by default and the number of Assisted. Hence, in the screenshot below, we see one of five(1/5) Assisted Agents is used. Note: Five is the provision for the number of Assisted Agents in the license.
Figure 7.10: Assisted Agents License to Users
- Enable checkbox for the users to whom permission is to be given. Click Save.
Note: 3 of 5 used seen on the top right corner in the screenshot below
shows that three Assisted Agents have been assigned to users out of a
total of five Assisted Agents available or attached to the current
Tenant. Click Save. 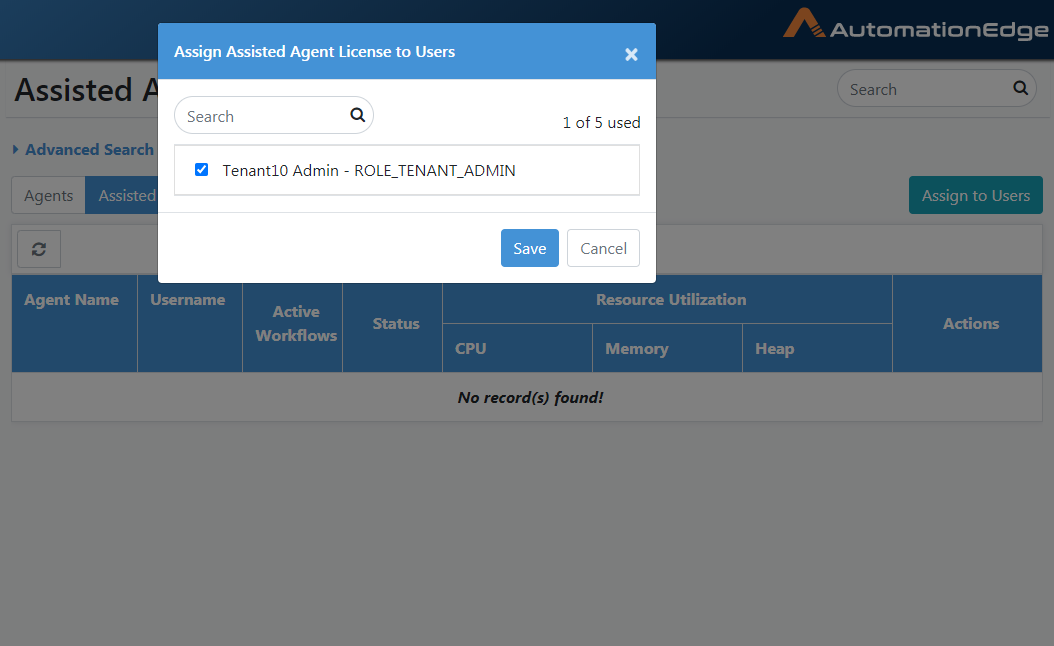
Figure 7.11: Assign Assisted Agent License to Users
-
We can see the Assisted Agent Assignment updated successfully message.
-
Now Agent Menu and 'Download Assisted Agent' buttons will be visible to any Admin and Agent Administrators and Tenant User Users that have been assigned permission to Assisted Agent. Click download.
Note: Assisted Agents can be downloaded if the System Administrator has set the System setting - 'Server URL'.
Assisted Agent: Download
Following are the steps to download Agents,
- After the assignment, you can see the Download Assisted Agent button on the top right corner. Click on the button.
Figure 7.12: Download Assisted Agent
- The Proxy Configuration window appears. Configure Proxy if required. For details, see Vault Connections.
Assisted Agent: Startup
- Unzip the downloaded Agent zip file and extract the Assisted Agent on the machine where to run. It contains an ae-agent directory. Copy the downloaded zip file to one or more machines to run an Assisted Agent.
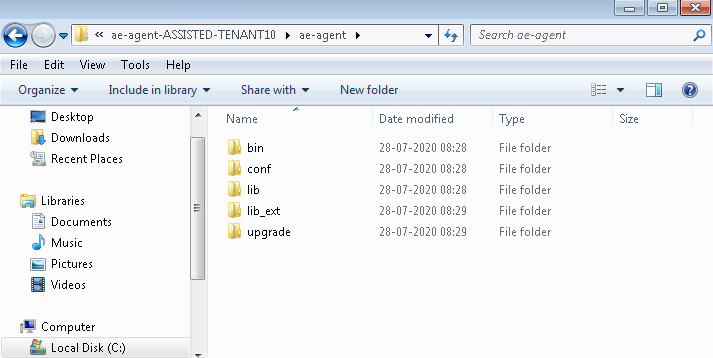
Figure 7.13: Assisted Agent Directory
- Run ae-agent/bin/startup.bat or ae-agent/bin/startup.sh file (for Windows and Linux, respectively) from the command prompt. Assisted Agent will register itself with the server and be available to run any Assisted workflows assigned to the user as described in the next section.
A new Assisted Agent registration for a user who already has an Assisted Agent registration is not allowed, and the startup will fail.
-
Type cmd in the Windows explorer address bar and press keyboard enter.
-
Type startup.bat. Press Keyboard Enter. Starting Agent from command prompt is the recommended way rather than double-clicking on startup.bat.

Figure 7.14: Execute startup.bat
- Once Startup is complete, view Assisted Agents in UI. You can see the Assisted Agent status as Running.
Note: Assisted Agent license configuration includes the number of hours (any number of hours between 6 and 23 hours) it can run. For long-running Assisted Agent, the Assisted Agent stops running after the time mentioned in the license. Restart the Agent on the next day.
- To stop an Agent Run ae-agent/bin/shutdown.bat or ae-agent/bin/shutdown.sh file (for Windows and Linux respectively).
Assigning Workflow to an Assisted Agent
There is no need to assign Assisted workflows to an Assisted Agent. However, Assisted Agent can execute Assisted workflows for which Assisted Agent Owner User has execution permissions. Please note that Assisted workflows are always sequential workflows.
Tab: Controller Agents
Introduction
Many of the AE workflows involving UI automation running on MS Windows machines encounter the following operational issues:
-
Agents cannot run as service: We need to start the user's login session and start the agent. We cannot start it as a windows service, as running UI from the service is not available.
-
Windows console cannot be locked: Some UI workflows do not run with a locked windows console.
-
RDP should always be connected: If we log in to Windows using RDP, the RDP should always be connected while running the workflow. UI workflows do not work in case RDP is disconnected.
-
Agents should always be started manually after login into the machine, and the login session should be not be locked.
Managing a large number of Agents is cumbersome. The Controller is a solution to control Agent's uptime from the AE portal.
Agent Controller: Designate at least one Agent as Agent Controller by marking one or more agents as 'Controller' from AE Portal. The Agent Controller does not run any workflow**.** Agent controllers receive instructions from the server to start Agents on user demand. The Controller who takes control first starts the Agent.
An Agent controller cannot start automatically; always start it manually. To view controller from UI, need to set enableController=True in TOMCAT_HOME\webapps\aeui\aeui-config.properties property file.
Agent controller can run on Windows machines only, and it can control Agents on Windows machines only.
Controlled Agents: Except for controller agents, all Agents are controlled Agents. Start controlled Agents from the AE Portal. As we need to start the Windows session using RDP, provide the Windows login password of the corresponding windows user. The Agent captures other details like hostname, IP address, username where it is running. Provide the password in the AE Portal.
The option to download controller and view controllers is available to Admin and Agent Administrator.
Is RDP enabled workflows
Is RDP enabled is a configuration checkbox during workflow creation or update.
The Controller could be a single risk point with many RDP sessions to agent's machines open and unlocked. We have mitigated that risk by acquiring the RDP session only for workflow execution and agent start-up duration; achieve it by marking the workflows as Is RDP enabled true. For more details on Is RDP enabled, refer to the section Is RDP Enabled.
Manage Controller Agent
Agent Controller: Download
Following are the steps to start a controller agent.
-
Go to the Agent menu and Controller sub-menu.
-
Click the Download Controller button on the top right corner.
-
A pop-up window appears for setting Proxy server details if required. Click Download.
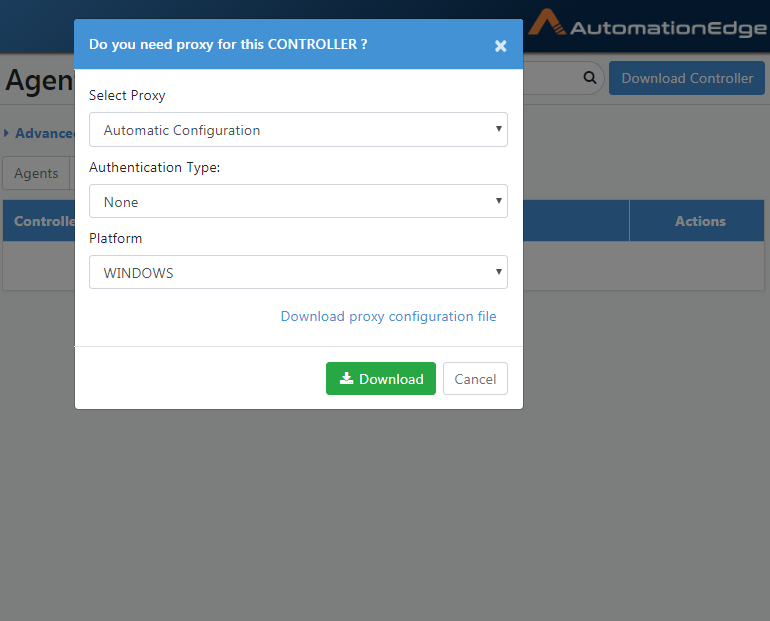
Figure 7.15: Proxy Window
- Agent Controller download in progress circle appears.
Figure 7.16: Downloading Controller Agent
- A Download started message appears, and you can see the agent controller zip is downloading.
Agent Controller: Start
-
Start Agent controller from ae_agent/bin directory by running startup.bat
-
You can now see the Agent Controller is running
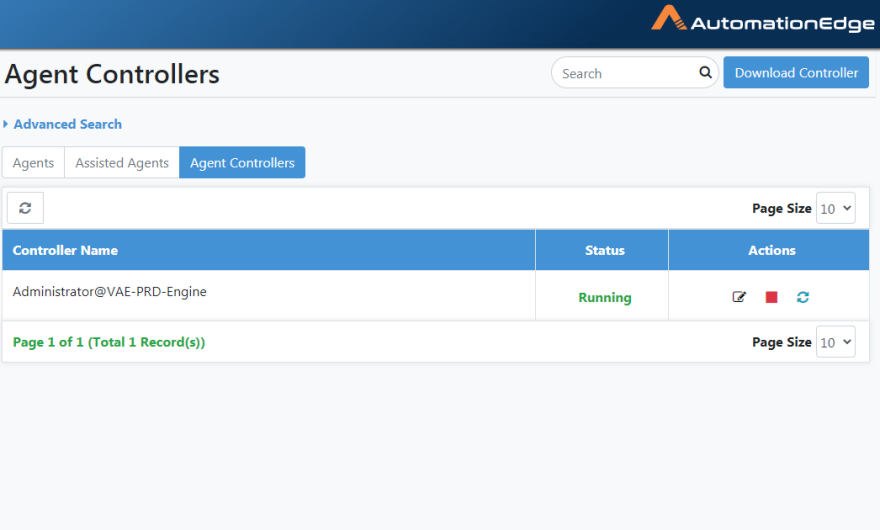
Figure 7.17: Controller Agent Running
Agent Controller: Stop
- You can now see Edit and Stop icons in the Actions column. You may click the stop icon to see the Stopping Agent message as below.

Figure 7.18: Stopping Agent Controller
- The Agent now shows as stopped.
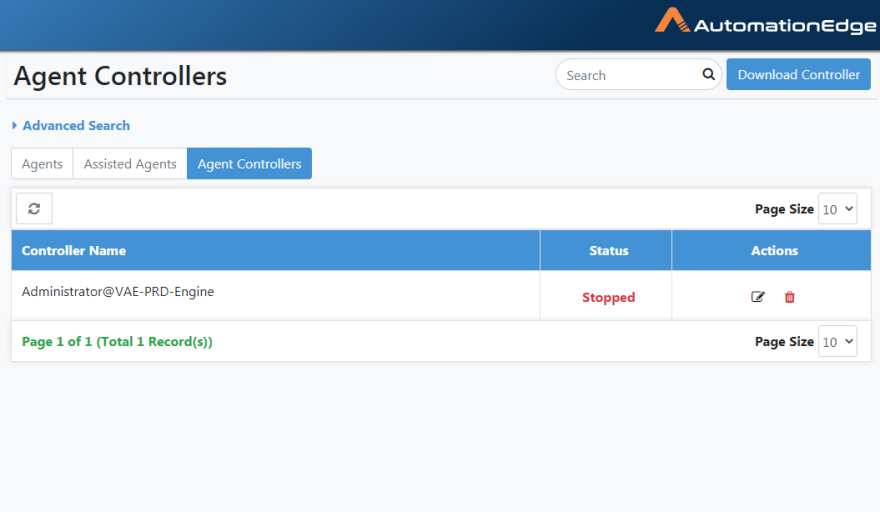
Figure 7.19: View Agent Status is stopped
Agent Controller: Delete
- Click the Delete icon. It gives a pop-up to configure delete.
Figure 7.20: Delete Controller Agent
Agent Controller: Edit
- Click the Edit button next to the Controller you wish to edit.
Figure 7.21: Edit Controller
- Edit the Agent Controller Agent Name, Domain name or IP Address.
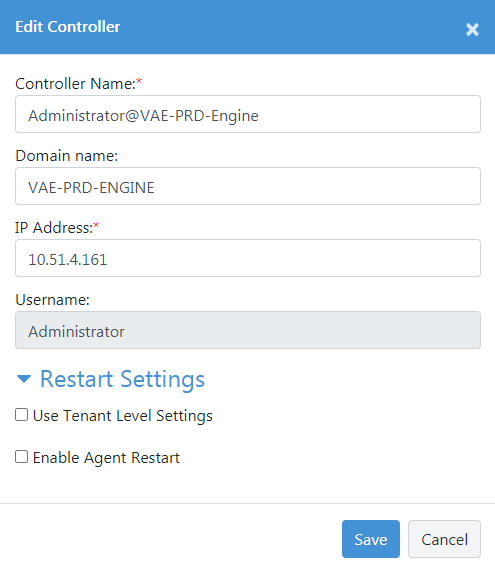 Figure 7.22: Agent Controller Edit
Agent Controller Setups
-
Agents are installed and registered on all agent VMs.
-
Click on Start🡪All Programs🡪Startup🡪Right Click Open Startup. Copy the shortcut of the Agents bat file (remoteStartup.bat) to the startup of each Agent machine.
-
Mark at least one agent as Agent Controller.
-
For all the other Agents, enter the windows password using the Agent Edit dialog.
-
In case your Security policy does not allow the use of connection details for terminal services due to windows policy settings, you may need additional settings as discussed in the next section.
-
By default, Windows shows a Certificate confirmation dialog for every new RDP session. Make sure to suppress this dialog on the controller machine.
After the setup, click the Start button against Agent
(![]() ) to invoke RDP on the machine and start the Agent.
) to invoke RDP on the machine and start the Agent.
For Agent controllers, the time the password is stored to connect to the required Agent machine is configurable. The <Agent_Controller_Home>/conf/>application.properties file has a property "agent.rdp.password.cleanup.duration.seconds". The default value is 15 seconds. To save the password for a longer duration while establishing connectivity set the property to a higher value.
However, log off any previous RDP sessions before the Controller can attempt to start the Agent. Generally, manage Agent machines with the Agent Controller only. Otherwise, any manual RDP session to theAgent's machine will also start the Agent.
On clicking on the 'Stop' button against the running Agent, the Agent stops, and the RDP session logs out.
Workflow Needs Administrator privileges
If a workflow running on an Agent machine needs administrator access, run the Agent as administrator. Follow the following two steps to Run Agent as administrator,
- Right Click on the remoteStartup.bat shortcut and click Properties.

Figure 7.23: remoteStartup executable on Agent machine
-
The remoteStartup - Shortcut Properties window appears, as seen below.
-
Click the Advanced button.
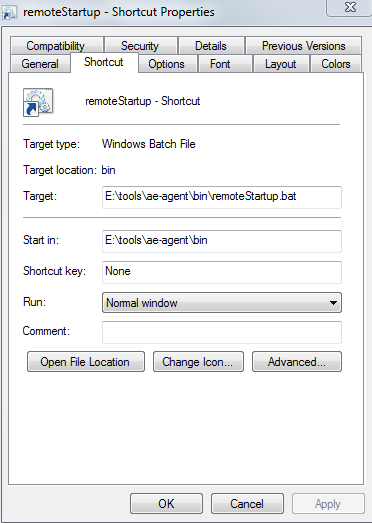
Figure 7.24: Setup Advanced properties
- Enable the 'Run as administrator' check box.

Figure 7.25: Enable Run as Administrator
Windows policies for Agent Controller
Windows Security policies for Agent Controller
In case your Security policy does not allow the use of connection details for terminal services due to windows policy settings, you may additionally need to configure the following settings,
A. On Controller Machine:
- On the Remote Desktop Connection Window, uncheck Always ask for credentials, as seen below.
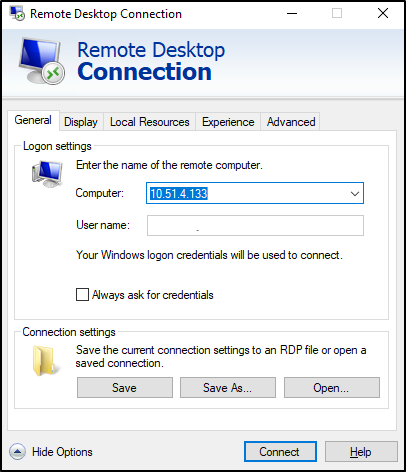
Figure 7.26: On Controller, machine uncheck 'Always ask for credentials'
- We use a solution that uses Window Credential Manager to store the credentials for automatic RDP connection temporarily. To use stored passwords on the Controller VM, navigate to the following path under group policy:
Computer Configuration (gpedit.msc) -> Administrative Templates -> System -> Credential Delegation
Enable the following policies on the Controller Machine
i. Allow delegating default credentials with NTLM-Only server authentication
ii. Allow Delegating Default credentials
iii. Allow Delegating saved credentials
iv. Allow Delegating saved credentials with NTLM-only server Authentication
-
Run the regedit.exe tool
-
Find the registry key: HKEY_CURRENT_USER\Software\Microsoft\Terminal Server Client.
Create a DWORD value with the name: RemoteDesktop_SuppressWhenMinimized and set its value to 2.
- Find the registry key HKEY_CURRENT_USER\Software\Wow6432Node\Microsoft\Terminal Server Client
Create a DWORD value with the name RemoteDesktop_SuppressWhenMinimized and set its value to 2.
- Find the registry key: HKEY_LOCAL_MACHINE\Software\Microsoft\Terminal Server Client.
Create a DWORD value with the name: RemoteDesktop_SuppressWhenMinimized and set its value to 2.
- Find the registry key HKEY_LOCAL_MACHINE\Software\Wow6432Node\Microsoft\Terminal Server Client
Create a DWORD value with the name: RemoteDesktop_SuppressWhenMinimized and set its value to 2.
-
Close the regedit.exe tool.
B. On Agent machine:
- We need to disable the following policies on the Agent Machine so that the Controller can automatically connect to agent Machine.
Navigate to the following path under the group policy,
Computer Configuration (gpedit.msc) -> Administrative Templates -> Windows Components -> Remote Desktop Services -> Remote Desktop Session Host -> Security
On the Agent, VMs disable the policy: Always prompt for password upon connection
- If you are still unable to create an RDP connection automatically, additionally
Set the following registry entry:
**HKEY_LOCAL_MACHINE\SOFTWARE\Policies\Microsoft\WindowsNT\Terminal Services\DisablePasswordSaving = 0 **
Windows Remote Desktop policies for RDP enabled workflows
In the case of Is RDP enabled workflows, you may need to configure the following settings,
C. On Agent machine
- Idle timeout and Active Timeout.
If enabled, idle timeout value has to match the max workflow execution time, found under group policy at
Computer Configuration -> Administrative Templates -> Windows Components -< Remote Desktop Services -> Remote Desktop Session Host -> Session Time Limits
i. Set Time Limit for Active but idle Remote Desktop Service sessions
ii. Set Time Limit for Active Remote Desktop Service sessions
UI Configuration for Starting/Stopping Controlled Agents
Start AutomationEdge Agents from the respective Controller Agents to which they are assigned. Please refer to section 7.7 Agents: Controller Assignment for steps to assign Agents to Controllers. Following are the steps for AutomationEdge Agents Start/Stop,
- Go to the Agents 🡪 Agent List menu.
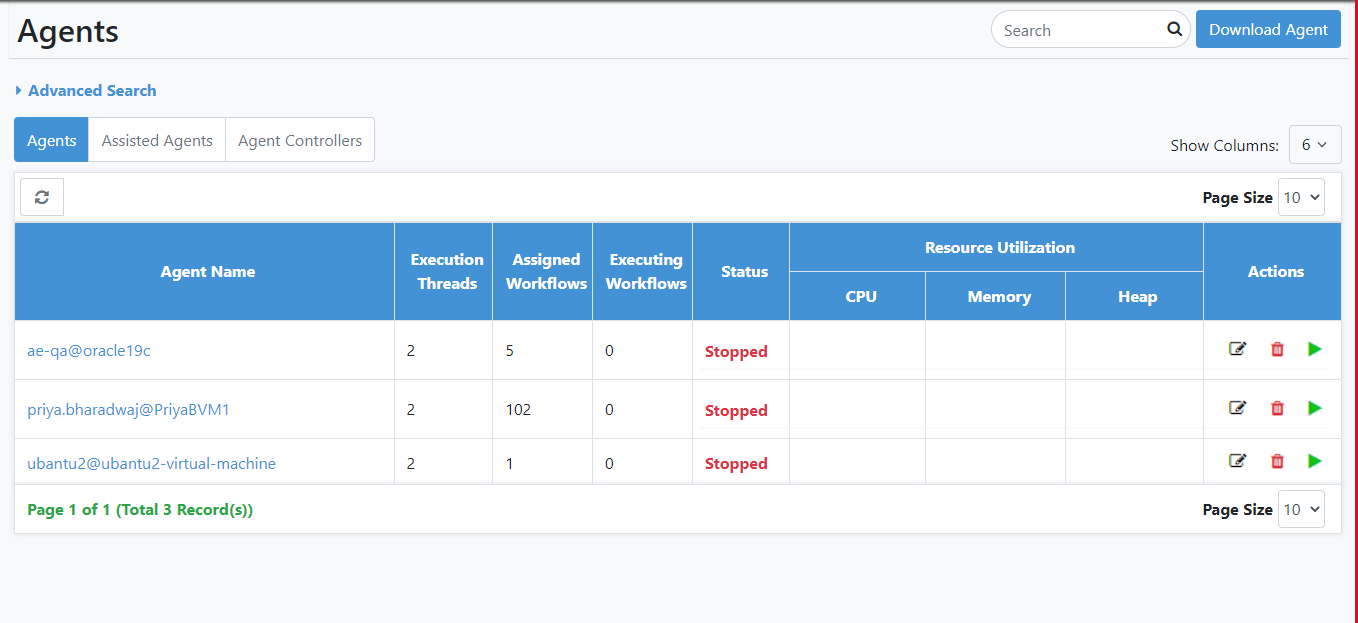
Figure 7.27: Agents View
-
Click the Download button on the top right corner to download the Agent.
-
You may start the Agent on your machine/VM.
-
You see the Agent in the Agent List Column is in running state.
-
For taking RDP and starting the Agent on the Controller machine, you need to edit the Agent and provide Agent machine credentials. Click Edit in the Action column.
-
Click Edit in the Action column.
-
Provide Remote Machine Password for the User and Click Save. Successful Changes saved to Agent message displays.
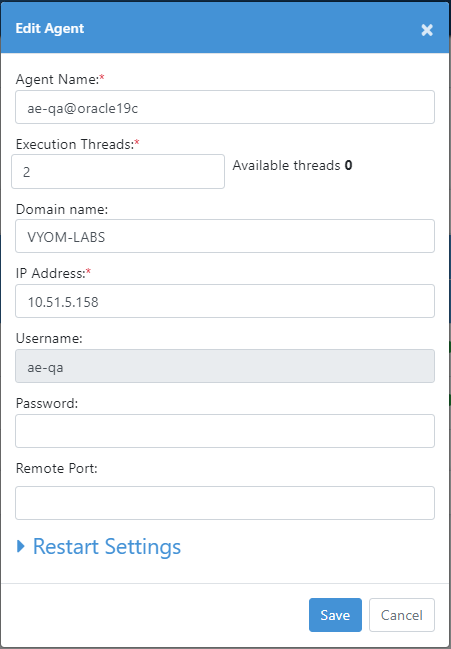
Figure 7.28: Edit Agent to set Remote Desktop password
-
Once the Agent machine details have been saved, the start arrow in the Actions list is enabled whenever Agent is in the stopped state. The options available in the Actions column are Edit, Start and Delete when Agent is in the stopped state.
-
You may click the Start arrow next to the Agent to take an RDP of the Agent machine/VM and start the Agent.
-
When you click on the Start icon for the Agent, a message box Initiated Start command for Agent displays.
-
While the Agent is starting, the start icon is disabled.
-
Also, the first time you start an Agent, you may see a pop-up to confirm the authenticity of the remote machine. Enable checkbox (Don't ask me again for connection to the computer) and click Yes to connect to the remote machine.
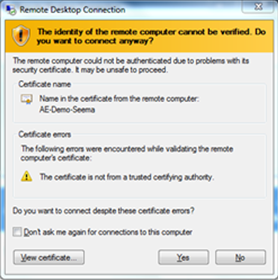
Figure 7.29: Controller confirming the authenticity of the remote machine
- Controller Agent tries to establish Remote Desktop Connection.
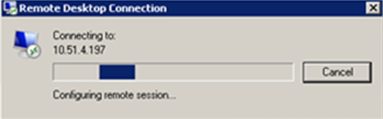
Figure 7.30: Controller starting remote machine and agent on the remote machine
-
RDP starts the remote machine. Controlled Agent also starts on the machine.
-
The start icon is no longer visible next to the first Agent and Agent in the Running state.
-
In the Actions column, click Stop. The Confirm Stop Agent dialog appears.
-
Enter the reason for stopping the Agent, if required.
To allow users to understand why an Agent was stopped, we recommend providing the reason for stopping an Agent. To view the reason why an Agent was stopped, on the Agents page hover the mouse over the status of the selected Agent.
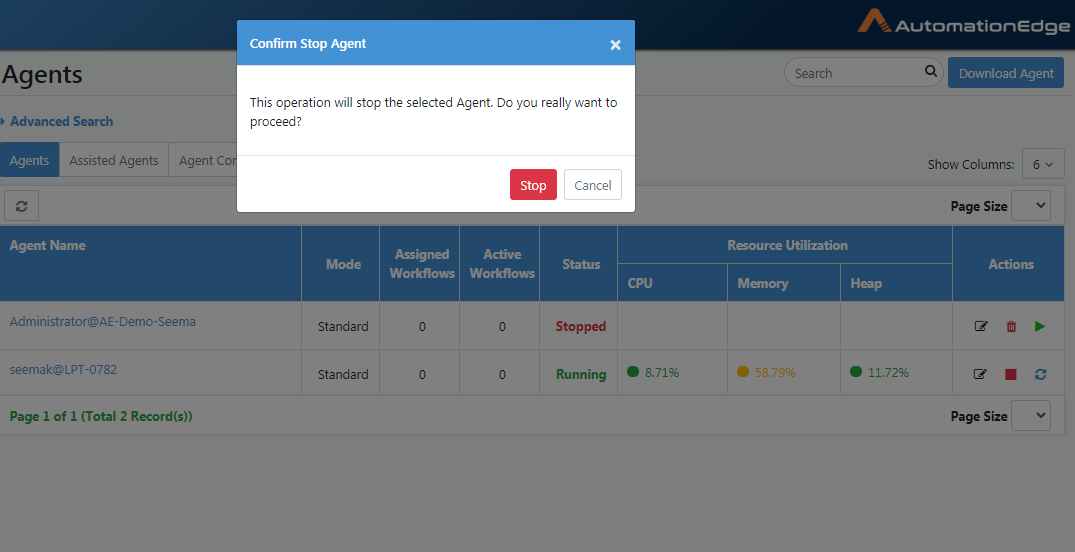
Figure 7.31: Stop Remote Agent
When a running Agent is stopped, the RDP session also logs out.
- In this case, it displays a Stopping Agent is in Progress, message. When a running Agent is stopped, the RDP session also logs out.
Agents: Workflow Assignment
Using the Workflow Assignment menu, you can assign and edit workflows assignments to agents.
You can assign up to 500 workflows (minimum workflow 0 -- maximum workflows 500) to an Agent. :::
To assign a workflow to an agent using Workflow Assignment:
-
Navigate to the Agents🡪 Workflow Assignment menu.
-
By default, the Agents tab is active.
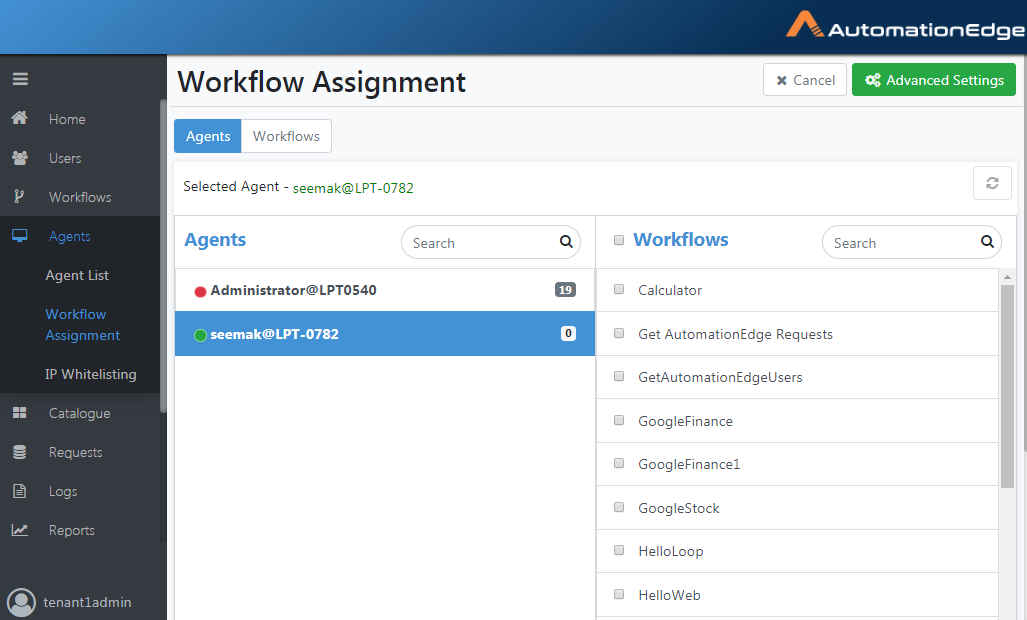
Figure 7.32: Assigning Workflows to Agent
-
Scroll or Search for Workflows on the right-hand side column of the page. Enable or disable the checkbox for workflows to assign to the Agent.
-
Enable checkbox next to two workflows -- HelloWebGeneric2 and HelloWorld, as seen below.
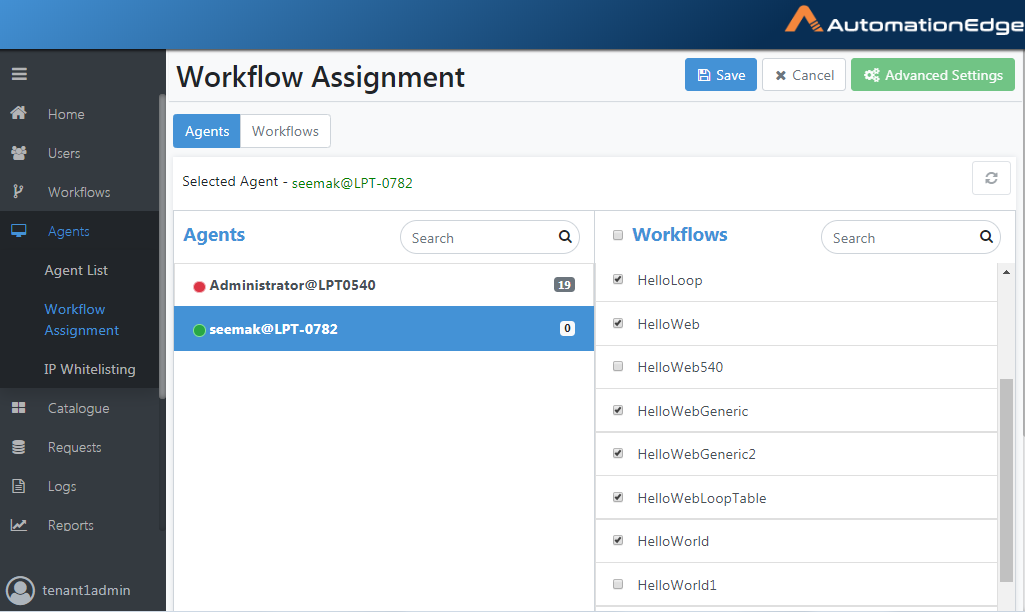
Figure 7.33: Selecting Workflow to assign to an Agent
- Click Save to save the assigned workflow to an agent. Assignment saved successfully message appears.

Figure 7.34: Workflow Assignment Confirmation Box
- Similarly, you can go to the Workflows tab next to the Agents Tab. Select the Agents on the right-hand column for the workflow selected on the left-hand column.
To run an assisted Workflow, the User needs the execute permissions on that Workflow. It is not required to assign such Workflow to any Agent. The assigned workflows or agents appear at the top in the Workflow Assignment tab.
Import Agent Assignments
Assign all the workflows of one agent to another agent, with this option.
To assign a workflow to an agent:
-
Navigate to the Agents🡪Workflow Assignment menu.
-
Click Advanced Settings button on the top right corner.
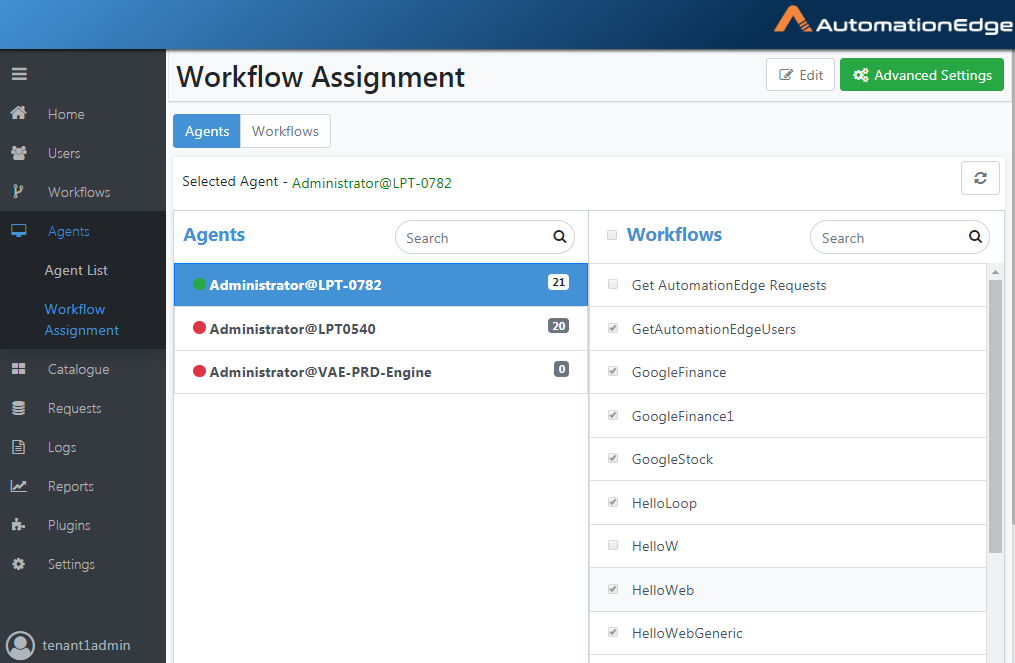
Figure 7.35: Advanced Settings
- An Import Assignment screen appears.

Figure 7.36: Source and Target Agents
-
Click Import from the drop-down list and select an Agent to import.
-
Select agent from the drop-down of Select Target Agent(s).
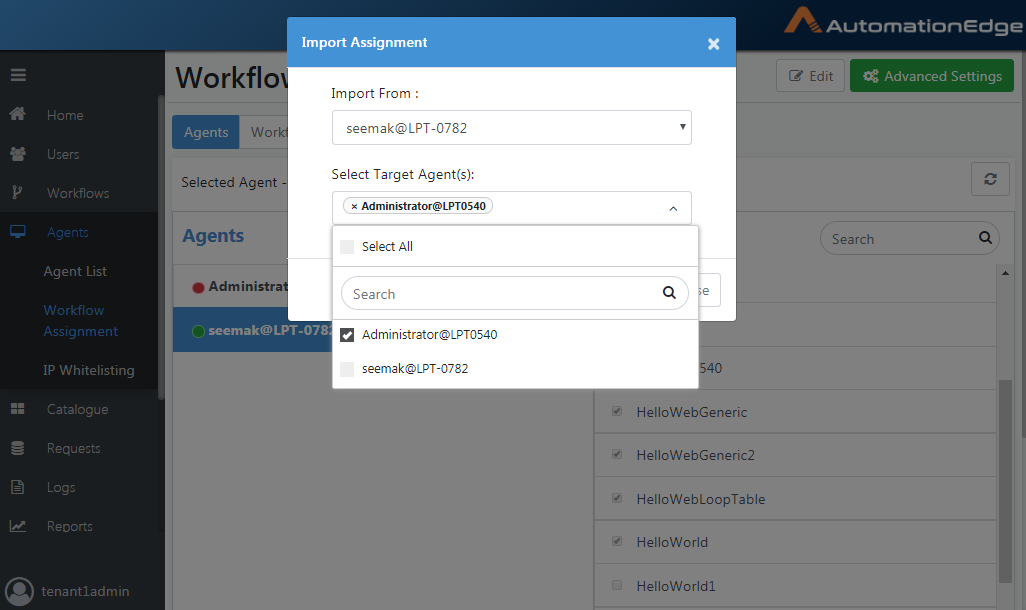
Figure 7.37: Select Agent
- The Import Assignment is seen below.
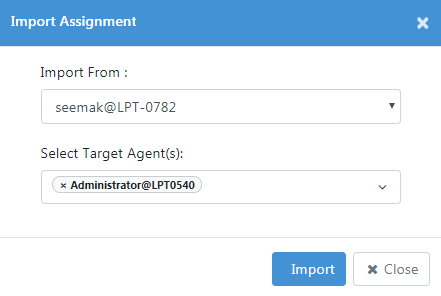
Figure 7.38: Import Assignment
- Click Import. Notice the message 'Operation successfully completed'.
Following is a table to describe the fields for Select Target Agent(s).
Table 7.5: Agent Configuration Field Description
| Field Name | Description |
|---|---|
| Select Agent(s) | To select an agent from the drop-down list. |
| Select all | To select all the agents in the drop-down list. |
| Deselect all | To deselect all the selected agents in the drop-down list. |
| Import From | To select the location from the drop-down list for importing agents. |
| Save Button | To save agent configuration. |
| Reset Button | To clear the selected details of the agent. |
Agents: Controller Assignment
The Actions column on the Agents page has an icon to Start Agents, disabled by default. Assign Agents to one or more Controllers to enable the Start icon. Controllers can start Agents assigned to them.
For Agents assigned to more than one Controller, any idle Controller can start the Agent. Deleting an Agent Controller deletes all its Agent assignments.
A well planned Agent assignment to Controllers acts as a load balancer to balance the load on Controllers. Agent Controller assignment also provides tighter control over Agents and serves security purposes by restricting Agent access to the designated Controllers.
From the Controller Assignment menu, assign and edit,
-
Agents to a Controller or
-
Controllers to an Agent
-
Navigate to the Agents🡪 Controller Assignment menu.
-
By default, the Agents tab is active. Select an Agent from the list.
-
Click the Edit button on the top right corner.
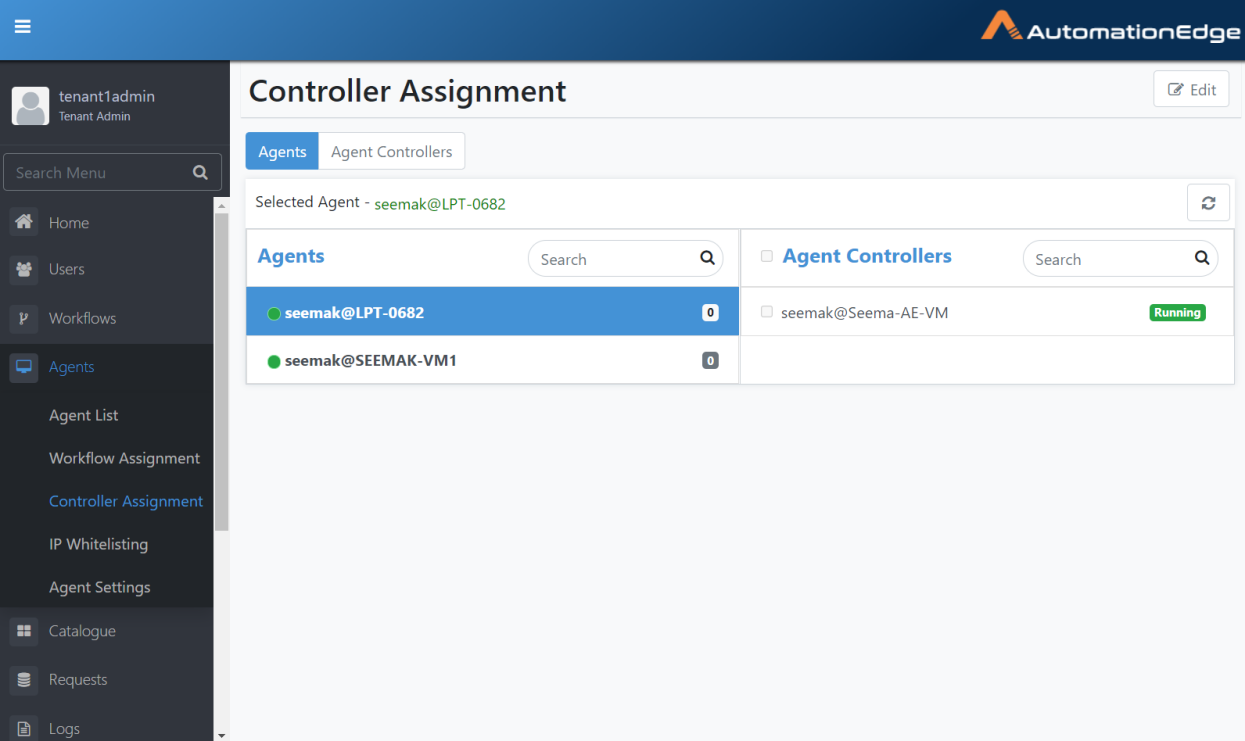
Figure 7.39: Assigning Workflows to Agent
- Select one or more Agent Controllers by enabling the checkboxes in the Agent Controllers column on the right.
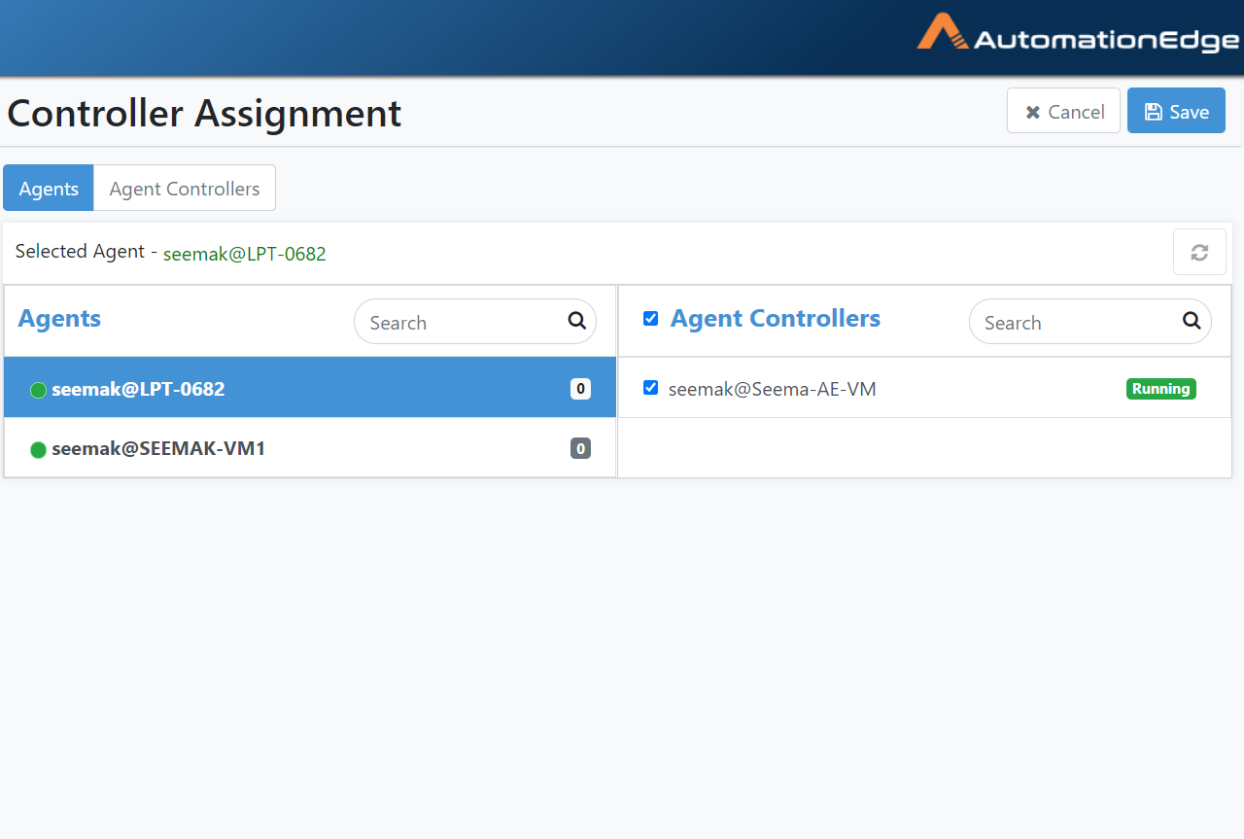
Figure 7.40: Selecting Controllers to be assigned to an Agent
- Click Save to save the assigned Controllers to an Agent. Assignment saved successfully message appears.

Figure 7.41: Workflow Assignment Confirmation Box
-
Similarly, go to the Agent Controllers tab next to the Agents tab, select a Controller and assign Agents to it by selecting them from the right column.
-
The process of Agent(/s) assignment to Controller(/s) is complete.
Agents: IP Whitelisting
Agents IP whitelisting allows Agents only from certain IP Address to talk to the AE Server. This feature is available at the Tenant level (the default behavior allows Agents from any IP Address to talk to the AE).
Add/Modify/List/Delete whitelisting's on the Agents🡪 IP Whitelisting menu,
-
There are three options for whitelisting,
-
IP
-
IP Range 192.168.0.0 to 192.168.0.100
-
CIDR Notation, e.g. 192.168.0.1/24 or 192.168.0.0/16
-
-
A Admin can create multiple whitelisting.
-
Migration from Previous Versions:
-
During Server migration for each of the tenants (other than SYSADMIN Tenant) that are present for migration, to add white listings as follows,
- 0.0.0.0/0
-
Perform Source IP Validations at the following levels,
-
Agent Registration: Verify the Source IP Address on Agent registration. For IP whitelisting specified for the Tenant during Agent registration, AE Server verifies the Source IP Addresses against this list. If the verification fails, Agent registration fails.
-
Agent Startup: Verify the Source IP Address on Agent Startup. If the Agent Source IP Address validation fails against the Agent IP Whitelisting list, then start-up fails.
-
Thirdly, validate the Source IP per day for the first call.
-
-
The following screenshot shows the default IP whitelisting.
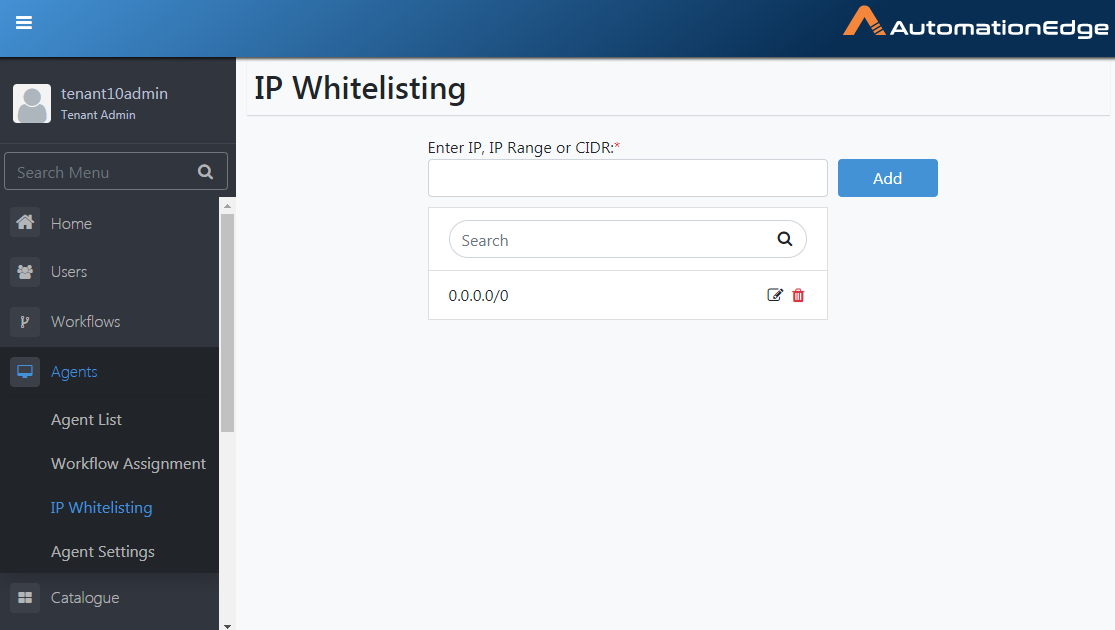
Figure 7.42: Default IP Whitelisting
Agent Settings
In Agent Settings, you can enable a setting to Include JRE with Agent. Once Include JRE with Agent is enabled, Agent is bundled with JRE when downloaded. There is no need to install JRE on the Agent machine separately. You may also configure Agent machine remote port.
The changes made to the agent settings will automatically be applied to the agent which you will download.
Following are the steps to configure Agent Settings,
- Navigate to Settings🡪Agent Settings. Click Edit.
Figure 7.43: Edit Agent Settings
- The table below explains each of the Agent Settings,
| Setting | Explanation |
|---|---|
| Include JRE with Agent | Set using a toggle switch. Click to include JRE with Agent during download. |
| Always download with alternate GC Options | Set using the toggle switch. |
| Note: - If the user toggles the setting to enabled before downloading or registering the agent, then the new agent will have the GC options enabled by default. | |
| - The tenant level setting is only used while downloading a new agent from UI. Agents that are already downloaded or registered before changing the setting will not be impacted. | |
| Auto disable Debug logs after Minutes | Modify the time in minutes or hours after which the downloading of the debug log will stop automatically. |
| Note: | |
| - The Tenant level setting will override the selection in the Edit Agent dialog defined at the Agent level. | |
| - Default value for the setting is 30 minutes. Minimum value allowed is 15 minutes and maximum value allowed is 1440 minutes, that is, 24 Hours. | |
| - It is recommended that debug log be set for the shortest duration possible, as the logging can generate huge amount of information that will occupy a lot of disk space. | |
| Remote Port | RDP connects to Agent on this port. The default value is 3389. |
| CPU Usage Threshold(%) | Configure the thresholds for CPU Usage, beyond which it sends notifications. The default value is 60%. |
| Memory Usage Threshold(%) | Configure the thresholds for Memory Usage, beyond which it sends notifications. The default value is 60%. |
| Disk Usage Threshold(%) | Configure the thresholds for Disk Usage, beyond which it sends notifications. The default value is 60%. |
| Heap Usage Threshold(%) | Configure the thresholds for Heap Usage, after which it sends notifications. The default value is 60%. |
| Enable Agent Restart | Set using a toggle switch. Click to enable Agent Restart. |
| Note: Agent restart features is not supported on Linux based OS. | |
| The Agent Restart Time field is available if you enable the field. | |
| Agent Restart Time | Schedule an Agent Restart Time if Agent Restart is enabled. Configure the restart time at the Tenant level in this menu or on individual agents by editing Agent in the Agent List menu. |
| JVM Options | Settings that control the behavior and performance of the JVM when running the application. |
-
Edit the settings as desired. Click Save. When settings are changed, the settings come into effect the next time the agent requests the server's workflows.
-
Any updates in the setting at the Tenant level or the Agent level in the Agent List menu are added to Audit logs.
-
Agent Settings Updated Successfully message appears.
Agents: Features/Permissions for other users
Table 7.6: Agents' features
| Feature/Role | Admin | Workflow Administrator | User Administrator | Agent Administrator | Tenant User | Activity Monitor |
|---|---|---|---|---|---|---|
| View Agent | ✔ | - | - | ✔ | - | ✔ |
| Download Agent | ✔ | - | - | ✔ | - | - |
| Workflow Assignment | ✔ | - | - | - | - | - |
| Agent Import | ✔ | - | - | - | - | - |
| Assisted Agent | ✔ | ✔ | ✔ | ✔ | ✔ | ✔ |
| Controller | ✔ | - | - | ✔ | - | - |