Users
User List
Add a new user, upload users, edit and delete users on the Tenant Users menu.
Table 5.1: Tenant User Options
| Buttons/Text Box | Description |
|---|---|
| Search Users (Search Text Box) | Enter search string to filter Tenant Users. |
| Advanced Search | Enter advanced search criteria to filter Tenant Users. |
| Add New User | Used to add new user. |
| Upload users | Used to upload the users in bulk. |
User List: View
To view Tenant Users,
-
Use the Menu Toggle to expand the main menu.
-
Click on the Users menu item. Click the Tenant Users sub-menu.
-
A list of all tenants appears in tabular format, as shown below.
To search for Tenant Users,
-
Use the Menu Toggle to expand the main menu.
-
Click on the Tenant Users menu item
-
Enter a search string to filter the records in real time.
Figure 5.1: Viewing Tenant Users
Table 5.2: Tenant User Tabular List Column Description
| Field Name | Description |
|---|---|
| Username | Displays tenant user username |
| IDP Username | In the case of an SSO user, an IDP username also displays in addition to the username. |
| Role | Displays tenant user role |
| Name | Displays tenant user first name & Last Name |
| Created | Displays the tenant user creation date |
| Last Updated Date | Displays tenant user last updated date. |
| State | It displays the State of the User. The possible states are Unverified, Active, Locked, Dormant, Disabled, Deleted and Enabled The following section, Tenant Users: State, discusses The Details about User State. |
| Actions: | |
| Edit ( | Click to edit tenant user details. |
| Delete( | Click to delete tenant user. |
User List: Search
To search for plugins,
-
Use the Menu Toggle to expand the main menu. Click on the Users menu item
-
Enter a search string to filter the records real time.
Figure 5.2: Search Free Text Box
User List: Advanced Search
For Advanced Search on tenant users:
-
Navigate to the Users 🡪 Tenant Users menu.
-
Click Advanced Search.
Figure 5.3: Advanced Search
-
You can select the column on which you wish to base your search.
-
Once you select the column, the Criterion field appears. Choose your criterion.
Figure 5.4: Advanced Search on Select Criterion
-
Provide a value for the column.
-
Click the Add Filter button to add the filter. You can add more filters, if required.
-
Click Search. The search result based on the filter criteria is displayed.
-
Click Remove Filters to clear the filter criteria.
User List: Add New
To add a Tenant user,
- Navigate to Users 🡪 Tenant Users.
- Click Add New User.
Refer to Table 10: Add New User -- Details. Towards the end of this section for a description of the User creation fields.
- Select user Type from the drop-down list.
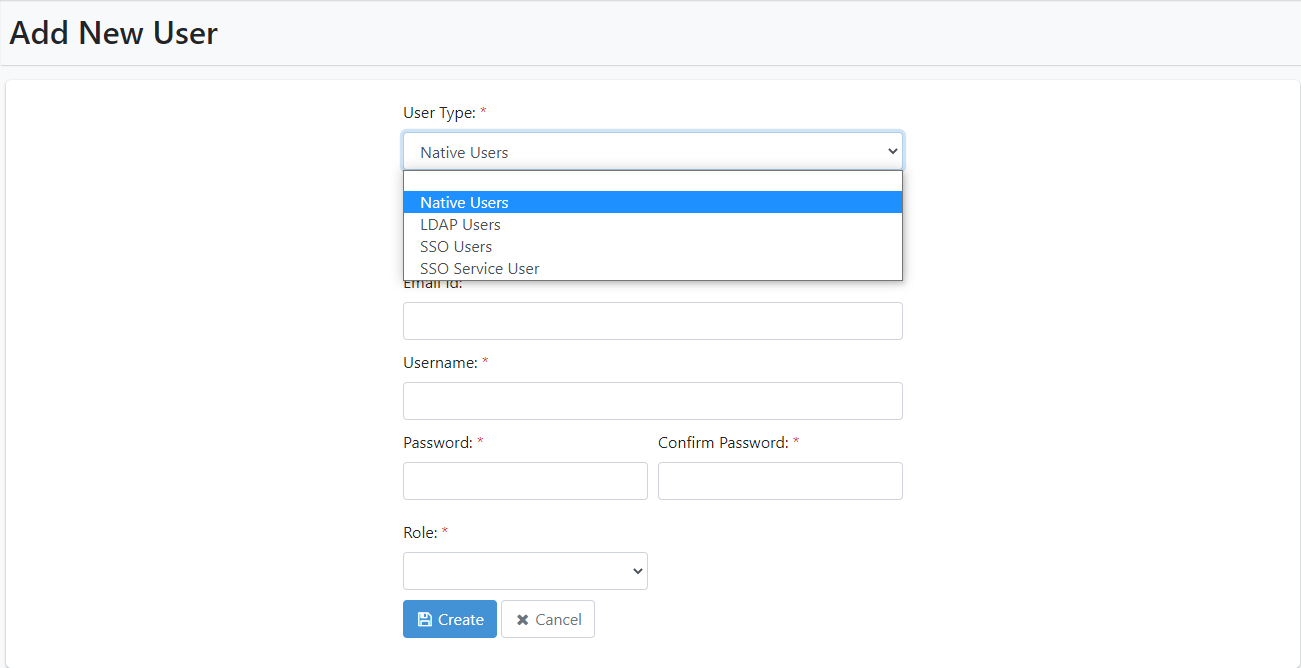 Figure 5.6: User Type
- The User Details page appears as shown below for User type: Native User.
Figure 5.7: Create Native User
- In case the role chosen is Tenant User, an option to add User to
Groups is available. The Tenant User Details page appears as shown
below for User type: Native User
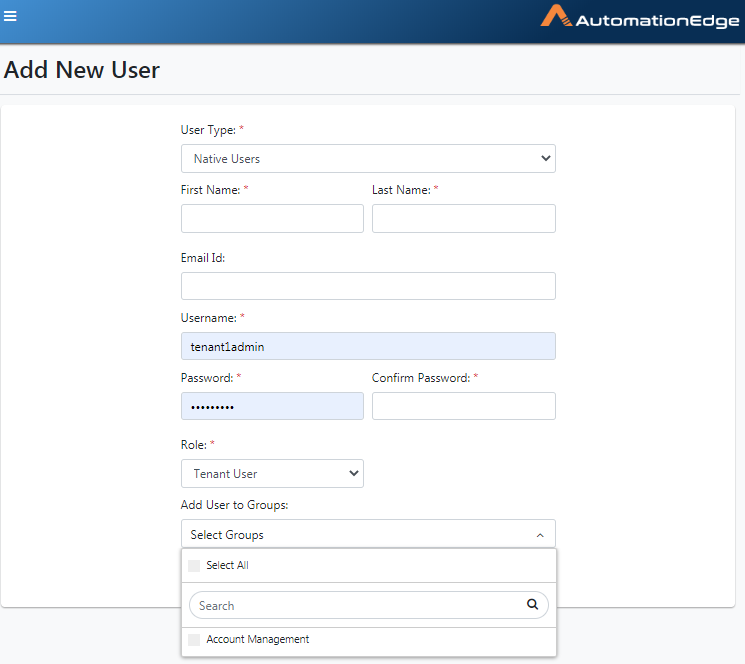
Figure 5.8: Native User with role Tenant User
- The Tenant User Details page appears as shown below for User type:
LDAP User.
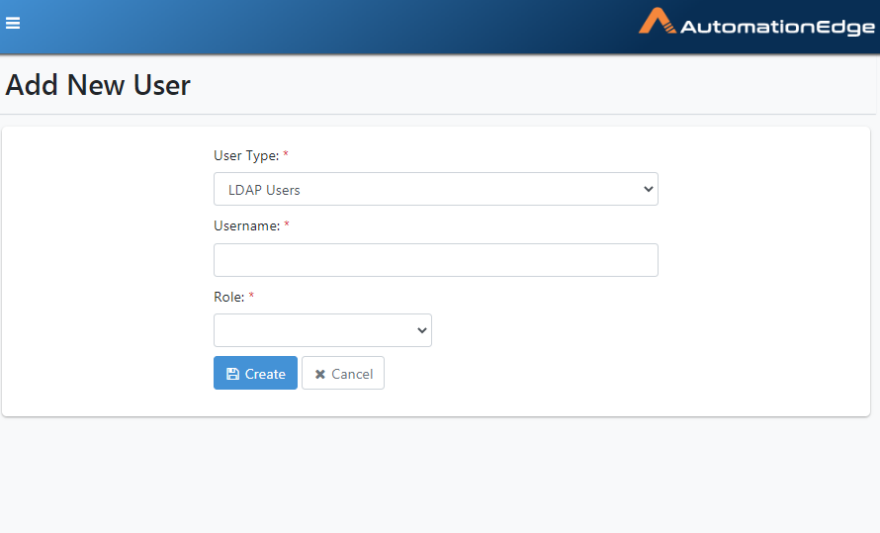
Figure 5.9: Create LDAP user
- In case the role chosen is Tenant User, an option to add User to
Groups is available. The Tenant User Details page appears as shown
below for User type: LDAP User
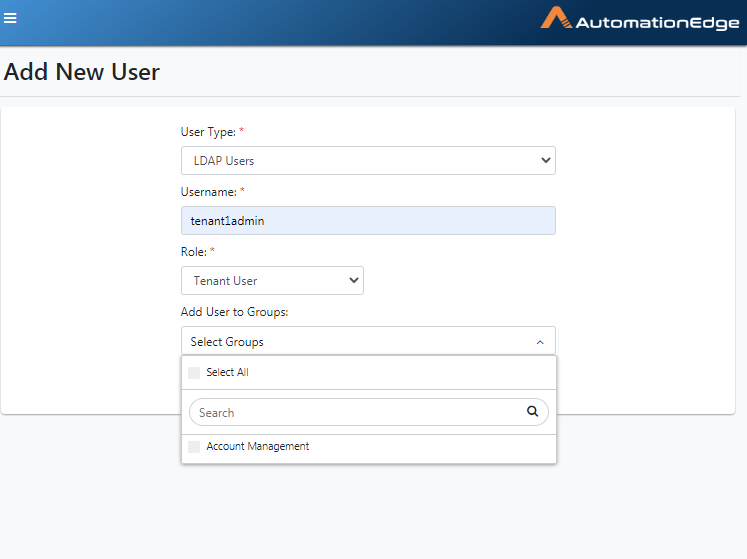
Figure 5.10: LDAP User with role Tenant User
- The User Details page appears as shown below for User type: SSO Users.
Figure 5.11: Create SSO user
- In case the role chosen is Tenant User, an option to add User to
Groups is available. The Tenant User Details page appears as shown
below for User type: SSO User.
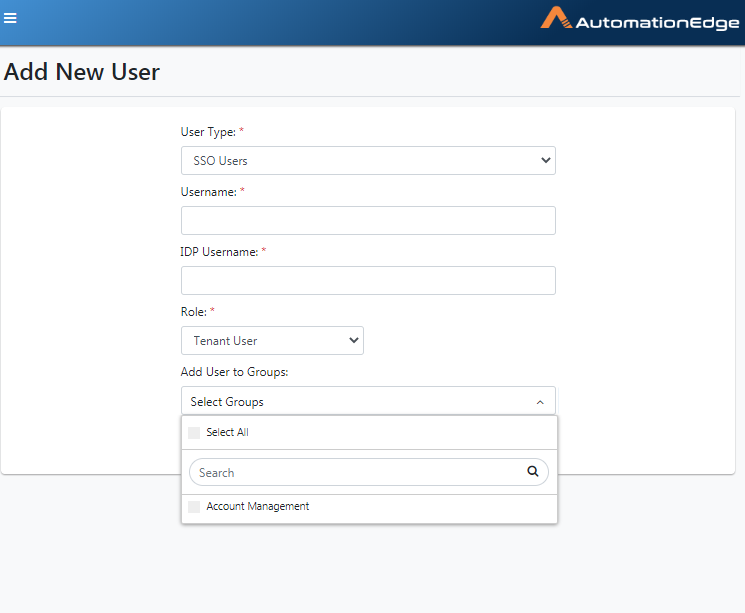
Figure 5.12: SSO User with role Tenant User
-
Complete the user creation process of User Type SSO Users.
-
Provide an AutomationEdge SSO Username to be created.
-
Provide an IDP Username to link to this AutomationEdge SSO User.
-
Select a Role and Click Create button. User created successfully message displays.
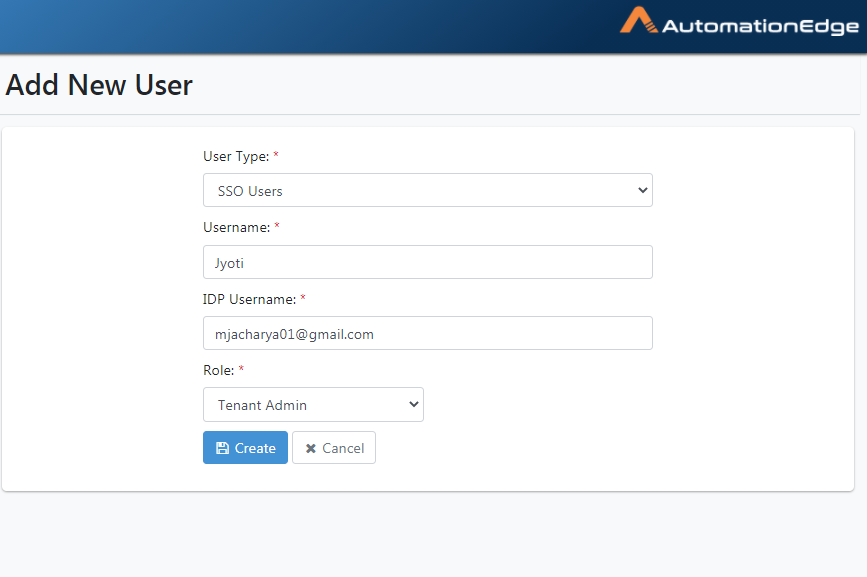
Figure 5.13: Create SSO Users Type
-
You may now use this SSO User to 'Sign In with SSO' on the AutomationEdge Login screen as described in the section Sign In with SSO.
-
Similarly, you may use Native and LDAP users for Sign In on the AutomationEdge Login screen
A description of the User Details page fields for all the User Types is provided in the table below.
Table 10: Add New User -- Details
| Field Name | Description |
|---|---|
| User Details | |
| User Type | Select from the following, |
| - Native User: Details of the users are stored in the AE-DB. User authentication is done by AE DB. | |
| - LDAP User: | |
| - LDAP user type is available in the dropdown list only if LDAP has been configured in the settings menu. | |
| - Details about the user are fetched from LDAP. User authentication is done using LDAP authentication. | |
| - SSO User: AutomationEdge SSO User Authentication is done by Identity Provider. The supported protocol is OpenID Connect. | |
| Every Organization/Tenant can have one unique AutomationEdge SSO user linked to a particular Identity Provider user. | |
| - SSO Users cannot be created for Sysadmin role. | |
| - SSO Users cannot use Process Studio. | |
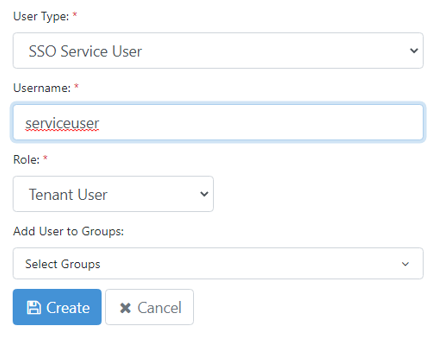
| - SSO Service User: | |
| - The user type is available only if SSO is configured through the Settings menu and the protocol selected is OpenID Connect. | |
| - Additional information: | |
| - Only users with Tenant Admin or User Admin roles can create the SSO Service users. | |
| - Only the following fields are available when creating the user: Username, Role, and Add User to Groups. | |
>  | |
| - SSO Service Users must create a POST request to get a session token from the REST API. For example, | |
| > POST request to | |
> http: //<host:port>/aeengine/rest/sso/serviceuser/authenticate with the following request body: {\"scope\": \"\<scope name created at IDP\>\",\"clientId\": \"\<clientID\>", \"clientSecret\": \"\<secret\>\", \"username\": \"\<AE username\>\" } | |
| - The user cannot sign in through the AE UI or Process Studio, and must sign in using the authentication API. | |
| - The user can call other REST APIs depending on the user role selected in the Role field. | |
| You must Setup Single Sign-On under Settings🡪 | |
| Single Sign-On menu to be able to add SSO | |
| Users. Refer section - Single Sign-On for the setups. | |
| First Name | Specify the user's first name. |
| A Admin cannot add, remove, and delete tenants; Only Users can be added or deleted. This field is Mandatory. | |
| Last Name | Specify the user's last name. This field is Mandatory. |
| Email Id | Specify user's email Id. |
| Send verification over email | Select the checkbox to send a verification email link to the user. Users can verify the sign in details through the link, which will activate their user account. Users will receive message confirming that the verification is successful. |
| Users can also, reset their password after they activate their account. | |
| Important: To use the field, user must set the email configuration details in Email Configuration. | |
| NOTE: This field is available only if you select Native User in the User Type field and also specify the email address of the user in Email Id field. | |
| This link is active for 24 hours only. | |
| You can also send a mail to users to reset their forgotten password. | |
| NOTE: Ensure that the proper URL is added to the ae.portal.baseURL property in the ae.properties file. Reach out to your support team if you face any issues when accessing the URL. | |
| Username | Specify the user's AutomationEdge username. This field is Mandatory. |
| IDP Username | Specify the Identity Provider (IDP) username to be linked to the AutomationEdge username. |
| - Only one AutomationEdge username from an Organization/Tenant can be linked to an IDP username. | |
| - AutomationEdge Username is linked to an IDP username should be unique across Tenants. | |
| Password | Specify the user's password. This field is Mandatory. |
| Force Change Password | Enable checkbox to force the user to change the password on the next login |
| Role | Select from the following: |
| - ROLE_TENANT_ADMIN | |
| - ROLE_TENANT_USER | |
| - ROLE_USER_ADMIN | |
| - ROLE_WORKFLOW_ADMIN | |
| - ROLE_AGENT_ADMIN | |
| Add User to Groups | If the Role selected is Tenant User, an option to Add User to Groups is available. A Tenant user can be assigned to one or more Groups. |
| Buttons : | |
| Create button | Click to create a Tenant User. |
| Cancel button | Click to cancel the process of adding a new tenant |
For LDAP users, enter only username and role; other details are fetched from LDAP during the first login.
-
In this section, we have demonstrated end to end User creation for user type SSO users.
-
For other User Types, enter users' details (First Name, Last Name, Email Id, Username, password, etc.) as per User Type.
-
For other user Types, you can use the 'Sign In' option on the AutomationEdge Login screen.
-
You will have to change the password on First Login for Native Users.
-
Click Create.
-
After the first Login, the users are activated.
While Admin can create users with roles as above, User Administrator can create/update users having Tenant user role only.
- The process of Tenant User creation is complete.
User List Add: Upload Users
Use the Upload Users feature to create users in bulk at a time. Only Tenant Users (with role Tenant user) can be created using this feature.
A description of the fields is given in the table below.
Table 11: Button "Upload Users": Bulk User Upload Field/Button Description
| Field Name | Description |
|---|---|
| User Type | Select User Type: LDAP User/Native User/SSO User |
| Download sample template link | Reference format for entering user details. |
| Buttons: | |
| Choose File | To select the .csv file that contains the list of users. |
| Upload Users | To upload the selected user list file |
| Cancel button | To cancel bulk user upload. |
To create users in bulk:
-
Navigate to the Users menu.
-
Click the arrow next to Add New button. Click Upload Users.
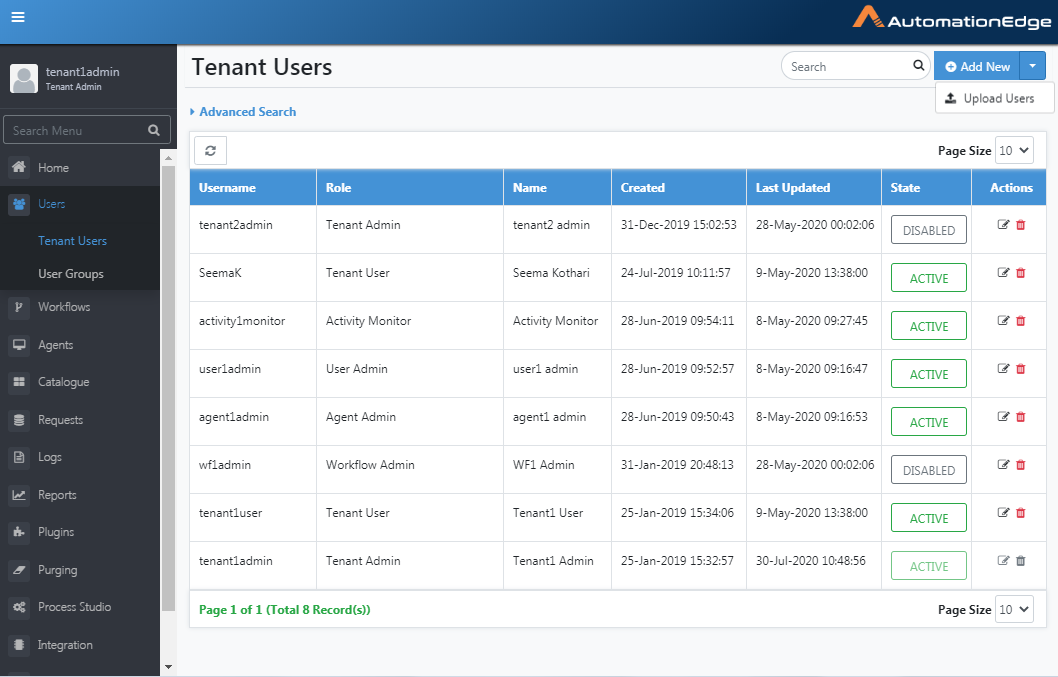
Figure 5.14: Selecting Upload Users Button
-
Select User Type
-
Click the Sample Template button on the top right-hand corner to download a sample file template to upload users.
Template for native users has firstname, lastname, email, username, and groupnames.

Figure 5.15: Template of Native Users
- Template for LDAP users has only username and groupnames columns.
- Template for SSO users has username, idpusername, and groupnames columns.
-
Edit the downloaded template, that is, enter the groups to which you want to add the members. Save the .csv file.
-
Click Choose File and select the created user detail file. In this case, we shall upload a file for Native Users. Similarly, you may upload files for LDAP or SSO users.
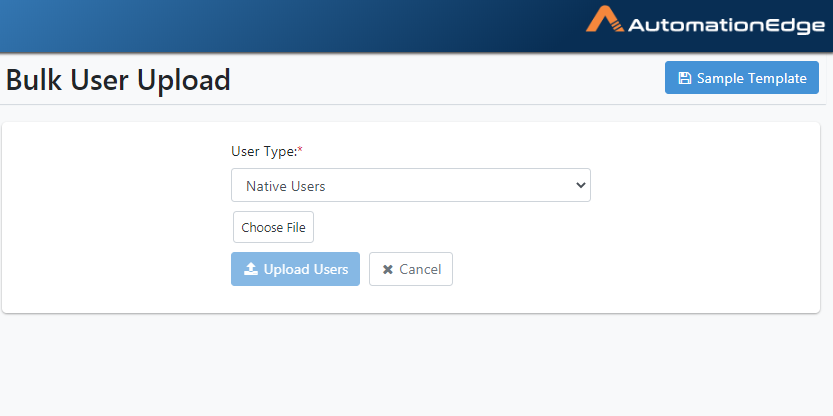
Figure 5.16: User Details Sample Template
- Preview of selected user file displays. Click Upload Users to upload the user details file.
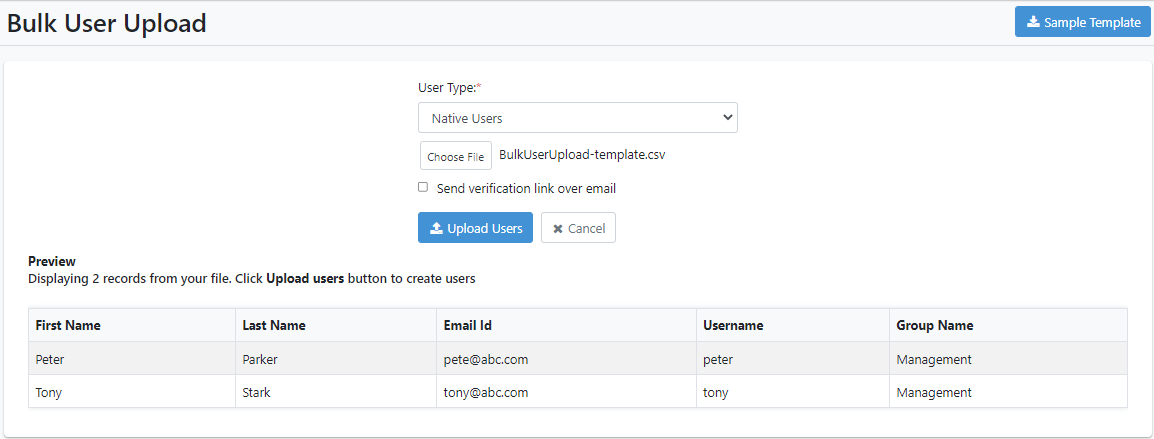
Figure 5.17: Preview of Selected User File
- The Result of upload is displayed as shown below. The uploaded information is also available in a downloaded file.
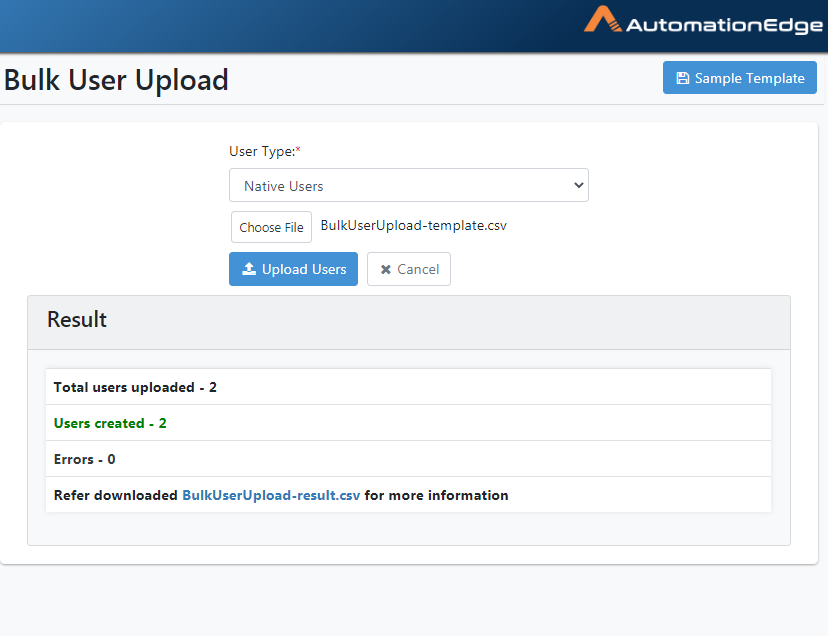
Figure 5.18: Uploading Users
In case of partial failures, the file BulkUseUpload-result.csv file adds the reason for failure against each failed user.
User List: State
The State is useful for Tenant User monitoring. Following is the complete list of User States possible.
-
UNVERIFIED<Unverified User>- As soon as a user account is created it goes into UNVERIFIED state. When the users try to log in for the first time dormancy check will be applied, and if account happens to be dormant, then the account state changes to DISABLED otherwise, ACTIVE and logs in.
-
ACTIVE - The user logs in and performs normally when in this state.
-
LOCKED - A user may be locked on crossing the max number of Attempts for unsuccessful login. The schedules configured by the locked user may continue to run. On login, a locked user gives a generic error message.
-
DORMANT - If an account has had no activity for an extended period, then the account is marked as dormant. A dormant account is automatically disabled. On login a dormant user gives a generic error message. The dormancy period can be set in the Tenant Policy menu under Settings. A dormant account can also be enabled or disabled by the System or Admin.
-
DISABLED - A user can be manually disabled from Active, Enabled or Locked states. If a user is disabled, their schedules get automatically disabled. A display message to show this warning is shown in the confirmation box for disabling users. On login, a disabled user gives a generic error message.
-
DELETED - A User Account is in DELETED state when an Administrator deletes the account. This state is not displayed on the UI. On login, a deleted user gives a generic error message.
-
ENABLED - A user is enabled from disabled, dormant or locked state; but the user is yet to login. On login an enabled user is marked as Active and logs in.
The following snapshot shows the different user states and their interrelationships.
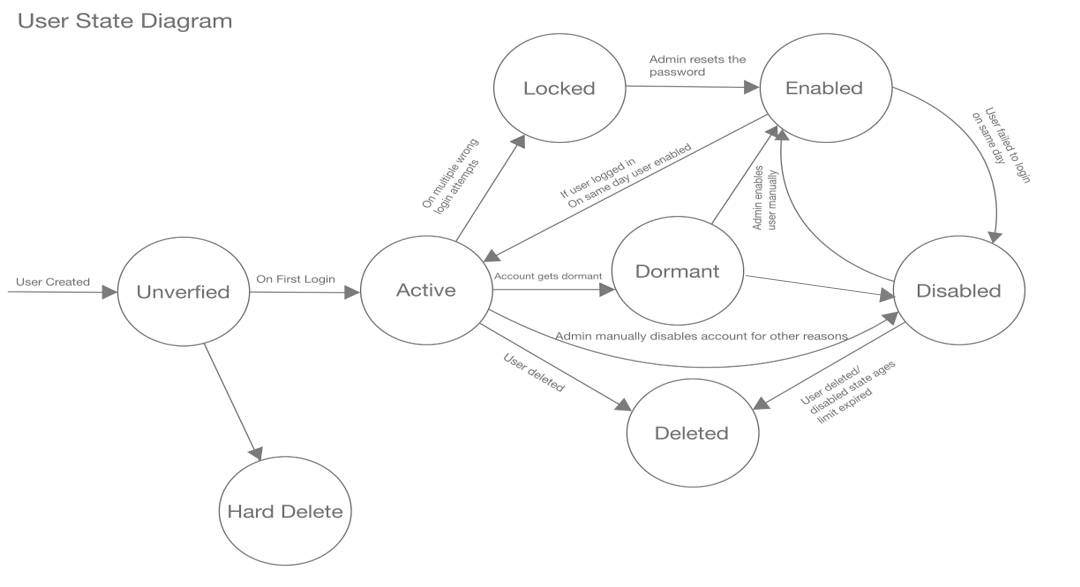
Figure 5.19: User states and Interrelationships
Tenant Users: Change State
AE Tenant Users menu is seen with several possible States in the snapshot below.
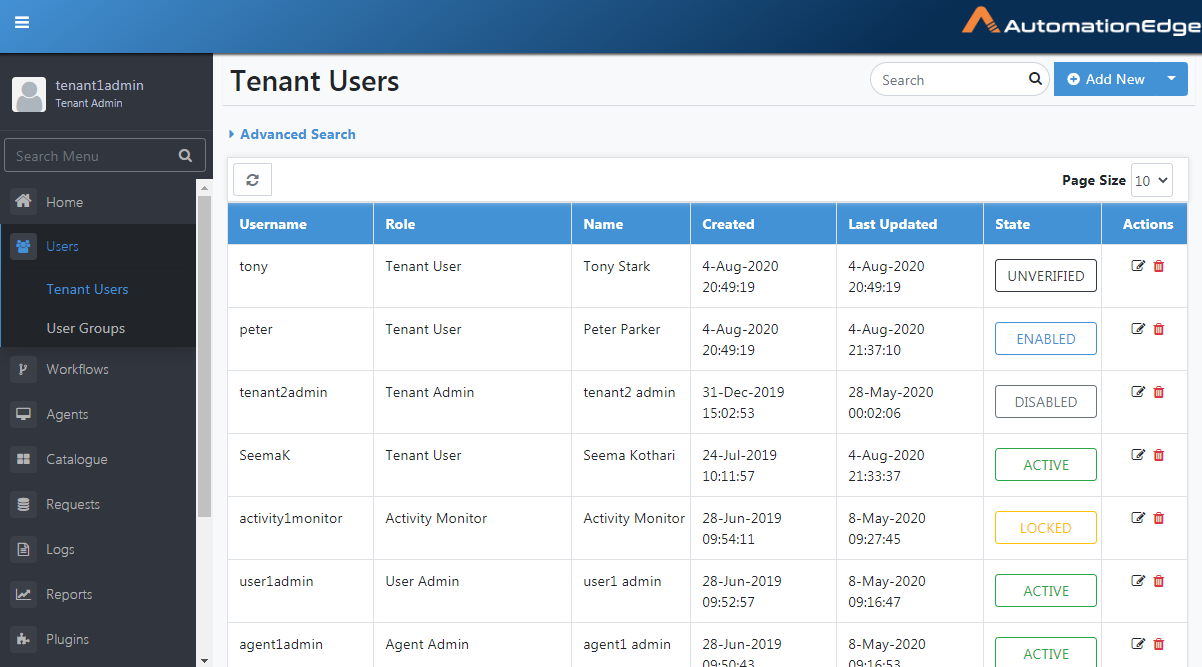
Figure 5.20: Snapshot depicting the several User States
The following screenshot shows some dormant accounts.
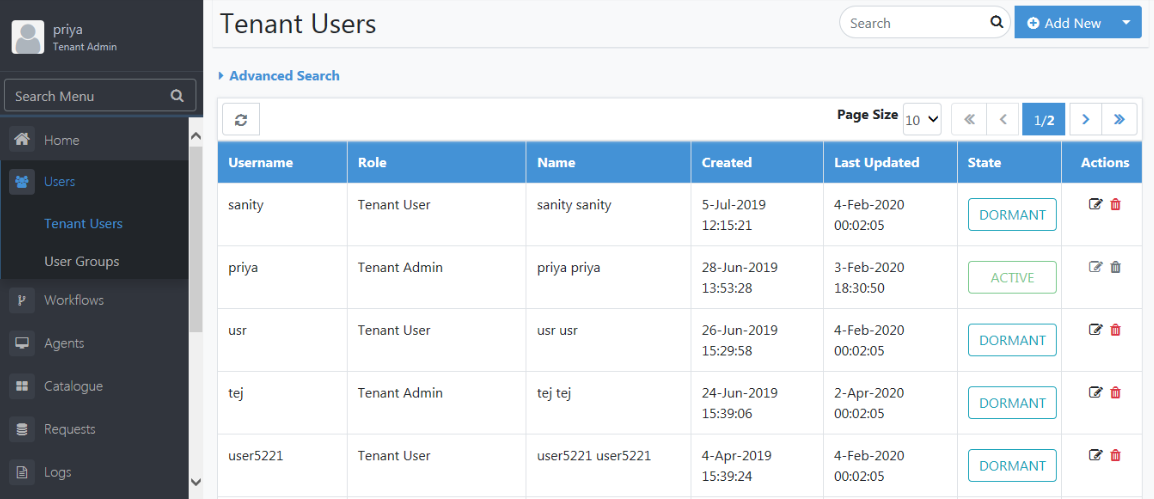
Figure 5.21: Snapshot depicting Dormant State
Change the state of an Active, Locked, Disabled, or Dormant user by clicking on the state link.
The use case below demonstrates how to change the state of a user in the LOCKED state.
The System Administrators can unlock Admin Users. System Administrators or Admins can unlock tenant Users.
Login AE UI. If a user is locked, you get a message that the account is inaccessible.
Following are the steps to change the user state from Locked to Unverified and then Active on the first login.
-
Navigate to the Users🡪 Tenant Users menu.
-
The State of a user is visible in the state column.
-
If a user is locked, its state is locked.
-
Click the LOCKED link corresponding to the tenant user you wish to unlock. In this case, we wish to unlock tenant12user.
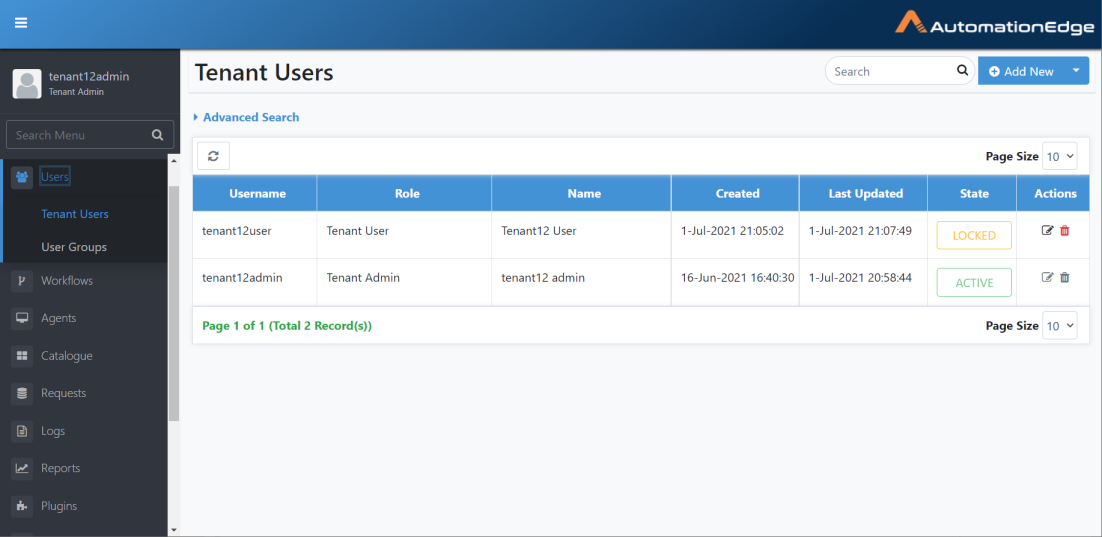
Figure 5.22: Tenant User is locked
- You can see a popup window to Select an Action as seen below. From Locked state you can use Unlock User option to Enable the user or Disable User to disable the user.
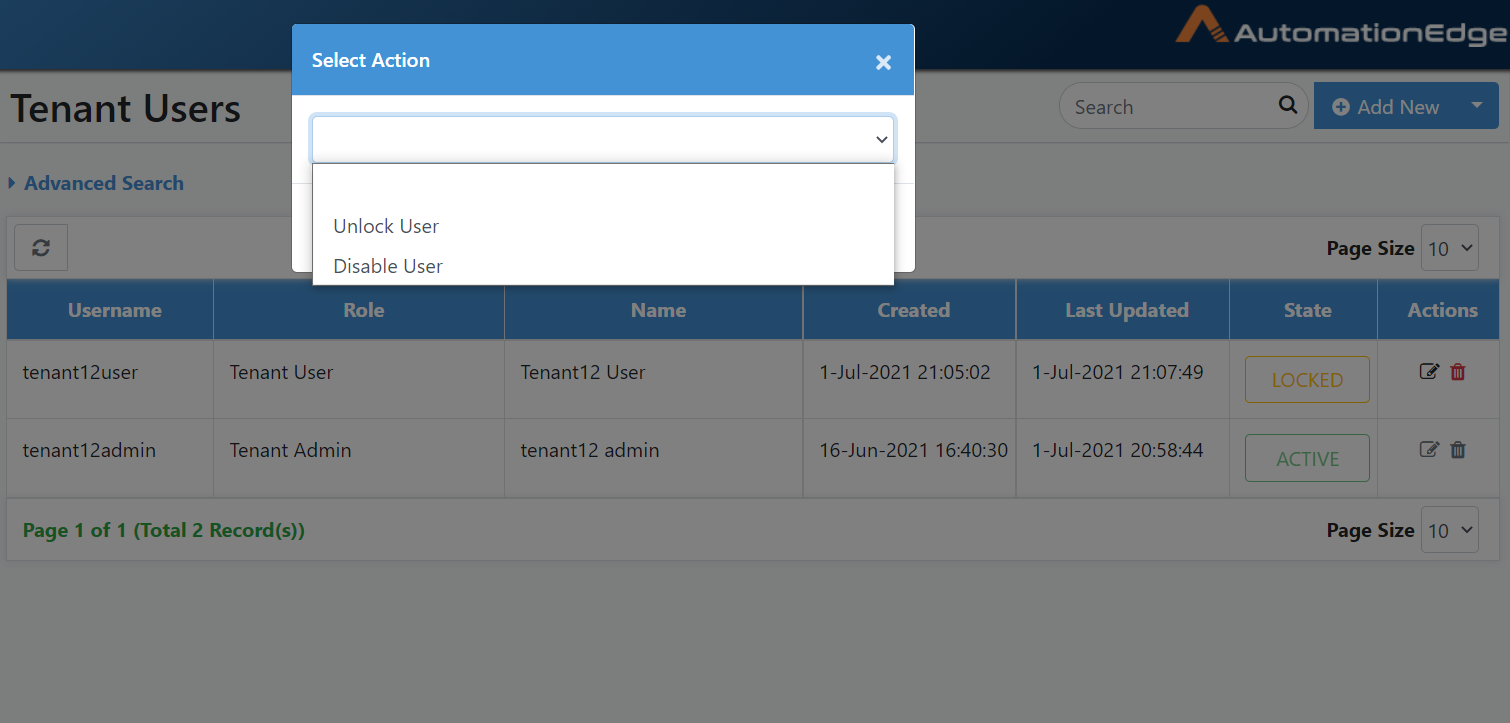
Figure 5.23: Actions for Locked User
- In this case, we have chosen Unlock tenant12user User.

Figure 5.24: Unlock Locked User
- An Unlock User pop-up appears. Set and confirm a new password for the user.
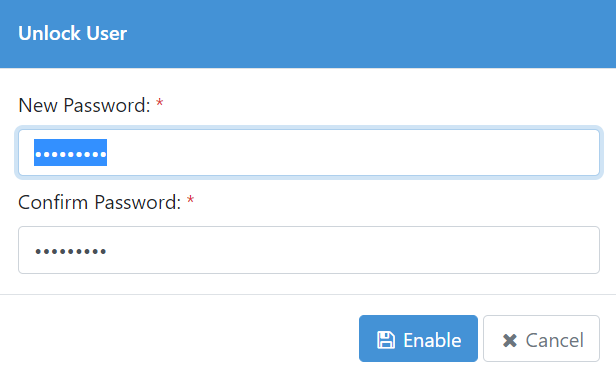
Figure 5.25: Unlock Tenant User - Reset Password
-
A User [Enabled] successfully message appears.
-
Once unlocked, the state of the Tenant user (tenant12user in this case) goes to Enabled.
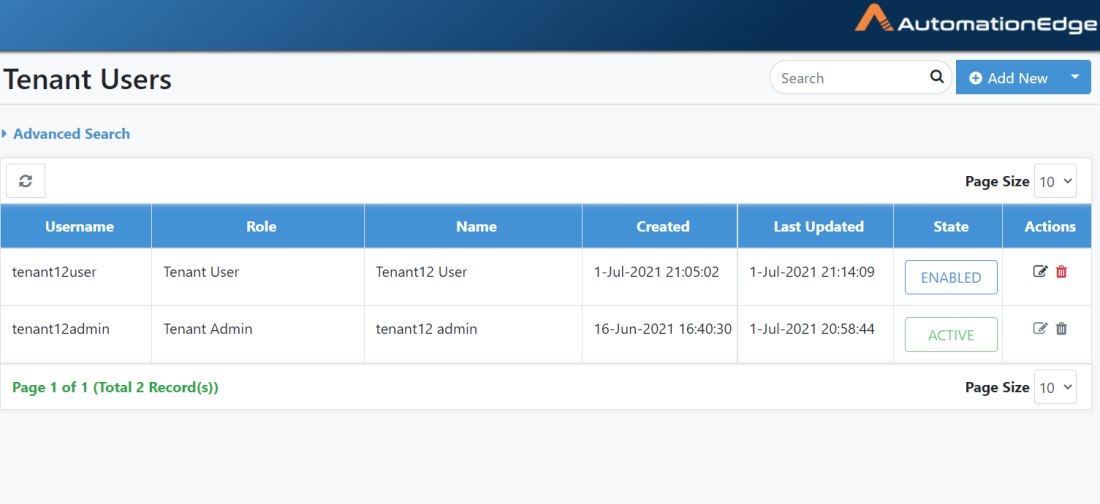
Figure 5.26: Unlocked User in Enabled State
-
You may now log in with tenant12user with the newly set password for the enabled user.
-
The first time you log in, it forces you to change the password.
-
A Change Password screen appears. Provide the password you set as part of unlocking the user account in the Old Password field. Provide the new password to set in the New Password and Confirm Password fields.
-
The screen below shows the passwords provided in an encrypted format. Click Change to change the password.
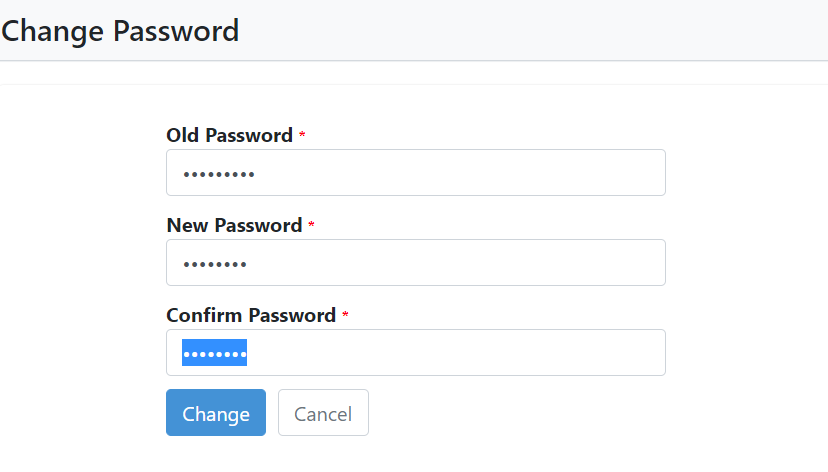
Figure 5.27: Force Change Password
- Password reset can give an error in the following scenarios,
-
In the same password as the old password, it gives an error - "Your new password cannot be the same as the old password."
-
If you provide a password same as an old password, depending on the Password History set in the Tenant policy, you get an error message --"New password must be different from your previous passwords."
-
If you provide an incorrect password, you get an error message -- "Incorrect old password".
-
With the correct old password and a valid new password, it takes you back to the login screen once the password is changed. Log in with the new password set on the first login.
-
Once you log in you, land on the Landing page. In the case of Admins, the landing page is the Home Page, while in the case of tenant Users, the landing page is the Catalogue page.
-
Navigate to the Tenant Users menu. You see that the Enabled user state for user tenant12user has changed to Active.
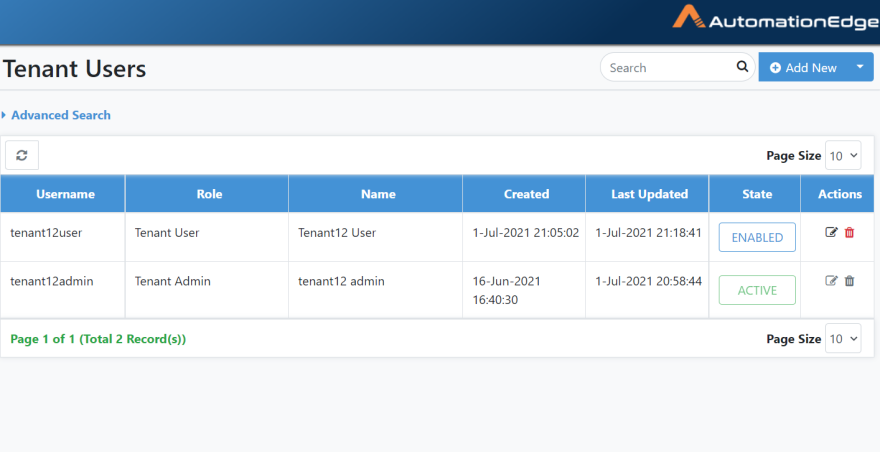
Figure 5.28: Unlocked User is Active
-
The process of unlocking the user account is complete.
-
Follow the same process to enable as well as disable/delete users. Depending on the current user state, the options to unlock, enable or disable/delete display upon clicking the current state. The unlock, enable or disable/delete steps are also demonstrated step by step in the AutomationEdge_R7.7.2_System_Administrator_Guide.
-
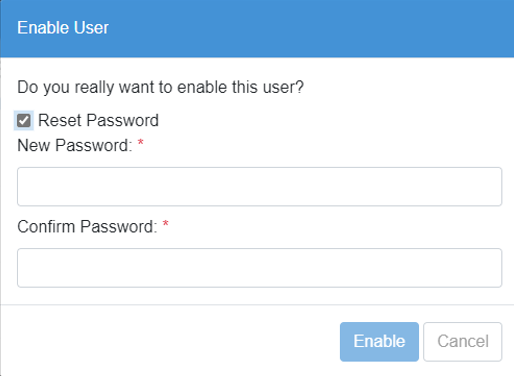
You can also enable a dormant or disabled user and then select Reset Password checkbox for a new password, if required.
-
Enter new password, and then click Enable.
-
The Reset Password option is unavailable for SSO and LDAP users.
User List: Edit
To edit tenant user details:
-
Navigate to the Users 🡪 Tenant Users menu.
-
Click the Edit icon (
 ) corresponding to the tenant user
you wish to edit.
) corresponding to the tenant user
you wish to edit.

Figure 5.29: Selecting Tenant User to Edit
-
Edit the details. For Native user's edit first name, last name, email Id, password and role. For LDAP users, edit role. However, the User Administrator cannot modify the role for Native Users as well as LDAP users. Add User to Groups is also not editable.
-
Check the Force Change Password checkbox if you want the user to change the password after the first login.
-
You can select the role for Tenant User. There are four Roles for Tenant Users (Refer 3 above)
a. ROLE_TENANT_ADMIN
b. ROLE_TENANT_USER
c. ROLE_USER_ADMIN
d. ROLE_WORKFLOW_ADMIN.
e. ROLE_AGENT_ADMIN
f. ROLE_ACTIVITY_MONITOR
- User Administrators cannot edit the Tenant role.
- User Administrators cannot edit LDAP Users
- For SSO Service User, you can modify only their role and user roup, if required.
- Select a new role that you want to select for your tenant.
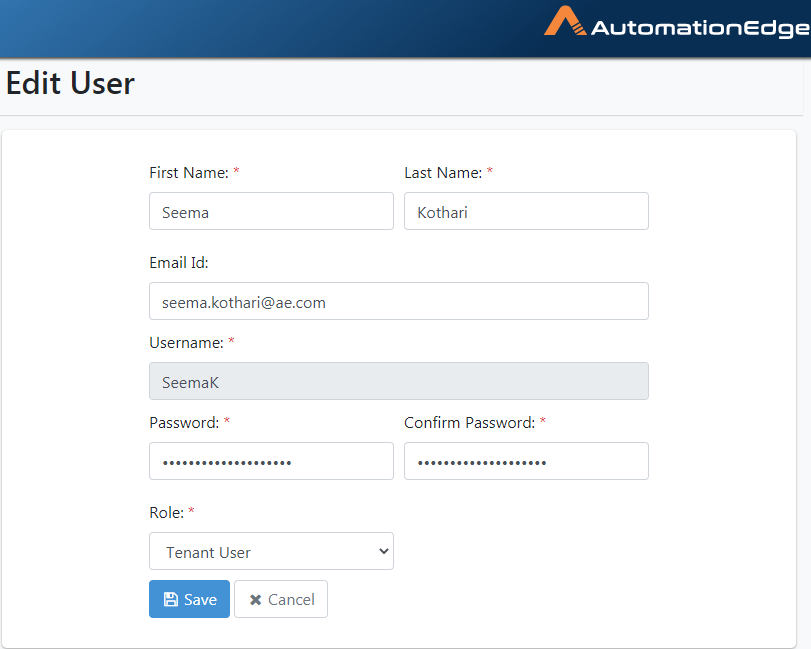
Figure 5.30: Editing Tenant Users Details
-
Click Save to save the edited details.
-
If a Tenant User was assigned a Group at the time of creation, the edit screen appears below. You can see the Add User to Groups field. However, it is not editable. Please note that a Group cannot be added to a Tenant User at the time of edit.
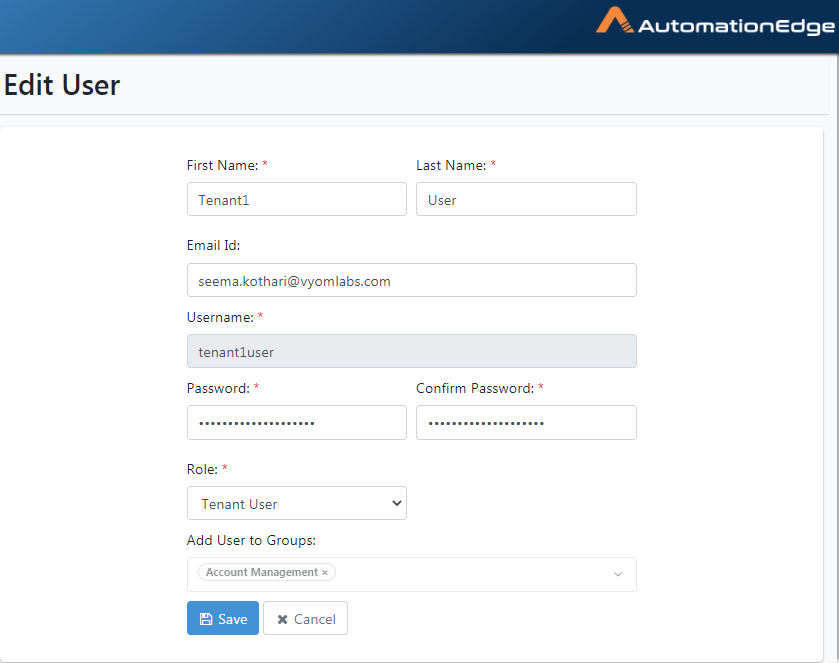
Figure 5.31: Add User to Group is not editable
User List: Delete
To delete the tenant user:
-
User the Menu Toggle to expand the main menu.
-
Click on the Users menu item. Click the Tenant Users sub-menu
-
 Click the Delete icon ( )
corresponding to the tenant user you wish to delete.
Click the Delete icon ( )
corresponding to the tenant user you wish to delete.
- Click OK to confirm user deletion. User deleted successfully message appears.

Figure 5.33: Confirming User Deletion
User List: Features/Permissions for other users
Table 12: Tenant Users Features
| Feature/Role | Admin | Workflow Administrator | User Administrator | Agent Administrator | Tenant User | Activity Monitor |
|---|---|---|---|---|---|---|
| Add New User Feature* | ✔ | - | ✔ | - | - | - |
| Upload Users | ✔ | - | ✔ | - | - | - |
| Advanced Search for Users | ✔ | - | ✔ | - | - | - |
| Edit/Delete | ✔ | - | - | - | - | - |
While Tenant Admin can create LDAP users with all roles, User Administrator can create LDAP users having Tenant user role only.
User Groups
Create New Group
Group Tenant users together to form groups of users. Assign workflow permissions to these groups. A user can be present in more than one group.
To add user group:
- Navigate to the Users 🡪 User Groups menu.
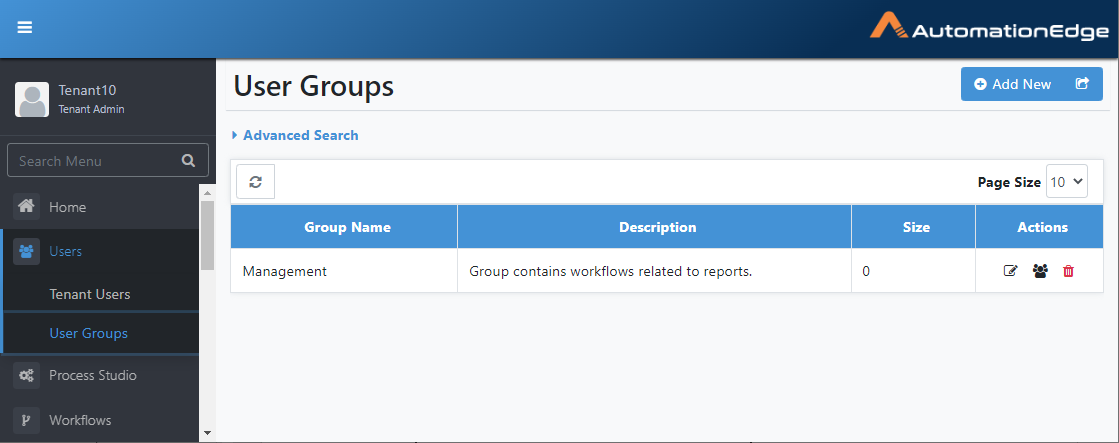
Figure 5.34: Adding User Groups
-
Click Add New. Create New Group dialog appears.
-
Enter Group Name and describe the created group.
-
Click Create to create a new group.
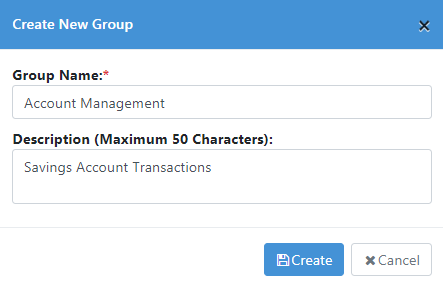
Figure 5.35: Entering User Group Details
- The new group is created as displayed below. A description of the fields is provided in the table below.
Table 13: Create New Group: Field/Button Description
| Field Name | Description |
|---|---|
| Create New Group: | |
| Group Name | To specify a user group name. |
| Description | To specify user group description. |
| Buttons: | |
| Create | To create a user group. |
| Cancel | To cancel creating a user group. |
Click  to export the user groups to a .csv file and download it.
Search User Group
A list of all user Groups is available as a tabular display.
There is no separate search field.
Figure 5.36: Search User Group
Table 14: Available User Groups Tabular Display
| Name | Description |
|---|---|
| Group Name | Displays the name of the user group |
| Description | Displays user group description |
| Size | Displays the size of the group |
| Actions: | Displays actions that can be performed on the user group. |
| Edit Group ( | To edit group. |
| Show Members ( | To view members of a group. |
| Delete Group ( | To delete group. |
User Groups: Advanced Search
For Advanced Search on user groups:
-
Navigate to the Users 🡪 User Groups menu.
-
Click Advanced Search.
-
You can select the column on which you wish to base your search.
-
If you select the Group Name column, the Comparator field appears. Choose your comparator.
-
Provide a value for the column.
-
Click the Add Filter button to add the filter. You can add more filters, if required.
-
Click Search. The search result based on the filter criteria is displayed.
-
Click Remove Filters to clear the filter criteria.
You can set how many records you want to view on a page by selecting the value from Page Size.
Edit User Group
To edit user group:
-
Click Users.
-
Click Users Groups.
-
Click the Edit icon (
) corresponding to the user group you
wish to edit.
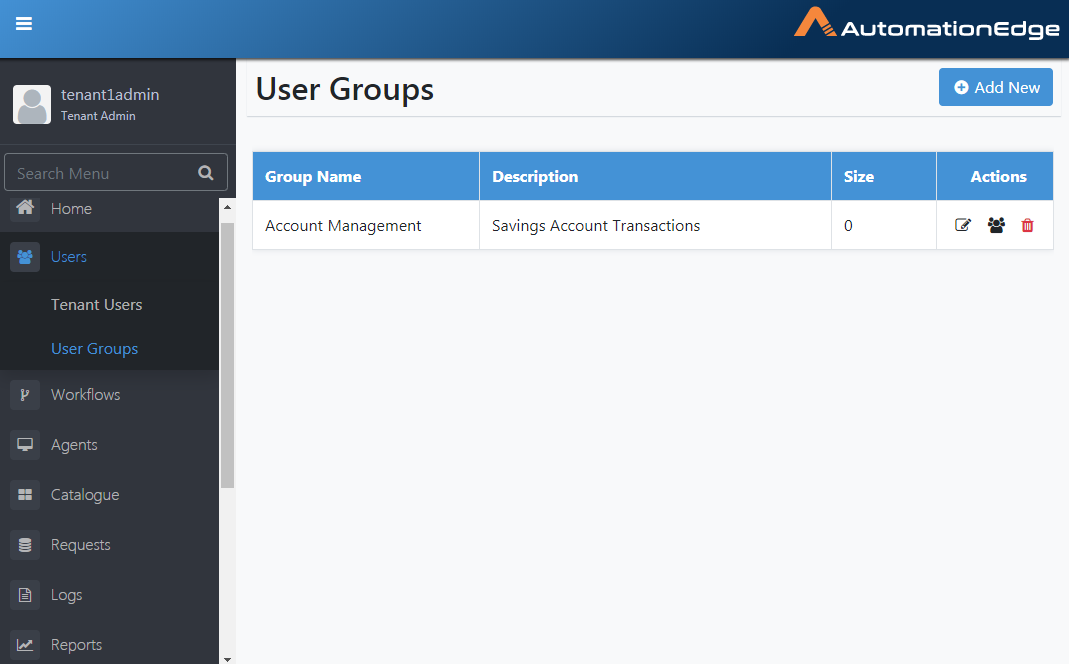
Figure 5.37: Editing User Details
- Edit the details
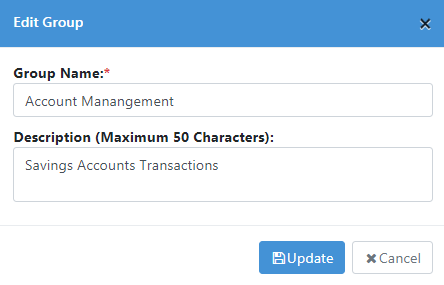
Figure 5.38: Saving Edited User Group Details
- Click Save to save the edited details.
User Groups: Delete
Delete a User Group, and all its users lose their membership.
Following are the steps to delete a user group:
- Navigate to the Users menu and User Groups sub-menu.
![]()
Click the Delete icon ( ) corresponding to the specific tenant user group you wish to delete from the list.
- Click Delete to confirm the deletion of the user group.

Figure 5.39: Confirming User Group Deletion
- A success message is displayed showing Group deleted successfully.
Adding User to a Group
To add a user to a group:
-
Navigate to the Users 🡪 User Groups menu.
-
Click the show members (
 ) icon
for a group.
) icon
for a group. -
Select users in the All Users list to add to the group.
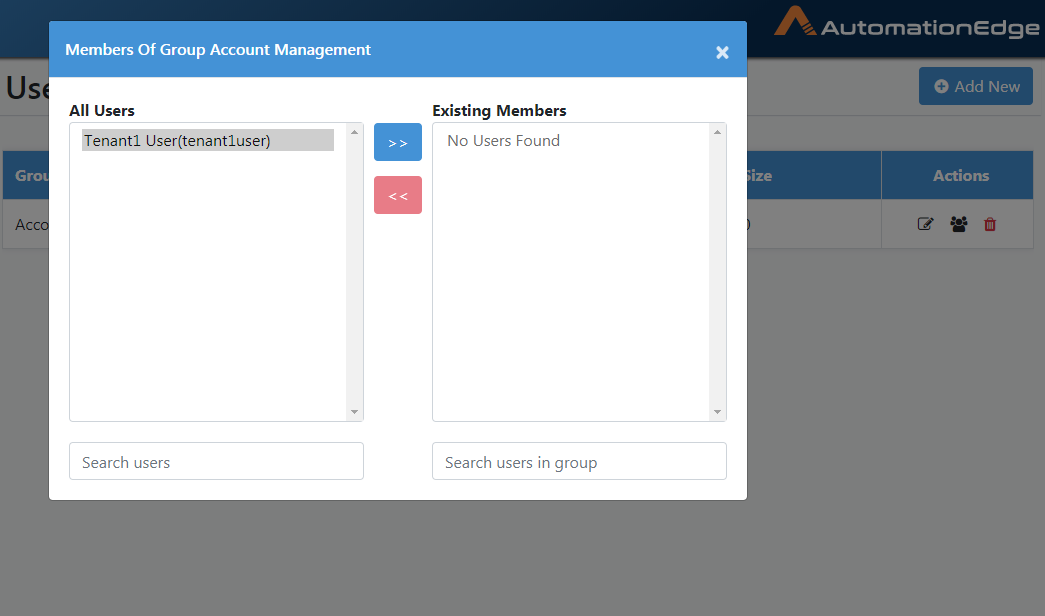
Figure 5.40: Adding Users to a Group
- Click the right arrows button to add users to the group successfully.
Removing User from a Group
To remove a user from a group:
-
Navigate to Users 🡪 User Groups. Click the show members (
) icon for a group. -
Select the user in the Existing Members list to remove. Click on the red arrows to remove the user from the group.
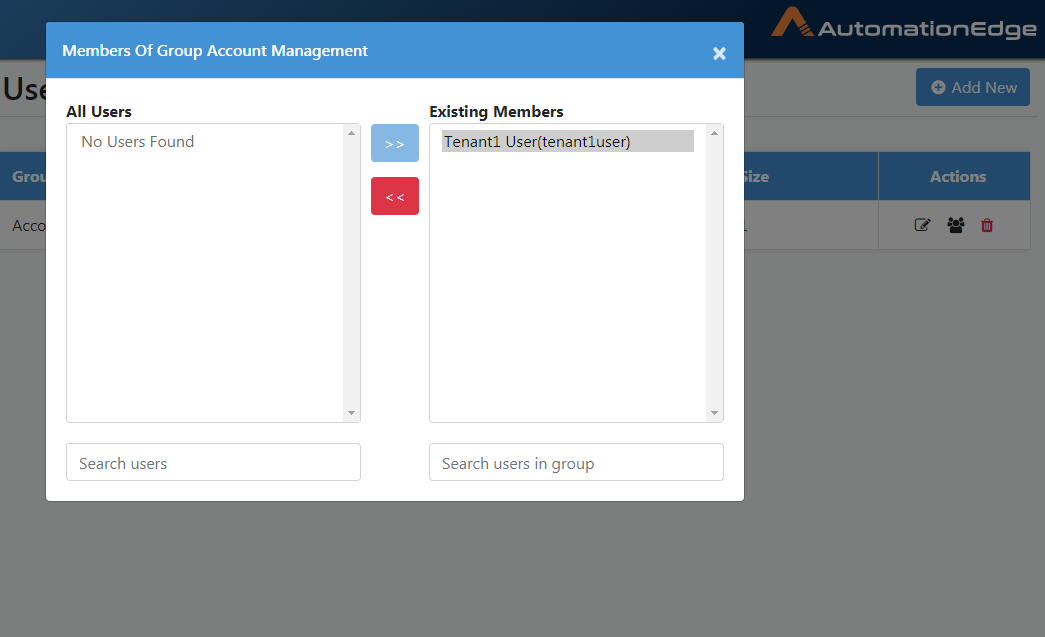
Figure 5.41: Select members to remove
- The users are removed from the group successfully.
User Groups: Features/Permissions for other users
Table 5.3: User Groups Features
| Feature/Role | Admin | Workflow Administrator | User Administrator | Agent Administrator | Tenant User | Activity Monitor |
|---|---|---|---|---|---|---|
| Create User Group | ✔ | - | ✔ | - | - | - |
| Edit User Group | ✔ | - | ✔ | - | - | - |
| Delete User Group | ✔ | - | ✔ | - | - | - |
| Add User to Group | ✔ | - | ✔ | - | - | - |
| Delete User from Group | ✔ | - | ✔ | - | - | - |