Settings
Email Configuration
Admins can configure an SMTP Configuration or Exchange Cloud Configuration for a tenant. The AEEngine will use the configured server details to send emails.
Add an SMTP email configuration
Following are the steps to configure SMTP.
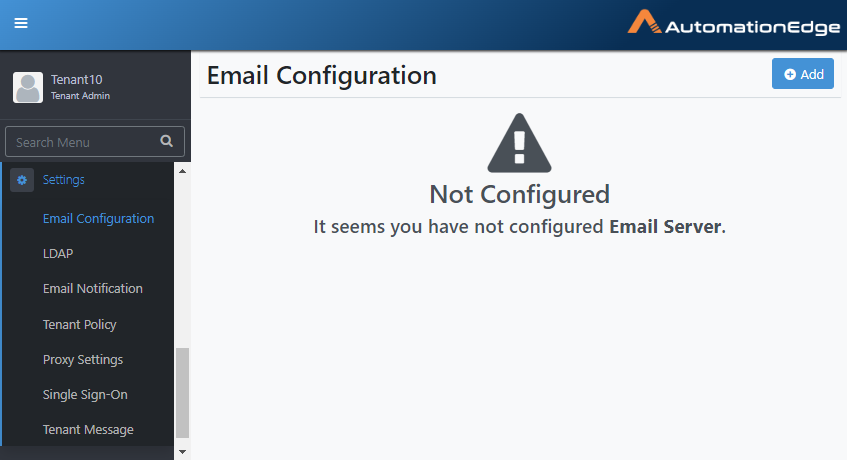
- Go to Settings→Email Configuration. The Email Configuration page appears.
Figure 21.1: Email Configuration page
- Click Add. The Configuration Type selection dialog appears.
- Select SMTP Configuration. The SMTP configuration detail fields appear.
Figure 21.2: SMTP Configuration page
- Enter the details, as required.
Table 21.1: SMTP Server Configuration Details
| Field | Description |
|---|---|
| SMTP host | Provide the fully qualified hostname or IP address of the LDAP server. |
| Port | Provide the port number for LDAP connectivity(e.g. for Gmail SMTP server SSL 465 TLS 582) |
| Authenticate | Select the checkbox to use authentication to connect to the SMTP server. |
| Username | Provide a username for authentication |
| Password | Provide a password for authentication |
| Encryption type | Choose from list: None, SSL or TLS |
| Sender name | Provide a personal name that will appear as from name in the email. It is an optional field. |
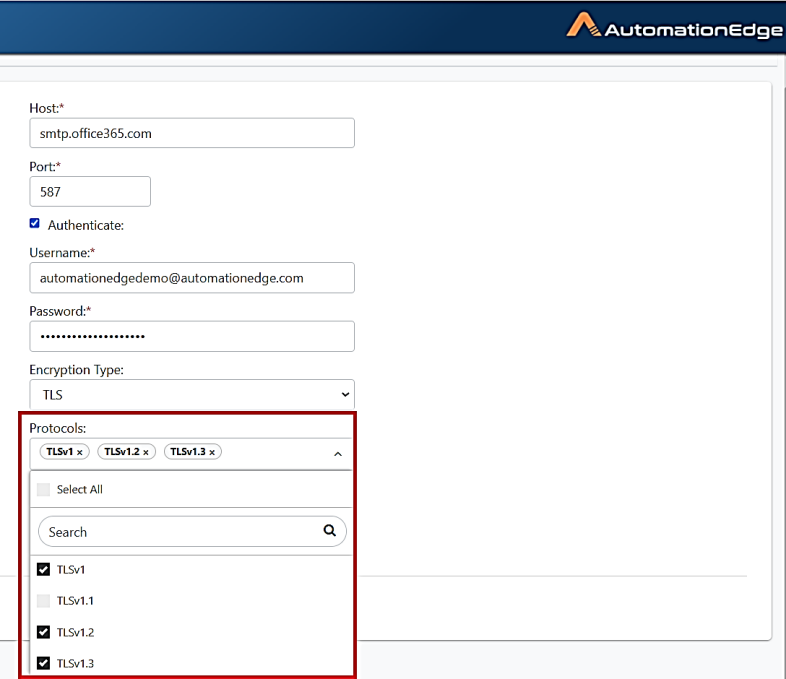
If user selects TLS as the Encryption Type, a Protocols list appears.
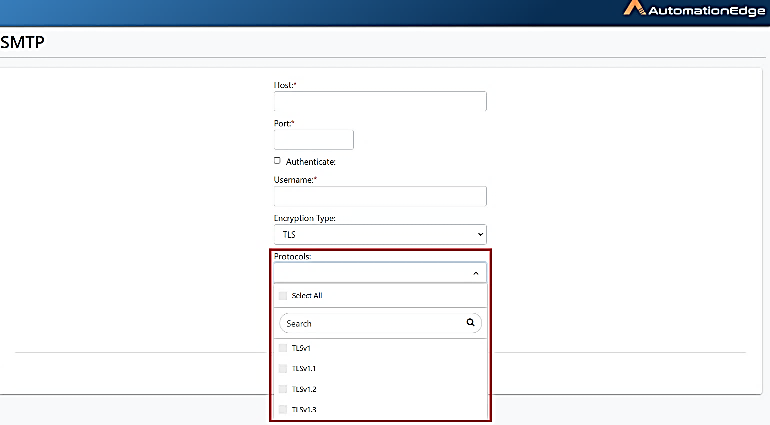 You can select one or more protocols for setting up SMTP configuration.
 |
|
-
Click Test to validate the SMTP connectivity. A message confirming the success of the connectivity appears.
-
Click Save. The SMTP configuration details are saved.
Add an Exchange Cloud configuration
To use Exhange Cloud configuration, you must have a Microsoft account. Create an account through the Azure AD portal. For details, see Appendix 17: Office 365 App Registration for Grant Type Refresh Token in Plugin Reference Guide 3.
Following are the steps to configure an Exchange Cloud configuration.
-
Go to Settings→Email Configuration. The Email Configuration page appears.
-
Click Add. The Configuration Type selection dialog appears.
-
Select Exchange Cloud Configuration. The Exchange Cloud configuration detail fields appear.
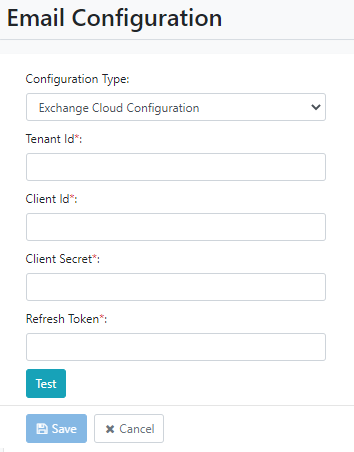
Figure 21.3: Exchange Cloud Configuration page
- Enter the details, as required.
Access your Microsoft account to fetch the details. The details will appear encrypted in the fields.
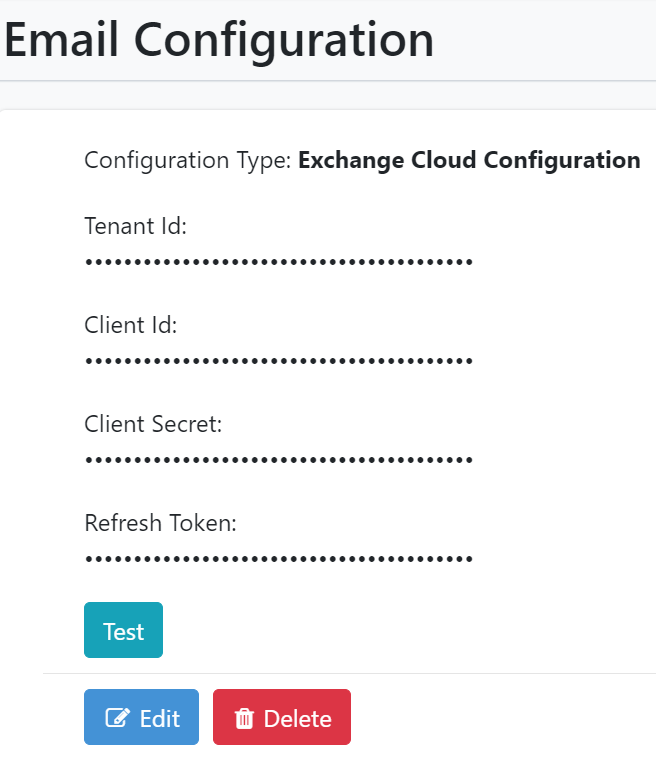
Figure 21.4: Exchange Cloud Configuration details
Table 21.2: SMTP Server Configuration Details
| Field | Description |
|---|---|
| Tenant Id | Copy-and-paste your Microsoft account Tenant Id. |
| Client Id | Copy-and-paste the client ID of the application created in your Microsoft account. |
| Client Secret | Copy-and-paste the client secret generated in your Microsoft account. |
| Refresh Token | Copy-and-paste the refresh token generated in your Microsoft account. |
-
Click Test to validate the Exchange Cloud connectivity. A message confirming the success of the connectivity appears.
-
Click Save. The Exchange Cloud configuration details are saved.
Change email configuration
You can set the email configuration details for either, SMTP Configuration or Exchange Cloud Configuration.However, to change the email configuration click Edit on the Email Configuration page, and enter the required details.
Delete email configuration
Following are the steps to delete an email configuration.
-
Go to Settings→Email Configuration. The Email Configuration page appears.
-
On the Email Configuration page, click Delete. The confirmation dialog appears. For example, if you are deleting SMTP Configuration, then the Confirm SMTP Configuration Deletion dialog appears.
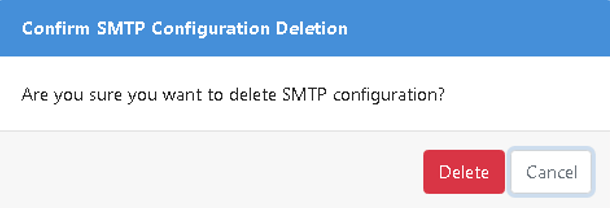
Figure 21.5: Confirm SMTP deletion dialog
- On the dialog, click Delete. The SMTP configuration deleted successfully message appears.
Settings: Features/Permissions for other users
Table 21.3: Settings Features
| Feature/Role | Admin | Workflow Administrator | User Administrator | Agent Administrator | Tenant User | Activity monitor |
|---|---|---|---|---|---|---|
| Configure SMTP | ✔ | - | - | - | - | - |
| Edit SMTP | ✔ | - | - | - | - | - |
LDAP
In AutomationEdge, there are three user types: Native, LDAP and SSO. AutomationEdge authenticates Native users locally, LDAP users on LDAP servers, and SSO users on an IDP server.
Configure an LDAP in the settings menu of a Admin; once configured, you can create users of the type LDAP.
Add LDAP Configuration
The configure LDAP settings,
-
Click Settings Tab and LDAP sub-menu.
-
The LDAP configuration page appears as shown in the following figure.
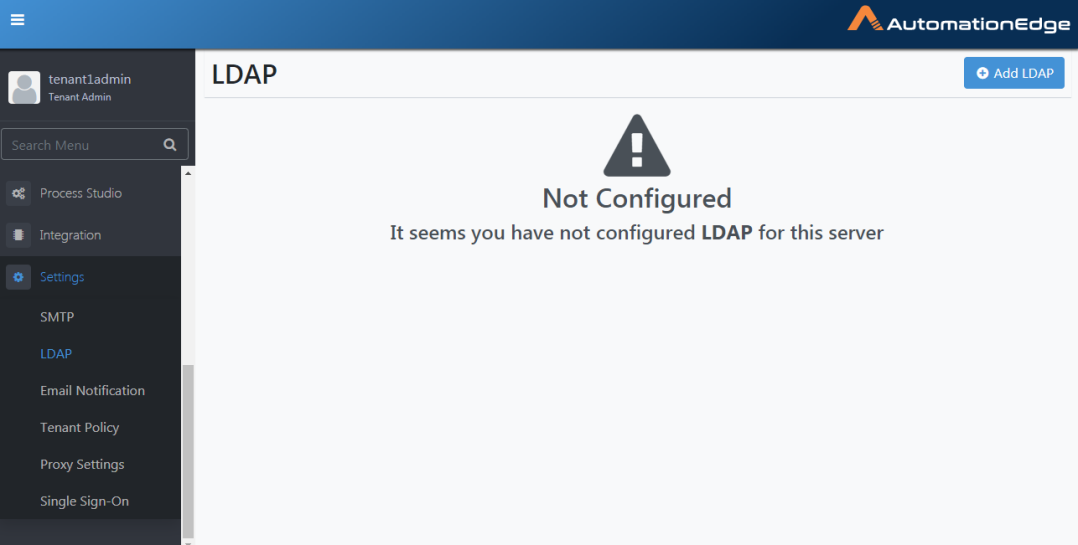
Figure 21.6: Configure LDAP
- Click Add LDAP
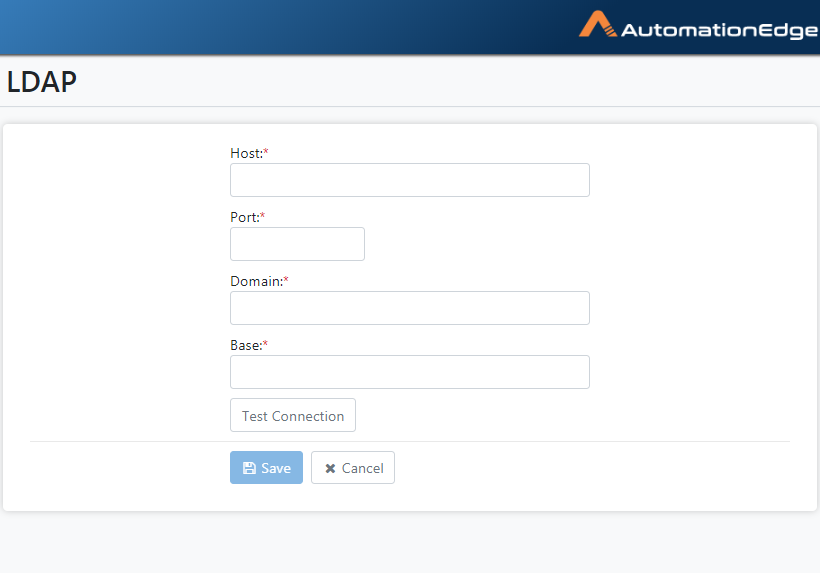
Figure 21.7: LDAP Configuration page
-
Provide the LDAP configuration Settings and Test Connection.
-
Click the Save button to save LDAP settings.
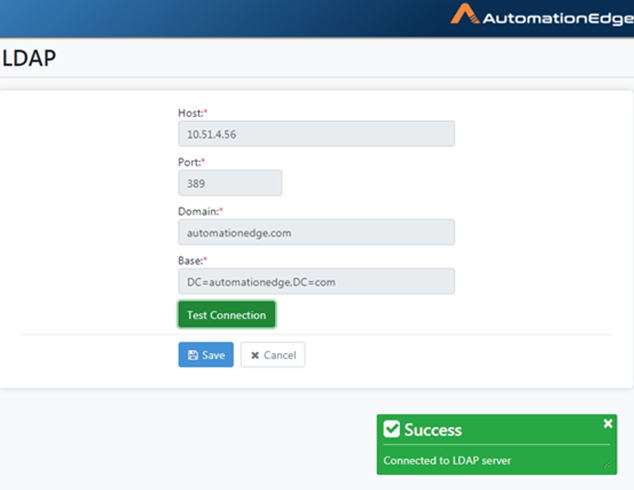
Figure 21.8: LDAP Configurations and Test Connection
- Save LDAP settings.
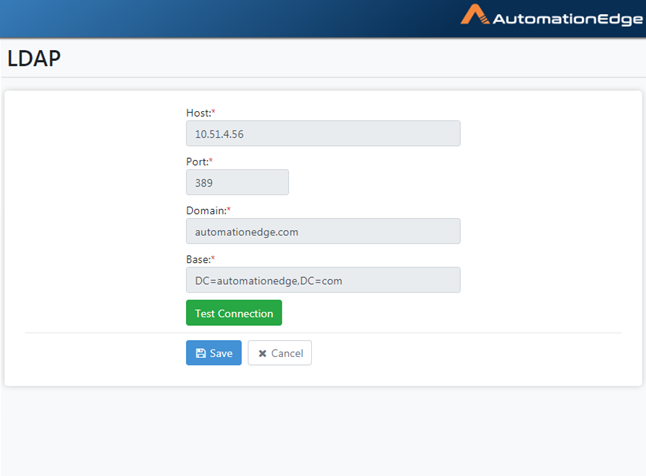
Figure 21.9: Save LDAP Configurations
- View LDAP settings saved Success Message.
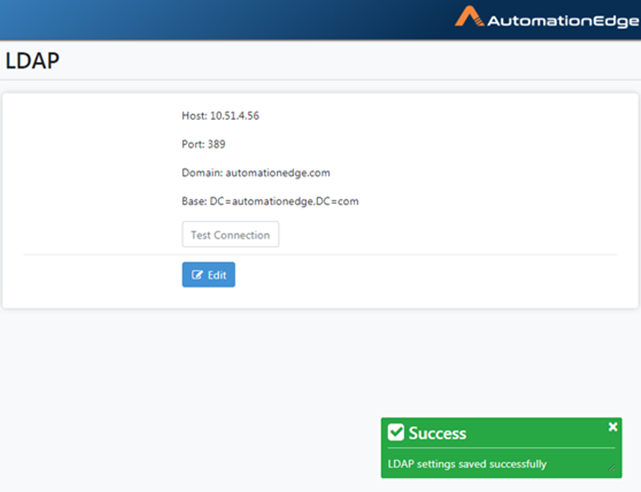
Figure 21.10: LDAP Configurations Saved Success Message
The following table describes the fields for an LDAP configuration.
Table 21.4: LDAP Configuration
| Field | Description |
|---|---|
| Protocol | The protocol is LDAP by default. |
| Host | Provide the fully qualified hostname or IP address of the LDAP server. |
| Port | Provide the port number for LDAP connectivity. |
| Domain | Provide the fully qualified domain name of the LDAP server. |
| Base | The server will search for a user starting at the base dn (dc=example, dc=com). |
| Buttons: | |
| Test Connection Button | Click to test LDAP connectivity. |
| Save Button | Click to save LDAP configurations. |
| Cancel Button | Click to Cancel. |
Settings: Features/Permissions for other users
Table 21.5: Settings Features
| Feature/Role | Admin | Workflow Administrator | User Administrator | Tenant User |
|---|---|---|---|---|
| Create LDAP User | ✔ | - | ✔ | - |
| Edit LDAP User | ✔ | - | - | - |
User Administrators can create LDAP users with the role Tenant User only.
Email Notification
Introduction
AutomationEdge supports sending notifications via email to different stakeholders such as Admin, Tenant Users. One of the scenarios for sending notifications is sending emails to users if a workflow request fails.
The SMTP server configuration is at the Tenant level. All Agents configured under this tenant have access and can use this SMTP server to send emails.
Notification Scenarios
AutomationEdge will support sending notifications in scenarios, as discussed in the following sections.
Pending Requests
Set the Higher and lower thresholds for pending requests. When the number of pending requests reaches the higher threshold, AutomationEdge stops accepting new requests. Scheduled requests also fail. In such a scenario, a notification is sent to all System Administrators and Admins by default.
However, one can enable notification for pending requests, which triggers notification once the number of pending requests reaches the lower threshold, and notification can be sent to System Administrators, Admins and email ids as configured.
Following are the steps to configure pending requests:
-
Go to the Settings menu and Email Notification sub-menu.
-
In case you have not yet configured SMTP, the Email Notification page appears as below.
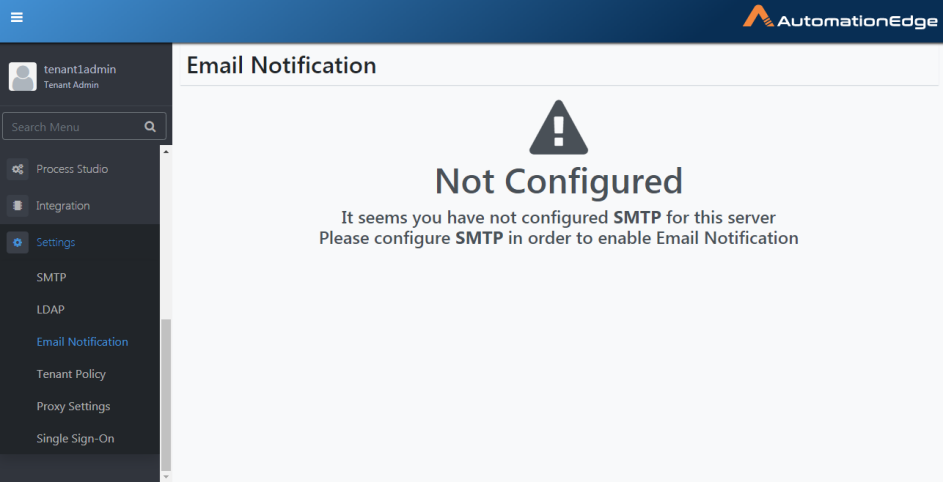
Figure 21.11: Email Notification
- If the SMTP configuration is available, the following Email Notification page appears. Click Add next to the Notification feature you wish to set up.
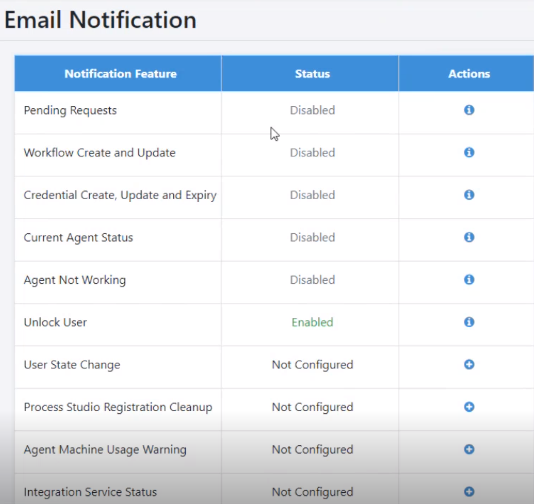
Figure 21.12: Email Notification
-
First, click the Details icon (
) next to Pending Requests.
-
Pending Requests configuration page appears. Click the toggle to enable the feature and Click Save.
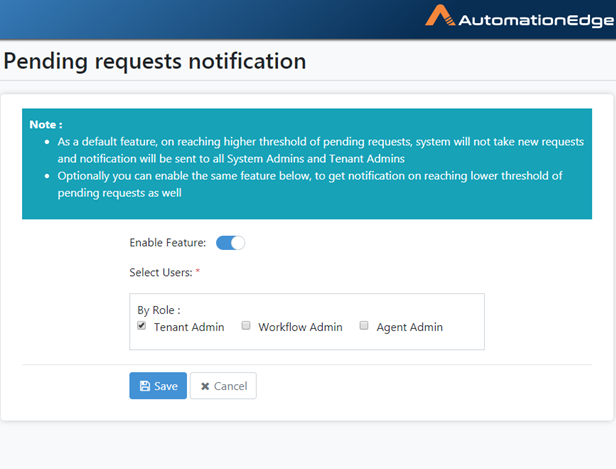
Figure 21.13: Configurations for Email Notification for Pending Requests
- A message displays showing Notification Configuration saved successfully.
Workflow Configuration Changes
When workflow configuration parameters are changed while editing a workflow, an email notification can be sent to all Admins, Workflow Administrators and configured email ids.
Following are the steps to configure Email notification for workflow configuration changes,
-
Go to the Settings menu and Email Notification sub-menu.
-
Click the Details icon (
) next to Workflow Configuration Changes.
-
Click the toggle to enable the Workflow configuration changes notification feature.
Select users by role by enabling checkboxes or select usernames to be notified from the dropdown list. The following snapshot shows user tenant1admin is selected. Click Save.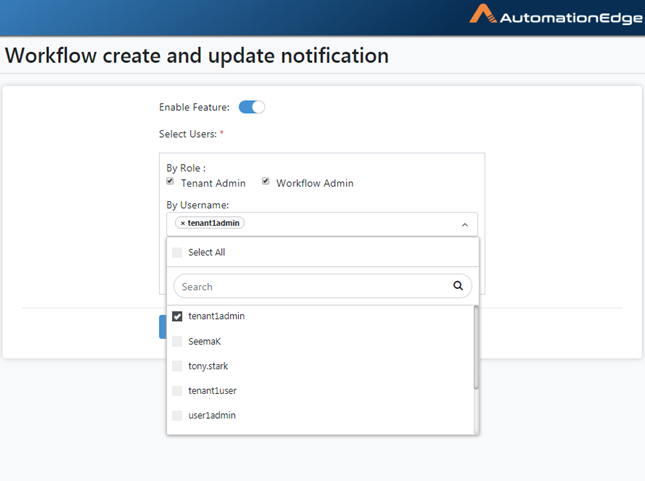
Figure 21.14: Select Users
- A message displays showing Notification Configuration saved successfully.
Credential Modification/Expiry
The configured users such as the Admins and Workflow Administrators receive an email notification when a credential is about to expire or is modified.
Following are the steps to configure Credential Create, Update and Expiry,
-
Go to the Settings menu and Email Notification sub-menu.
-
Click Details icon (
) next to Credential Create, Update and Expiry.
-
Click the toggle to enable the feature.
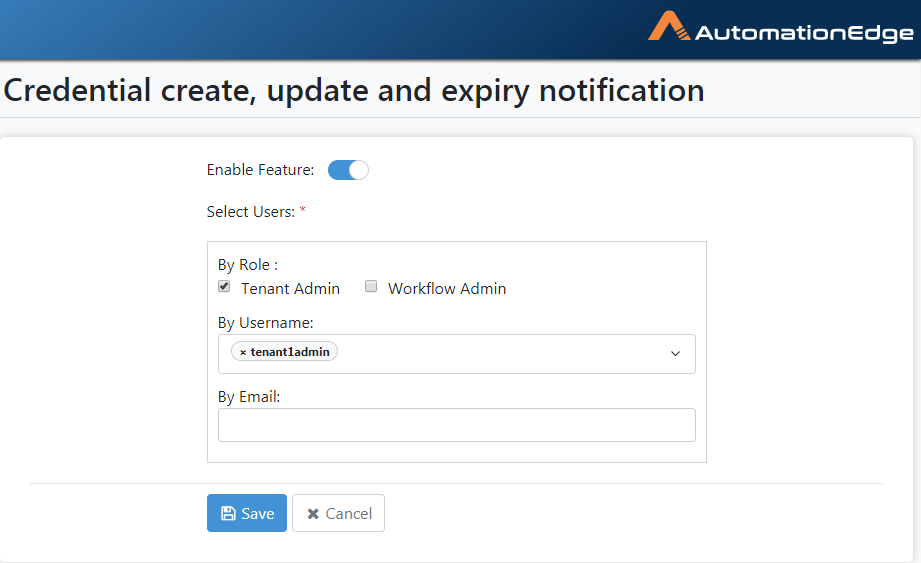
Figure 21.15: Email Notification for Credential Modification and Expiry
- A message displays showing Notification Configuration saved successfully.
Current Agent Status
A notification regarding the number of running requests, number of Running agents and their status etc., can be periodically sent to all Admins, Workflow Administrators and configured email ids. Set the period in hours.
Following are the configuration steps:
-
Go to the Settings menu and Email Notification sub-menu.
-
Click Details icon (
) next to Current Agent Status.
-
Click the toggle to enable the feature.
-
Choose a time in Start time and provide the end time if the interval is non zero.
-
Select roles and specify AutomationEdge usernames or emails to receive notifications.
-
Click Save.
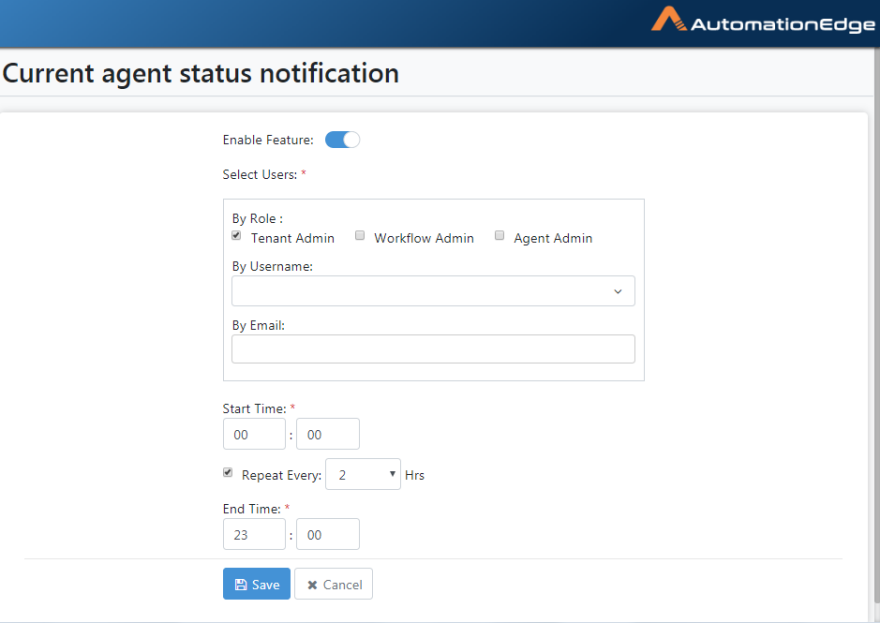
Figure 21.16: Configurations for enabling Current Agent Status
-
A message displays showing Notification Configuration saved successfully.
-
The configured users receive an email about Current Agent Status.
Agent Not Working (Unknown/Dead)
If an Agent goes to an unknown state or stops, configure Agent Not Working to send an email notification. The Notification can be sent to all Admins, Workflow Administrators, and configured email ids.
In addition, the notification lists the workflows assigned to the agent.
Note: If the workflows are not assigned to other agents, then the workflows will not get executed.
Following are the steps to configure Agent not working,
-
Go to the Settings menu and Email Notification sub-menu.
-
Click the Details icon (
) next to Agent Not Working.
-
The Agent not working notification page appears, as seen below.
-
Click the toggle to enable the feature, select one or more roles, users and specify emails. Click Save.
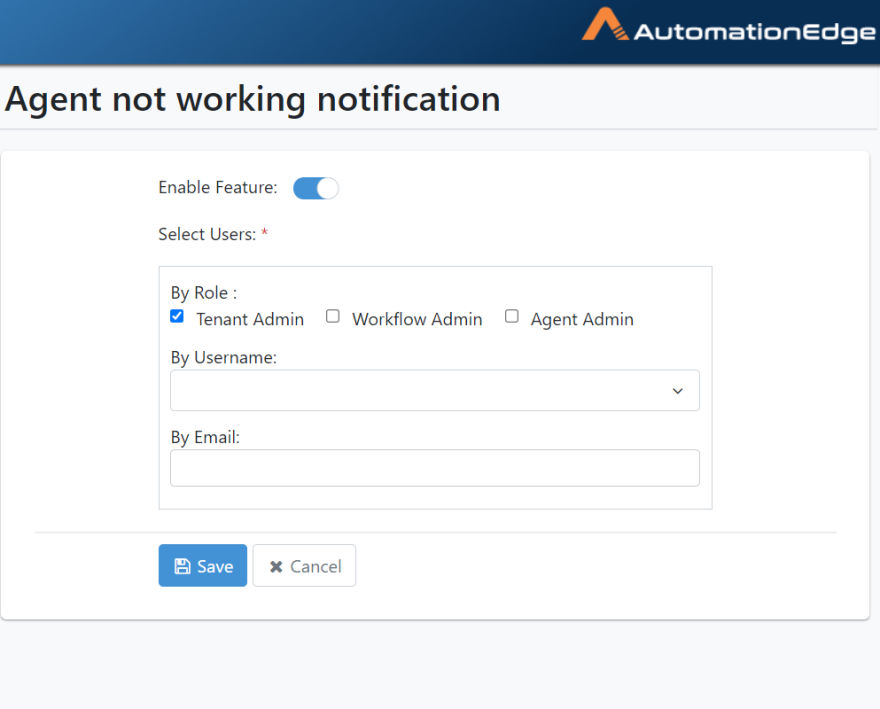
Figure 21.17: Agent Not Working Notification Configuration
-
A message displays showing Notification Configuration saved successfully.
-
An email about the Current Agent status, such as Agent Stopped, Agent gone to Unknown Status, is sent to all the users configured in the Notification settings.
Unlock User
Unlocking a user account sends an email to the user with the new password. SMTP configuration is a prerequisite to send the email.
Following are the steps to configure:
-
Go to the Settings menu and Email Notification sub-menu.
-
Click the Details icon (
) next to Unlock User.
-
The Unlock User notification configuration page appears.
-
Click the toggle to enable the feature. Click Save.
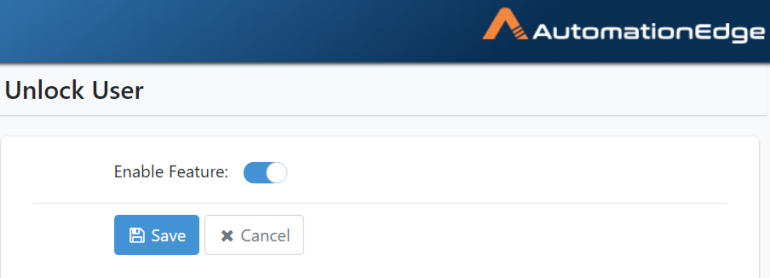
Figure 21.18: Enable Email Notification for Reset Password
-
A message displays showing Notification Configuration saved successfully.
-
With this notification setting, users unlocked with a new password receive an email.
User State Change
User State Change sends an email to the user when there is a change in the status of the user when nightly jobs are run. SMTP configuration is a prerequisite to send the email.
Following are the steps to configure:
-
Go to the Settings menu and Email Notification sub-menu.
-
Click the Details icon (
) next to User State Change.
-
The User State Change notification configuration page appears.
-
Click the toggle to enable the feature. Click Save.
-
A message displays showing Notification Configuration saved successfully appears.
Process Studio Registration Cleanup
All the Process Studio licenses are released by the AE Midnight Scheduler for PS registrations that are deleted during a day. Use the Process Studio Registration Cleanup feature to send an email notification to users.
Following are the steps to configure:
-
Go to the Settings menu and Email Notification sub-menu.
-
Click the
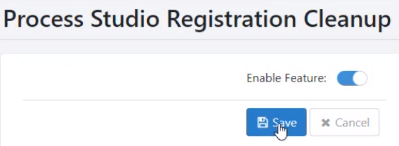
icon next to Process Studio Registration Cleanup. The Process Studio Registration Cleanup dialog appears.
-
Toggle the Enable Feature switch to apply the feature.
-
Click Save. A message displays showing Notification Configuration saved successfully appears.
Agent Machine Usage warning
You can configure 'Agent Not Working' to send an email notification if machine usage in terms of CPU, disk usage, memory usage and Heap usage exceeds the threshold set under Agent->Agent Settings. The Notification can be sent to all Admins, Workflow Administrators and configured email ids.
Following are the steps to configure Agent not working,
-
Go to the Settings menu and Email Notification sub-menu.
-
Click the Details icon (
) next to Agent Machine Usage Warning. The Agent Machine Usage Warning page appears.
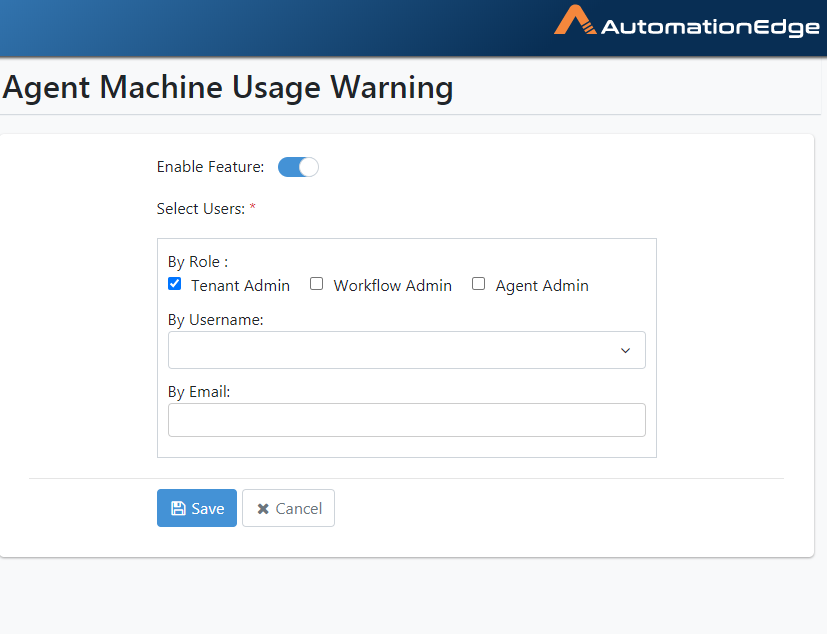 Figure 21.19: Agent Not Working Notification Configuration
-
Click the toggle to enable the feature.
-
Select users to send notifications by role, username or email. Click Save.
-
A message displays showing Notification Configuration saved successfully.
Integration Service Status
The configured users such as the Admins and Workflow Administrators receive an email notification upon addition, deletion or update of an Integration Service
Following are the steps to configure the Integration Service Status notification feature,
-
Go to the Settings menu and Email Notification sub-menu.
-
Click Add (
) next to Integration Service Status. The Integration status notification page appears.
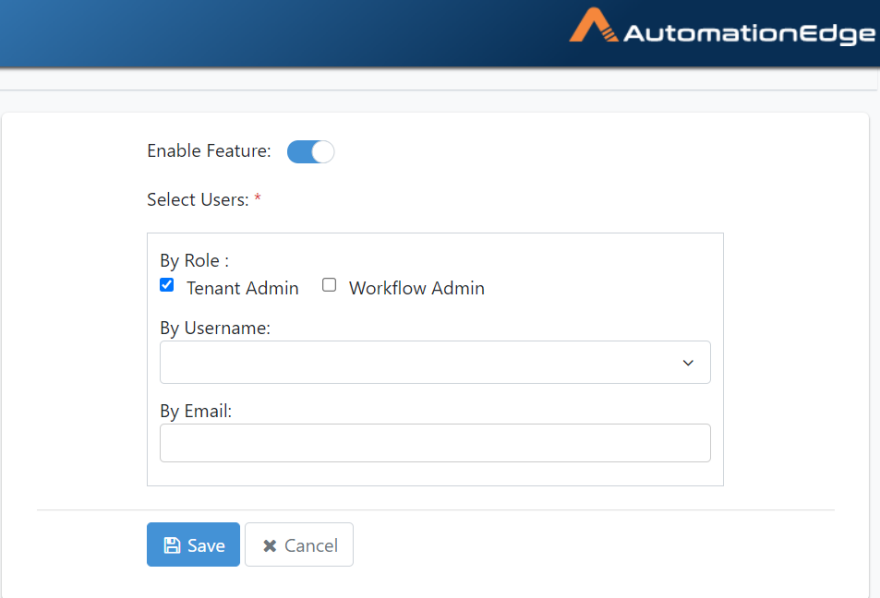
Figure 21.20: Notification Configuration for Integration Service Status
-
Click the toggle to enable the feature.
-
Select users for notification by role, username or email and click Save.
-
A message displays showing Notification Configuration saved successfully.
Note: The following are notification settings at the workflow level
- Workflow request fails
Enable and configure this setting to receive an email notification when workflow execution (request) fails. The recipients included in the workflow configuration receive an email.
- Workflow requests taking a long time to run
Enable and configure this setting to receive an email notification when the workflow execution time exceeds the 'Maximum completion time' specified in the workflow configuration. The recipients included in the workflow configuration receive an email.
License Consumption
Use the License Consumption feature to notify users about license renewal. SMTP configuration is a prerequisite to send the email.
Note:
-
The License Consumption notifications are applicable for Tenants using Consumption Based License.
-
All the license related notifications will be sent to all the Admins by default. You need to configure for other admin roles of a tenant and additional email ids, if required.
Following are the steps to configure:
-
Go to the Settings menu and Email Notification sub-menu.
-
Click the
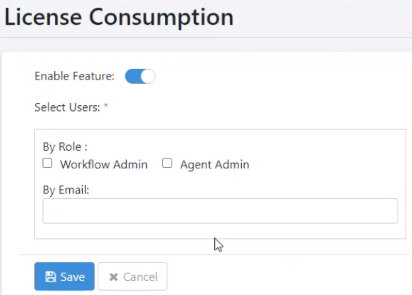
icon next to License Consumption. The License Consumption notification configuration page appears.
-
Toggle the Enable Feature switch to apply the feature.
-
In the Select Users section, under By Role select the Workflow Admin or Agent Admin checkbox. Also, in the By Email field provide the email address of the users who will receive the notification.
-
Click Save. A message displays showing Notification Configuration saved successfully appears.
Holiday Calendar Renewal
Use the Holiday Calendar Renewal feature to configure email notifications, which will notify the users to renew / create holiday calendar for the upcoming year. SMTP configuration is a prerequisite to send the email.
Note: To use the feature, ensure that you have created the first holiday calendar. For details, see [HolidayCalendar] .
As the current year comes to an end, the application checks if the holiday calendar for the new year exists for each tenant. If the holiday calendar does not exist and schedules are associated with the calendar, then the users receive email notifications depending on the notification settings.
Users will receive notifications as follows:
December 01, December 15, and every day between, December 26 to 30.
Following are the steps to configure:
-
Go to the Settings menu and Email Notification sub-menu.
-
Click the
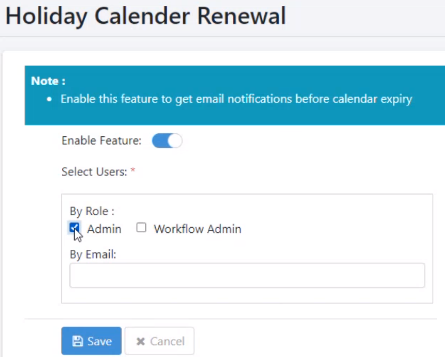
icon next to Holiday Calendar Renewal. The Holiday Calendar Renewal notification configuration page appears.
-
Toggle the Enable Feature switch to apply the feature.
-
In the Select Users section, under By Role select the Admin or Workflow Admin checkbox. Also, in the By Email field provide the email address of the users who will receive the notification.
-
Click Save. A message displays showing Notification Configuration saved successfully appears.
Role Update
Use the Role Update feature to configure email notifications, which will notify users when a user defined role is added, modified, or deleted. SMTP configuration is a prerequisite to send the email.
Following are the steps to configure:
-
Go to the Settings menu and Email Notification sub-menu.
-
Click the
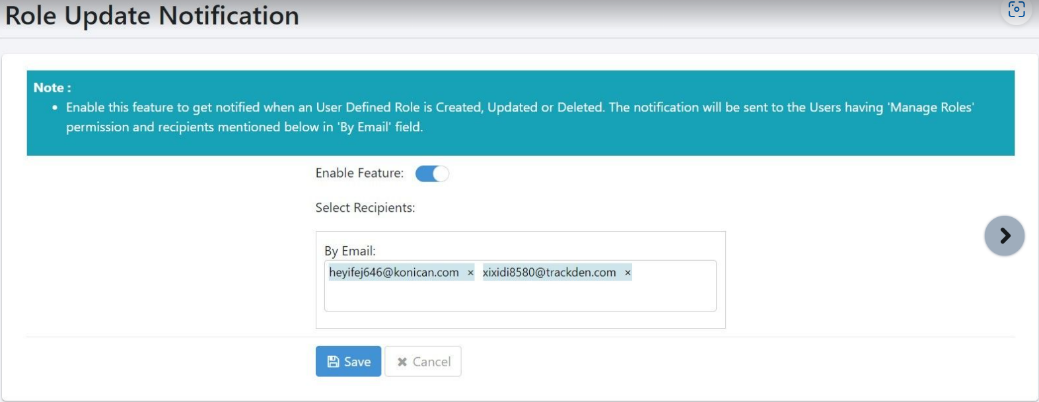
icon next to Role Update. The Role Update Notification configuration page appears.
-
Toggle the Enable Feature switch to apply the feature.
-
In the Select Recipients section, under By Email provide the email addresses of users you want to send the email to. In addition, users with Manage Roles permission will receive the email.
-
Click Save. A message displays showing Notification Configuration saved successfully appears.
Configurations
The section discusses the Login Policy, Password Policy, and Login Session Control configuration for AutomationEdge login. Password policy can be set and modified by an Administrator at Tenant level.
View Tenant policy configurations
To view the configuration details:
-
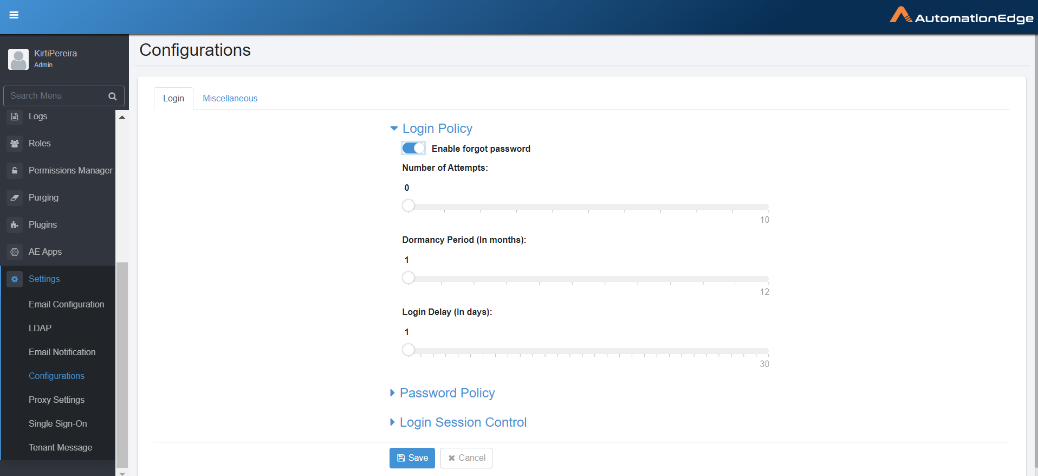
Navigate to Settings 🡪 Configurations menu. The Configurations page appears.
-
Click the respective links to view the respective policy details:
Login Policy: View the configured number of login attempts.
Password Policy: View the password policy configuration.
Login Session Control: View the concurrent login configuration.
Modify Configurations
To modify the configuration details:
- Navigate to Settings 🡪 Configurations menu. The Configurations page appears.
- Click Login Policy, and toggle the switch to enable user to reset the forgotten password. And, then enter the following details:
| Login Policy | |
|---|---|
| Number of Attempts | As seen in the figure, set the value for the ‘Number of Attempts’ between zero and ten (0-10). The default attempt limit is 0, i.e. there is no limit on the number of wrong password attempts. |
| The Admin can set the number of login attempts. The user is notified of the remaining attempts whenever they log in with the wrong password. | |
| Once the user reaches the unsuccessful login attempt limit set by the Admin, the user account is locked. | |
| The locked user account can be unlocked only by the Admin by setting the new password.AutomationEdge sends the new password to the user email if, | |
| - User registration has an email Id. | |
| - SMTP configuration is available for the tenant. | |
| - Email Notification is enabled for Password change. | |
| Else, the user has to contact the Admin. When users log in after account unlock, there is a force password change. | |
| The above is also applicable to LDAP users. For unlocking NATIVE users, the Admin has to provide a new password; however, there is no requirement for password resetting in the case of LDAP users. | |
| Dormancy Period (In months) | If an account has had no activity for a long period, then the account is marked as Dormant. The minimum setting for Dormancy is one month. You may increase the dormancy period up to 12 months. User Accounts are marked dormant during the nightly job. |
| A Admin can change this state by enabling or disabling it, or it is automatically disabled. | |
| Login delay (In days) | When Admin or User Administrator enables a locked/disabled/dormant user account, a user remains enabled until it logs in. On login, an enabled user is marked as Active and logs in. |
| By default, the user should log in to the account on the same day else the account is automatically disabled again. The default setting is one day. This setting is configurable can be increased to a maximum of 10 days. However, if a user fails to log in during this period, the user is disabled. |
- Click Password Policy, and toggle the switches for the respective fields:
| Policy Password | |
|---|---|
| Password Expiry / | |
| Maximum password age (In months) | Set the value for Password Expiry (In months) between zero and twelve (0-12). The default is Password Expiry Months is 0, i.e. there is no password expiry. The Admin can set the Password Expiry (In months). |
| This policy forces the user to change their passwords within the duration set by the Admin. Set the period in months. User must change their password within the period; otherwise, it forces to change password. Users will be notified before 15 days, seven days, one day and on the day of password expiry, at the time of login. | |
| Password History | The default and minimum value of the password history is one (1), i.e. it compares the new user password with at least one previous password. |
| When Admin changes the default value of password history to greater than 1, then after that, whenever the user changes the password, the system starts to store the user’s passwords in a password history table. Any new password changed by the user is checked with all previous passwords present in the history table. | |
| This feature will force the user to use new passwords when he changes the password. Depending on the setting, users will not be able to use the last ‘N’ passwords while changing it. | |
| The user is notified with an error message if the new password is the same as one of the old passwords. | |
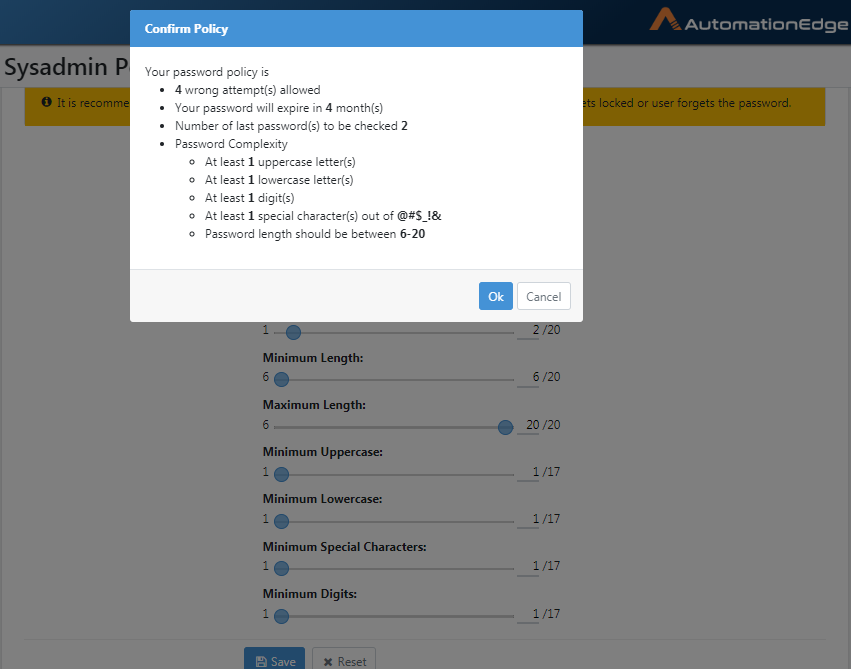
| Password Complexity | Password Complexity comprises the following five attributes:- Maximum Length/Length of Password: Set the value for Maximum Length between six and twenty (6-20). The default value is 20, i.e. the maximum length can be up to 20 characters.- Minimum Uppercase: Set the value for Minimum Uppercase in between zero and seventeen (0-17). The default value is 1, i.e. there must be at least one uppercase letter. - Minimum Lowercase: Set the value for Minimum Uppercase in between zero and seventeen (0-17). The default value is 1, i.e. there must be at least one lowercase letter. - Minimum Special Characters: Set the value for Minimum Uppercase in between zero and seventeen (0-17). The default value is 1, i.e. there must be at least one Special Character [@,#,$,&,_]. - Minimum Digits: Set the value for Minimum Digits in between zero and seventeen (0-17). The default value is 1, i.e. there must be at least one Digit. |
- Click Login Session Control, and enter the following field details:
| Login Session Control | |
|---|---|
| If you have configured the Concurrent Login details in the ae.properties file (for details see, Installation guide prior to release 7.7.2), then you will have to reconfigure the details through the AE UI. | |
| Control Options | Select from any of the following option to configure for concurrent logins to AE: |
| - Allow Multiple Sessions: The default configuration. If the option is selected, a user can login concurrently and have multiple active sessions at the same time. | |
| - Prevent New Sessions: If the option is selected, the user will be unable to log on to a new session if a session is already in progress. If a session is active and a user tries to login again then an error message appears. | |
| - Invalidate Old Sessions: If the option is selected, then the user will log out of the current active session, and will log into the new session. | |
| User Exception List | Select the tenant users for whom you don't want to allow concurrent logins. |
- Click Save. The details are saved and the Confirm Policy dialog appears.
-
Click Ok. The password policy updated successfully message appears.
-
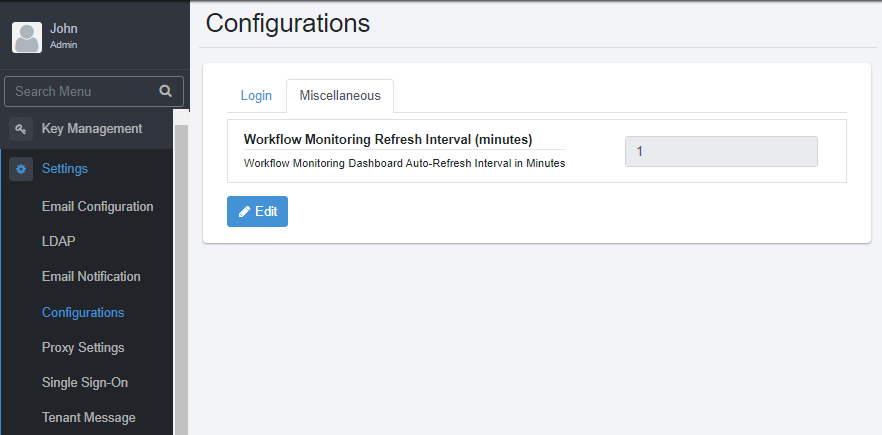
Click Miscellaneous tab, and then click Edit. The box is available.
-
In the box, enter the time in minutes for refreshing the workflow monitoring view automatically. Save the details.
Note: The minimum time you can configure for auto-refreshing the view is one (1) minute.
Vault Connections
The Admin can use the assigned security vaults to set the vault connections and retrieve the credentials stored in the vault. You can use the vault credentials to work with the workflows.
IMPORTANT:
-
The Security Vaults option is available only if you set the enableSecurityVault key to true in the aeui-config.properties file.
-
You will have to change the key value in the aeui-config.properties file every time you upgrade the AE UI.

Set vault connections
Setting vault connection,
-
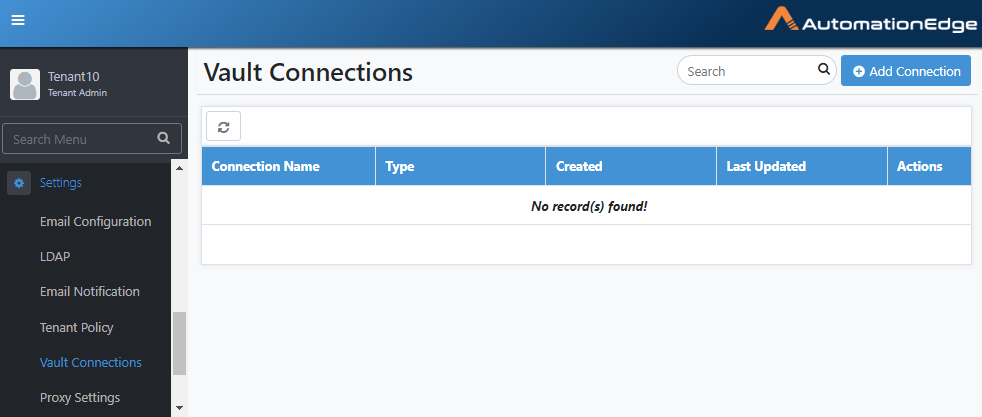
Go to Settings🡪Vault Connections. The Vault Connections page appears.
-
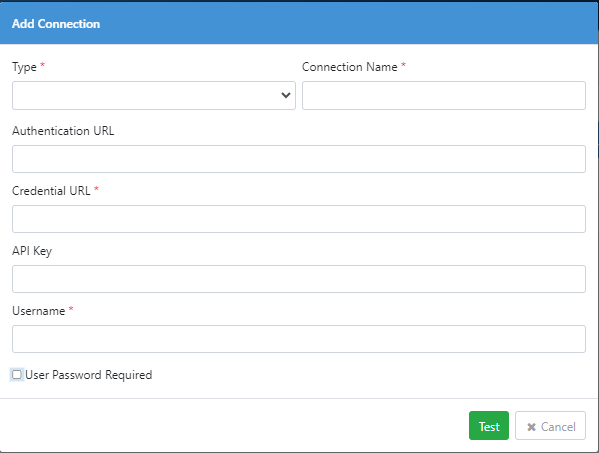
Click Add Connection. The Add Connection page appears.
-
Enter the field details.
| Field Name | Description |
|---|---|
| Type | Select the security vault. For example, BeyondTrust |
| Note: The system administrator can assign multiple security vaults to a tenant. | |
| Connection Name | Enter a unique name for the vault connection. |
| Authentication URL | Enter the security vault's sign-in API URL. For example, BeyondTrust's sign-in API URL. |
| Credential URL | Enter the security vault's credential API URL. For example, BeyondTrust's credential API URL. |
| API Key | Enter the unique API key through which you will communicate with the security vault. |
| Username | Enter your security vault's username. |
| User Password Required | Select the checkbox if you want to sign in with your security vault's password. Else, clear the checkbox. |
| Note: The Password field is available, if you select the checkbox. | |
| Important: To allow password less sign in at BeyondTrust, ensure to clear the User Password Required checkbox under Configuration → API Registrations. | |
| Password | Enter your security vault's password. |
- Click Test. A message confirming that vault connection is established successfully appears.

Note:
-
To modify the vault connection details, click Edit.
-
To delete the vault connection details, click Delete.
Proxy Settings
Set Proxy settings at,
-
Tenant Level
-
Individual Agent Level
-
Process Studio Level manually
A Proxy setting at the Tenant level
Configure Proxy Settings on the Proxy Settings menu on AutomationEdge UI.
A Proxy setting at Agent level
Agents use the Proxy settings at Tenant level or set Proxy Settings on AutomationEdge UI while downloading an Agent or manually copy <Tenant Name>-proxy-config.properties file to Agent\conf folder. It stores the Proxy settings in the database or a file <Tenant Name>-proxy-config.properties.
-
Proxy Settings are at the Tenant level, are visible during Agent download by default.
-
Accept the tenant level Proxy setting or set Proxy during Agent download; it takes precedence over the option above.
-
The Proxy can also be set at the agent level manually by copying <Tenant Name>-proxy-config.properties in the Agent/conf directory.
-
There are two scenarios for Agent upgrade for the AutomationEdge server upgrades from versions below 5.3.0 to 5.3.0 and above.
-
Running Agents: If the Agent is running during AutomationEdge upgrade, it goes for auto-upgrade. Since there is no Proxy configuration yet, the Agent does not pick up any Proxy settings; Configure Proxy settings manually.
-
Stopped Agents: If an Agent stops during AutomationEdge upgrade and Proxy is available, it picks up the Proxy settings during the Agent startup.
-
-
Suppose there are changes in proxy server configuration at any later point in time. In that case, users have to update the existing configuration at the server-side, download the new configuration file, manually replace it with already downloaded agents and restart the Agents. The newly downloaded agents will have the updated proxy configuration.
The Proxy setting at the Process Studio level
Set up Proxy settings at the Process Studio level manually. Download Proxy settings from Proxy Settings UI or Agent Download UI.
-
Proxy in Process Studio is set manually by copying <Tenant Name>-proxy-config.properties in the Process Studio Distribution/conf directory.
-
Suppose, at any later point in time, there are changes in the proxy server configuration. Users have to update the existing configuration at the server-side, download the new configuration file, and manually replace it into Process Studio distributions.
Proxy Settings provides two main options for Proxy settings, as listed in the table below.
Table 21.6: Proxy Settings options:
| Add Proxy Button | Click Add Proxy button for Automatic Configuration (dynamic) or Proxy Server configuration (static) at the Tenant level. Add Proxy is used to configure proxy and saves in the database. It also gives the option to download Tenant Name-proxy-config.properties for dynamic and static configurations. |
| It provides the following options, | |
| - Automatic Configuration (Dynamic from Internet Options if available) | |
| - Proxy Server | |
| - Use Proxy File from URL is checked (Dynamic) | |
| - Use Proxy File from URL is unchecked (Static) | |
| - Download: For both Dynamic and Static Proxy, values are stamped into a file proxy-config.properties and downloaded on click of Download button. | |
| For both static and dynamic Proxy Servers, the following authentication types are available: None or Simple. | |
| Download Button | Click the Download button for the following options, |
| 1. Automatic configuration to detect Internet Options proxy settings with no simple authentication and download Tenant Name-proxy-config.properties. | |
| 2. Proxy Server to configure static or dynamic proxy at the Tenant level and download Tenant Name-proxy-config.properties | |
| These options do not store proxy in the database. |
The following three sections describe the steps to configure Proxy Settings for each of the above options.
Add Proxy
You may add Proxy Settings for the AutomationEdge server. This section discusses the steps to Add Proxy for the following Proxy options,
-
No Proxy
-
Automatic Configuration
-
Proxy Server
-
PAC (Proxy Auto-Configuration)
Following are the steps to add proxy settings,
-
Navigate to the Settings menu and Proxy Settings submenu.
-
Click Add Proxy button.
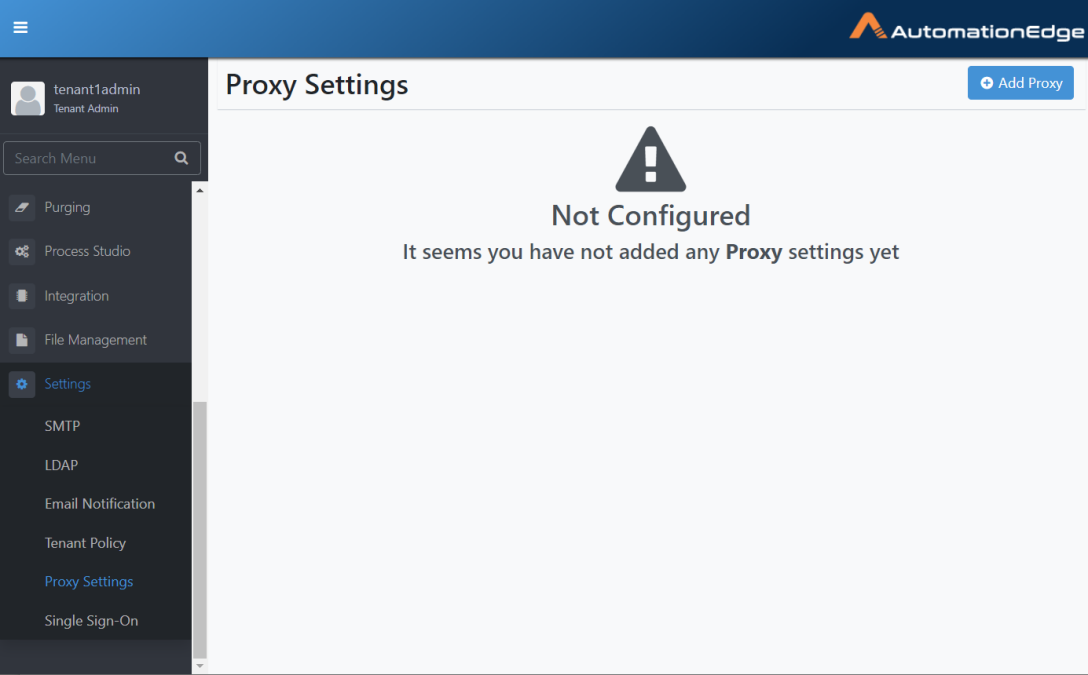
Figure 21.21: Add Proxy Button
- The default setting is No Proxy. Leave the default settings or modify them as detailed in the following sections.
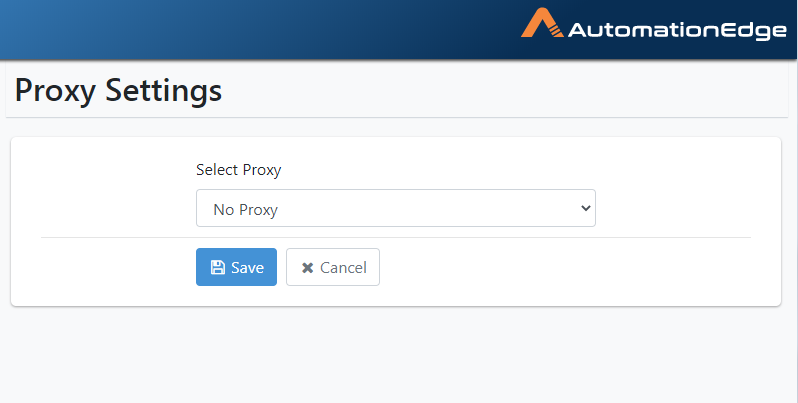
Figure 21.22: Default is No Proxy
Add Proxy: No Proxy
If you do not want to use the proxy settings at the system level, use No Proxy. Following are the steps for the No Proxy option.
-
Navigate to the Settings menu and Proxy Settings submenu.
-
Click Add Proxy button.
-
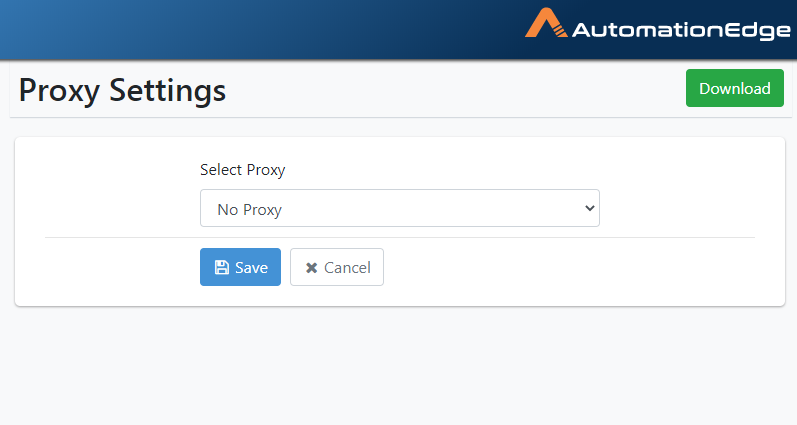
The Proxy Settings page appears, as seen below. The default Proxy is No Proxy.
Figure 21.23: Add No Proxy
- In the Select Proxy drop-down list, select No Proxy. Click Save.
Figure 21.24: Select No Proxy
- Proxy Configuration saved successfully message appears.
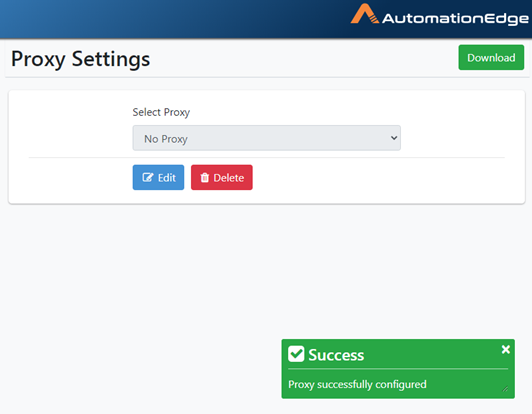
Figure 21.25: No Proxy Saved successfully.
- The process of adding No Proxy is complete.
Add Proxy: Automatic Configuration
Automatic Configuration detects proxy from Windows Internet options. In the case of the Linux environment, Automatic configuration is not a valid option.
Following are the steps for Automatic Configuration.
-
Navigate to the Settings menu and Proxy Settings submenu.
-
Click Add Proxy button.
-
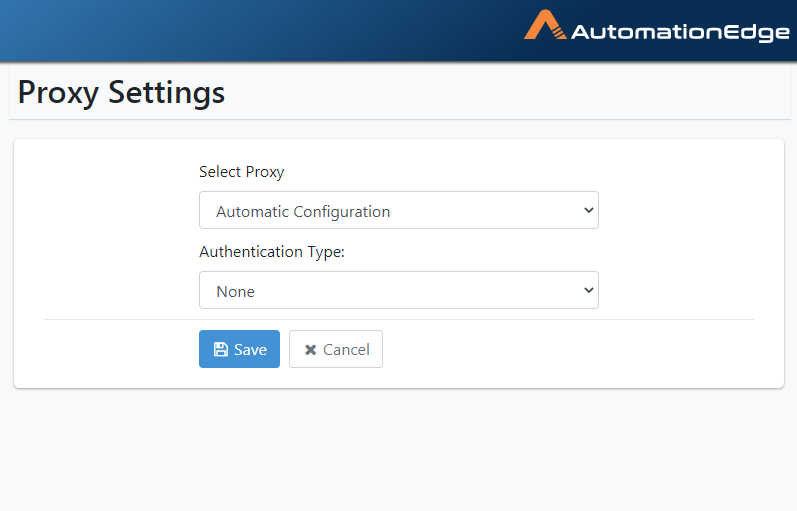
On the Proxy Settings page, the default is No Proxy. Select Automatic configuration as seen below. You may leave the Authentication type as None.
Figure 21.26: Automatic Proxy with no Authentication
-
You may choose desired Authentication type from the dropdown list.
-
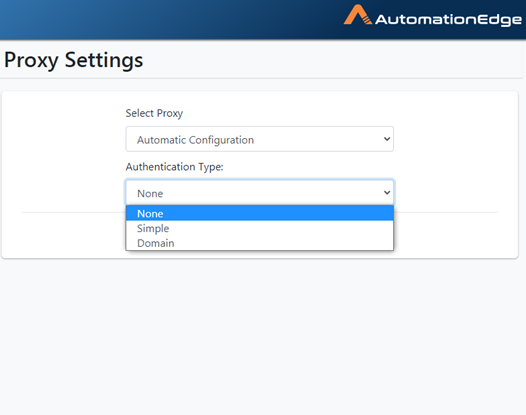
If your Automatic Internet options proxy needs authentication, you may select Simple or Domain Authentication from the dropdown list below.
Figure 21.27: Authentication Options
-
If you select Simple, provide Username and Password.
-
Provide Simple Authentication details as shown below. Click Save.
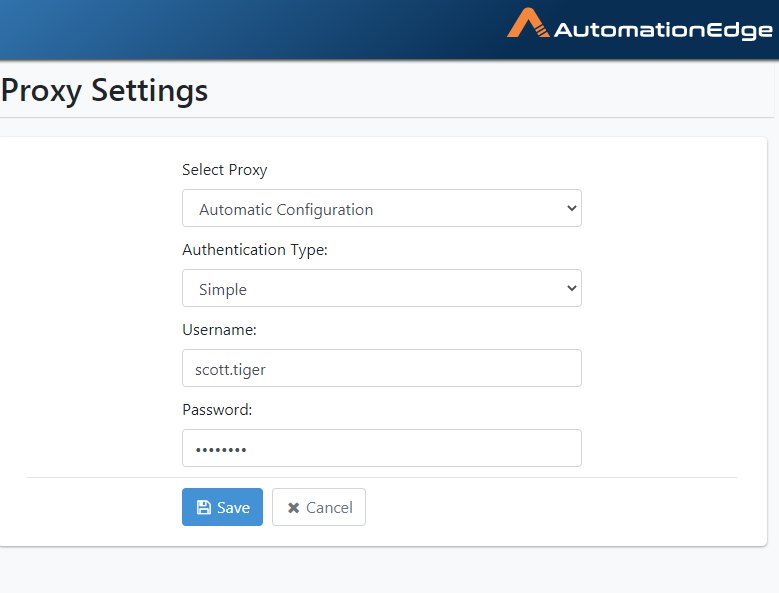
Figure 21.28: Automatic Configuration with Simple Authentication
- If Domain selected, additionally provide the Proxy Server Domain.
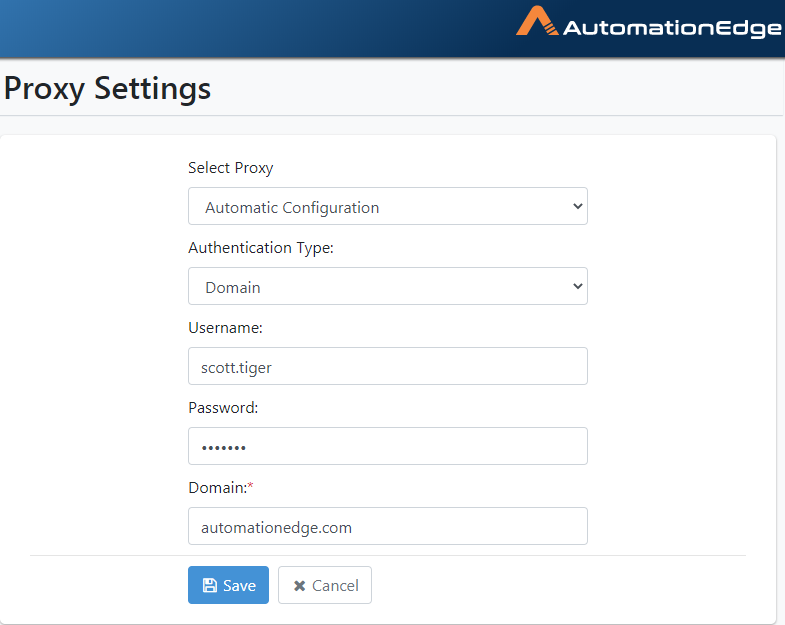
Figure 21.29: Automatic Configuration with Domain
- In the case of Domain Authentication, additionally, provide the
domain(e.g. automationedge.com). Click
Save.
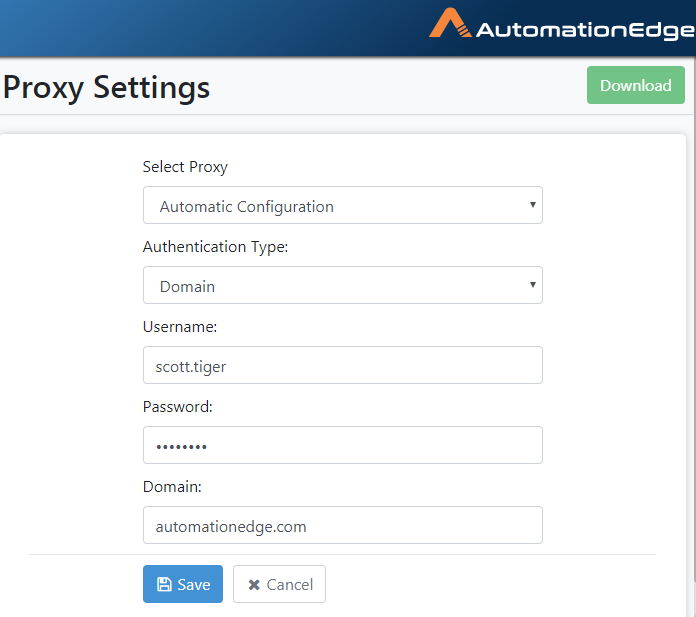
Figure 21.30: Automatic Configuration with Domain Authentication
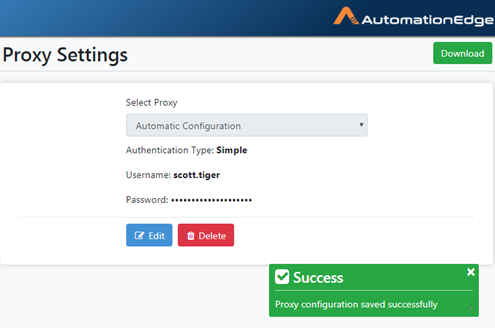
- The following screenshot shows a Simple configuration saved. Proxy successfully configured message appears, as seen below.
Figure 21.31: Automatic Proxy Successfully Configured
- The process of Automatic configuration is complete.
Add Proxy: Proxy Server
Following are the steps to configure proxy using static proxy details.
-
Navigate to Settings🡪Proxy Settings menu.
-
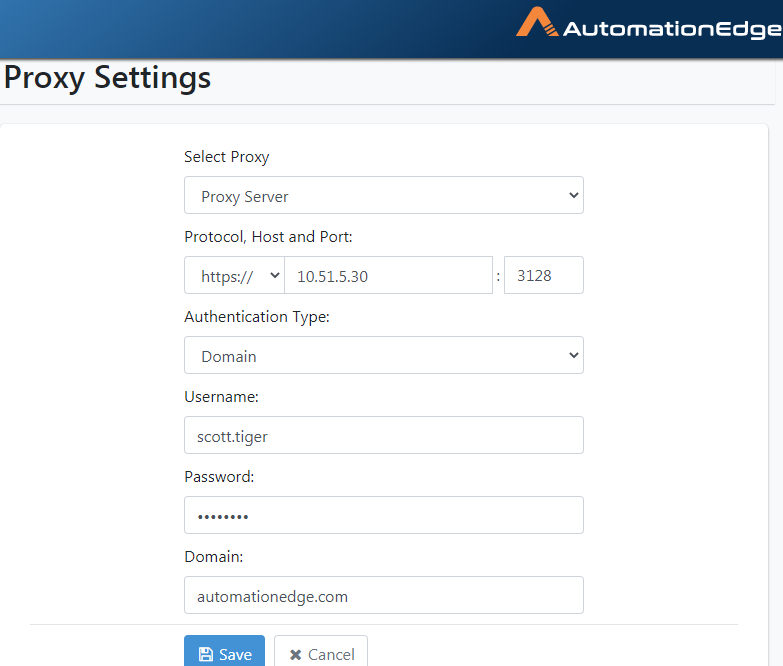
Click Add Proxy button.
-
The screen appears as shown below. Select Proxy Server from the Select Proxy dropdown.
Figure 21.32: Default Screen for Automatic Configuration
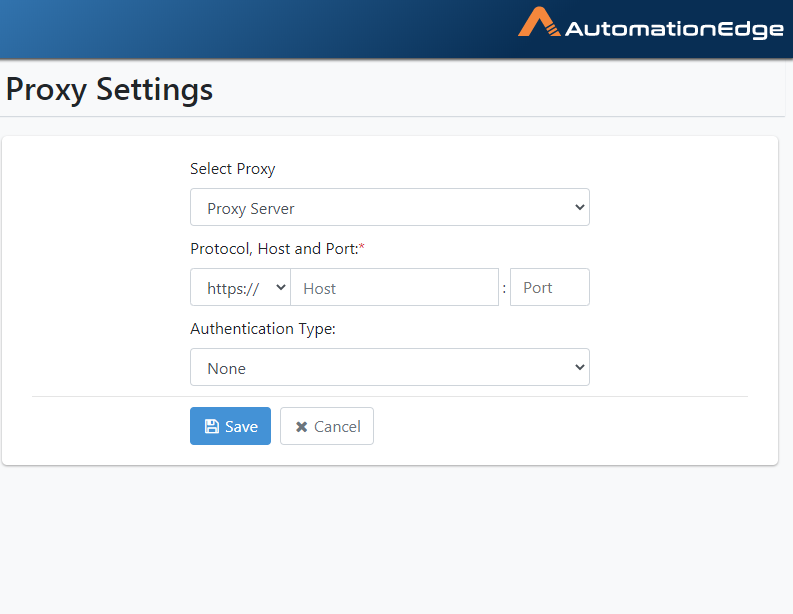
- Choose the correct protocol, Host and Port as seen below for a
static Proxy configuration.
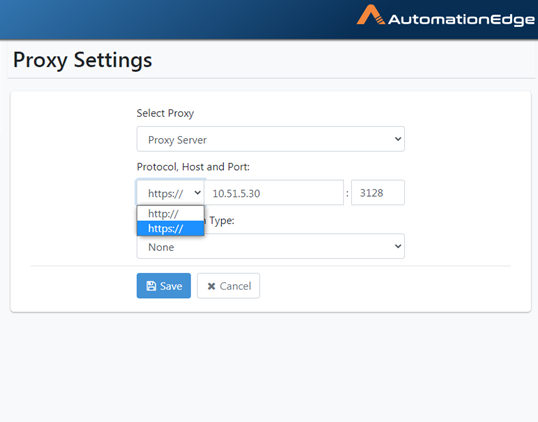
Figure 21.33: Select Protocol
- You may choose Authentication type Simple as seen below. Provide Username and Password.
Figure 21.34: Configure Simple Authentication
- In case you select Authentication Type as Domain, additionally provide the Domain name. Click Save.
Figure 21.35: Domain Authentication
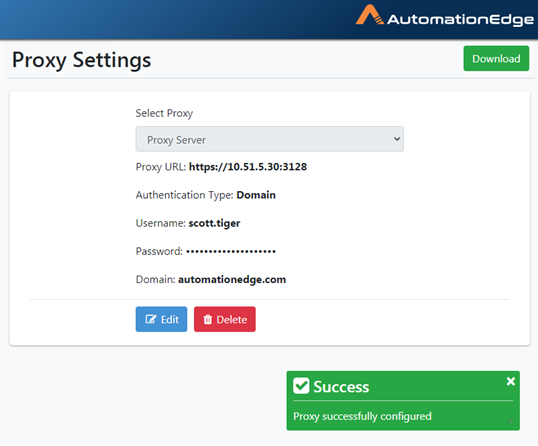
- Proxy successfully configured message appears.
Figure 21.36: Proxy Server successfully configured
The process of setting a static Proxy Server is complete.
Add Proxy: PAC
This option sets a Dynamic Proxy; Set a Dynamic Proxy by providing the PAC (proxy auto-config) file URL to
Following are the steps to configure Proxy settings using PAC file URL.
-
Navigate to Settings🡪Proxy Settings menu.
-
Click Add Proxy button.
-
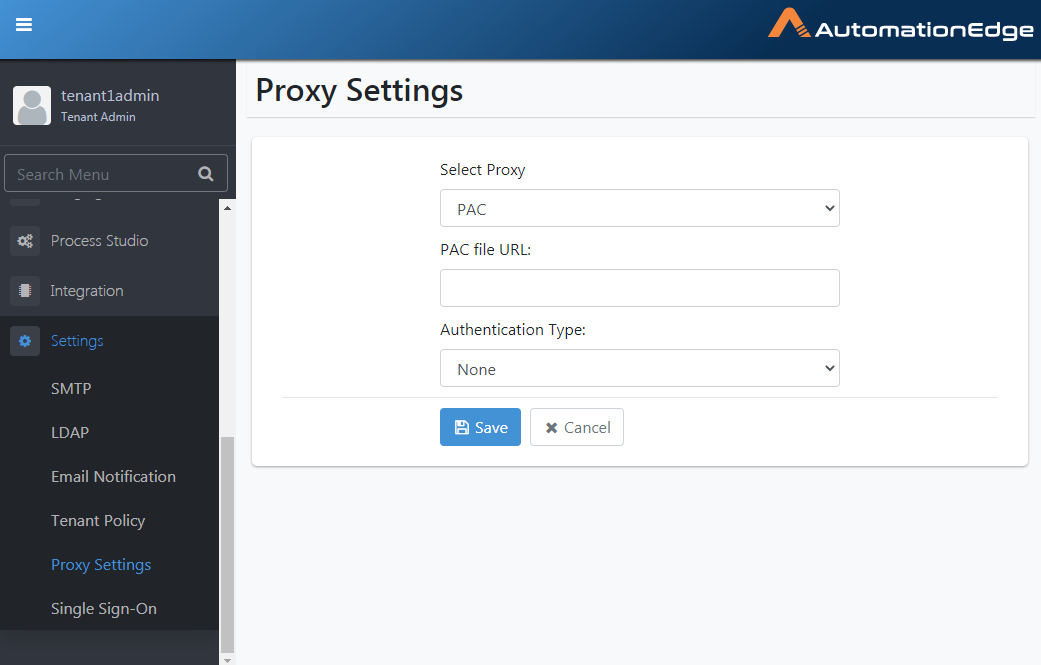
Select Proxy as PAC.
Figure 21.37: Proxy auto-config(PAC)
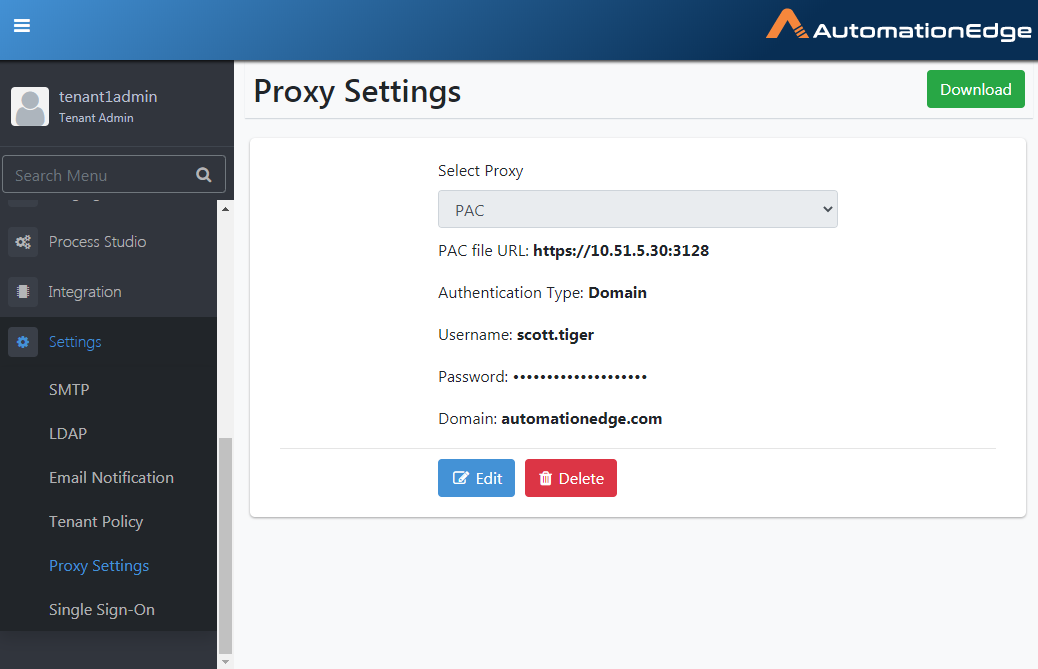
Provide the URL for the proxy auto-config(PAC) file. Choose Authentication Type from None and Simple or Domain. Click Save.
- The following screenshot shows Authentication Type None.
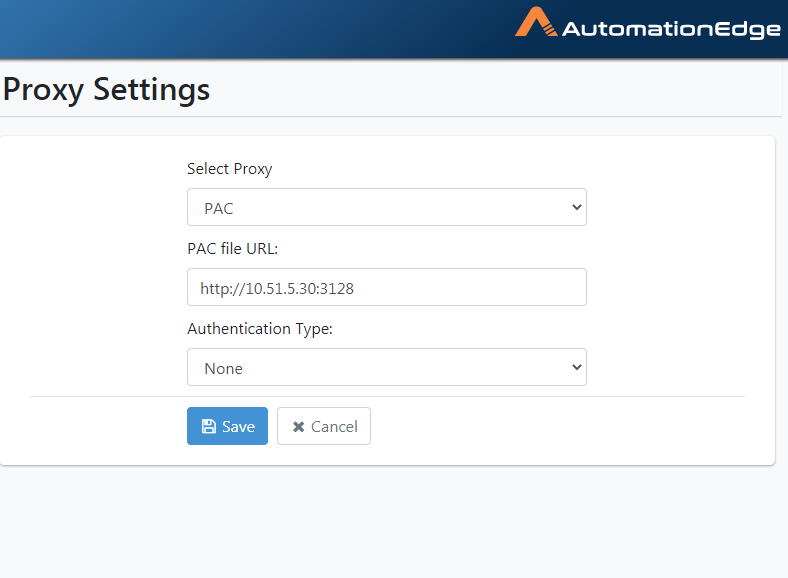
Figure 21.38: PAC URL
- The following screenshot shows details of Authentication Type
Simple.
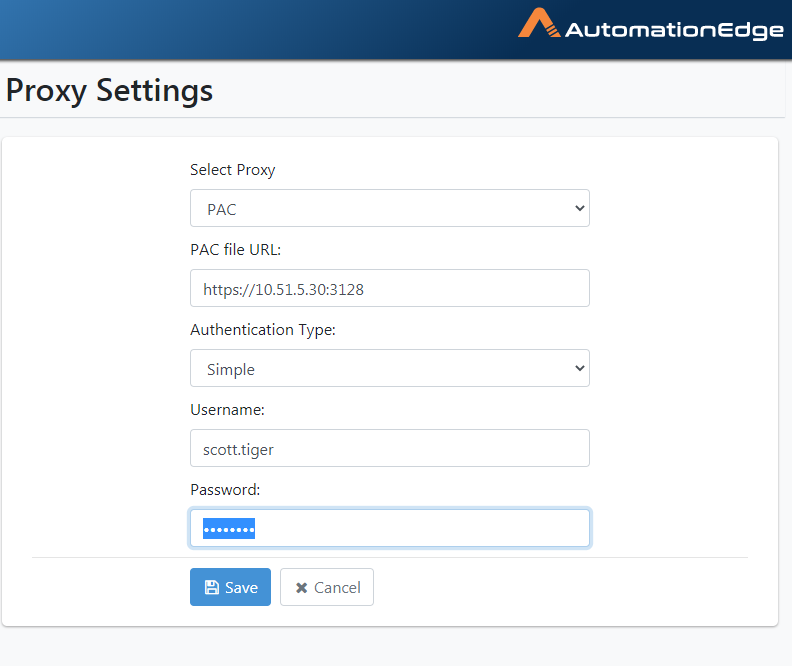
Figure 21.39: Proxy Settings with PAC File from URL with Simple Authentication
-
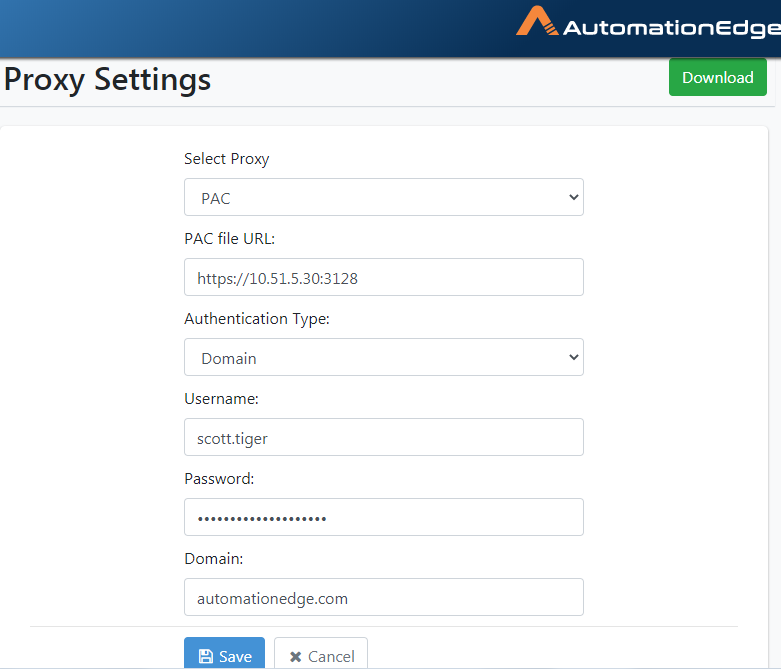
The following screenshot shows details of the Authentication Type Domain.
-
Provide all the details and click Save.
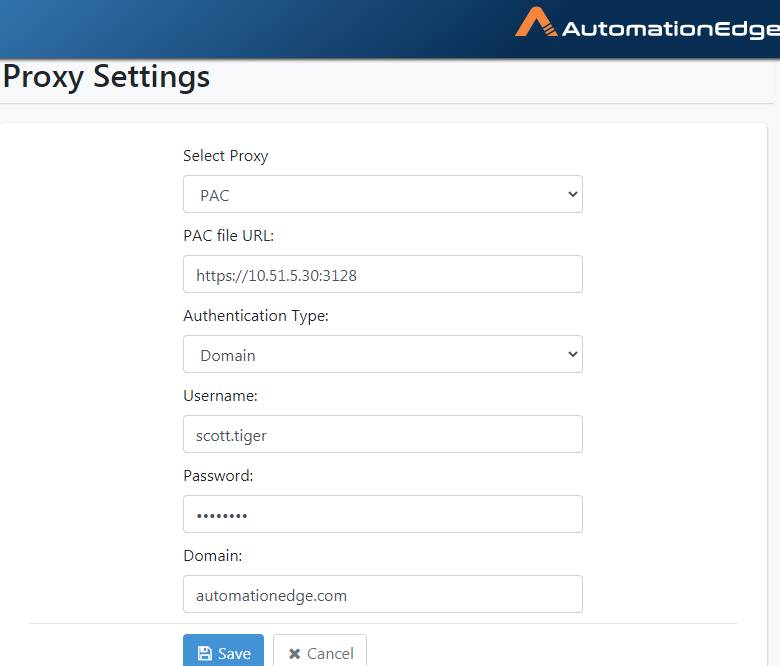
Figure 21.40: Proxy Settings with PAC File from URL with Domain Authentication
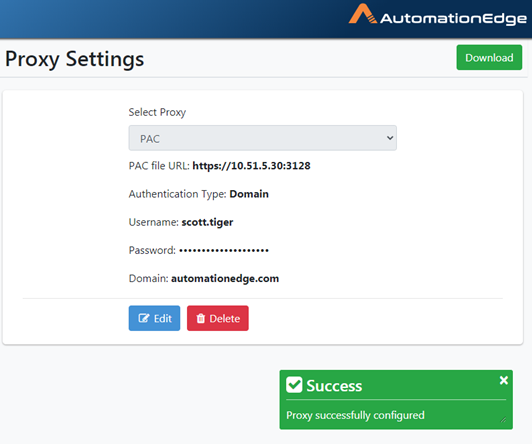
- Proxy successfully configured message appears, as seen below.
Figure 21.41: Proxy Configuration with PAC File from URL Successful
- The process of configuring proxy from the PAC File URL is complete.
Download Proxy Configuration file
-
Navigate to Settings🡪Proxy Settings
-
Once Proxy Configuration with any of the Proxy options (No Proxy, Automatic Configuration, Proxy Server or PAC) has been set up, a Download button appears on the top right corner.
-
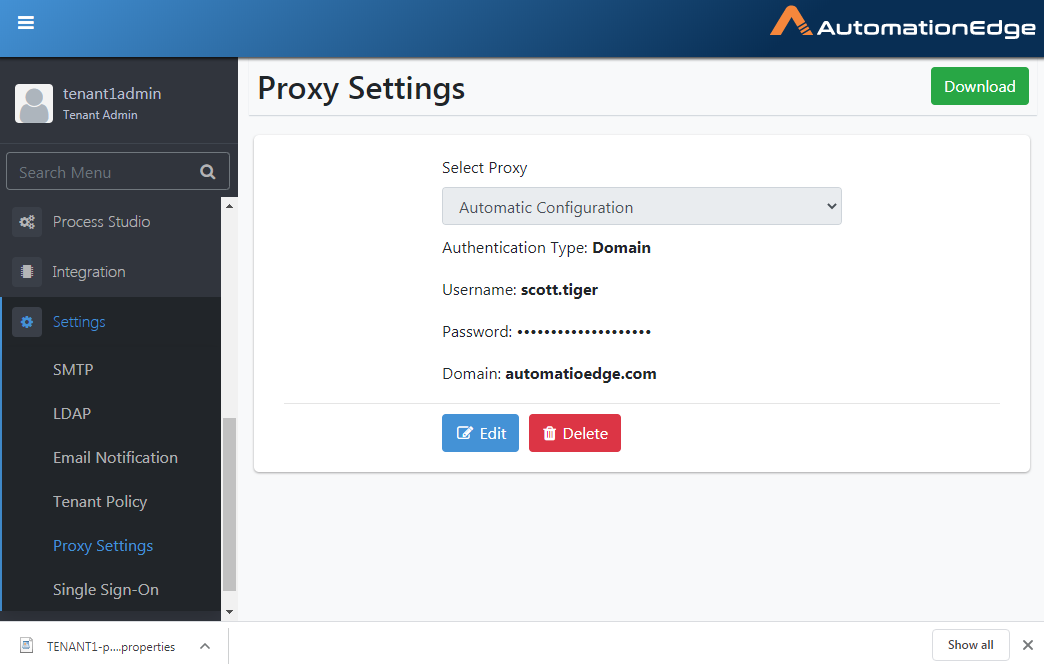
In the snapshot below, we can see Automatic Proxy Configuration with Authentication Type Domain has been set up.
-
Click the download button on the top right corner.
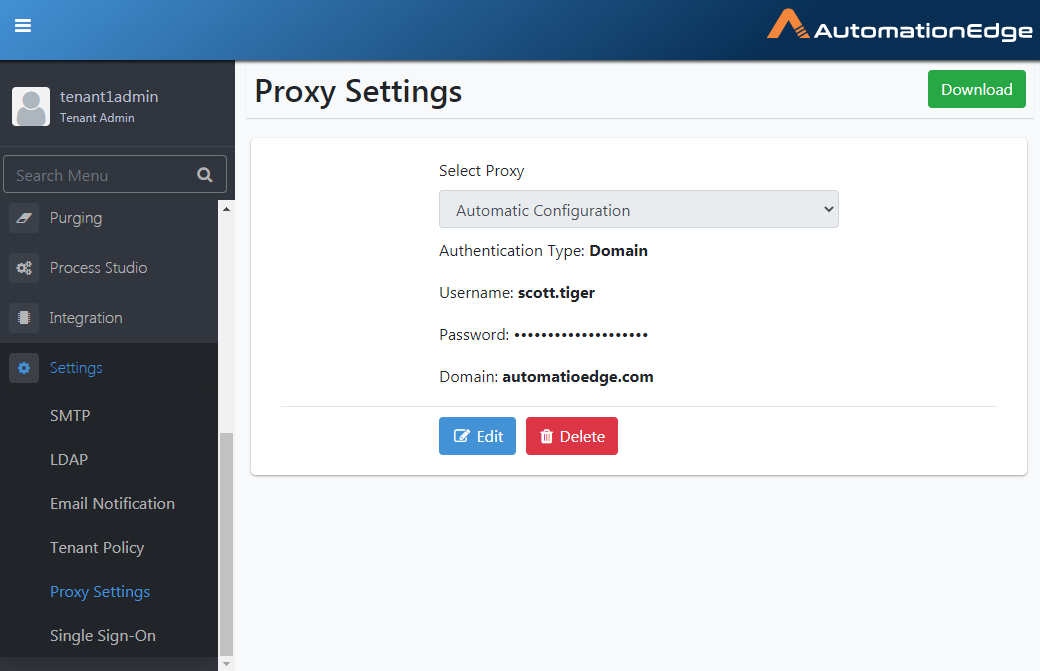
Figure 21.42: Downloaded Proxy Configuration File
-
By default, you will see the file configuration as the one already set on the screen.
-
You may use the already configured settings or change the configurations for the Configuration file to download.
-
To change configurations click on the Edit button. Note that all the fields are editable.
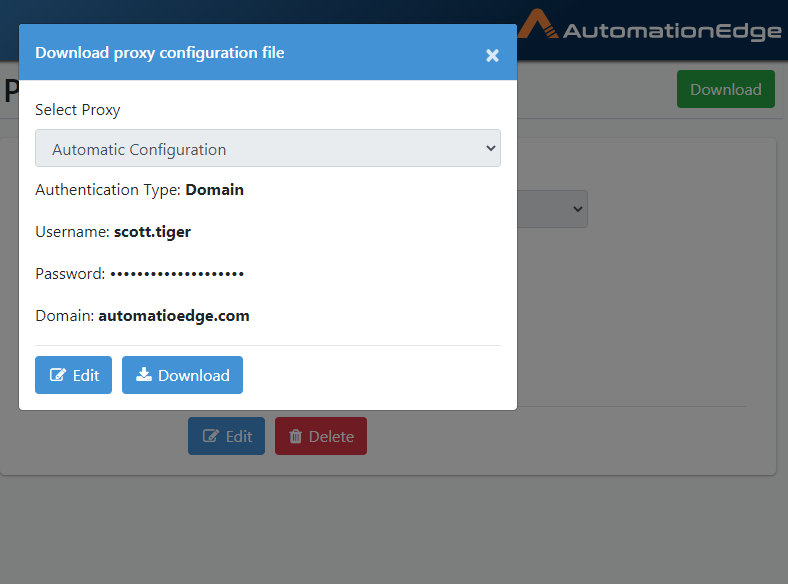
Figure 21.43: Edit Proxy Configuration File
- Make changes as desired. Click Download.
Figure 21.44: Edit and Download Proxy Configuration file
-
Proxy configuration file <Tenant Name>-proxy-config.properties file is downloaded as seen below.
-
If desired, you may copy the file to <Agent>\conf or <Process Studio Distribution>\conf folders.
Figure 21.45: Downloaded Proxy Configuration file
- The process of downloading the Proxy Configuration file is complete.
Edit Proxy Settings
- Navigate to Settings🡪Proxy Settings. Click Edit.
Figure 21.46: Edit Proxy Settings
- Notice that all fields are editable. You may change the Proxy as well as Authentication Type. Update to the desired Proxy settings. Click Save.
Figure 21.47: Enter updated Proxy Details
- Proxy Configuration saved successfully message appears.
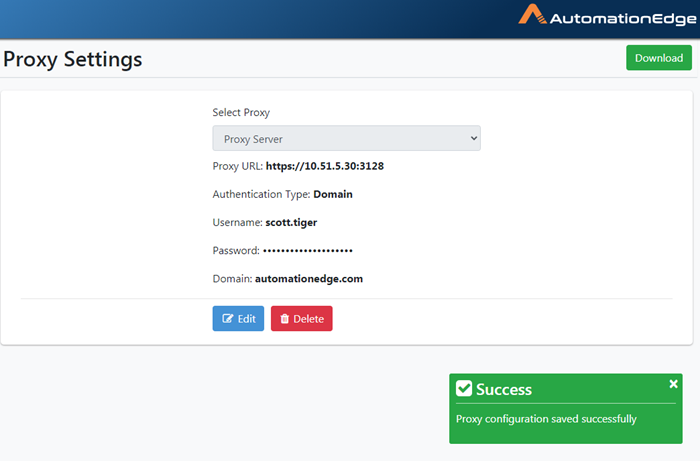
Figure 21.48: Proxy configuration saved successfully
Delete Proxy Settings
Following are the steps to delete Proxy Settings. The procedure is the same for all types of Proxy configurations.
- Navigate to Settings🡪Proxy Settings. Click Delete.
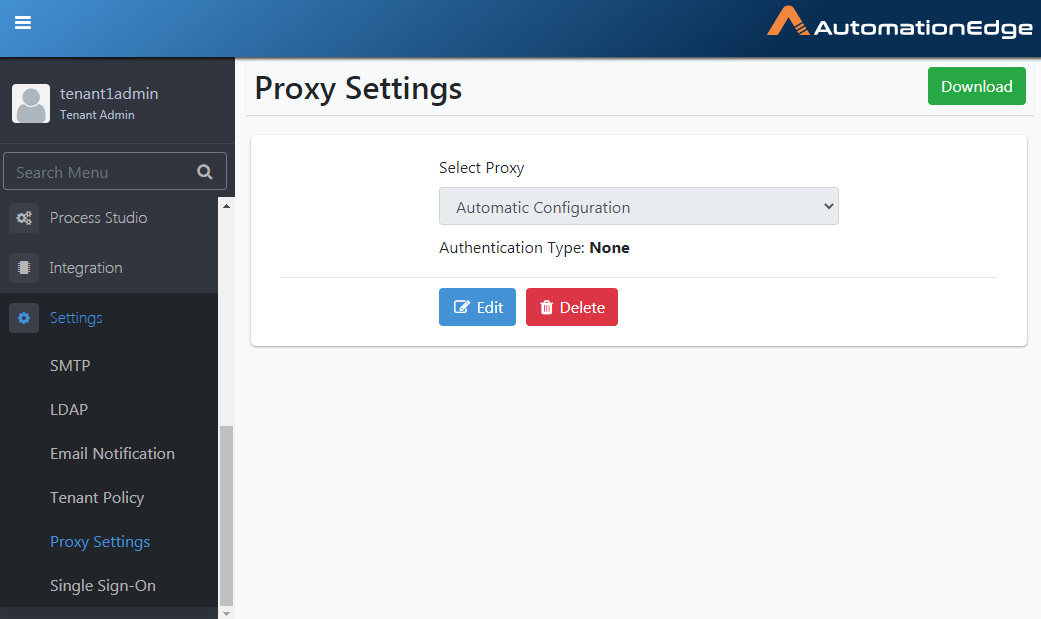
Figure 21.49: Delete Proxy Configuration
- You may Click Delete to delete the proxy configuration.
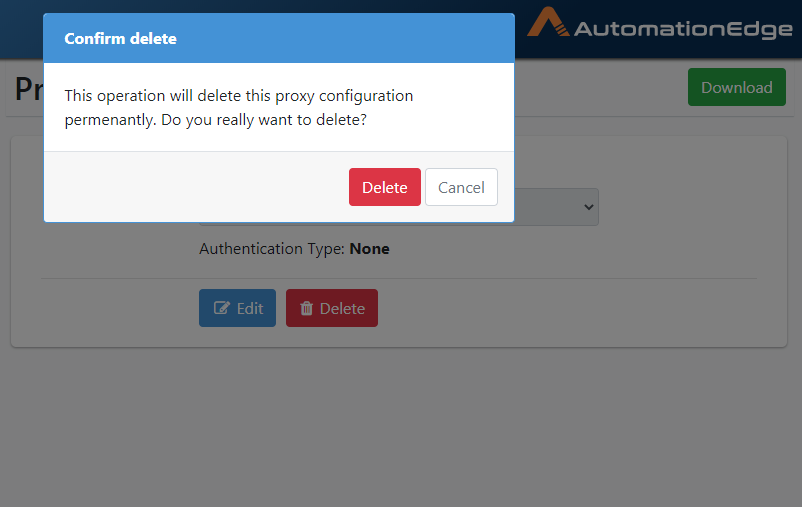
Figure 21.50: Confirm Proxy Configuration Deletion
-
Proxy configuration deleted successfully message appears.
-
Proxy deletion at the Tenant level from the database is complete. The database record will be soft deleted.
-
The Proxy configuration has to be removed manually from existing agents or PS distributions.
Single Sign-On
AutomationEdge supports Single Sign-On using an Identity Provider. The following protocols are supported,
-
OpenID Connect (OIDC)
-
SAML
In this section, we will discuss the steps to configure Single Sign-On. In particular, the following configuration is for Okta SPA (Single Page Application) with OIDC. We shall also discuss configuration aspects of Identity Providers Keycloak and ADFS with OIDC and SAML for Okta, Keycloak, and ADFS.
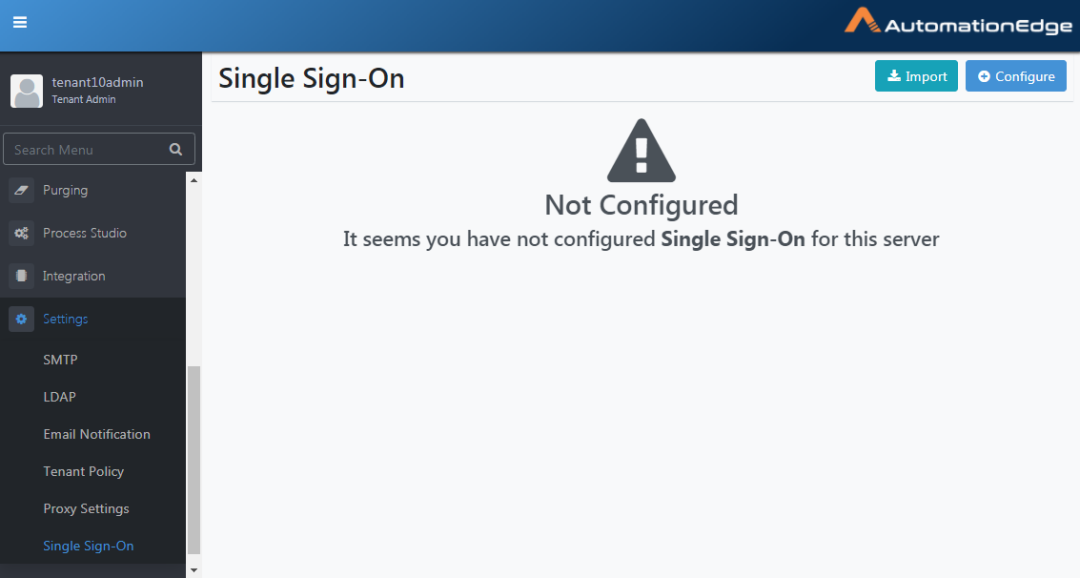
- Navigate to the Settings menu and Single Sign-On submenu. Click Configure button.
Figure 21.51: Single Sign-On
Configure AE Single Sign-On for OpenID Connect (OIDC)
Configure SSO with Import Button for OpenID Connect (OIDC)
In this section, we will configure Single Sign-On by importing Endpoint Configurations. This section applies to Okta/Keycloak/ADFS for OIDC protocol.
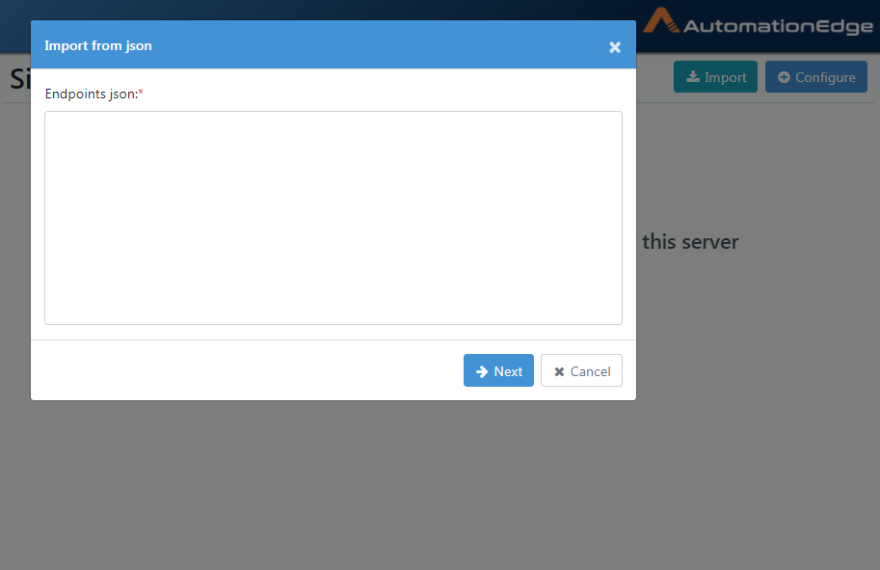
- Click Import on the Single Sign-On page. The Import from json dialog appears.
Figure 21.52: Endpoints JSON input window
- Paste the Endpoints JSON in the dialog. See the following Endpoints JSON sample:
  {\"issuer\":\"https://dev-371272.okta.com/oauth2/default\",\"authorization_endpoint\":\"https://dev-371272.okta.com/oauth2/default/v1/authorize\",\"token_endpoint\":\"https://dev-371272.okta.com/oauth2/default/v1/token\",\"registration_endpoint\":\"https://dev-371272.okta.com/oauth2/v1/clients\",\"jwks_uri\":\"https://dev-371272.okta.com/oauth2/default/v1/keys\",\"response_types_supported\":\[\"code\",\"token\",\"id_token\",\"code id_token\",\"code token\",\"id_token token\",\"code id_token token\"\],\"response_modes_supported\":\[\"query\",\"fragment\",\"form_post\",\"okta_post_message\"\],\"grant_types_supported\":\[\"authorization_code\",\"implicit\",\"refresh_token\",\"password\",\"client_credentials\"\],\"subject_types_supported\":\[\"public\"\],\"scopes_supported\":\[\"OpenID
  Connect\",\"profile\",\"email\",\"address\",\"phone\",\"offline_access\"\],\"token_endpoint_auth_methods_supported\":\[\"client_secret_basic\",\"client_secret_post\",\"client_secret_jwt\",\"private_key_jwt\",\"none\"\],\"claims_supported\":\[\"ver\",\"jti\",\"iss\",\"aud\",\"iat\",\"exp\",\"cid\",\"uid\",\"scp\",\"sub\"\],\"code_challenge_methods_supported\":\[\"S256\"\],\"introspection_endpoint\":\"https://dev-371272.okta.com/oauth2/default/v1/introspect\",\"introspection_endpoint_auth_methods_supported\":\[\"client_secret_basic\",\"client_secret_post\",\"client_secret_jwt\",\"private_key_jwt\",\"none\"\],\"revocation_endpoint\":\"https://dev-371272.okta.com/oauth2/default/v1/revoke\",\"revocation_endpoint_auth_methods_supported\":\[\"client_secret_basic\",\"client_secret_post\",\"client_secret_jwt\",\"private_key_jwt\",\"none\"\],\"end_session_endpoint\":\"https://dev-371272.okta.com/oauth2/default/v1/logout\",\"request_parameter_supported\":true,\"request_object_signing_alg_values_supported\":\[\"HS256\",\"HS384\",\"HS512\",\"RS256\",\"RS384\",\"RS512\",\"ES256\",\"ES384\",\"ES512\"\]}
Note: For details about Endpoint JSON, see Appendix 2: SSO -- Identity Providers.
- Click Next. The Single Sign-On page appears. The information from the Endpoints JSON are populated in the Single Sign-On Configuration page.
Figure 21.53: Complete Single Sign-On configurations
- Enter the field details.
| Field name | Description |
|---|---|
| Protocol | Select the Single Sign-On protocols: |
| Available options are: | |
| - None (SSO configuration cannot be saved with None Protocol) | |
| - OpenID Connect | |
| - SAML 2.0 | |
| Select OpenID Connect. | |
| Issuer | Identity Provider Base URL (e.g. |
| https://dev-371272.okta.com/oauth2/default in case | |
| of Okta); Get the URL from the Endpoints URL or | |
| Identity Provider Portal. | |
| ------------- | -------------------------------------------------------- |
| Redirect URL | Your web application must host a route that Identity Provider sends information to when a user signs in. Redirect URL must be an absolute URI. Redirect URL in aeui portal SSO configuration page must be the same as redirect_uri in Identity Provider portal. |
| Note: SSO authentication is supported only for secure sites (HTTPS), either with a domain name or IP address. An HTTPS environment in IE11, Chrome browser and Firefox support SSO functionality. | |
| Client ID | The public identifier for apps. |
| Client Secret | It is the secret known only to the application and the authorization server |
| Authorization Endpoint | It is the Identity Provider Authorization Endpoint (in the form of a URL, e.g. in Okta - https://dev-371272.okta.com/oauth2/default/v1/authorize).IDP generates Authorized Code and sends it to the AutomationEdge Server. |
| User Information Endpoint | It is the endpoint provided by IDP to retrieve user information. If this endpoint is missing from the IDP JSON then Claims needs to be added manually to the IDP. |
| Token Endpoint | Token Endpoint is an IDP URL containing the Token parameter, which AE can use. |
| Following are the steps,- AE server uses the Authorized Code from Authorization Endpoint to request Token from IDP. Token Endpoint (e.g. https://dev-371272.okta.com/oauth2/default/v1/token) uses the Authorized Code sent back from AE server, generates Token and sends the Token to AutomationEdge Server. | |
| End Session Endpoint | Endpoint for logout from IDP. (e.g. https://dev-371272.okta.com/oauth2/default/v1/logout) |
| JWKS URI | Displays the URL that is used to verify the token received from IDP. |
- In this example, the identity provider is Okta for SPA (Single Page Application).
In the case of Okta for Web Application, Client Secret is mandatory.
Keycloak supports OpenID Connect (OIDC) and SAML protocol.
Refer to Appendix 2: SSO to see how we can fetch configuration values in Okta, Keycloak, and ADFS.
- Click Save.
Configure SSO with Configure Button for OpenID Connect
In this section, we will Configure SSO using the configure button.
-
Log in as a Admin.
-
Navigate to the Settings🡪Single Sign-On Configuration menu.
-
Click on Configure button.
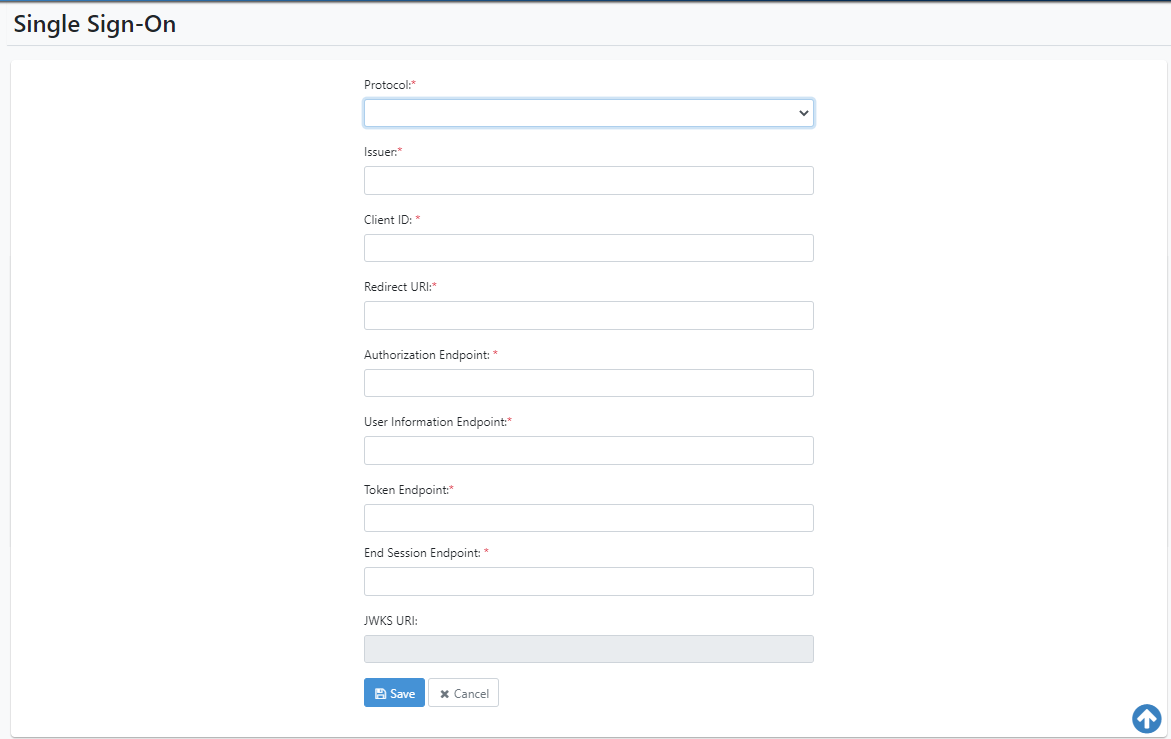
The Single Sign-On page appears. Notice that, unlike the previous sections, all the fields are blank.
-
Select a Protocol from the drop-down list. We shall choose OpenID Connect for this configuration.
-
Fill in the other Single Sign-On configuration details.
-
You may obtain the Identity Provider authorization endpoint, Redirect URL and Client ID from the configurations in the Identity Provider.
-
In this example, the identity provider is Okta for SPA (Single Page Application).
In the case of Okta for Web Application additionally, Client Secret is also required.
Keycloak supports OpenID Connect protocol.
Refer to Appendix 2: SSO to see how we can fetch these configuration values in Okta and Keycloak.
- Click Save. SSO Configuration created successfully message appears.
Configure AE Single Sign-On for SAML
In this section, we will discuss Single Sign-On with SAML. This section applies to Okta/Keycloak/ADFS for SAML protocol.
For SSO with SAML, we need to do some changes at the backend in Tomcat before we configure
Configurations in AutomationEdge backend
Before configuring on AutomationEdge UI, perform some changes in Tomcat. We send SAML requests from SP (Service Provider), i.e. AE-Engine, to IDP, and after authorization, IDP sends a response. The response sometimes may have a big header. The current tomcat configuration cannot handle such a big header, and we need to increase the header size.
In the Tomcat Directory, look for the config Folder. Open the server.xml to change the header size. Check which connector you are using and increase the size of maxHttpHeaderSize="65536".
Connector port="8080" protocol="HTTP/1.1"connectionTimeout="20000"maxHttpHeaderSize="65536"redirectPort="8443" /\
Make some changes in the webapps aeui folder. If we are using the SAML protocol, we need to comment on the POST request. Follow the steps below:
Navigate to Tomcat home/Webapps/aeui/WEB-INF web.xml
Open web.xml and look for <http-method>POST</http-method> andcomment it using as seen in the screenshot below.
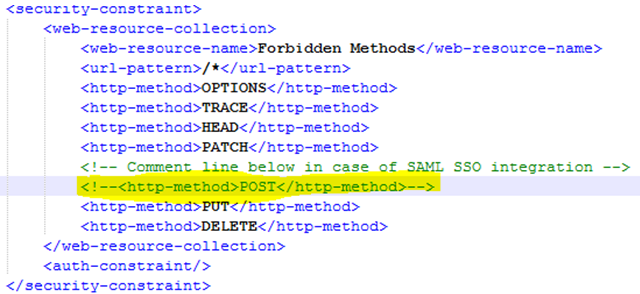
Figure 120a: Comment POST request
Configuration on AutomationEdge UI
Following are the Single Sign-On configurations on AutomationEdge UI.
-
Login with a Admin and Navigate to Settings🡪Single Sign-On menu.
-
Click Configure. The Single Sign-On page appears.
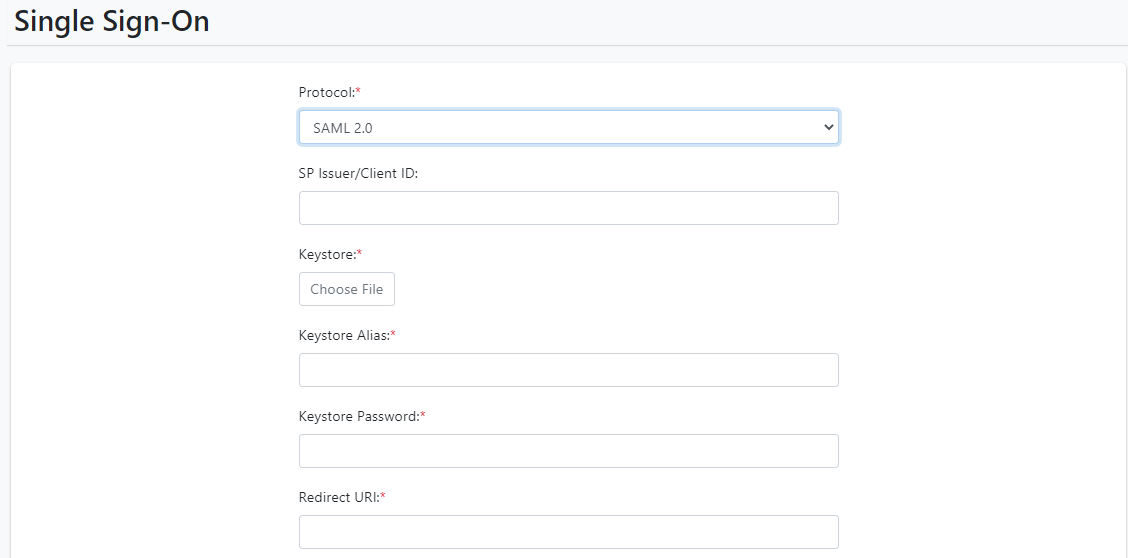
Figure 21.54: Single Sign-On Configuration
- Enter the field details, and then click Save.
| Field name | Description |
|---|---|
| Protocol | The Single Sign-On protocols supported are |
| - None | |
| (The None option does not allow saving of the SSO configuration) | |
| - OpenID Connect | |
| - SAML 2.0 | |
| Select SAML 2.0 | |
| SP Issuer/Client ID | Enter the SP Issuer value for Okta. For Keycloak/ADFS, enter the Client ID. |
| Keystore | Here we share the public and private keys with AE. It is for xml signature verification. Upload the Keystore file (.jks) here; it is mandatory. Refer to 2.9 Keystore and Certificate Generation for generating the .jks file. |
| Keystore Alias | Provide the Keystore Alias you provided while generating Keystore. |
| Keystore Password | Provide the Keystore Password you provided while generating Keystore. |
| Redirect URL | Your web application must host a route that Identity Provider sends information to when a user signs in. Redirect URL must be an absolute URI. Redirect URL in the aeui portal SSO configuration page must be the same as redirect_uri in the Identity Provider portal. |
| Note: | |
| SSO authentication is supported only for secure sites (https), either with a domain name or IP address. An HTTPS environment for IE11, Chrome browser and Firefox support SSO functionality. | |
| Single Sign-On URL | Copy and paste the Identity Provider Single Sign-On URL from the IDP site. |
| Single Logout URL | Copy and paste Identity Provider Single Logout URL from the IDP site. |
| Logout Redirect URL | On logout from SSO Application, you log out of the application as well as IDP.Specify a Logout Redirect URL. |
Refer Appendix 2: SSO to create a descriptor file, Keystore and to fetch, Redirect URIs, Client ID for the desired Identity Provider (Okta/Keycloak/ADFS).
Tenant Message
In this section, we will discuss the steps to configure a tenant message. The tenant admin can send the message to associated users, which provides additional or important information or alerts to the users.
- Navigate to the Settings 🡪 Tenant Message. The Tenant Message appears.
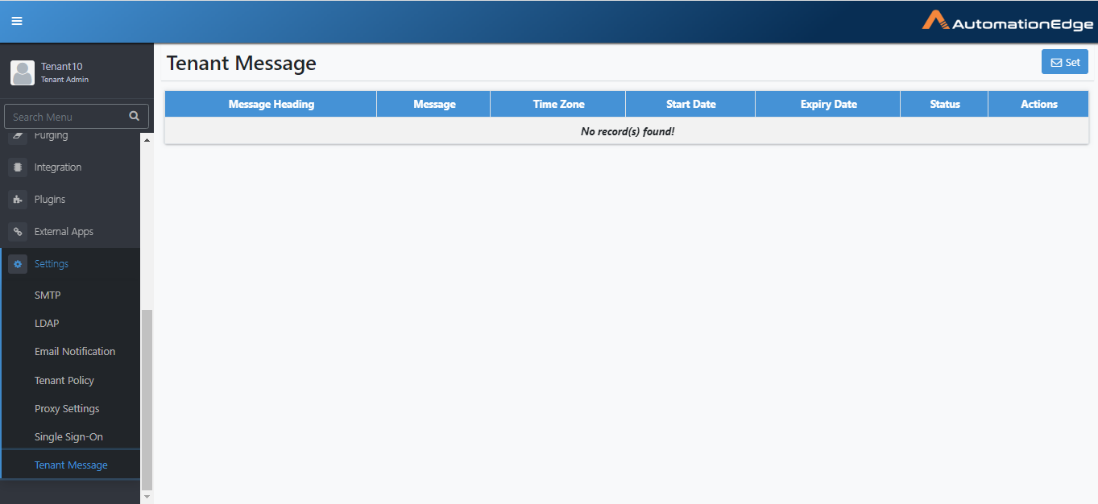
Figure 21.55: Tenant Message page
- Click Set. The Tenant Message page appears.
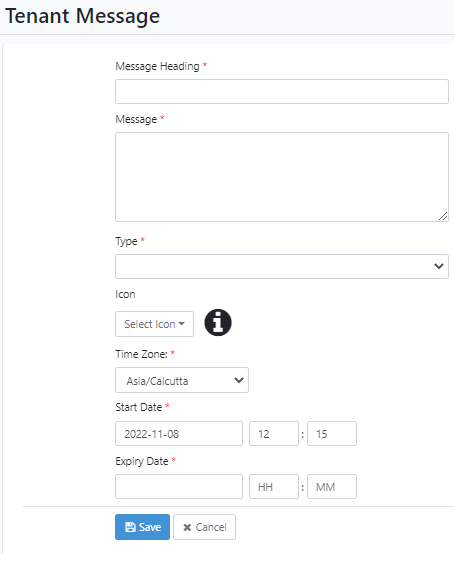
Figure 21.56: Tenant Message page
- Enter the field details.
|---------------|------------------------------------------------------|
| Field name | Description |
|---|---|
| Message Heading | Type a message title. |
| Message | Type the details you want users to be provided with. |
| Note: You can also use HTML tags to format the content. | |
| Type | Select if the message is informative or important or an alert. |
| Icon | Select the icon you want to attach to the message. The icon changes depending on the message type selected in Type. Note: User’s can search for an icon of their choice if required. |
| Time Zone | Select the time zone of the message. |
| Start Date | Select the date and time when you want to send the message. |
| Expiry Date | Select the date and time after which the message will no longer be available to the users. |
-
Click Preview. You can view the message before saving it.
-
Click Save. The details are saved and users will see the message when they sign in to the AEUI.

After the expiry date and time has elapsed, the status of the message changes to Expired.
To modify the message, click
