PowerShell: Active Directory
The appendix describes how to setup the PowerShell Active Directory.
Prerequisites
Following are the prerequisites for Active Directory on a client machine:
- PowerShell version 5 and above.
- Active Directory role installed on Server Manager on targeted server.
- ActiveDirectory module on localhost and AD server.
- Requisite privileges for Active Directory server.
Set PowerShell Execution Policy
To configure the PowerShell Execution Policy:
- Open PowerShell command prompt in Run as Administrator mode. Go to Start -> Search PowerShell -> Right click on Windows PowerShell -> Click Run as Administrator option.
- Use the following command and change the computer's execution policy to run PowerShell scripts: Command: Set-ExecutionPolicy unrestricted –Force.
- Use the following command to check if the execution policy has changed: Command: Get-ExecutionPolicy.
Update PowerShell version
-
Download Windows Management Framework from the following link:
Windows PowerShell version 5.1: https://www.microsoft.com/en-us/download/details.aspx?id=54616
System requirements:-
WMF 5.1 requires Microsoft .NET Framework 4.5 or above.
-
You can install Microsoft .NET Framework 4.5 or above by following the instructions at Installing the .NET Framework. Use a 64-bit version of Windows.
Important:Support for the 32-bit version the Microsoft Azure Active Directory Module for Windows PowerShell was discontinued in October, 2014.
-
Restart the machine once the Windows Management Framework 5.1 installation is completed.
Note:Right click to open the PowerShell and select Run As Administrator option and use the commands on that terminal to proceed with module installation.
-
-
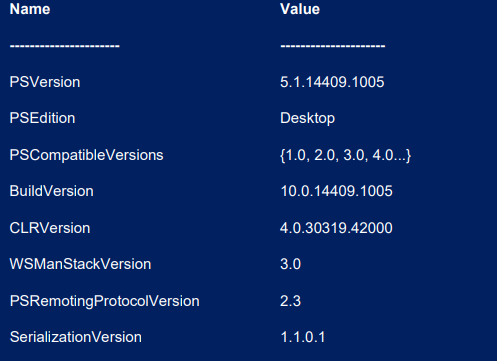
Check if PowerShell version is updated to 5.1 using the following command:
Command: $PSVersionTableExpected output:
Modules required for Active Directory plugin
Module name: Active Directory
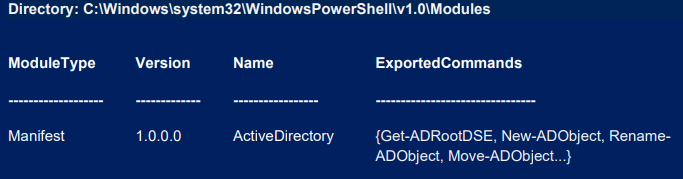
Use the following command to check the available modules via PowerShell. Open PowerShell with Run as Administrator mode:
Command: Get-Module -ListAvailable -Name ActiveDirectory
Expected output:
In normal Windows Desktop OS Active Directory module needs to be installed and setup. In case of Windows Server OS Active Directory module can be setup using Add features in Server Manager.
In the following sections, we describe Active Directory module setup on both
Windows Desktop OS and Windows Server OS.
Install Active Directory Module on Windows Desktop OS
Following are the steps for installing and setting up the Active Directory module on the Windows Desktop OS:
Preqrequisites
Use any of the following versions of Windows: Windows 10, Windows 8.1, Windows 8 or Windows 7 Service Pack 1 (SP1).
STEP 1: Install required software
Installing the required software is a one-time activity.
-
Install Microsoft .NET Framework 4.5 or above by following the instructions from Installing the .NET Framework.
-
Download and install the Remote Server Administration Tools (RSAT) for supported Windows version from any of the following locations:
- RSAT for Windows 10
- RSAT for Windows 8.1
- RSAT for Windows 8
- RSAT for Windows 7 with SP1 (both x86 and x64)
- RSAT for Windows Vista 32-bit (x86)
- RSAT for Windows Vista 64-bit (x64)
Note:You must restart the machine after installing RSAT.
STEP 2: Enable tools
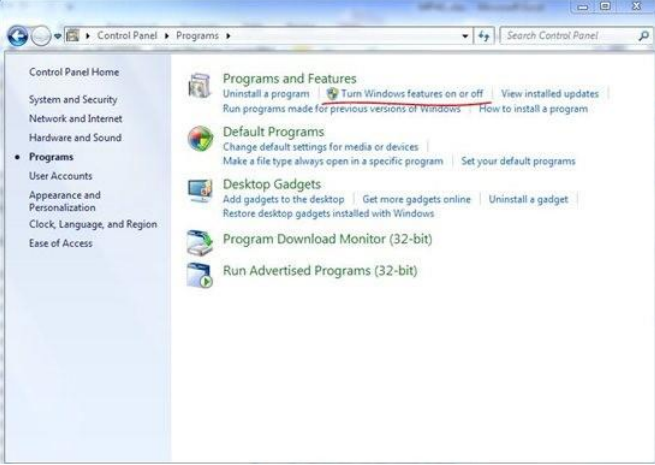
You must enable the tools that you want to use through the Control Panel. To enable the tools that you want to use: Click Start -> Click Control Panel -> Click Programs and Features -> Click Turn Windows features on or off.
In the RSAT releases for Windows 10, Windows 8.1, and Windows 8, tools are again all enabled by default. You can open Turn Windows features on or off to disable tools that you don't want to use.
In RSAT for Windows 10, Windows 8.1, and Windows 8, you access GUI-based tools on the Tools menu from within the Server Manager console.
For RSAT on Windows Vista and Windows 7, you must enable the tools for the roles and features that you want to manage after you run the downloaded installation package.
You don't have to enable the tools for RSAT on Windows 8 or later versions.
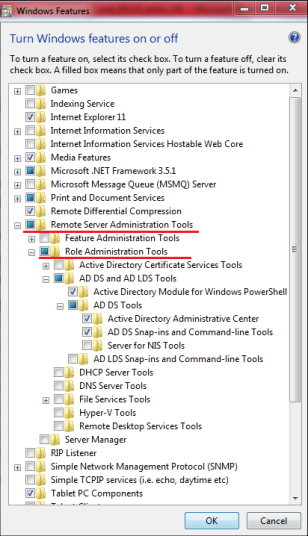
To install Active Directory on Windows Vista and Windows 7, click Remote Server Administration Tools -> click Role Administration Tools -> check the AD DS and AD LDS Tools option -> click OK.
Install ActiveDirectory Module on Windows Server OS
Prerequisites
You can use the following versions of Windows: Windows Server 2016, Windows Server 2012 R2, Windows Server 2012, or Windows Server 2008 R2 SP1.
STEP 1: Install required software
Installing the required software is a one-time activity.
Install Microsoft .NET Framework 4.5 or above by following the instructions from Installing the .NET Framework.
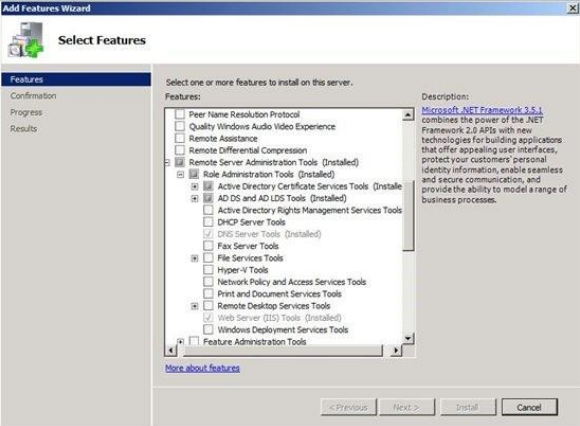
STEP 2: Enable tools
If you have to install management tools on Windows Server 2008, Windows Server 2008 R2, Windows Server 2012, or Windows Server 2012 R2 for specific roles or features that are running on remote servers, you don't have to install additional software. Start the Add Features Wizard in Windows Server 2008 or Windows Server 2008 R2 or the Add Roles and Features Wizard in Windows Server 2012 and later versions. Then, on the Select Features page, expand Remote Server Administration Tools, and then select the tools that you want to install. Complete the wizard to install your management tools.
STEP 3: Confirm module availability
Use the following command to check available modules via powershell. Open PowerShell with run as Administrator mode:
Command: Get-Module -ListAvailable -Name ActiveDirector
Expected output: