Work with Tenants
AutomationEdge is a multi-tenant system, that can host automation services for multiple tenants (customers) on one server. Users, workflows, and other objects created for one Tenant are not visible to another tenant. In the chapter, you will learn about adding and deleting tenants and various tenant statusstatuses. The chapter includes the following topics:
- Add new tenant
- Tenant status
- Delete a tenant
Add New Tenant
You need to add tenants under which you can create users.
To add a new tenant:
-
In the menu, click Tenants. The Tenants page appears.

Figure: Tenant
-
On the page, click Add New. The Add New Tenant dialog appears.
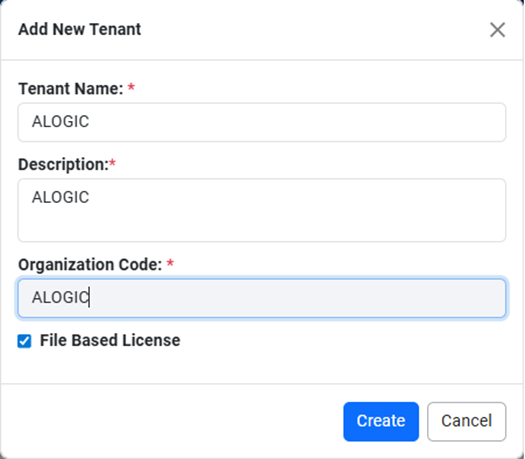 Figure: Add New Tenant
 -
Enter the following field details:
| Field Name | Description |
|---|---|
| Tenant Name* | Enter a unique tenant name. Only alphanumeric characters and space is/are allowed |
| Description* | Enter a description of the tenant. |
| Organization Code* | Specify unique organization code to a tenant. |
| File Based License | The check box is selected by default. |
*: indicates a mandatory field.
- Click Create. The created tenant appears on the Tenant page.
- To modify the tenant details, click Edit (
 ) and update the description of the tenant.
 - You cannot modify the default, System Admin Tenant, whose org code is SYSADMIN.
View tenant details
After adding the new tenant, you can view the details on the Tenant page.
To view tenant details:
-
In the menu, click Tenants. The Tenants page appears.
-
View the following tenant details:
| Field name | Description |
|---|---|
| Tenant Name | Displays the name of the tenant. |
| Org Code | Displays the unique organization code. |
| Description | Displays the description of the tenant. |
| Created | Displays the date when the tenant was created. |
| License Status | Displays the status of the license. |
| Status | Toggle switch to enable or disable the tenant. For details, see Tenant status. |
| Actions | You can edit or delete the tenant. |
View license details
You can view license details such as customer ID, license ID, start date, end date, and so on.
To view license details:
- In the menu, click Tenants. The Tenants page appears.
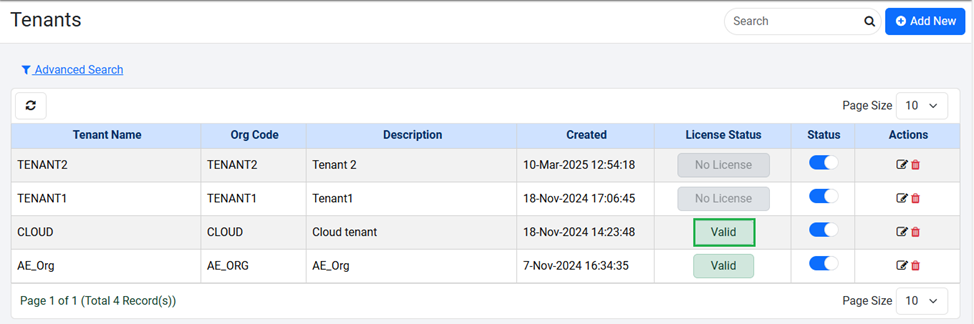
Figure: Tenants page
- In the License Status column, click the status, for example, Valid. The License Details dialog appears.
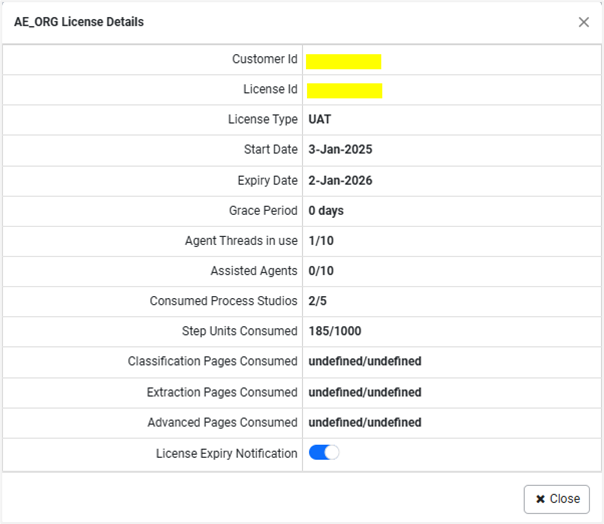
Figure: License Details dialog
You can view the following field details:
- Customer Id: Displays the unique customer ID of the tenant.
- License Id: Displays the license ID used by the tenant.
- License Type: Displays the type of license used. For example, UAT, Development, and so on.
- Start Date: Displays the start date of the license.
- Expiry Date: Displays the expiry date of the license.
- Grace Period: Displays the additional number of days that the license can be used before renewal.
- Agent Threads in use: Displays the agent thread in use.
- Assisted Agents: Displays the number of assisted agents in use.
- Consumed Process Studios: Displays the number of Process Studios in use.
- Step Units Consumed: Displays the total number of step units consumed.
- Classification Pages Consumed: Displays the number of pages consumed to classify a document.
- Extraction Pages Consumed: Displays data extraction based on the number of pages.
- Advanced Pages Consumed: Displays advanced pages that use AI to process documents.
- License Expiry Notification: Toggle the switch to enable or disable the license expiry notification for any tenant.
System Admin can turn off or turn on License Expiry Notification for any tenant.
-
If license expiry notifications are on and the license expires within 30 days:
→ Expiry notification email will be sent. -
If license expiry notifications are off and the license expires within 30 days:
→ No email. -
If the license expires in more than 30 days (regardless of notification setting):
→ No email. -
If the license is expired and not renewed:
→ The system checks the license expiry notification setting and decides whether to send an email. -
If the license is renewed:
→ License expiry notifications are enabled if they were previously disabled.
→ No email is sent (expiry is now more than 30 days).
Tenant Status
You can enable or disable the status of a tenant. The system administrator can manage the status with a toggle switch.
To enable or disable a tenant, slide the toggle switch (![]() ). A message asking for confirmation to enable or disable the tenant appears.
). A message asking for confirmation to enable or disable the tenant appears.
When the toggle switch appears:
-
Blue (
 ): indicates the tenant is enabled.
 -
Grey (
 ): indicates the tenant is disabled.
When you disable a tenant, the following features are also disabled for the users, that is, the tenant user is unable to:
-
Sign in to AutomationEdge.
-
Register new Process Studio or sign in to Process Studio.
-
Trigger tenant user’s schedules.
-
Raise new workflow requests.
-
Sign in to connected apps.
-
Use the Agent as it is shut down.
-
Continue with the Credential expiry job.
-
Trigger workflow schedules.
-
Trigger notification schedules.
-
Trigger email report schedules.
When you enable the tenant again, you need to enable all the disabled features manually.
Delete a Tenant
You can delete a tenant, if required.
Disable the tenant before deleting it.
To delete a tenant:
- In the menu, click Tenants. The Tenants page appears.
- In the Status column, toggle the status switch and disable the tenant. The delete option becomes available.
- In the Actions column, click
 . The Confirm Tenant Deletion dialog appears.
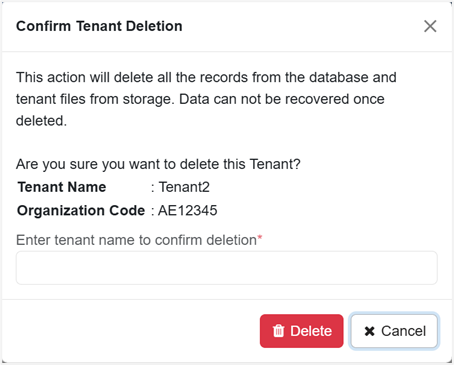
Figure: Confirm Tenant Deletion dialog
- Enter the name of the tenant and click Delete. The tenant details are deleted.