Work with Purging
Some tables in the AutomationEdge database accumulate a large amount of data over time. To maintain optimal system performance, the records should be periodically purged.
Purging enables the creation of a Purge Policy and Purge Schedule to periodically clean up the database tables. The process reduces database and disk space usage, thereby enhancing the performance of the AutomationEdge system.
In the chapter, you will learn about how to create a purge policy and schedule the purging activity.
The chapter includes the following topic, Purging Configuration.
Purging Configuration
In the topic you will learn about how to configure the purge policy and schedule the purge. The Purging Configuration page has the following two tabs:
- Configure purging policy
- Create a purge schedule
Configure purge policy
Configure the purge policy by defining the data retention duration and notification details. You can purge the following data tables:
- Audit Logs
- User Session History
- Workflow Requests
- Notification History
The purge policy determines data retention duration (in months) for each table data, that is, for Audit Logs, User Session History, Workflow Requests, and Notification History. A System Administrator can set a Purge Policy, while a Tenant Administrator can only edit the policy.
In addition, as a System Administrator you can terminate a purge that is in progress. Use the option to terminate a purge job in scenarios where the job goes for a very long time.
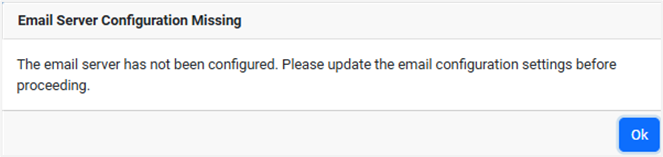
You must configure the email server details before proceeding with configuring the Purge Policy. Else, you will receive the following message:
To configure the purge policy:
- In the menu, click Purging -> Purging Configuration. The Purging Configuration page appears with the Policy tab selected by default.
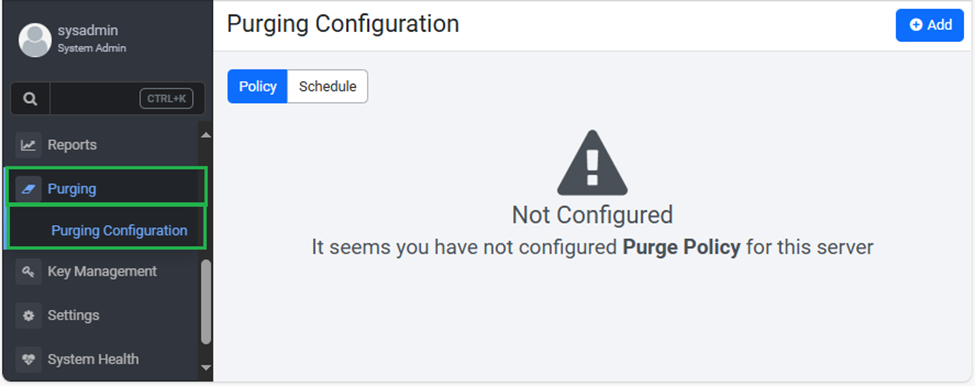 Figure 95: Purging -> Purging Configuration page
- On the page, click Add. The purge policy fields details appear.
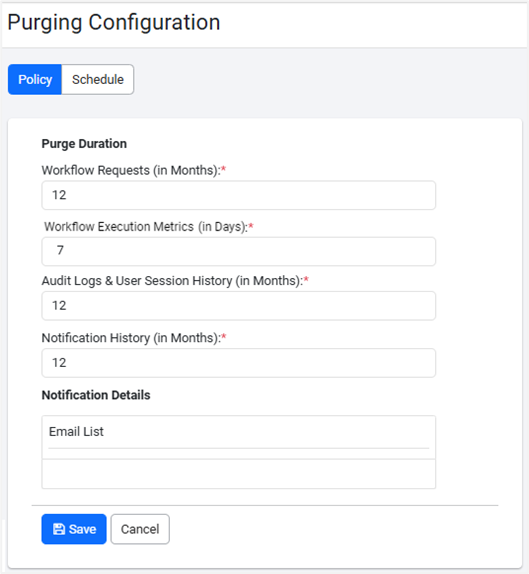
Figure 96: Purging Configuration page
- Enter the following field details:
| Field Name | Description |
|---|---|
| Purge Duration | |
| Workflow Requests (in Months)* | Enter the data retention duration in months for the workflow requests. The records older than the set duration are purged from the data table. For example, if you set 12 months, then any record older than 12 months will be permanently deleted when the scheduled purge job runs. |
| Workflow Execution Metrics (in Days)* | Enter the data retention duration in days for the workflow execution metrics. The records older than the set duration are purged from the data table. For example, if you set 7 days, then any record older than 7 days will be permanently deleted when the scheduled purge job runs. Note: The Workflow Execution Metrics (in Days) field is available only if the Workflow Metrics service is running |
| Audit Logs & User Session History (in Months)* | Enter the data retention duration in months for audit logs and user session history. The records older than the set duration are purged from the data table. For example, if you set 12 months, then any record older than 12 months will be permanently deleted from the data table when the scheduled purge job runs. |
| Notification History (in Months)* | Enter the data retention duration in months for notification history. The records older than the set duration are purged from the data table. For example, if you set 12 months, then any record older than 12 months will be permanently deleted when the scheduled purge job runs. Note: The value for Notification History must be less than or equal to the value entered for Workflow Requests. |
| Notification Details | |
| Email List | Select the email addresses of the admins you want to send the emails to. |
* Indicates mandatory field.
-
Click Save. The purge details are saved and appear under the Policy tab.
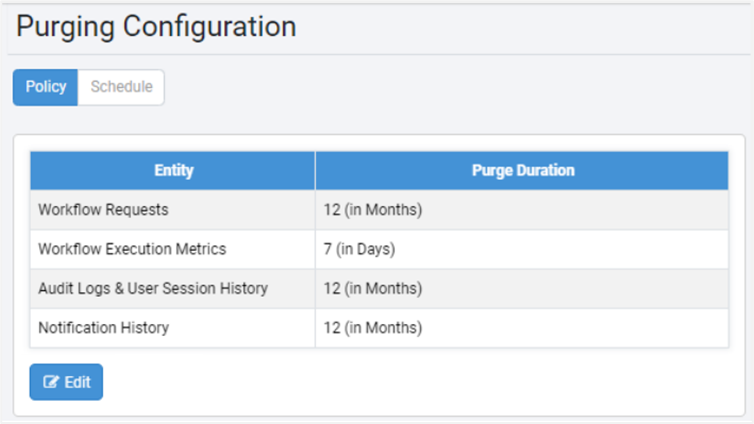
Figure 97: Purging Configuration page
To modify the purging details, click Edit.
Create a purge schedule
You can create a purge schedule.
For ease of understanding, the data table is called Entity.
To create a purge schedule:
-
In the menu, click Purging → Purging Configuration. The Purging Configuration page appears.
-
On the Purging Configuration page, click the Schedule tab. The Purge Schedule page appears.
 Figure 98: Purging Configuration page
- On the page, click Add. The Purge Schedule Configuration page appears.
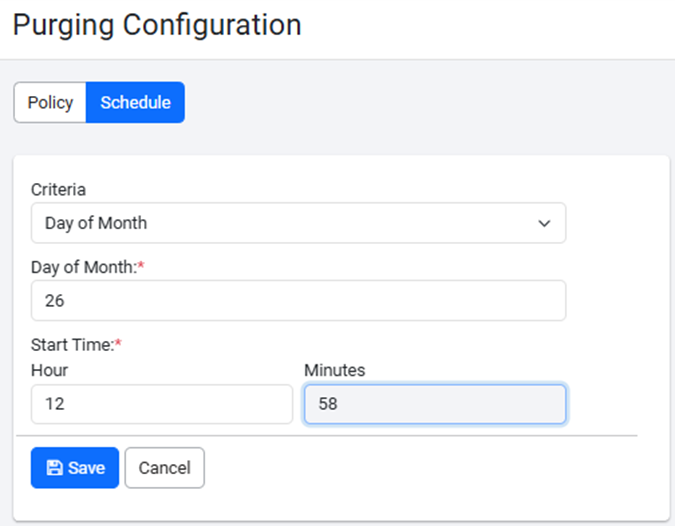
Figure 99: Schedule purge fields
Purge Schedule Fields
| Field name | Description |
|---|---|
| Criteria | Select if you want to schedule the purge on a day of the month or week. Available options are: • Day of Month • Day of Week Note: The purging schedule details change depending on the criteria you select. |
| Day of Month* | (If criterion is Day of Month) Select the day of the month to schedule the purge. |
| Day of Week* | (If criterion is Day of Week) Select the day of the week when you want to schedule the purge. |
| Week of the Month* | (If criterion is Day of Week) Select the week of the month when you want to schedule the purge. |
| Start Time* | Select the purge start time in hours and/or minutes. |
| Hour | Specify the hour for the purge start time. |
| Minutes | Specify the minutes for the purge start time. |
* Indicates mandatory field.
- Click Save. The purge schedule details are saved.
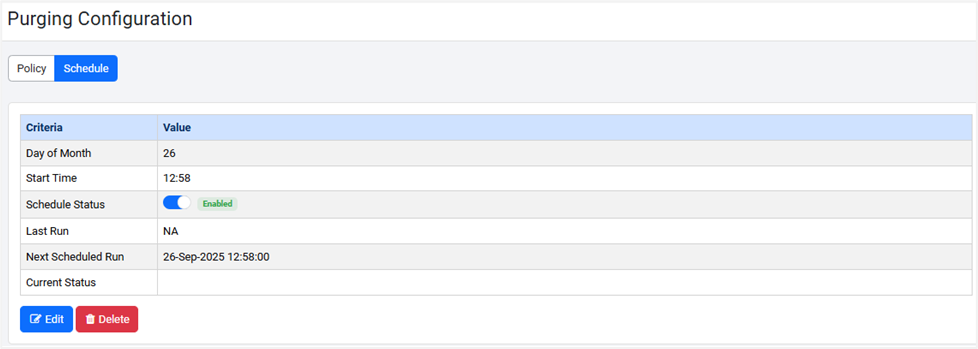
Figure 100: Schedule details
- To modify the schedule details, click Edit.
- To delete the schedule details, click Delete.
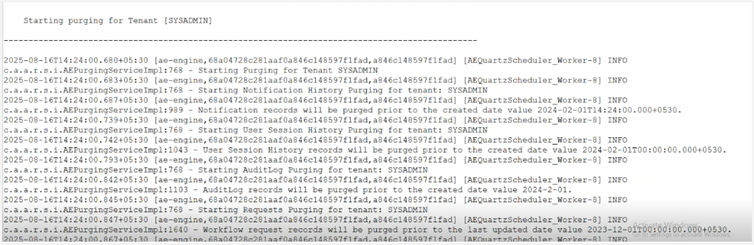
Understand how purging works
When the purging starts as scheduled, the records of all entities of a tenant are completely purged. Only after purging of records of the current tenant is complete, does the purging of the next tenant start.
For example:
For Tenant1, if the data from the Notification History entity is purged, then the purging of Audit Logs, User Session History, and Workflow Requests records is also completed. Only after Tenant1’s purge is complete will the purge for the next tenant (for example, Tenant2) start.
When you purge the parent entity (parent table), all the child entities (child tables) associated with the parent also get purged.
For example:
If you scheduled the purge of the Workflow Requests table for records older than 12 months, then the purge will also permanently delete records of associated or dependent tables, such as Tasks, for the same duration.
The entities (data tables) are purged in the following order:
- Notification History
- Audit Logs
- User Session History
- Workflow Requests
Only when the purge starts, the options to terminate the purge and refresh(![]() ) the view become available.
) the view become available.
The options to edit, delete, or disable the schedule are unavailable (inactive) when the purge is in progress.
You may need to terminate the purge if the process of purging takes a long time because of the huge number of records (millions of records). On termination you can modify the Purge Policy details and reschedule the purge.
- Terminate: Click to end the purging.
 : Click to refresh the view.
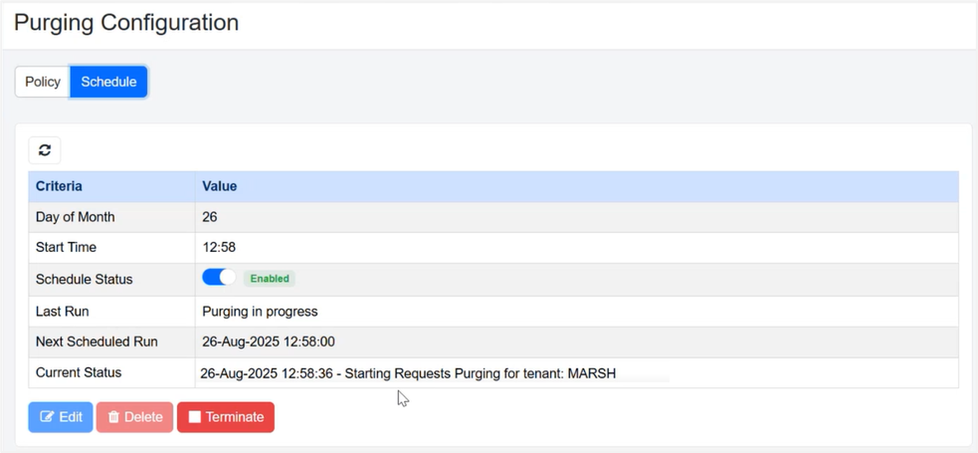
Figure 101: Purging in progress view
Termination of purge
Click Terminate to stop the purge gracefully. The purge job completes the current batch in progress before terminating.
For example:
If the purge of the Notification History entity for Tenant1 is complete and the purge of 50,000 records (divided into 5 batches of 10,000 records) for Tenant2 is in progress, and you click Terminate while the second batch is being purged, then the purge terminates only after the second batch is fully purged. The purge will not proceed to the third batch.
After the purge is completed or terminated, the following details appear:
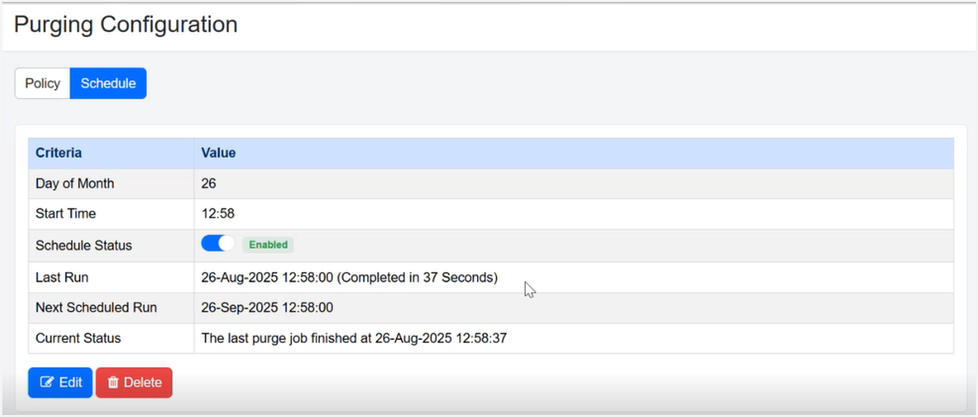 Figure 102: Purging completed
To view the purge details:
The Purging Configuration page displays the criteria and the respective values. The following details appear on the page:
| Field name | Description |
|---|---|
| Criteria | |
| Day of Month OR Day of Week: | Displays the day of the month when the purge is scheduled. For example, 5 indicates 5th day of the month. Or , Displays the day of the week when the purge is scheduled. For example, Saturday. |
| Week of the Month | Displays the week of the month when the purge is scheduled. For example, 4. Note: This field is displayed only if the selected criteria is Day of Week. |
| Start Time | Displays the time when the scheduled purge will start. |
| Status | Toggle the switch to enable or disable the schedule. |
| Last Run | Displays when the previous scheduled purge was run and the duration of the purging. |
| Next Scheduled Run | Displays the date and time when the next scheduled purge will run. |
| Current Status | Displays the current purge status. For example, if the purge of Requests records for the first tenant has started, then you will see the status as seen in the following screenshot: Figure 103: Current Status view 1 Immediately after completion of the purging of the records of the first tenant, the purging of Requests records of the next tenant begins,as seen in the following screenshot: Figure 104: Current Status view 2 |
-
Whenever the next purge happens, the action restarts from the batch after the terminated batch.
For example, if the purge terminated after the second batch of records of the Notification History table for Tenant2, then the purge starts from the third batch, which is considered the first batch for Tenant2. -
The details of purge operations are logged in the ae-purge.log.