Work with Task Templates
Templates let you create predefined task formats that can be used in workflows. These templates are useful in steps such as Human in the Loop and Reject/Repair, where manual approval or document review is required. Templates provide a standardized way to manage approvals and document reviews in workflows, ensuring consistency.
You can design a template for two main purposes:
- Approval: For tasks where an approver needs to review and approve or reject.
- Document Review: For tasks where a reviewer verifies the extracted text from documents and makes the changes if required.
A user with an Admin role must create templates in AEUI for developers to use in Human-in-the-Loop (HIL) or Reject and Repair (RR) steps. A template can either include both Data Fields JSON and Action Buttons configuration (for Approval tasks) or only Action Buttons configuration (for Document Review tasks). In a Human-in-the-Loop step, approvals are handled through action buttons. When an approver selects an action button, the workflow continues according to the selected action.
In addition to action buttons, Human-in-Loop steps can include input data fields and labels which are defined in a JSON format. These elements are displayed to the approver to provide context or to capture required information before the workflow continues.
In addition to creating templates from scratch, you can also import existing templates. This helps save time and ensures consistency when setting up tasks across multiple workflows.
- 8.2.0 to 8.2.3
- 8.2.4 onwards
Approval Template
Select Approval Template where an approver needs to review and approve or reject.
To create Approval templates:
-
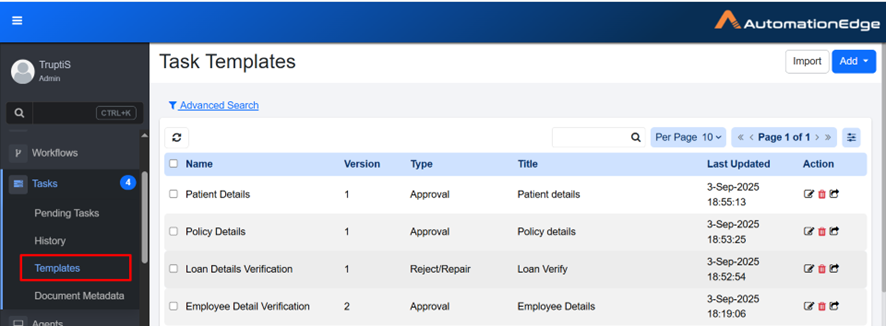
In the menu, click Tasks → Templates. The Task Templates page appears.
-
View Task Templates:
Column name Description Name Displays the unique task template name. Version Displays version of the task. For more details, see Version. Type Displays the task type. This shows as Approval when the Approval template is selected, or Reject/Repair when the Document Review template is selected. Title Displays the default title specified in the template, which can be overridden by the plugin field Task Title. For more details, check Human in Loop step in the AutomationEdge Standard Plugins Reference Guide. Last Updated Displays date and time when the task was last updated. Action Click Edit  , Delete
  , or Export
  to manage the task. For more details, see Action.
Version
When you create a Task Template, it is assigned the default version number 1. You can then use the template to create tasks. Each task created refers to the template as its source. If you modify and save the template later, the version number is incremented (for example, from version 1 to version 2), because the template has already been used to create tasks.
Action
-
Edit Click
to open the task template in edit mode. This allows you to update the template details such as Data Fields, Action buttons and other configurations. After making changes, save the template to apply the updates. -
Delete Click
to delete the template. A confirmation dialog appears asking you to confirm the deletion. -
Export Click
to export the template in JSON format.
To add templates:
-
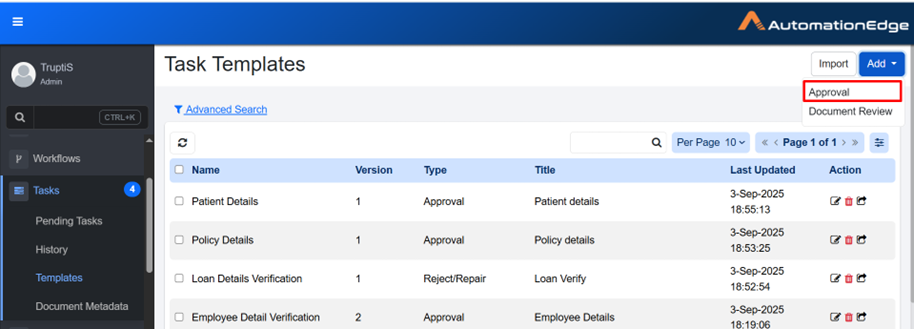
On the Task Templates page, click Add. A list of task template types appears.
-
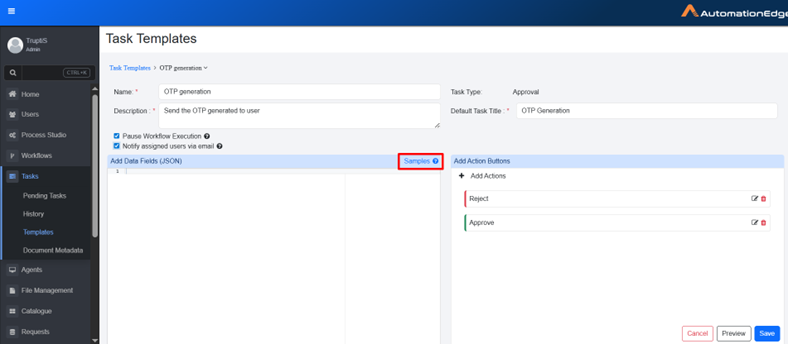
In the list, select Approval. The Task Templates details appear.
-
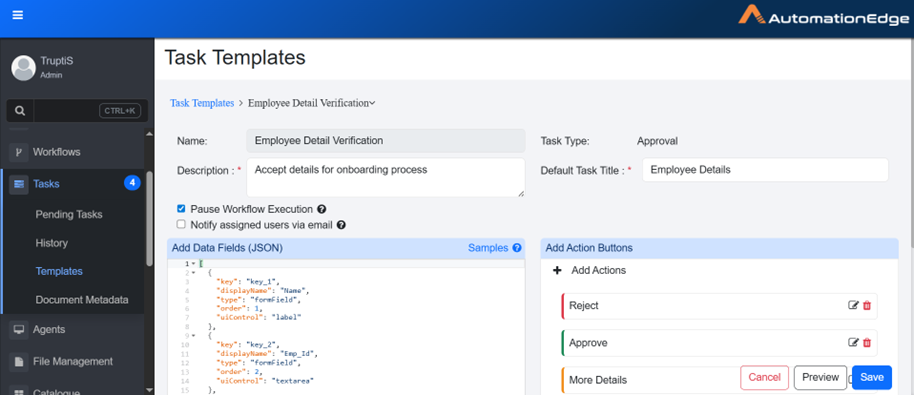
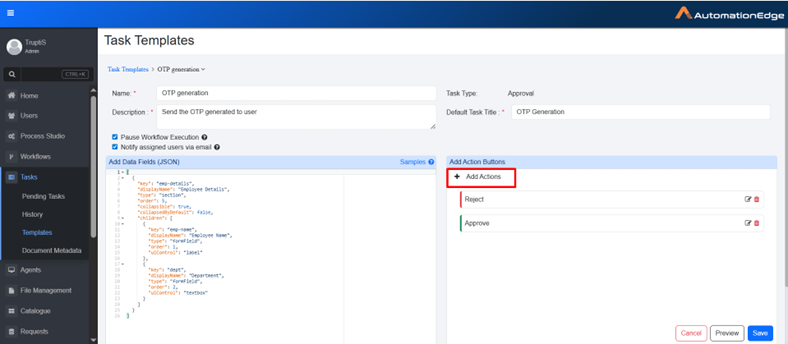
Enter the following field details:
Field name Description Name Enter the unique task template name. Description Enter a brief description of what the task is for. Task Type When you select the Approval type, the Approval option is set by default. Default Task Title Enter the default title that will be automatically assigned to new tasks. This title is replaced by the title specified in the Human in the Loop step and is displayed in the Pending Task details. Pause Workflow Execution Select to pause the workflow until this task is completed by the user. Notify assigned users via email Select this to send email notification to the nominated user whenever a new pending task is created. Add Data Fields (JSON) Write a JSON code to create data fields. You can click Samples to get different sample code. For details, see Sample section. Add Action Buttons Click + to add action buttons. For details, see Add Action Buttons. -
Click Save. Template is created.
Note-
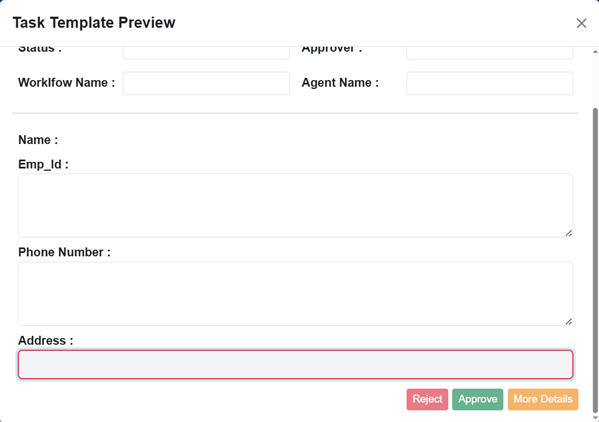
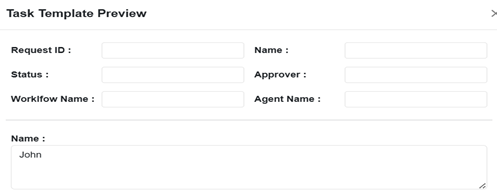
Click Preview to view the template.
-
Click Cancel to cancel creating the template. The value key in the JSON Sample is used only for preview for Approval and Document Metadata. For example, if "value":"John" is specified in the sample, the template or Document Metadata Preview will show the value for the key as John. However, this value will not be reflected in the actual Pending Task. There, the value will be obtained at runtime during workflow execution.
-
Add Data Fields (JSON)
This section refers to the configuration interface where you define the structure of the data your system will handle.
Samples
While creating task templates, you can add data fields in JSON format. You can also refer to predefined samples.
To add samples in Data Fields:
-
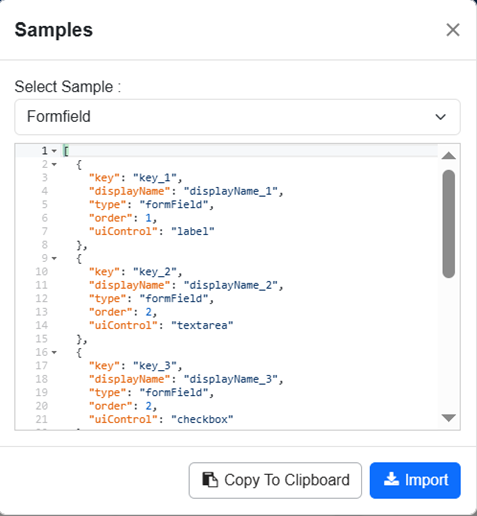
On the Task Templates page, click Samples. The Samples dialog appears.
-
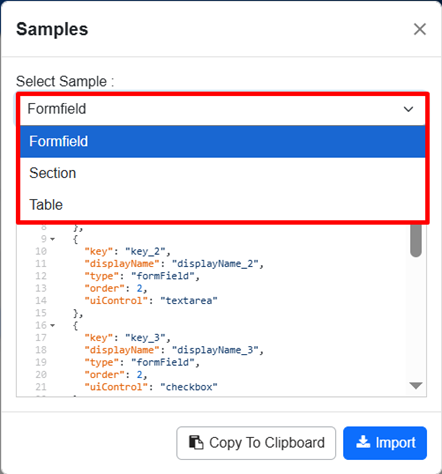
In the Select Sample list, select the sample you want to use. The following three samples are available, each of which represent different types of data.
Formfield
Use the formfield sample to create input fields that allow users to enter data, such as text areas, labels, and other form elements.
The controls enable structured input, enforce mandatory selections, and support flexible input. The AE UI uses the uiControl property in the JSON template to render components and apply validations.
The following UI controls are supported:
- label: Read-only display field.
- textarea: Multi-line text input.
- checkbox: Displays a checkbox. If checked, the value is set to "true"; otherwise, it is "false".
- textbox: Single-line text or numeric input.
- radio: Mandatory Control: Single-choice selection. Users must select one option; the form cannot be submitted or saved until a value is selected.
- select: Mandatory Control: Drop-down list with fixed, non-editable options. Users must select one value from the list to save the form.
- combobox: Non-Mandatory Control: Drop-down list that allows users to select an existing option, enter a custom value, or leave the field blank.
Section
Use this sample to group multiple form fields together under a single heading for better organization.
Table
Use this sample to display or capture data in a tabular format, where rows and columns can hold structured information.
secret is only applicable for field controls, textbox and label. Values for fields that are marked as secret are kept in the encrypted format in the database. For example,
{
"key": "id",
"displayName": "Employee Id",
"type": "formField",
"secret": "true",
"uiControl": "textbox",
},
- In the dialog, do one of the following:
- Click Import. The sample is copied to the Add Data Field (JSON) section. OR
- Click Copy to Clipboard. The sample is copied, and you can paste it into the Add Data Field (JSON) section.
Add Action Buttons
Action buttons define the options that users can select while performing a task. These buttons control how the task proceeds based on the user's choice. For example, you can configure action buttons such as Approve, Reject, or Send for Review.
To add Action button:
-
In Add Action Buttons section, click Add Actions. Details to Add Actions appear.
-
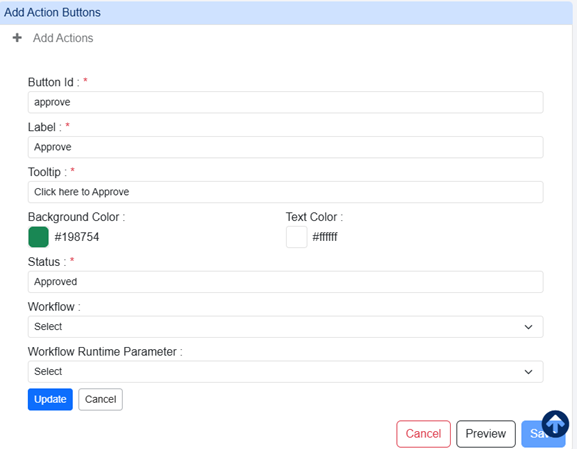
Enter the following field details:
Field name Description Button Id Enter the button ID. Label Enter the label that you want to display on the button. Tooltip Enter a short message that appears when you hover over a button to explain its purpose. Background Color Select a color for the button. Text Color Select a color for text on the button. Status Enter the status that will appear on the Task History tab after the task is completed. Workflow Select the workflow that should be triggered when the button is selected. You can also search for the workflow. For more details, see Target Workflow section. Workflow Runtime parameter Select the runtime parameter defined in the target workflow. You can also search for the parameter. For more details, see Workflow Runtime Parameter section. -
Click Update. The button is added to the Add Actions Buttons.
Approval Template
Select Approval Template where an approver needs to review and approve or reject.
To create Approval templates:
-
In the menu, click Tasks → Templates. The Task Templates page appears.
-
View Task Templates:
Column name Description Name Displays the unique task template name. Version Displays version of the task. For more details, see Version. Type Displays the task type. This shows as Approval when the Approval template is selected, or Reject/Repair when the Document Review template is selected. Title Displays the default title specified in the template, which can be overridden by the plugin field Task Title. For more details, check Human in Loop step in the AutomationEdge Standard Plugins Reference Guide. Last Updated Displays date and time when the task was last updated. Action Click Edit , Delete , or Export to manage the task. For more details, see Action.
Version
When you create a Task Template, it is assigned the default version number 1. You can then use the template to create tasks. Each task created refers to the template as its source. If you modify and save the template later, the version number is incremented (for example, from version 1 to version 2), because the template has already been used to create tasks.
Action
-
Edit Click
to open the task template in edit mode. This allows you to update the template details such as Data Fields, Action buttons and other configurations. After making changes, save the template to apply the updates. -
Delete Click
to delete the template. A confirmation dialog appears asking you to confirm the deletion. -
Export Click
to export the template in JSON format.
To add templates:
-
On the Task Templates page, click Add. A list of task template types appears.
-
In the list, select Approval. The Task Templates details appear.
-
Enter the following field details:
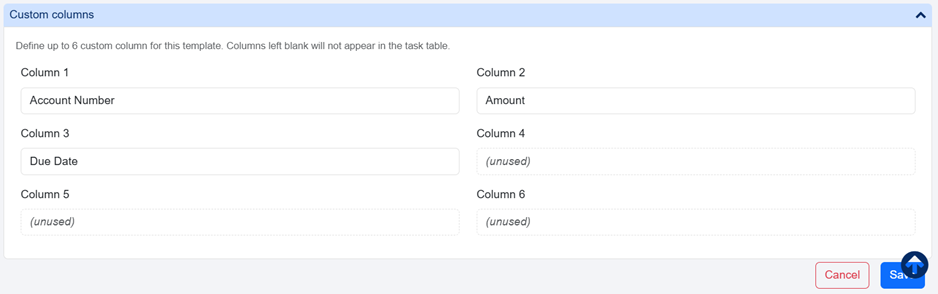
Field name Description Name Enter the unique task template name. Description Enter a brief description of what the task is for. Task Type When you select the Approval type, the Approval option is set by default. Default Task Title Enter the default title that will be automatically assigned to new tasks. This title is replaced by the title specified in the Human in the Loop step and is displayed in the Pending Task details. Pause Workflow Execution Select to pause the workflow until this task is completed by the user. Notify assigned users via email Select this to send email notification to the nominated user whenever a new pending task is created. Add Data Fields (JSON) Write a JSON code to create data fields. You can click Samples to get different sample code. For details, see Sample section. Add Action Buttons Click + to add action buttons. For details, see Add Action Buttons. Custom Columns Use this section to define up to six additional columns for the template. These columns appear with the standard fields on the Pending Tasks tab, in the task details view, and in CSV exports.
Refer Custom Columns. To add custom columns see, Add Custom Columns. Note: Custom Columns feature is available from Release 8.2.4 onwards. -
Click Save. Template is created.
Note-
Click Preview to view the template.
-
Click Cancel to cancel creating the template. The value key in the JSON Sample is used only for preview for Approval and Document Metadata. For example, if "value":"John" is specified in the sample, the template or Document Metadata Preview will show the value for the key as John. However, this value will not be reflected in the actual Pending Task. There, the value will be obtained at runtime during workflow execution.
-
Add Data Fields (JSON)
This section refers to the configuration interface where you define the structure of the data your system will handle.
Samples
While creating task templates, you can add data fields in JSON format. You can also refer to predefined samples.
To add samples in Data Fields:
-
On the Task Templates page, click Samples. The Samples dialog appears.
-
In the Select Sample list, select the sample you want to use. The following three samples are available, each of which represent different types of data.
Formfield
Use the formfield sample to create input fields that allow users to enter data, such as text areas, labels, and other form elements.
The controls enable structured input, enforce mandatory selections, and support flexible input. The AE UI uses the uiControl property in the JSON template to render components and apply validations.
The following UI controls are supported:
- label: Read-only display field.
- textarea: Multi-line text input.
- checkbox: Displays a checkbox. If checked, the value is set to "true"; otherwise, it is "false".
- textbox: Single-line text or numeric input.
- radio: Mandatory Control: Single-choice selection. Users must select one option; the form cannot be submitted or saved until a value is selected.
- select: Mandatory Control: Drop-down list with fixed, non-editable options. Users must select one value from the list to save the form.
- combobox: Non-Mandatory Control: Drop-down list that allows users to select an existing option, enter a custom value, or leave the field blank.
Section
Use this sample to group multiple form fields together under a single heading for better organization.
Table
Use this sample to display or capture data in a tabular format, where rows and columns can hold structured information.
secret is only applicable for field controls, textbox and label. Values for fields that are marked as secret are kept in the encrypted format in the database. For example,
{
"key": "id",
"displayName": "Employee Id",
"type": "formField",
"secret": "true",
"uiControl": "textbox",
},
- In the dialog, do one of the following:
- Click Import. The sample is copied to the Add Data Field (JSON) section. OR
- Click Copy to Clipboard. The sample is copied, and you can paste it into the Add Data Field (JSON) section.
Add Action Buttons
Action buttons define the options that users can select while performing a task. These buttons control how the task proceeds based on the user's choice. For example, you can configure action buttons such as Approve, Reject, or Send for Review.
To add Action button:
-
In Add Action Buttons section, click Add Actions. Details to Add Actions appear.
-
Enter the following field details:
Field name Description Button Id Enter the button ID. Label Enter the label that you want to display on the button. Tooltip Enter a short message that appears when you hover over a button to explain its purpose. Background Color Select a color for the button. Text Color Select a color for text on the button. Status Enter the status that will appear on the Task History tab after the task is completed. Workflow Select the workflow that should be triggered when the button is selected. You can also search for the workflow. For more details, see Target Workflow section. Workflow Runtime parameter Select the runtime parameter defined in the target workflow. You can also search for the parameter. For more details, see Workflow Runtime Parameter section. -
Click Update. The button is added to the Add Actions Buttons.
Target Workflow
A target workflow is another workflow that is invoked from the current source workflow. You can use this option when the approval process requires multiple steps, such as a Maker-Checker scenario. The source workflow handles the initial processing. When the user clicks a specific action button, the target workflow is triggered. The target workflow performs additional processing based on the data from the source workflow and then decides.
Ensure that the target workflow in the template action has only one mandatory runtime parameter. If there are other parameters, those parameters should be optional.
Workflow Runtime Parameter
To pass information from the source workflow to the target workflow:
- In the Approval Task Template, define a runtime parameter for the action.
- Map this runtime parameter to the target workflow. This parameter acts as an input container for the source workflow's metadata.
- The source workflow passes the metadata as a JSON object into this runtime parameter.
Add Custom Columns
- These columns only show up on Pending Tasks page when you filter the table by a specific task template.
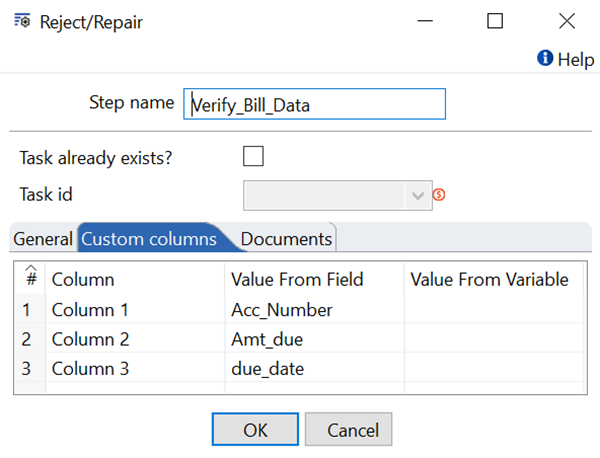
- The data is populated from the variables or values given in the HITL step in Process studio.
The Rules
- You can add up to 6 custom columns for each template.
- Column names must be between 1 and 60 characters long. Every column name within a single template must be unique.
- If a column is left blank, it won't show up in the table or the search results.
- If you rename a column, the change happens immediately. You don't need to restart the system or wait for a new software update.
Keep the following points in mind before renaming a column:
- The new name is applied everywhere, including past tasks.
The system identifies columns by their position, not by their name. After you rename a column, all tasks that use the template display the new label, including previously completed tasks. - Your data is not changed.
Renaming a column updates only the label. Existing values in the column remain unchanged. - Saved filters and searches continue to work.
Filters and searches use the column position instead of the column name. No updates are required after renaming. - The system does not keep the previous column name.
Rename history is not stored. Audit entries that referenced the previous name are not updated automatically. If the previous name is required for compliance or tracking purposes, record it before renaming the column. - External integrations might require updates.
Third-party systems, reports, or scripts that reference the column by name display the updated label after the rename. Inform integration owners before renaming a column used in external integrations. - Previously exported files are not updated.
Files exported before the rename continue to display the previous column name. Export the file again to include the updated label.
For Example,
If you want to see a person's Name whenever you search for a specific template:
- Add "Name" as a Custom Column for that template.
- The data for this column is set up during the HITL (Human-in-the-loop) step in the Process Studio. For instructions on how to set this up, please refer to the Standard Plugin Guide.
Document Review
Select Document Review when you need to create tasks where a reviewer verifies the extracted text from documents and makes the changes if required.
- 8.2.0 to 8.2.3
- 8.2.4 onwards
To create document review template:
-
In the menu, click Tasks → Templates. The Task Templates page appears.

-
Click Add. A list of task template types appears.

-
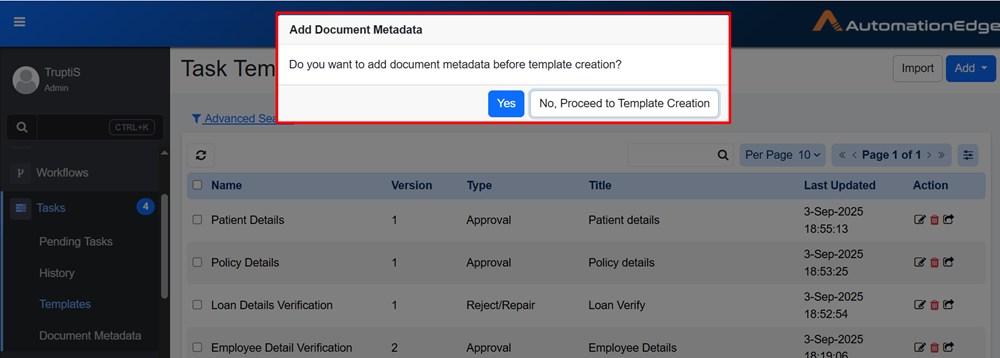
Select Document Review. Add Document Metadata dialog appears.
-
In the dialog, do one of the following:
- Click Yes. If Document Metadata has not been created, you are redirected to the Document Metadata tab. For details, see the Document Metadata. OR
- Click No, Proceed to Template Creation. If Document Metadata is already created, the Task Templates page appears.
-
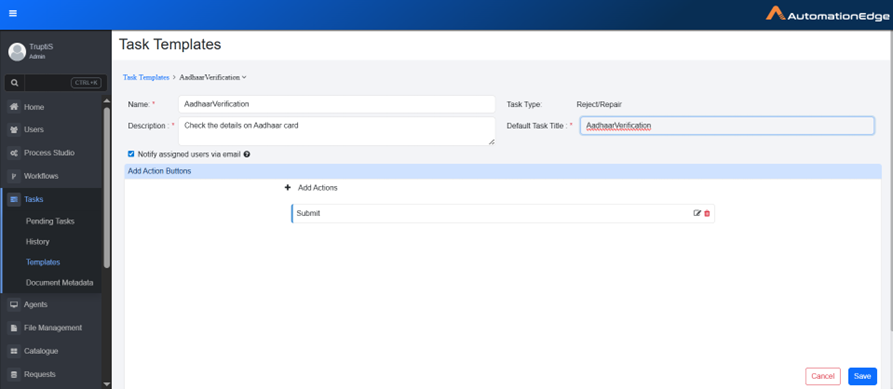
Enter the following field details:
Field name Description Name Enter the unique task name. Description Enter the task description. Task Type Task type is selected Reject/Repair by default. Default Task Title Enter the default title that will be automatically assigned to new tasks. This title is replaced by the title specified in the Human in the Loop step and is displayed in the Pending Task details. Notify Assigned user via email Select this to send email notification to the nominated user whenever a new pending task is created. Add Action Buttons Click Add Actions to add action buttons. For more details, see Add Action Buttons. -
Click Save. The template is created.
To create document review template:
-
In the menu, click Tasks → Templates. The Task Templates page appears.
-
Click Add. A list of task template types appears.
-
Select Document Review. Add Document Metadata dialog appears.
-
In the dialog, do one of the following:
- Click Yes. If Document Metadata has not been created, you are redirected to the Document Metadata tab. For details, see the Document Metadata. OR
- Click No, Proceed to Template Creation. If Document Metadata is already created, the Task Templates page appears.
-
Enter the following field details:
Field name Description Name Enter the unique task name. Description Enter the task description. Task Type Task type is selected Reject/Repair by default. Default Task Title Enter the default title that will be automatically assigned to new tasks. This title is replaced by the title specified in the Human in the Loop step and is displayed in the Pending Task details. Notify Assigned user via email Select this to send email notification to the nominated user whenever a new pending task is created. Add Action Buttons Click Add Actions to add action buttons. For more details, see Add Action Buttons. Custom Columns Use this section to define up to six additional columns for the template. These columns appear with the standard fields on the Pending Tasks tab, in the task details view, and in CSV exports.
Refer Custom Columns. To add custom columns see, Add Custom Columns. Note: Custom Columns feature is available from Release 8.2.4 onwards. -
Click Save. The template is created.
Add Action Buttons(Reject/Repair)
Action buttons define the options that users can select while performing a task. These buttons control how the task proceeds based on the user's choice. For example, you can configure action buttons such as Submit, send OTP, Verify, and so on.
To add an action button:
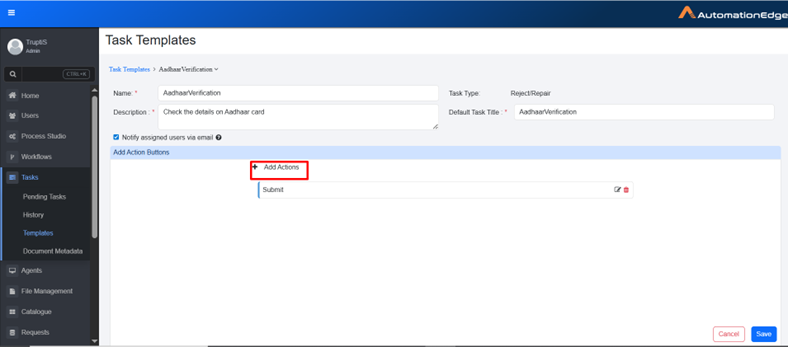
-
In the Add Action Buttons section, click Add Actions. The fields to add the details appear.
-
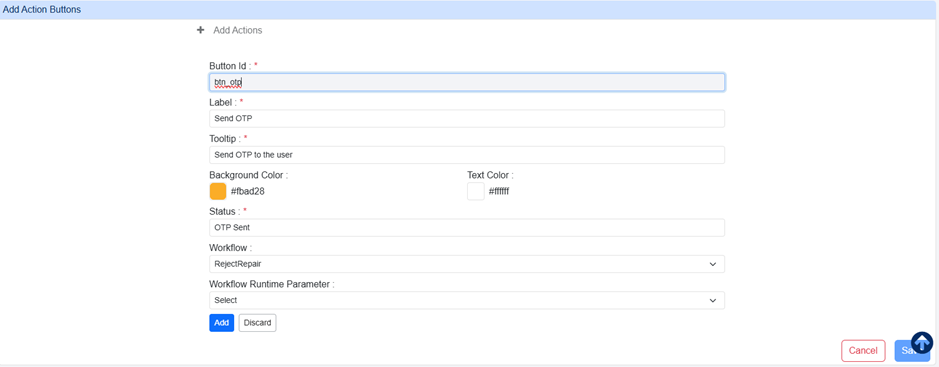
Enter the following field details:
Field name Description Button Id Enter the unique button ID. Label Enter the label that you want to display on the button. Tooltip Enter a short message that appears when you hover over a button to explain its purpose. Background Color Select a color for the button. Text Color Select a color for text on the button. Status Enter the status that will appear on the Task History tab after the task is completed. Workflow Select the workflow that should be triggered when the button is selected. Workflow Runtime parameter Select the runtime parameter defined in the target workflow. -
Click Add. The button is added to the template.