Schedular
The Scheduler lets you automate workflow execution at defined times so tasks run consistently without manual input. Instead of triggering workflows by hand, you create schedules that run daily, weekly, monthly, or on a custom cron expression — with support for holiday calendars to skip non-working days. Scheduled workflows are ideal for routine operations such as reporting, data processing, or batch jobs. You can configure repeat intervals, set time zones, and use options like "skip if ongoing" and "execute last skipped schedule" to handle overlapping executions. Admins can transfer schedule ownership between users to ensure continuity when team members leave, and bulk enable or disable schedules during platform upgrades or migrations.
Assisted workflows cannot be scheduled. These require manual initiation since they depend on user input during execution.
The topic consists of the following sections:
Add new schedules
You can create new schedules that will trigger the workflows accordingly.
To add a new schedule:
-
In the menu, click Workflows -> Scheduler. The Scheduler page appears.
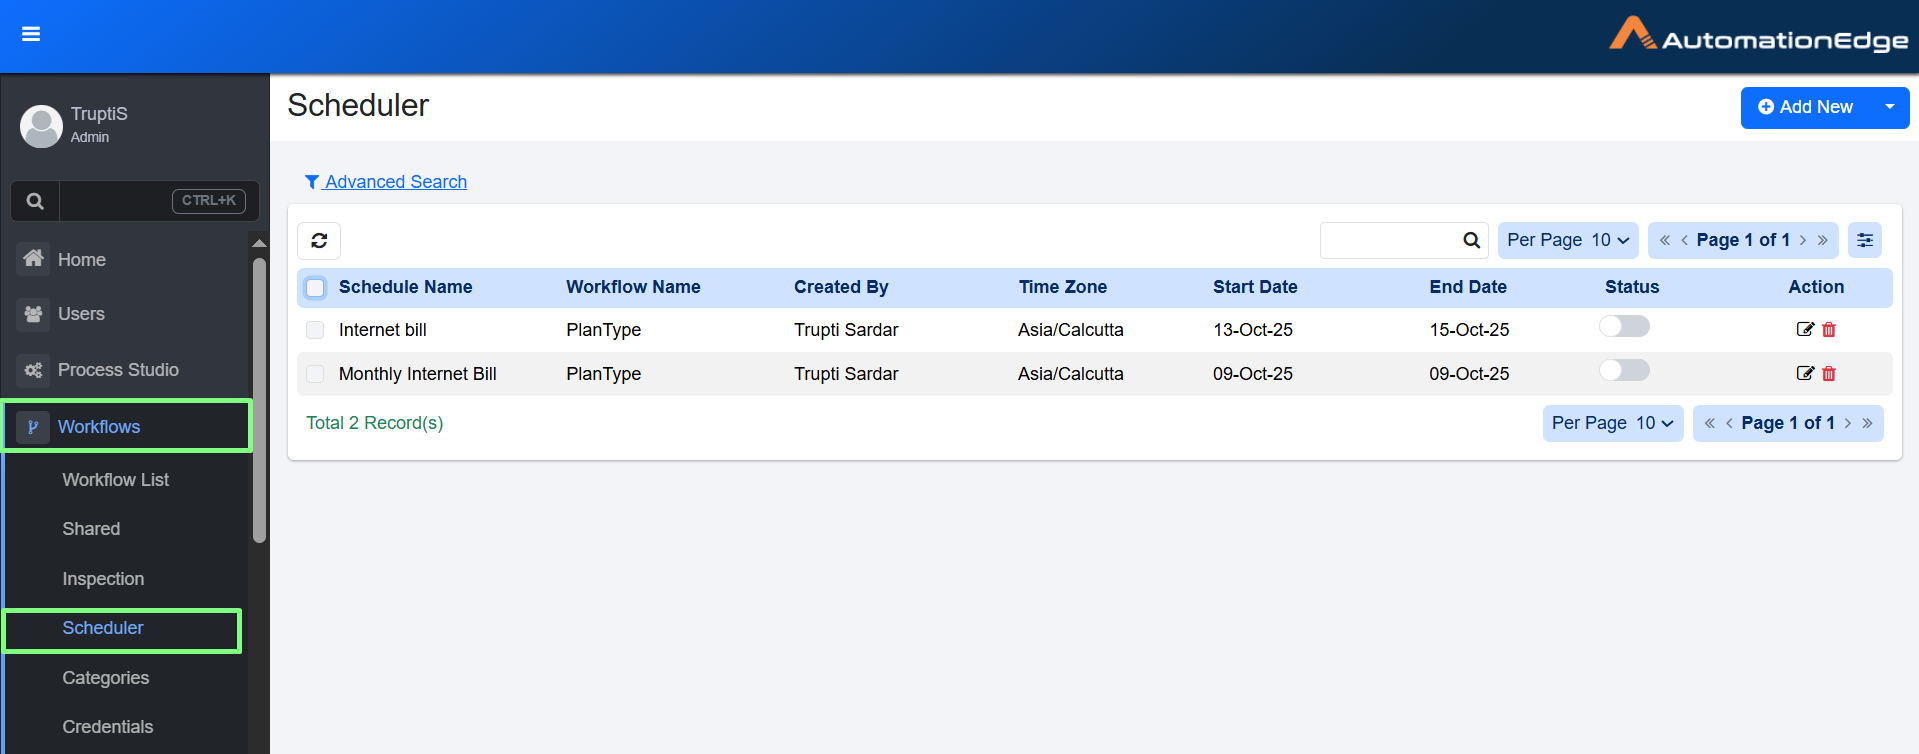
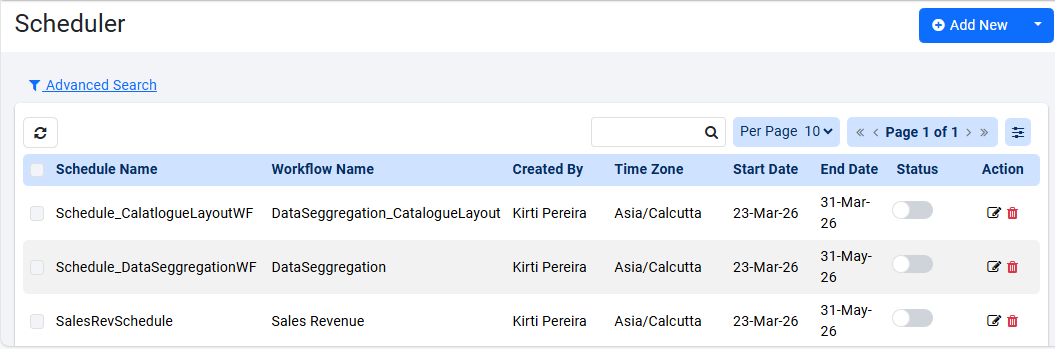
The Scheduler page -
Click Add New. The Create New Schedule page appears.
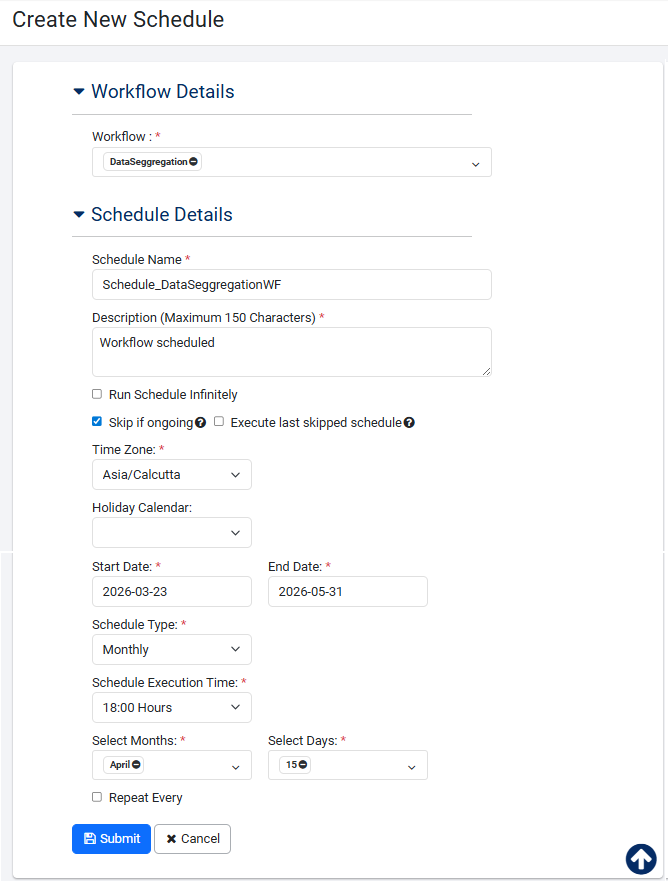
Create New Schedule page -
Enter the following field details:
| Field Name | Description |
|---|---|
| Workflow Details | |
| Workflow* | Select the workflow for which you want to create a schedule. You can also search for a workflow for which you want to create a new schedule. Note: Enter values for runtime parameters of the workflow as per workflow definition. For example, values for parameters, such as: Credential, Product Key, Input Files (zip), and so on. |
| Schedule Details | |
| Schedule Name* | Enter the name of the schedule you want to create. |
| Description (Maximum 150 Characters) * | Enter the description of the schedule. |
| Run Schedule Infinitely | Select the checkbox if you want the schedule to run infinitely, that is, without an end date. Note: If the checkbox is selected, then the schedule End Date field is unavailable. |
| Skip if ongoing | Select the checkbox if you want to skip the workflow execution as per the schedule. The option is applicable only if the existing request is in the following state: New, Retry, ExecutionStarted, and AwaitingInput. Note: You can view the details of the request on the Audit Logs page. |
| Execute last skipped schedule | Select the checkbox if you want to skip the workflow execution when existing request created by the schedule is ongoing (in progress). Requests having status New, Retry, ExecutionStarted, or AwaitingInput are considered as an existing ongoing request. Note: • The field is available only if you select the Skip if ongoing checkbox. • If more than one schedule is skipped, then only the last skipped schedule is executed. • If a request’s status is Expired (as the request is unattended by an Agent), then a new request is created for the skipped schedule, which is executed. • Even if the scheduled date range exceeds or times out the skipped trigger will still execute. |
| Time Zone * | Select the time zone you want to set for the schedule. Note: The current (browser) time zone is populated by default. You cannot change the time zone once a schedule is created. |
| Holiday Calendar | Select the holiday calendar, if required. |
| Start Date * | Set the start date of the schedule in yyyy-mm-dd format. |
| End Date * | Set the end date of the schedule in yyyy-mm-dd format. |
| Schedule Type * | Select the schedule type you want to set. The available options are: • Daily • Weekly • Monthly • Custom Note: If you have added the ae.schedules.enable.cron.expression.input property in the ae.properties file, and set the flag as true, then an additional schedule type, Custom, is available in the list. The option allows you to provide a Cron Expression for the schedule. 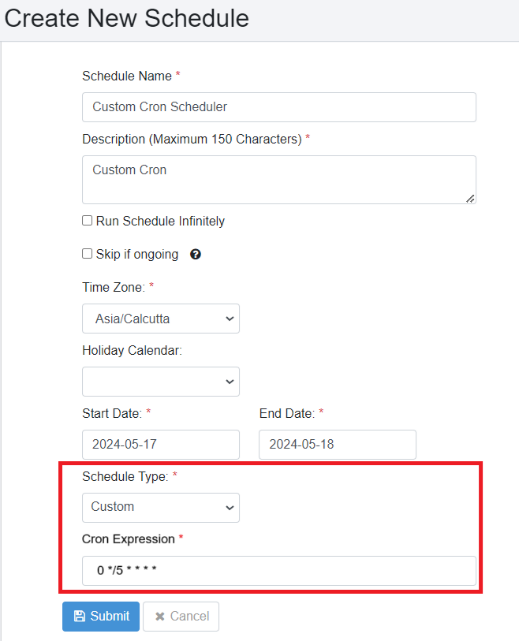 Create New Schedule: Cron Expression |
| Schedule Execution Time OR Start Time | Set the schedule execution time for the workflows in hours and minutes. The schedule will start execution at a time greater than or equal to the Start time specified. Note: • If you select the Repeat Every checkbox, then Schedule Execution Time is labelled Start Time. • If the schedule type is Daily, the schedule starts running at the set time every day. • If the schedule type is Weekly, the schedule starts running at the schedule time on the selected day of the week. • If the schedule type is Monthly, the schedule starts running for the selected months and selected days. |
| Repeat Every * | Select the checkbox to add repeat instructions and then enter the repeat instructions by the hour or minute. • If Hours is selected, 1-24 values are available in the list. • If Minutes are selected 1, 2, 3, 4, 5, 10, 15, 20, 30, 45 values are available in the list. If the checkbox is clear, then the schedule runs once per day. |
| End Time * | Set the schedule execution time for the workflows in hours and minutes. The schedule will execute until a time less than the end time specified. Note: • The field is available only if you select the Repeat Every checkbox. • If the schedule type is Daily, the schedule stops running at the set time every day. • If the schedule type is Weekly, the schedule stops running at the scheduled time on the selected day of the week. • If the schedule type is Monthly, the schedule stops running on the selected months and selected days. |
* Indicates mandatory field.
-
Click Submit. The details are saved and appear on the Scheduler page.
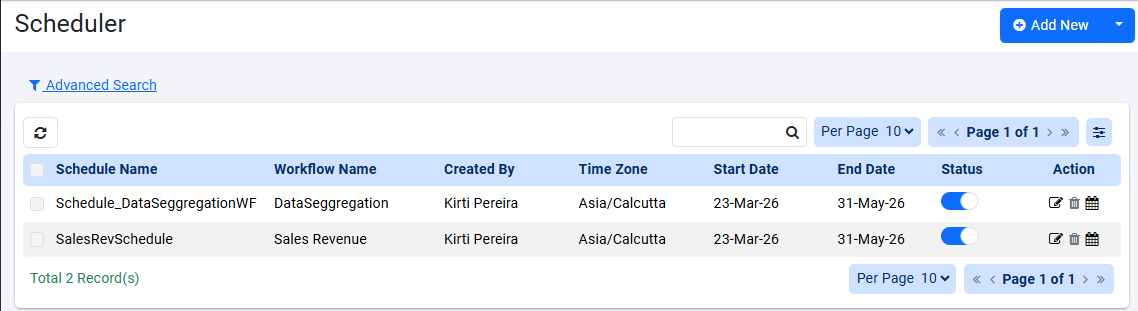
Scheduler page view
Disable or enable or delete schedules
You can disable workflow schedules in bulk when you perform AE version upgrades or migration. However, ensure the schedules are enabled after the migration is complete. You can also delete schedules in bulk.
Use the toggle switch to disable or enable individual schedules. If the schedule is disabled, then the option to delete the selected schedule is available.
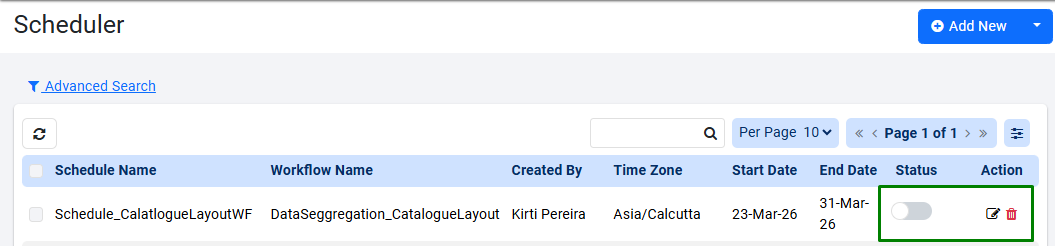
Delete single workflow schedule
Use any one of the following ways to disable or enable schedules in bulk:
To disable schedules using Selected
-
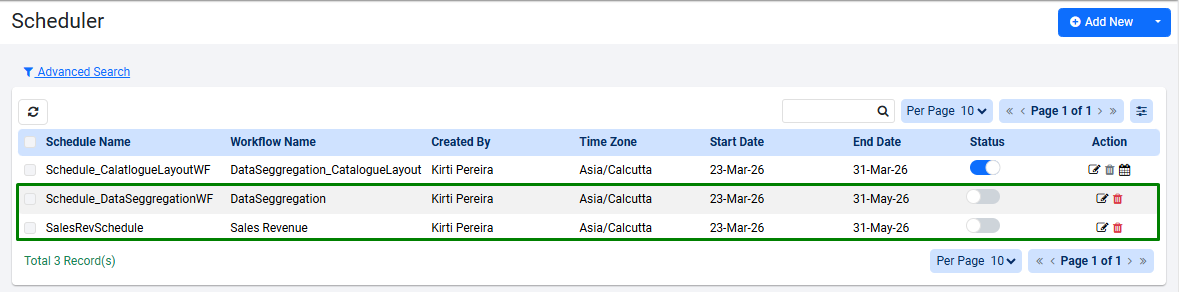
On the Scheduler page, select the checkbox against the Schedule Name column header. All the workflows are chosen and the Selected list appears.
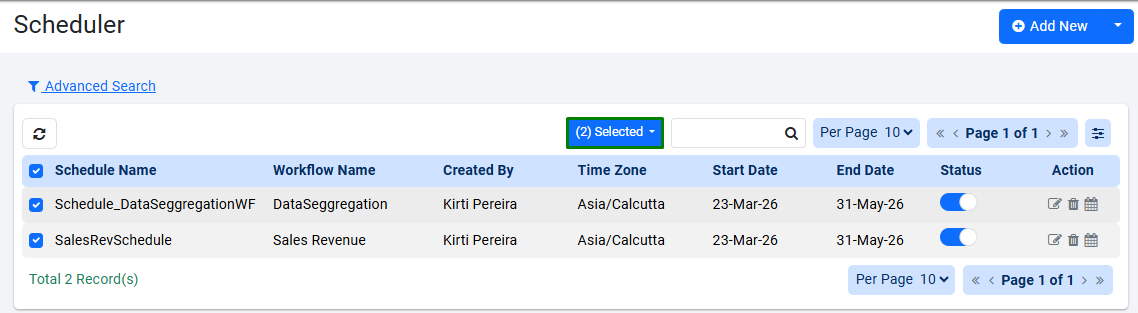
Scheduler page view: all workflows selectedNoteIf you want to disable specific schedules, then select them individually. The count is reflected accordingly in the Selected list.
-
Click the Selected list. The options to Enable, Disable, and Delete the schedules appear.

Selected list options -
Click Disable. The Confirm Schedule Disable dialog appears.
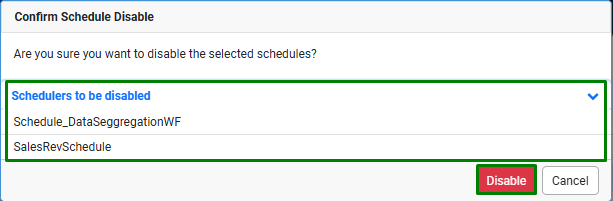
Confirm Schedule Disable dialog -
Check the list of schedules and click Disable. The Bulk Action Result dialog appears that displays if the deactivation of schedules is successful or not.
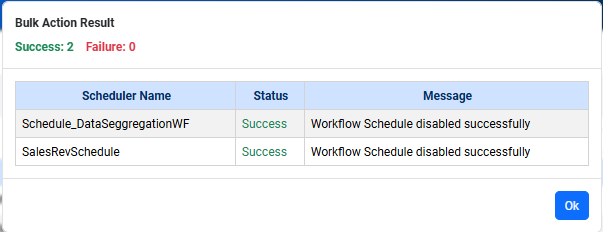
Bulk Action Result dialog -
Click Ok. The Scheduler page is refreshed and the Delete option in the Action column is activated.
Scheduler page updated view
To enable the schedules, select the required checkbox(es) as required, and again click Selected and click Enable. After you confirm that you want to proceed with enabling the schedules, the Scheduler page is refreshed and displays the updated schedule status.
To delete schedules using Selected
-
On the Scheduler page, select the checkbox against the Schedule Name column header. All the workflows are chosen and the Selected list appears.
Scheduler page view: all workflows selectedNoteEnsure the schedules are disabled before proceeding with the deletion. Else, you will see the following:
Scheduler deletion failure viewNoteIf you want to delete specific schedules, then select them individually. The count is reflected accordingly in the Selected list.
-
Click the Selected list. The options to Enable, Disable, and Delete the schedules appear.
Selected list options -
Click Delete. The Confirm Schedule Delete dialog appears.
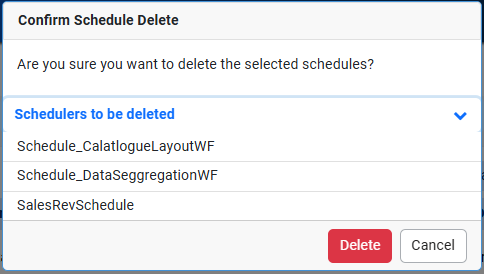
Confirm Schedule Delete dialog -
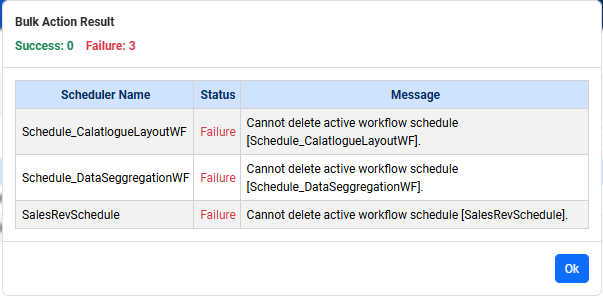
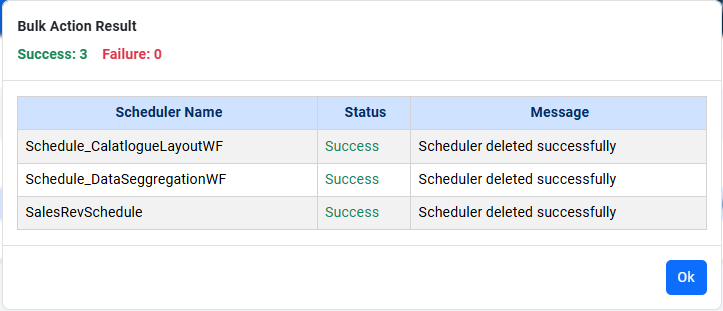
Check the list of schedules and click Delete. The Bulk Action Result dialog appears that displays if the deletion of schedules is successful or not.
Bulk Action Result dialog -
Click Ok. The Scheduler page is refreshed, and all schedules are removed from the page.
To disable all schedules
-
On the Scheduler page, click
 next to Add New. You will see the following options:
Options view -
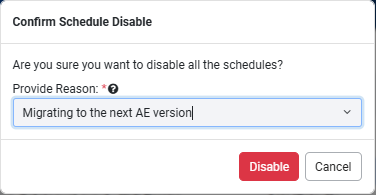
Click Disable All. The Confirm Schedule Disable dialog appears.
Confirm Schedule Disable dialog -
In the Provide Reason box, either enter a reason for disabling the schedules OR select the reason from the list. You can provide only one reason for disabling the schedules.
-
Click Disable. The Scheduler page is refreshed, and all the schedules are disabled.
Scheduler page view after disabling all schedules
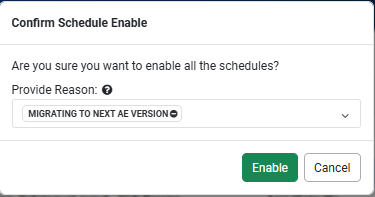
Use Enable All to activate those schedules that you have disabled using Disable All. If you have manually disabled (toggle switch) or disabled the schedule through Selected option, then those schedules will not be enabled.
To activate all schedules, select Enable All. In the Confirm Schedule Enable dialog that appears, choose the reason which you had selected or added when disabling the schedule, and then click Enable. The schedules are enabled.
Confirm Schedule Enable dialog
View schedule details
On the Scheduler page, you can view the details of the schedules and edit, delete, and activate the schedules.
To view the schedule details:
- In the menu, click Workflows -> Scheduler. The Scheduler page appears.
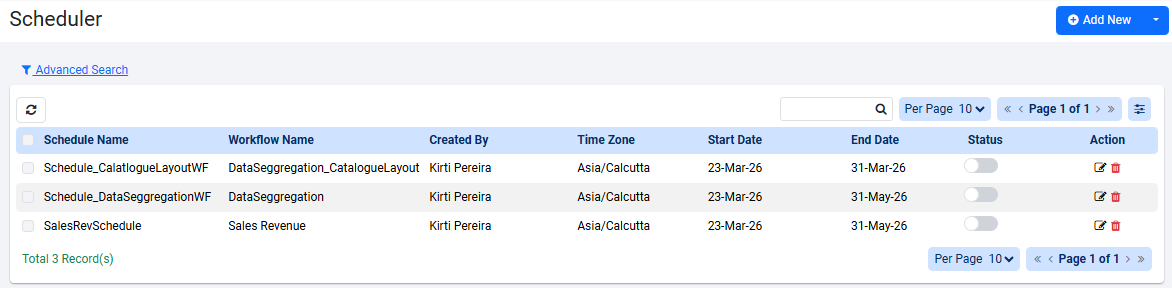
- View the following field details:
| Field name | Description |
|---|---|
| Schedule Name | Displays the name of the schedule. |
| Workflow Name | Displays the name of the workflow for which you have created the schedule. |
| Created By | Displays the name of the user who created the schedule. |
| Time Zone | Displays the selected time zone of the schedule. |
| Start Date | Displays the schedule start date. |
| End Date | Displays the schedule end date. |
| Status | Toggle the switch to activate or deactivate the schedule. Note: You can deactivate expired schedules too. |
-
In the Actions column:
- To edit the schedule details, click
 .
. - To delete the schedule, click
 .
.
The option to delete is disabled ( ) when the schedules are active.
NoteMake the schedule inactive before deleting.
-
To view upcoming schedule fire times, click
 .
.
Schedule fire time details -
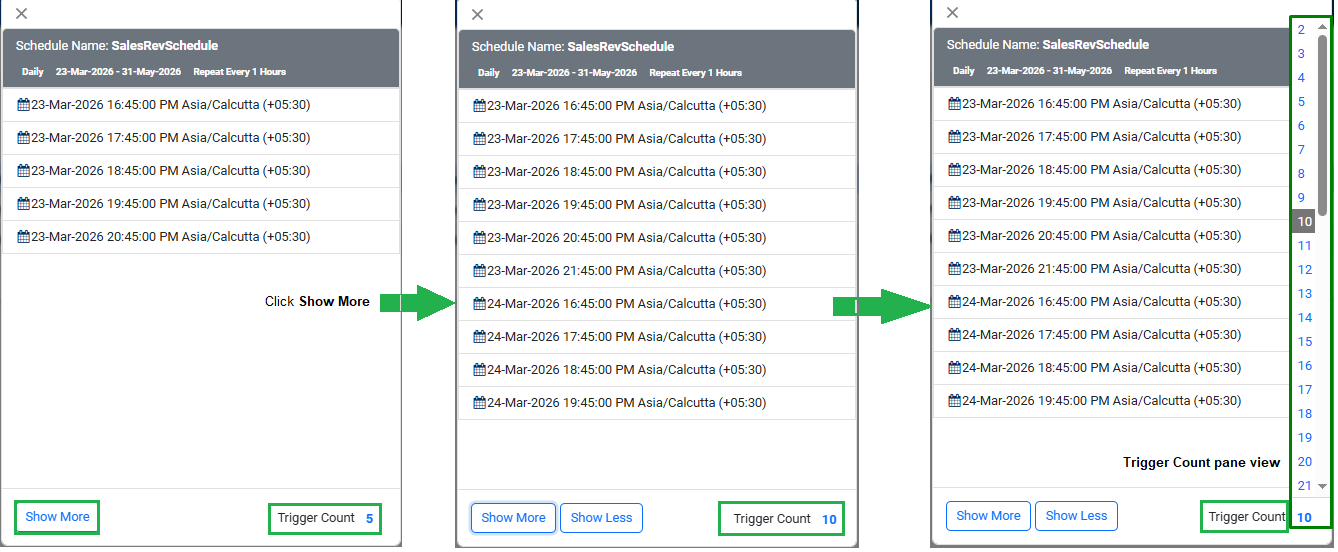
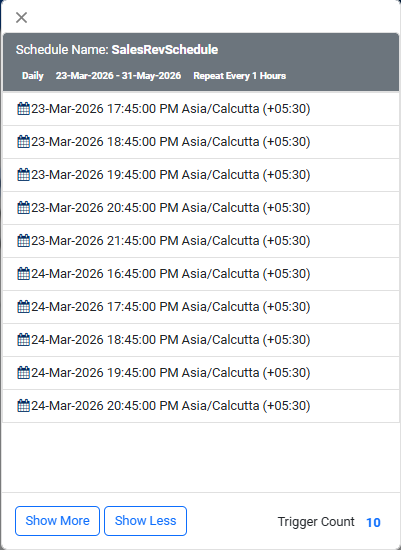
To view more schedules, click Show More.
-
Click the Trigger Count value to view the counts that you can view in the trigger count pane. Scroll and select the count of triggers that you want to view at a time. You can increase or decrease the number of scheduled triggers, as required.
Trigger count pane
-
- To edit the schedule details, click
- You can search for schedules through search and advanced search features. For details, see Search and Advanced search.
- To increase or decrease the number of rows that you view per page, select the number from the Per Page list.
- To go to the next or previous page, click >> / > or << / <.
- Click
 to add or remove the Start Date and/or End Date columns from the Scheduler page. You cannot add and/or remove the other columns that appear by default.
Transfer schedules
A user deletion could first delete all its artifacts, including schedules. However, there might be cases when the schedules are still valid, and there is a need to retain them even after user deletion. Use the Transfer Schedules feature to transfer schedules before user deletion. The section describes how to transfer the ownership of schedules.
Who can transfer ownership of schedules
Only Admins have access to Schedule Ownership Transfer.
Transfer ownership of any user’s (including itself) schedule to any other user who has WRITE access to the scheduled workflow. Ownership transfer won’t be available if the target user does not have WRITE access to the scheduled workflow.
| User Case | Conditions | UI | API |
|---|---|---|---|
| Schedule Transfer is invoked | Target User has Write access to Scheduled Workflows | Success Message will be displayed | 200 Ok will be returned |
| Schedule Transfer is invoked | Target User does not have Write access to Scheduled Workflows | Not possible through UI | API will return error, and no schedules will be transferred. |
| Schedule Transfer is invoked | Any User other than Admin | Not possible through UI | API will throw Access denied error |
To transfer ownership of schedules:
-
In the menu, click Workflows Scheduler. The Scheduler page appears.
-
Click
. The Bulk Transfer and Transfer Schedule options appear.
Transfer Schedule option -
Click Transfer Schedule. The Transfer Schedule page appears.
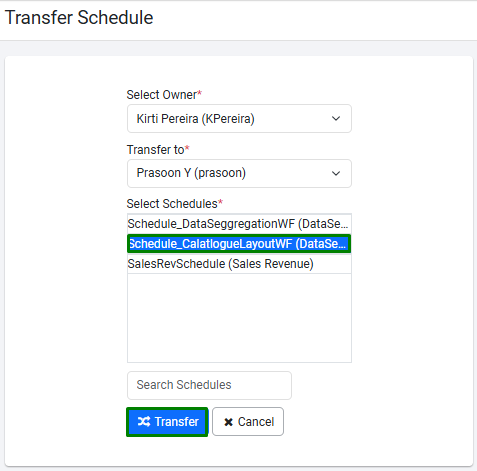
Transfer Schedule page -
Select the following field details:
- In the Select Owner* list, select the owner of the workflow. The Transfer to* field appears.
- In the Transfer to* list, select the target user who will be the new owner of the schedules. The Select Schedules* field appears.
- In the Select Schedules* list, select the schedule that you want to transfer and then click Transfer. The schedule is transferred to the selected user.
- In the Search Schedules box, enter the name of the schedule that you want to transfer.
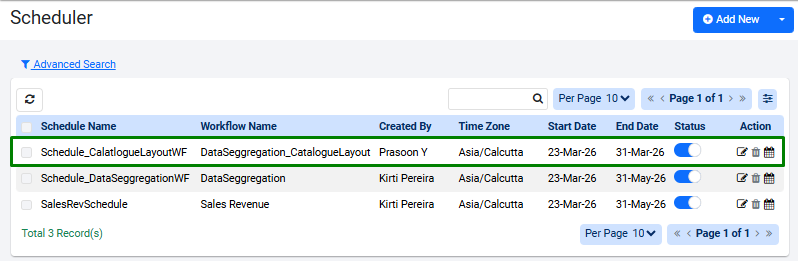
Schedule is transferred to the selected user
The target user must have the Write permissions to the schedule’s underlying workflow. The schedule is enabled and transferred to the selected user.