Work with Agent List: Agents
The Agent List lets you view, monitor, and manage all registered agents from a single page. You can track each agent's status, see the number of execution threads running, and download new agents to deploy on additional machines. Without centralized visibility, managing agents across multiple machines would require manual checks on each server. Admins and Agent Administrators use this feature to monitor agent health, download agents for deployment, and run agents as a Windows service for unattended operation. The page also shows Assisted Agents and Controller Agents tabs, giving you a complete view of your entire agent infrastructure in one place.
Ensure that the hardware supports running of configurable multithreaded Agents.
The topic includes the following sections:
- View agent details
- Monitor an agent
- Download and start the agent
View agent details
View the details of the Agents, Assisted Agents, and if enabled the Controller Agent.
The Agent Upgrade feature will be available in future releases.
For Cloud users only, the option to manually initiate the Agent upgrades, (Actions column and /or Upgrade Agents <number of agents to upgrade> ( )), will be available if the following property is set in the ae.properties file:
ae.feature.manage-agent-upgrades.enabled=true
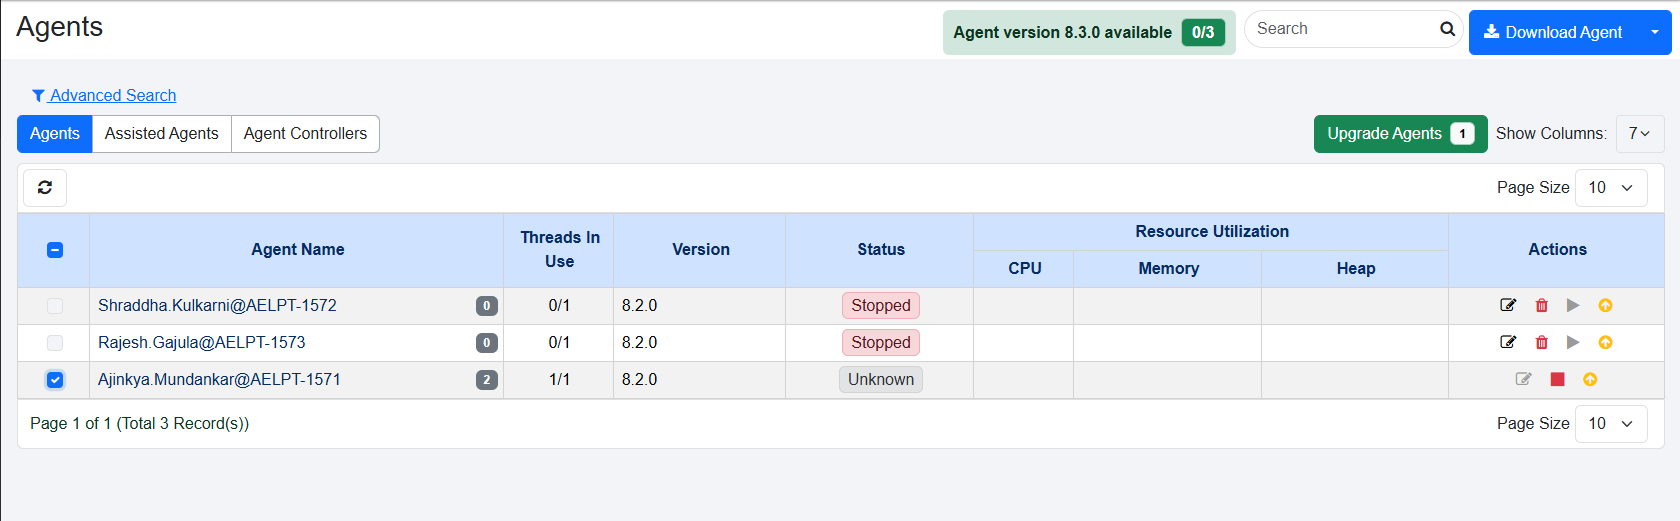
A notification about the available agent version appears on the Agent Utilization page.
To upgrade multiple agents, select the checkboxes next to the agents and click Upgrade Agents.

The Agents upgrade option view
To upgrade the agent to the latest version:
In the Actions column click  .
OR
Select the checkbox next to the agent you want to upgrade, and then click Upgrade Agents <number of agents to upgrade> ().
The option to upgrade the agent is available if the Agent status is RUNNING, or STOPPED, or STOPPED (Out of memory) or UNKNOWN.
As an Admin click Upgrade All to upgrade all agents and if you select one or more agents, then Upgrade Selected option is available.
.
OR
Select the checkbox next to the agent you want to upgrade, and then click Upgrade Agents <number of agents to upgrade> ().
The option to upgrade the agent is available if the Agent status is RUNNING, or STOPPED, or STOPPED (Out of memory) or UNKNOWN.
As an Admin click Upgrade All to upgrade all agents and if you select one or more agents, then Upgrade Selected option is available.
The Agents upgrade selected view
To view the agent details:
- In the menu, click Agents → Agent List. The Agents page appears.
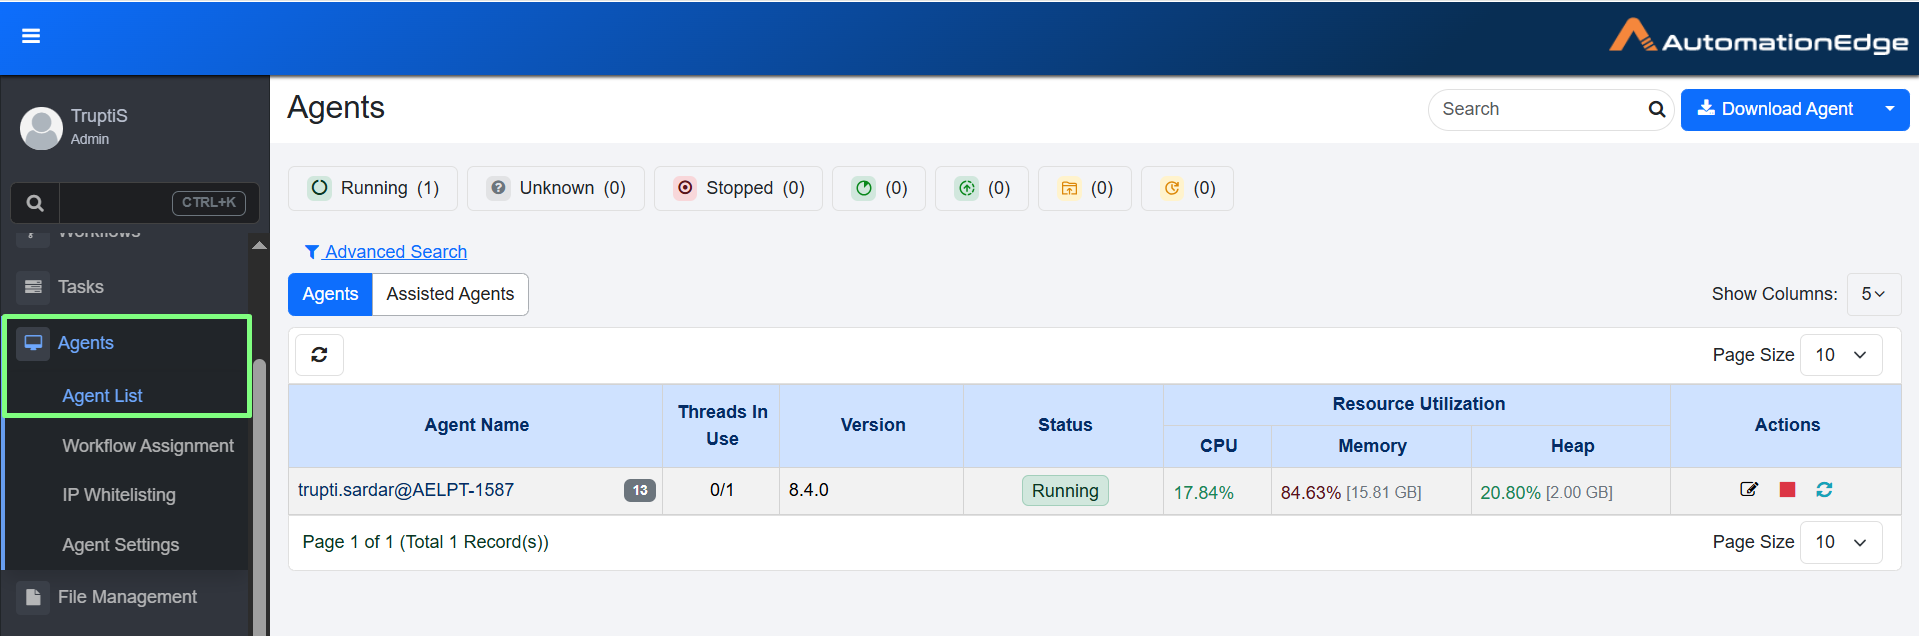
The Agents page

Agent status buttons
On the Agent Monitoring page, status-wise agent count buttons appear at the top to provide quick visibility and ease of filtering the data into the current state of agents. You can filter the table by only one state at a time. The status buttons act as quick filters for the agent list table. The Running, Unknown, and Stopped status buttons are expanded and visible by default. The ![]() Pending Update,
Pending Update, ![]() Pending Upgrade,
Pending Upgrade, ![]() Upgrading,
Upgrading, ![]() Updating appear in a collapsed (icon-only) state initially. When you hover over these icons, the buttons expand to display their labels. Select a status button to keep the view expanded. To see the Clear Filter button, simply hover over the status.
Updating appear in a collapsed (icon-only) state initially. When you hover over these icons, the buttons expand to display their labels. Select a status button to keep the view expanded. To see the Clear Filter button, simply hover over the status.
Clicking any status button applies a filter to the agent list table based on the selected status.
Click  to clear applied filter.
- View the column details:
| Column name | Description |
|---|---|
| Agent Name | Displays the name of the agent. Hover over the agent's name to see the following details: - Name - IP Address - Hostname - MAC Address - JRE Details – JRE version and whether the agent is using bundled JRE |
| Threads In Use | The column displays two runtime metrics as a single value. For more details, see Threads in Use. |
| Version | Displays the version of your Agent. |
| Status | Displays the status of the agent, such as Pending Update, Running, Stopping, Unknown, Updating, or Stopped. Running: Status indicates that the agent is in running state and can execute the workflow. Stopped: Status indicates that the agent is stopped and cannot execute the workflow. Pending Update: Status indicates that the agent is informed about the updates and will not accept any new requests. In addition, if executions are in progress, then the updates will start after the executions are completed. Stopping: Status indicates that shutdown or stop of the agent has been initiated on the agent. The status will remain so till the ongoing executions are completed. Unknown: Status indicates the server is not sure about the status of the agent due to factors such as abrupt shutdown or network failure. Pending Upgrade: Status indicates that agent needs to auto-upgrade itself. Updating: When a workflow is assigned to an agent, the agent properties change. During this process, the agent status appears as updating. Upgrading: Status indicates that agent is auto-upgrading itself. The cases when an agent goes to UPDATING state are: - When the agent is upgrading itself from an older version to a newer version, if an Agent needs to update and there are workflows already executing on Agent, then the Agent status changes to Updating, remains in the state and waits for the workflow execution completion. Once the execution is complete, the Agent updates, you can hover over the Updating status to see the details, such as workflow execution in progress. - When workflow assignments are changed. - When plugin assignments are changed. - When Workflows/plugins are updated. - When agent mode is changed. Stopped (Out of Memory): Status indicated that the agent has stopped because it is Out of Memory. If you see this status, increase the minimum and maximum values of the aeagent.jvm.xmx.option property in the application.properties file. Note: The status appears as a badge next to the Running status.  |
| Resource Utilization | CPU – Displays CPU usage in percentage. The following Resource Utilization parameters are captured and displayed on AutomationEdge UI: CPU, Memory, Disk Space and JVM Parameter (Heap size). |
Memory – Displays memory usage in percentage. Hover over the value to view the memory used out of the total available memory. 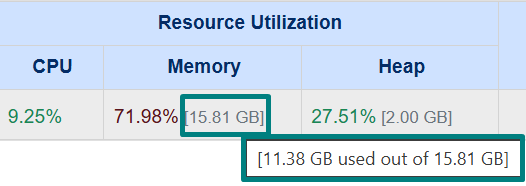 | |
Heap – Displays heap usage (disk space and JVM parameter) in percentage. Hover over the value to view the memory used out of the total available memory and agent's minimum heap size.  Note: Alternate GC configurations can cause the reported heap size to appear smaller than the total allocation. |
Threads in Use
The column displays
- the number of currently executing workflows
- the number of execution threads allocated to the agent
The display format is X/Y, where X represents the executing workflows and Y represents the execution threads. For example, 0/1 indicates that no workflows are running and one thread is allocated.
Edit agent field details
- In the Actions column:
i. Click  . The Edit Agent dialog appears.
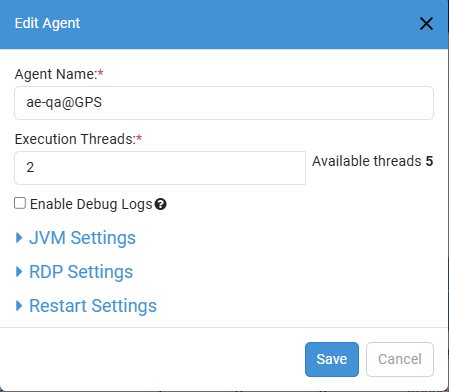
Edit Agent dialog
ii. Modify the following field details, as required:
| Field Name | Description |
|---|---|
| Agent Name * | Modify the name of the agent. |
| Execution Threads * | Modify the number of execution threads for the agent. Note: Available threads: Displays the number of execution threads available for the agent. |
| Enable Debug Logs | Select the checkbox to enable Debug level logs for the agent. Note: Selecting the checkbox will start debug log download, which will contain detailed information about workflow executions. |
| JVM Settings | |
| Enable JVM GC Options | Select the checkbox to enable the JVM GC options. Important: Select the checkbox to ensure that the heap memory used by the Agent for processing a heavy workload is freed by posting the executions. If the setting is changed, then the Agent is restarted. |
| JVM Options | Modify the JVM value which will allow you to specify JVM arguments with which agent is launched. Examples: Most used heap sizes are: -Xms1024m -Xmx2048m Note: To resolve the Chrome browser compatibility issue (for version 137 or later), add the following flag: -DignoreDeprecatedExperimentalOptions=true The flag prevents older, unsupported browser commands from being sent and allows the agent to work correctly with the latest Chrome versions. 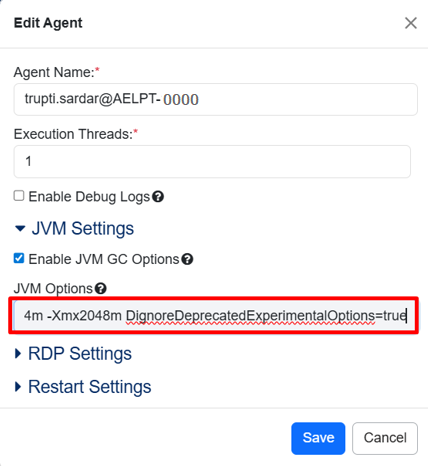 Edit Agent dialog For more details about setting the flag through startup.bat, see the GUI Automation Reference Guide. |
| RDP Settings | |
| Domain Name | Modify the name of the domain that you want to use. |
| IP Address * | Modify the IP address, as required. Note: To hide or view the IP address click |
| Username | Modify the enter the name of the user. |
| Password | Modify the password of the user. |
| Remote Port | Modify the remote port, if required. |
| Restart Settings | |
| Use Tenant Level Settings | Select the checkbox if you want to apply tenant level settings for the agent. Note: If you select the checkbox, then the Enable Agent Restart option is unavailable. |
| Enable Agent Restart | Select the checkbox if you want to restart the agent automatically. Note: Agent restart feature is not supported on Linux based OS. |
| Agent Restart Time * | Select the required time when you want to restart the agent. Note: The field is available only if you have selected the Enable Agent Restart checkbox. |
* Indicates mandatory field.
Both Enable JVM GC Options and Enable Debug Logs options are also available for Assisted Agents. For more details, see Configure Agent settings. When you change the values using the edit option and save them, the agent will restart automatically. After restarting, the agent will use the new values you have saved.
 Stop option is available if the Agent status is Running or Unknown.
Click to stop and end all activities of a running Agent and change its status to Stopped.
Or
Click to mark an Agent in Unknown status as Stopped.
- To allow users to understand why an Agent was stopped, we recommend providing the reason for stopping an Agent.
- To view the reason why an Agent was stopped, on the Agents page hover the mouse over the status of the selected Agent.
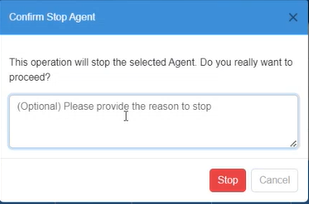
Confirm Stop Agent
 : Delete option is available when an agent status is Stopped. When you delete an agent, the records are removed, and therefore, you cannot start the deleted agent.
 : Use the option to restart agents. Agent restart features in not supported on Linux based OS.
 : If an Agent is down, a Start option is visible, and the Start icon is disabled; Assign Agent to one or one controller to enable it. For details, see Controller Assignment.
The Start option starts the Agent on the Controller Agent machine. The icon color is grey when it is disabled and green when enabled.
: If an Agent is down, a Start option is visible, and the Start icon is disabled; Assign Agent to one or one controller to enable it. For details, see Controller Assignment.
The Start option starts the Agent on the Controller Agent machine. The icon color is grey when it is disabled and green when enabled.
Monitor an Agent
You can monitor the resource utilization of an agent through Agent Monitoring page. The details are represented graphically on the page.
Following are the features of Agent Monitoring:
- Agent captures Resource Utilization information periodically (every minute) and sends it to the server every 15 minutes; it retains the details for thirty days.
- The following Resource Utilization parameters are captured and displayed on AutomationEdge UI: CPU, Memory, Disk Space and JVM Parameter (Heap size).
- The Agent Monitoring screen depicts Resource Utilization as pie charts and line charts.
- The page has filter options to display Agent Monitoring for different time intervals.
To view the resource utilization details:
- In the menu, click Agents → Agent List. The Agents page appears.
- In the Agent Name column, click the agent's name link. The Agent Monitoring page appears.
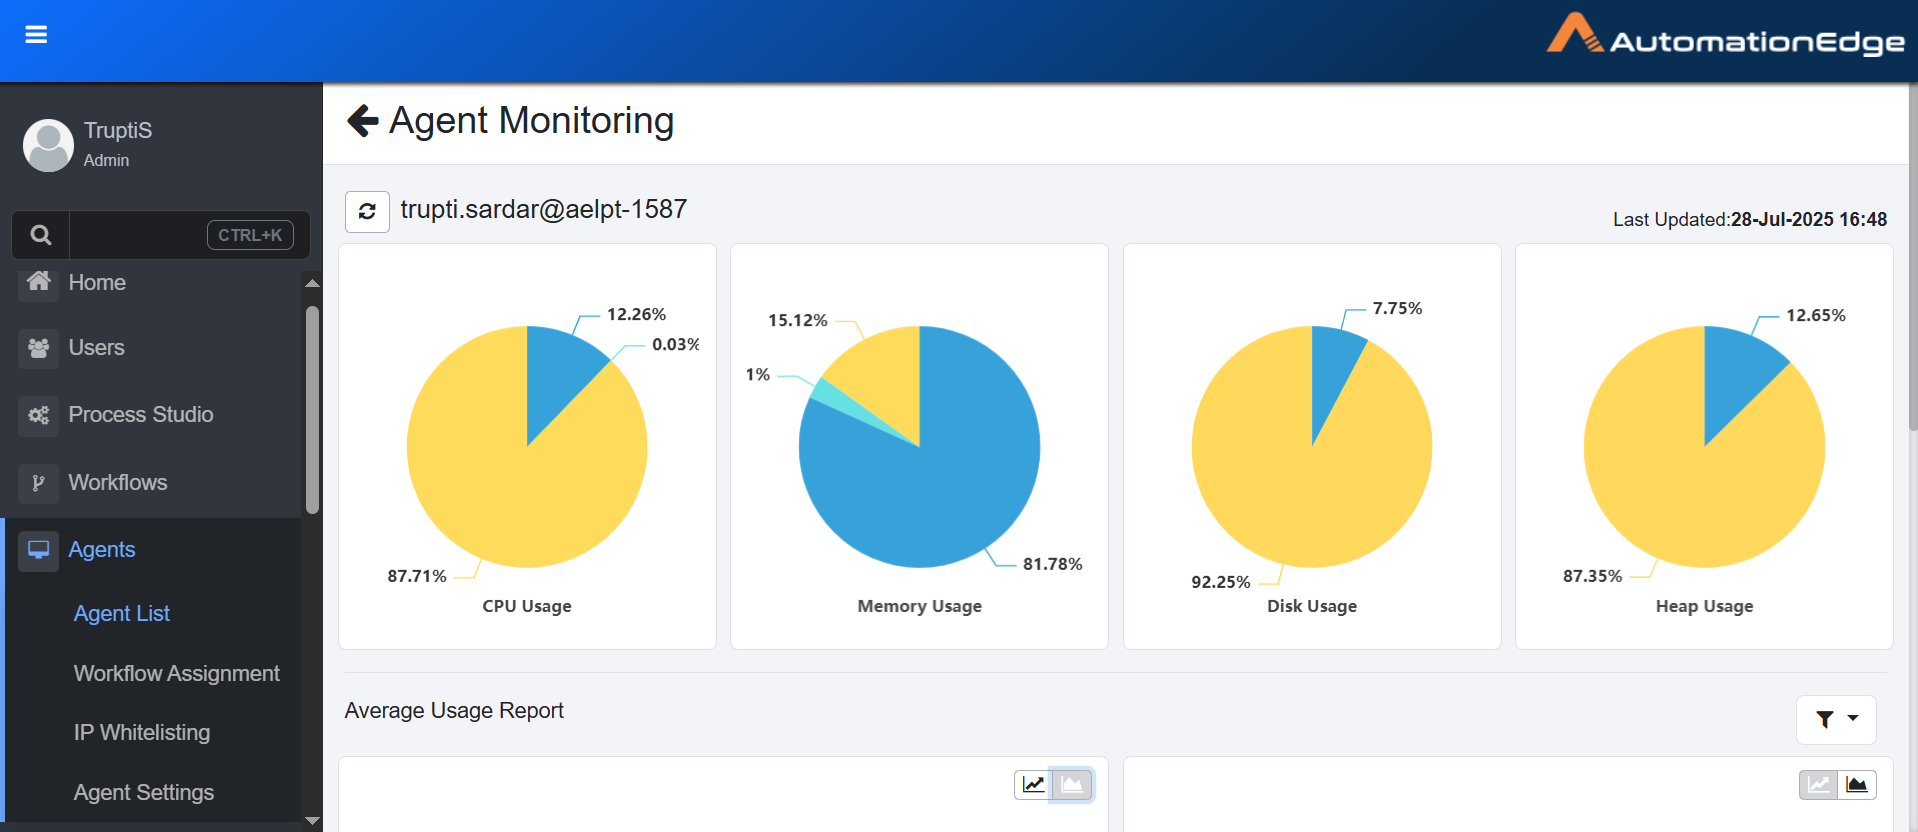
Agent Monitoring page
You can filter the graphical details of CPU, Memory, Disk, and Heap usage by selecting Predefined Filter and Custom Filter.
- Predefined filters display data for ranges such as Today, Week to Date, Month to Date, and so on.
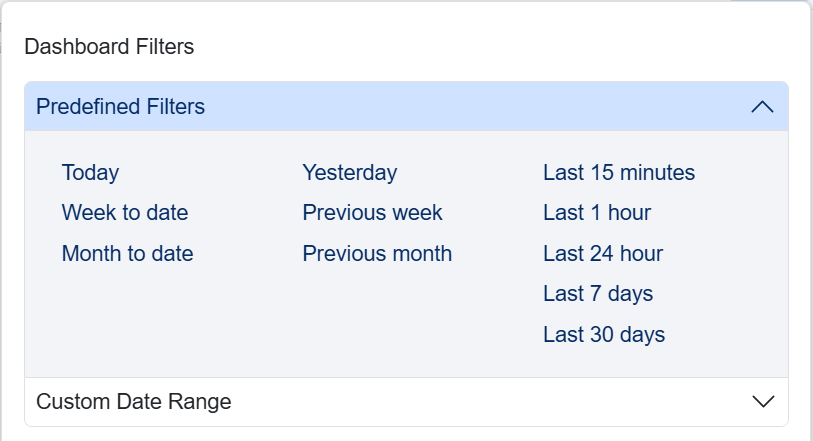
Predefined Filters
- In Custom Date Range, you must select a start date and an end date. The results are displayed based on the selected date range.
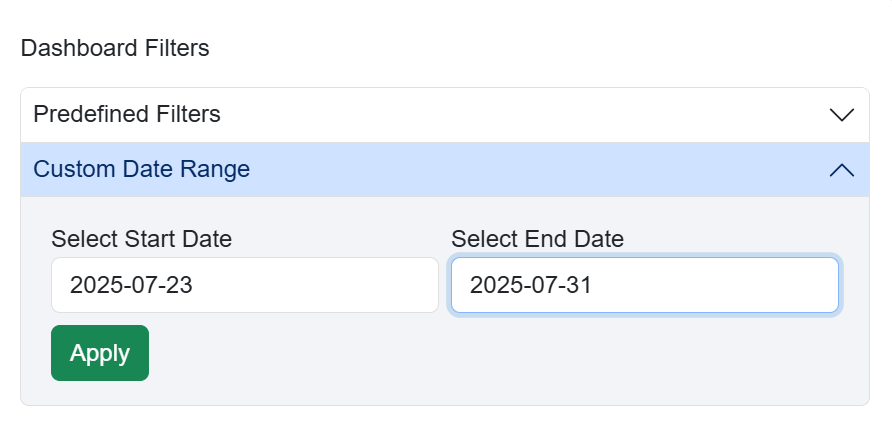
Custom Date Range
- Scroll down to see Average Usage Report.
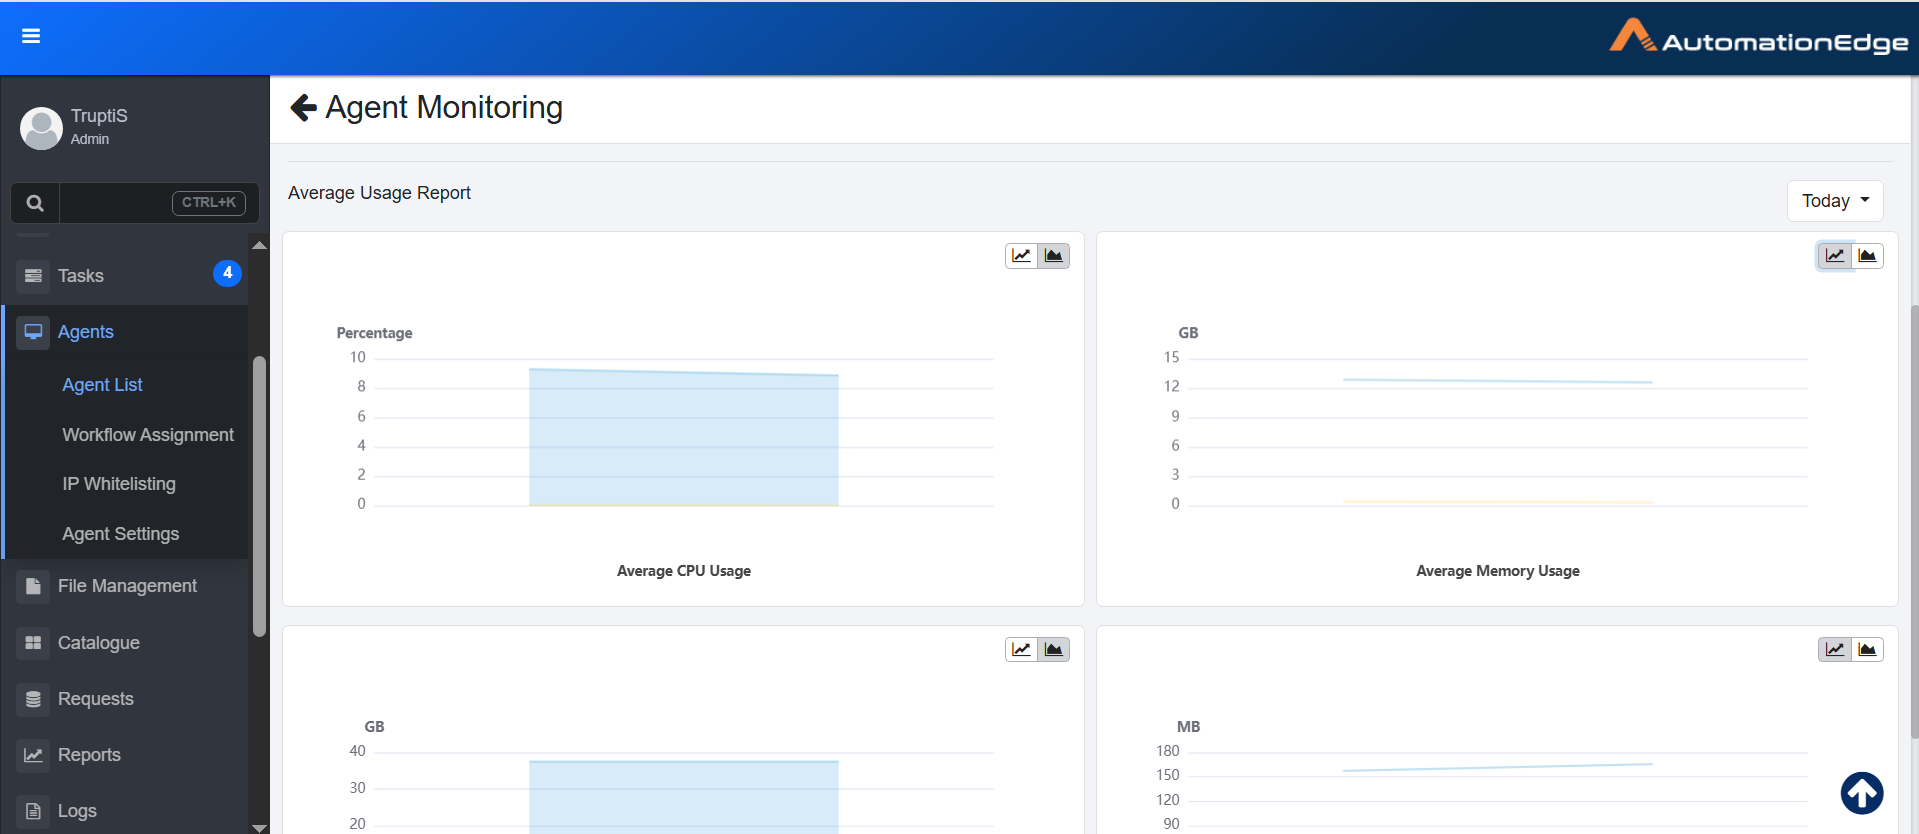
Agent Usage Report view
Download and start an agent
Download an agent from the AE server and install on available computers, either Windows or Linux OS. The agent connects to the server using the same URL specified in the URL setting under System Administrator and is assigned workflows for running.
To download an agent:
-
In the menu, click Agents → Agent List. The Agents page appears.
-
Click Download Agent. The Download Agent dialog appears.
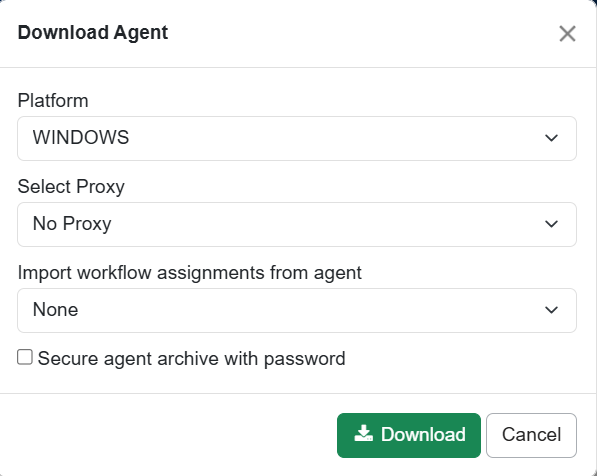
Download Agent dialog
NoteAdmins and Agent Administrators can download Agents if the System Administrator has set the Server URL through Settings.
-
Enter the following field details:
Field Name Description Platform Select the OS platform of your choice. Available options are: - WINDOWS
- LINUX
Select Proxy Select the proxy that you want to work with. During Agent download, you can use Automatic Configuration or set Static Proxy by providing Proxy protocol (http/https), host, port or set Dynamic Proxy (base on PAC file from URL). During Agent download, the Agent inherits the Tenant level proxy settings. You may overwrite it. The proxy settings at the Agent level will take precedence over those set at the Tenant level. The following options are available in the drop-down list for Select Proxy. You may overwrite the Proxy set at the Tenant level or set proxy afresh during Agent Download from the drop-down list.
The available options are:- No Proxy: Select the option if you do not want to use the proxy set at the system level.
- Automatic Configuration: Select the option if you want to auto-detect the proxy configuration from Internet Options settings, if any, and use it.
- Proxy Server: Select the option to set a static proxy. You can now provide static Proxy details, Protocol (http, https), Host (e.g. 10.51.5.30) and Port (e.g. 3128). If you have set a static proxy at the Tenant level, a Proxy details popup window appears with static proxy details pre-configured. You can add exceptions to bypass the proxy details, if required. When adding exceptions, you must ensure the following:
- Port numbers are not added along with the host name.
- Only semicolon (
;) is used as separator and spaces are not allowed in exception entry. - Only domain names are used and are not prefixed with
wwworhttp:/https:. For example,automation.com.
- PAC: Choose the option to set a Dynamic Proxy and provide the PAC file URL. For example,
https://10.51.5.30/proxy.pac. If you have set a dynamic proxy at Tenant level, the Proxy details popup window appears with dynamic proxy details PAC file from URL pre-configured.
For Automatic Configuration and both Static Proxy and Dynamic (PAC file URL), Proxy details are stamped into a file proxy-config.properties and packaged into agent zip on click of Download.
Note:
Non-proxy host list now supports regular expression. For example,*.automationedge.comwill bypass proxy fordemo.auomationedge.comandonedemand.automationedge.com.Import workflow assignments from agent Select the agent from which you want to import the workflow assignments. Secure agent archive with password Select the checkbox if you want to provide a password for the agent zip file.
Note: In the Password field, enter the password for the agent zip file. The field is available only if the checkbox is selected.Authentication Type For Automatic Configuration, Proxy Server and PAC Proxy options, the following three Authentication Types are available: - None: Leave Authentication type to none when Proxy settings do not need authentication.
- Simple: If proxy settings in Internet Options need authentication, select Authentication type- Simple from the dropdown list and provide a username and password. For Simple Authentication Type, you need to provide a Username (e.g. scott.tiger etc.) and password.
- Domain: If the Authentication type is a domain, you need to provide Domain (e.g. xxxx.com) in addition to username and password.
Note: The field is unavailable if the selected proxy is No Proxy.Download proxy configuration file A proxy configuration in the Agent Download UI stamps the values into a file proxy-config.properties.
You may download the file by clicking the 'Download proxy configuration file' link; if you click the Download button, the proxy-config properties file is packaged into agent zip and placed under <AGENT-HOME>/conf directory.
Download the file and manually copy it to the Agent machine when there are changes in proxy details.
In the case of the Server upgrade with a new Proxy configuration, there are two scenarios. If the agent is running, Proxy details are updated and manually copy the proxy-config.properties file, but if the Agent is in the stopped state, then the new proxy details are updated in the Agent.
Note: The field is unavailable if the selected proxy is No Proxy.Note Agent Upgrades: During upgrades, the agent acquires Tenant level proxy settings, if any. The following are the corrective actions for the two scenarios:
- Agents may be without any Proxy Settings, but Agent gets Tenant level proxy settings during the upgrade. Users need to delete the proxy configuration file from the Agent file system.
- The Agent may be using custom Proxy Settings (different from Tenant level settings); but, in case of an upgrade, Agent gets Tenant level Proxy Settings, User's need to download custom proxy settings again and copy to the Agent file system.Include workflow and plugin files in the downloaded zip Select the checkbox if you want to include the following artefacts in the agent zip: - Workflow definition files (psw/psp)
- Plugin files (jars)
- Files uploaded for assigned workflows via File Management
- Files uploaded for plugins via File Management
NoteSelecting to download the existing agent's workflow assignments and the corresponding artefacts allows the new agent to be readily available for executing the workflows.
Changes made to one agent at an individual level do not impact the other agent, even if they have the same workflows assigned to them. For example, if both Agent1 and Agent2 are assigned Workflow1, and the user assigns another workflow, Workflow2 to Agent1, then there is no change in Agent2.
-
Click Download. If a pop-up blocker appears, depending on the browser you selected, select the option to allow download of the Agent zip file.
Export Agent Details
The Export Agent Details in CSV Format feature allows users to export agent-related information in a CSV file. The export option is available on the Agents tab only and only users who have the Manage Agents permission can export the agent details. The exported file contains detailed information about agents, assisted agents, and agent controllers and provides a comprehensive view of all agent types.
Downloading agent details in CSV format provides a structured view of agent information, making it easier to compare agent states and other attributes across files. The administrator can analyze and manage the agents efficiently, as the file contains details such as JRE configuration, assigned heap memory, and related parameters.
To export agent details:
-
In the menu, click Agents → Agent List. The Agents page appears.
-
Click
 next to Download Agent and select Export Agent Details. The csv file is downloaded.
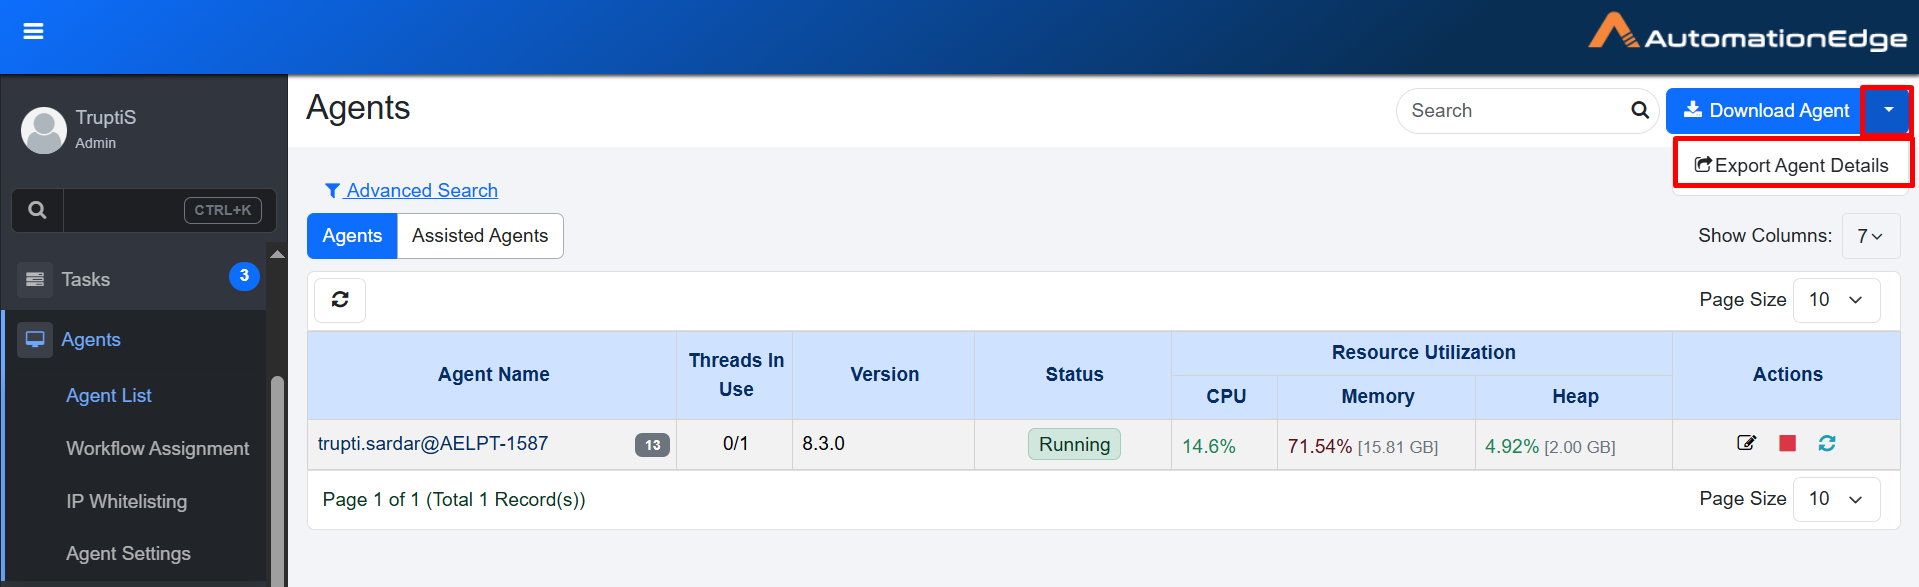
Export Agent Details
The exported CSV file includes detailed information about each agent. The file contains the following columns:
- Agent Name
- Agent Type
- VM User Name
- Hostname
- IP Address
- Operating System
- Version
- Agent State
- Execution Threads
- JRE Details
- JVM Options
- Registered as Service
- Running as Service
- Assigned Heap Memory
- Last Accessed Time
To start the agent:
-
On the system, copy the downloaded zip file to one or more machines where you want to run the agent and unzip the file and extract an agent. An unzipped ae-agent directory is created.
-
Double-click on aeagent.exe. The agent is registered with the server and becomes available for assigning workflows.
Note-
Running of agents using the aeagent.exe is available for Windows only.
-
For running agents on Linux, run startup.sh file.
When an agent starts, you will see a notification with the name of the agent. For example,

Notification -
Notifications and tray features are not available on Linux.
-
-
Run ae-agent/bin/startup.sh file (for Linux) from the command prompt. The Agent will register itself with the server and be available for assigning workflow.
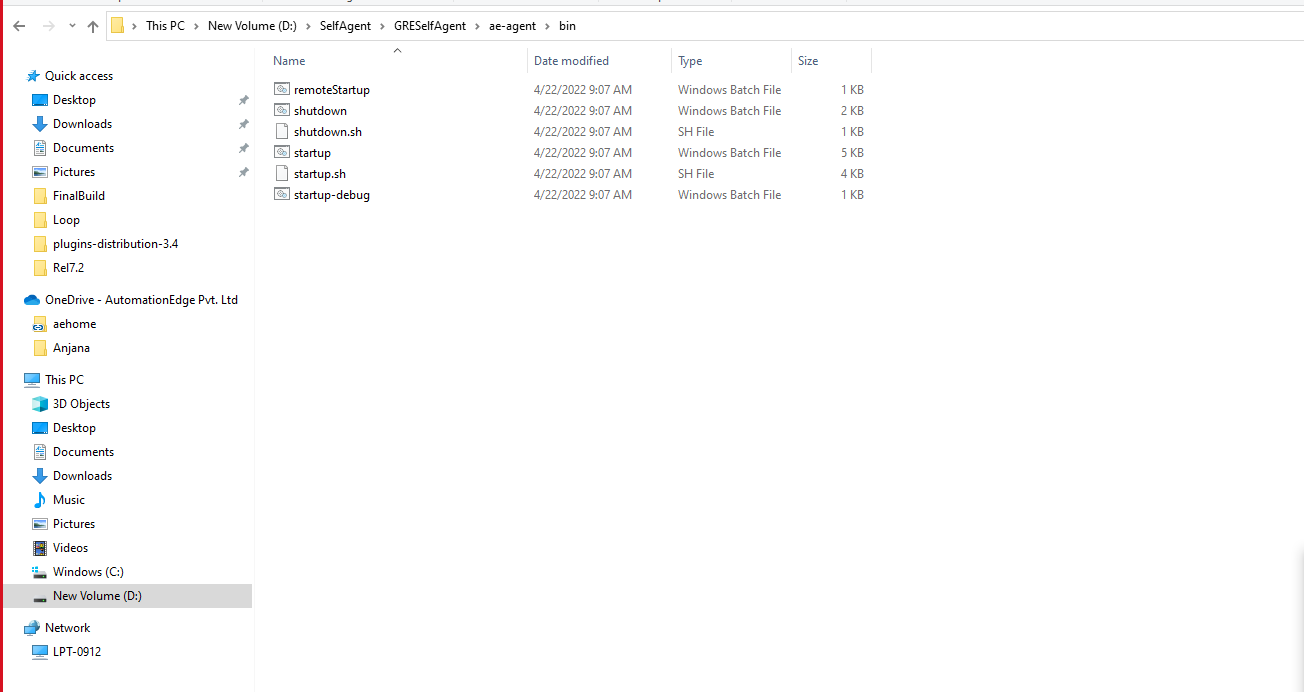
Windows Explorer
-
Type CMD in the Windows Explorer's address bar and open the command prompt. Starting agent from command prompt is the recommended way instead of double-clicking the startup.bat file.
In the Command Prompt, type startup.bat.
NoteOnce Start-up is complete, view Agents in UI. You can see the Agent status as Running for the first registered Agent in the list.
By default, Agent always registers with one execution thread. Once registered, you can edit the Agent execution thread count, provided your license has provision for these modes.
To stop an Agent Run ae-agent/bin/shutdown.bat or ae-agent/bin/shutdown.sh file (for Windows and Linux respectively) preferably from the Command Prompt.
NoteIf you run the startup.bat file, the command prompt will not be visible, and the Agents will run in the background. To view the command prompt, run ae-agent/bin/startup-debug.bat file.
Agent tray icon
After the agent starts, the agent tray icon appears in the system tray.
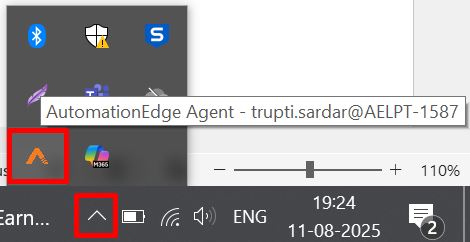
Agent tray view
The agent tray icon is not supported on Linux.
- Click the agent tray icon, and the menu appears.

Agent tray menu
- View the following tray menu details:
| Field Name | Description |
|---|---|
| Agent Name | Displays the name of the agent, which you can refer to when performing agent actions. |
| View Log | Click to view the agent log files. |
| Restart Agent | Click to restart the agent, if required. |
| Stop Agent | Enter the reason for stopping the Agent. Click to stop the agent, if required.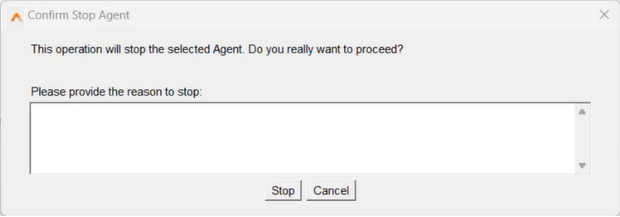 Confirm Stop Agent dialog |
| About | Click to view the agent details, such as:
|
OR
Run Agents as a Windows service
You can also run Agents as a Windows service. Running Agents as a service allows you to start the agents automatically and you need not start them manually.
We DO NOT recommend installing Agent Controller as a service.
The safest way to manually install the service is to use the provided service.bat script.
Prerequisite
You need Administrator rights on the server to install or uninstall Agent as a Windows service.
Limitations
If you run agents as a Windows service, then:
- Workflows with a combination of SAHI and GUI automation (Windows or applet) plugins will not work.
- We recommend not using new Web GUI plugin (extension based) to create a workflow, as these workflows may not work as expected.
- Workflows with Manual Intervention plugin will not work.
- Workflow having the Capture Webpage step from the Web GUI [Classic] plugin will not work.
To install agent as a service:
The user account you are using to register or start the agent as a service must have Modify permissions on the AGENT_HOME directory and the subdirectories and files.
-
Open the command prompt and run the command prompt (cmd.exe) as Administrator. Change directories to
<AGENT_HOME>\bin\. -
Type service.bat install to create the Windows service. The install command creates a Windows service called aeagent-service.
The default display name and description of the service is AE-Agent.NoteUse the Windows Services management console to start and stop the service.
-
There is a second optional parameter that allows you to specify the internal name of the service, service.bat install uat-agent.
RecommendationWe recommend that the service's internal name must not have any spaces or special characters. The name must only contain alphabets, digits, hyphen.
ImportantBy default, the account name of the installed service is Local Service. Change the default account name with the name with which you want to register your Agent. To modify the details, open Services → select the service (agent) → Properties → Log On → Log On As and change the name of the account.
DO NOT start the service without changing the Log On As account with the user account.
-
In the General tab, select the Startup Type as Automatic.
Note- The safest way to manually install the service is to use the provided service.bat script.
- If an agent is installed as a service, a gear icon appears next to the Agent in the AE UI. However, the icon is removed if you start the Agent using startup.bat instead of as service.
To uninstall agent as a service:
- Open the command prompt. Run the command prompt (cmd.exe) as Administrator.
- Change directories to
<AGENT_HOME>\bin\, run service.bat uninstall to remove the Windows service.
OR
If it has been installed with the non-default name, then run service.bat uninstall <service_name> to remove the Windows service.
Uninstalling the agent service will only remove the service itself, it will not delete the agent.
Edit Agents memory settings
Following are the Java memory settings for Agents in startup.bat by default.
| Memory Settings | Value |
|---|---|
| Heap Settings | -Xms1024m -Xmx2048m |
| MaxMetaspace Setting | -XX:MaxMetaspaceSize=128m |
| Memory per thread | -Xss=1MB |
Change the memory settings for workflows in the startup.bat or startup.sh file, as required. The new memory settings will take effect after you restart the agent and the workflow will execute successfully.
Following is a rough formula for total memory calculations: Total Max memory = [-Xmx] + [-XX:MaxMetaspaceSize] + number_of_threads * [-Xss].