Work with Tenants
AutomationEdge is a multi tenant system, that can host automation services for multiple tenants (customers) on one server. Users, workflows, and other objects created for one Tenant are not visible to another tenant.
Add New
To add a new tenant:
-
In the menu, click Tenants. The Tenants page appears.

Figure 15: Tenant
-
Click Add New. The Add New Tenant dialog appears.
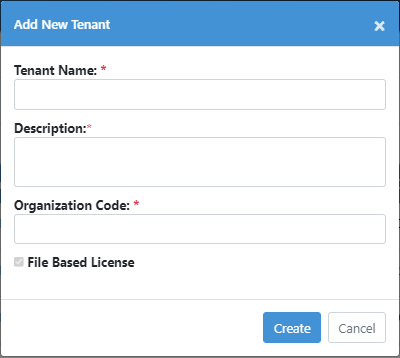
Figure 16 : Add New Tenant
- Enter the following field details:
| Field Name | Description |
|---|---|
| Tenant Name* | Enter a unique tenant name. Only alphanumeric characters and space is/are allowed |
| Description* | Enter a description of the tenant. |
| Organization Code* | Specify unique organization code to a tenant. |
| File Based License | The check box is selected by default. |
*: indicates a mandatory field.
- Click Create. The created tenant appears on the Tenant page.
To modify the tenant details, click Edit (![]() ) and update the description of the tenant.
) and update the description of the tenant.
Upload License
The System Admin is responsible for creating a License Admin. To access the Upload License option, you must be logged in as a License Admin. The License Admin can upload licenses for tenants and monitor their status, including whether they are valid, renewed, expired, or missing.
The License Administrator can upload license for the tenants.
-
Login as a License Admin. Click on Tenants. Tenants page appear.
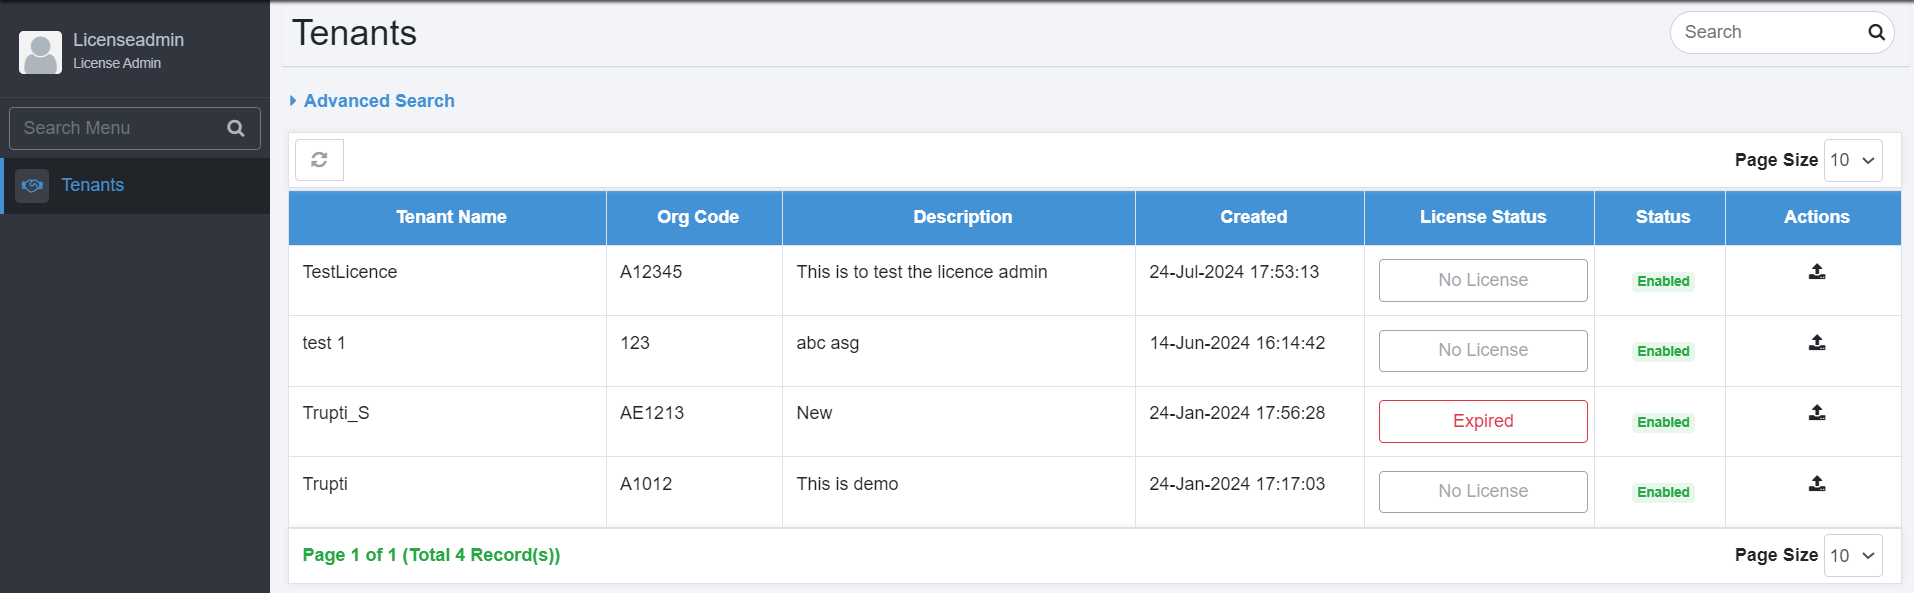
Figure 16: License Admin Tenants page
-
Click upload license icon (
 ) next to the tenant you want to
assign the license to. Upload License dialog appears.
) next to the tenant you want to
assign the license to. Upload License dialog appears. -
In the Upload License dialog, upload the file for the tenant.
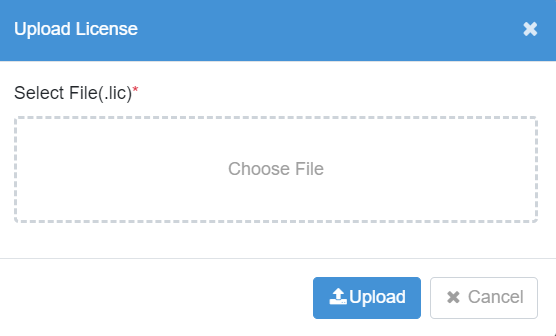
Figure 17 : Upload License
- Click Upload. The license is uploaded successfully.
Status
You can enable or disable the status of a tenant. The System Administrators can manage the status with a toggle switch.
When the toggle switch is blue, it indicates that the Tenant is enabled.
To enable or disable a tenant, slide the toggle switch
(![]() ). A message asking for confirmation to
enable or disable the tenant appears.
). A message asking for confirmation to
enable or disable the tenant appears.
When the toggle switch appears:
-
Blue (
 ): indicates the tenant is enabled.
 -
Grey (
 ): indicates the tenant is disabled.
When a Tenant is disabled, Agents shut down automatically. Agents, if shut down, must be started manually once the Tenant is enabled.
When you disable a tenant, the following features are also disabled for the users, that is, the tenant user is unable to:
· Sign in to AutomationEdge.
· Register new Process Studio or sign in to Process Studio.
· Trigger tenant user’s schedules.
· Raise new workflow requests.
· Sign in to connected apps.
· Use the Agent as it is shut down.
· Continue with the Credential expiry job.
· Trigger workflow schedules.
· Trigger notification schedules.
· Trigger email report schedules.
When you enable the tenant again, you need to enable all the disabled features manually.
Delete
The System Administrator can delete tenants, if required:
-
Toggle the status, and disable the tenant. The delete option becomes available.
-
Click
 . The Confirm Tenant Deletion dialog appears.
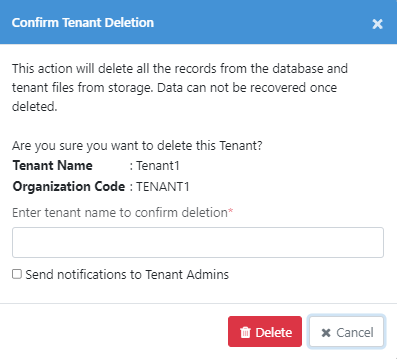
Figure 18: Confirm Tenant Deletion
-
Enter the name of the tenant and select the Send notifications to Tenant Admins. Tenant Admins will receive a notification informing them of the deletion.
-
Click Delete. The tenant details are deleted.