Work with Integration
Set up a Generic Integration System to work with various ITSM systems and extend to future systems via the Integration menu. This setup enables integration with any external system capable of triggering workflows and handling the results.
e.g.
-
Current and new - All known ITSM systems.
-
Easy to extend for new tools: Support configuration of different tools
-
File system: Execute a workflow if a new file is present at a specific location
-
Database: Watch a table for the availability of new records, and run workflow if records are available
-
Email: Run workflow on receipt of an Email
-
SMS and so on.
Following are the basic operations which any integration service performs:
-
Initialization
-
Poll for Automation Requests from Target system (Fetch Requests)
-
Forward Requests to AE Server
-
Send Request Submission Statuses to the Target system
-
Send Request Response to the Target system.
AutomationEdge Also supports the following,
-
Target system Pushing Requests directly to AutomationEdge
-
Request Response can also be sent directly to the Target system using Plugins.
Following is terminology in this Generic Integration System,
-
Integration Service: A tomcat-based service that hosts all the integration for a given tenant.
-
Integration: An instance of integration that is configured for a tenant to communicate with a third-party service.
-
Integration type: A group of integration that integrate with the same third-party Service. Typically, one integration type maps to one code base.
-
Integration (configuration): An instance of integration configured for a tenant to communicate with a third-party service.
-
Integration Setup:
Before you start using Integration services, perform the Integration Setup. Please refer to the section-Integration Services Setup in AutomationEdge_R7.6.0_Installation_Guide.
Services
An Integration Service is a web server (like Tomcat) that hosts all the connections for a specific group of users
Enable
The Integration menu is for System Administrators. They can enable the Integration Service for tenants. Once it's enabled, Tenant Administrators can add one Integration Service. They can then create their own Types and Configurations or use the Services and Types provided by the System Administrator.
System Administrators can disable the integration for a tenant. Which also deletes all the types/configurations of the tenants from the system.
Following are the steps to enable Integration Service for Tenants.
- Navigate to Integration -> Services menu. Click Enable on the top right corner. A list of all Tenants is shown with a field for 'Allowed number of configurations'. At first, Integration Service is turned off for all tenants.
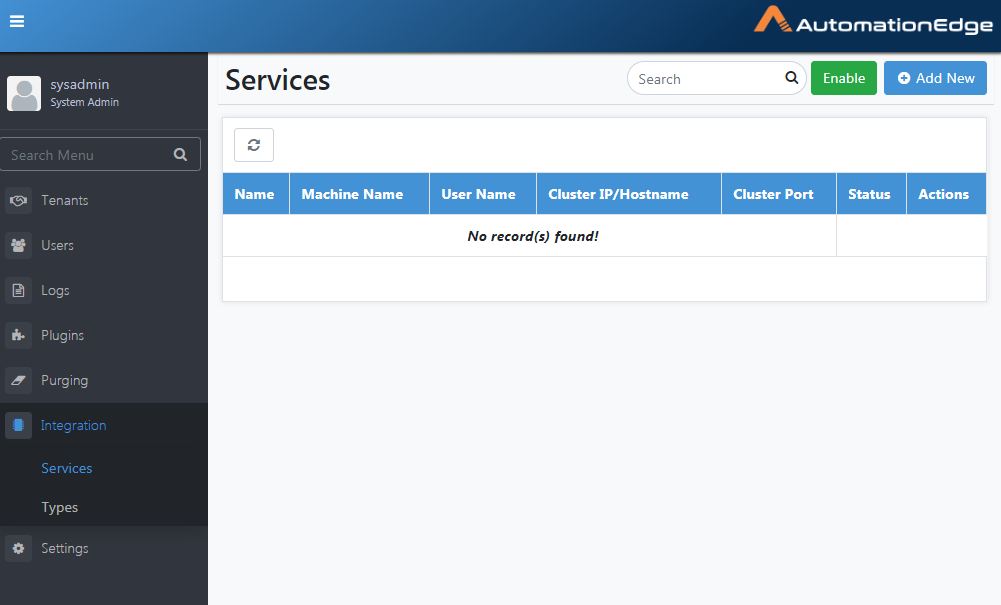
Figure 76: Enable Integration Service for Tenants
- Enable or disable the Status toggle to turn Integration services on or off for them. Also, set the number of Type configurations allowed.
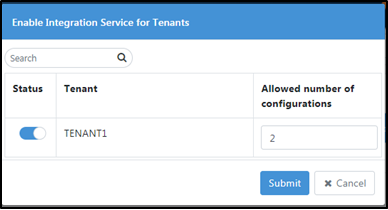
Figure 77: Tenants to enable/disable Integration Service
-
If you disable Integration Services for any Tenants, a warning will appear saying 'All type configurations for the disabled Tenant will be deleted'.
-
Click Ok. A message saying 'Operation completed successfully' will be displayed.

Figure 78: Confirm Assignment for Tenants
Add Integration Service
Following are the steps to create Integration Service
-
Navigate to Integration -> Services menu.
-
Click Add New.A page to configure an Integration Service appears.
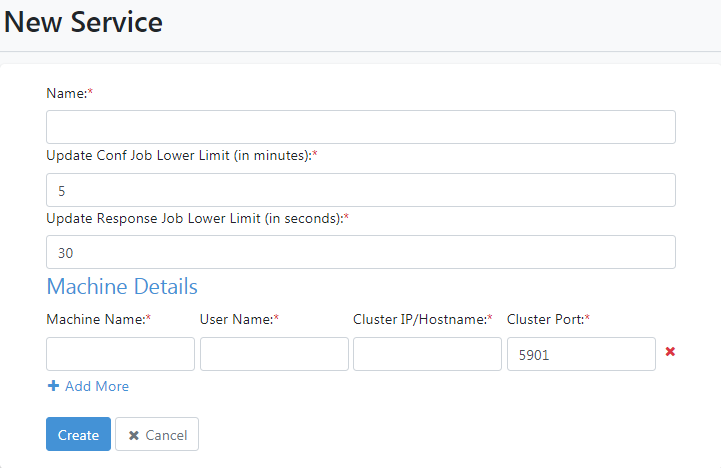
Figure 79: Integration Service Configuration pop up
-
This Integration Service isn't assigned to any Tenant. Create the Service and click the Enable button to assign it to Tenants.
-
Following table explains the parameters:
Table : Parameters for Integration Service Configuration
| Parameter | Description |
|---|---|
| Name | The name of the new Integration Service to create |
| Update Conf | Set the job schedule in minutes for updating the |
| Job Lower | Integration Services configuration file |
| Limit (in minutes) | (aeintegrationservice.conf). |
| The Integration Service creates a new scheduled job for each service to check for updated configuration or jars on the AutomationEdge server. It sends an update message to all cluster nodes in the AE Server. This job runs every 5 minutes by default if no value is specified. | |
| Update Response Job Lower Limit (in seconds) | Specify the job schedule in seconds for the update response. Additionally, the Integration Service runs another scheduled job every 30 seconds for each Tenant's list of Integration configurations to update the execution response on the ITSM system. |
| Machine Name | Specify the machine name on which to create the Integration Service. |
| User Name | The User Name on the machine with which the Integration Service runs. |
| Cluster IP | Specify the machine IP where the Service runs (known as Cluster IP in HA setup). High availability is built into AutomationEdge Integration services. When creating an Integration service in the AutomationEdge UI, you can configure a cluster of nodes. Integration service HA uses an active-passive polling mechanism, where polling occurs from one node of the integration service cluster. If the active node becomes unavailable, the passive node takes over as active, and polling resumes from this node. |
We recommend installing integration service on a different machine other than AE. If not, at least the tomcat for integration service should be different from AE Tomcat, and the Port of integration service should be other than AE cluster ports (i.e. 5900 port)
Specify the machine Port where the Service runs (known as Cluster Port in HA setup).
- Configure an Integration Service as shown below. Click Create. Upon creation, it performs the following validations:
-
The Integration Name must be unique across all tenants.
-
No other service can register with the same combination of machine host name and machine username.
-
The Cluster Port must be different from the server's Hazelcast Port.
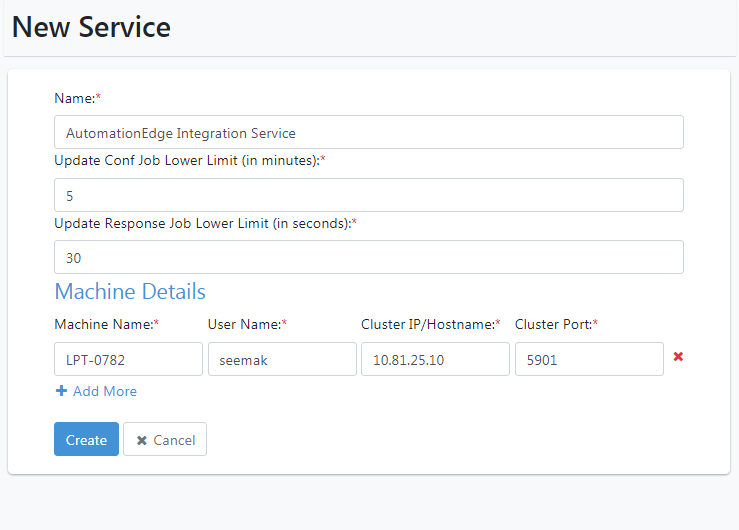
Figure 80: Integration Service Configuration Details
- You can click "Add More Machines" to add them as Integration Service Cluster nodes, providing High Availability (HA) with active-passive functionality.Click Create.
If a Service Name already exists or if the combination of Machine Name and Machine User Name is already registered, a failure message will be displayed.
-
The Integration Service is created and visible in the UI. Initially, the service status is stopped.
-
Before using Integration services, complete the Integration Setups and start the Service. Refer to the "Integration Services Setup" section in the AutomationEdge_R7.7.2_Installation_Guide for details.
If you want to Edit the Integration services.Click Edit ![]() Change the configuration parameters as desired; the Service name is not editable. Click Update.
Change the configuration parameters as desired; the Service name is not editable. Click Update.
Download configuration file
System Administrators and Tenant Administrators can register an Integration Service and download its configuration. Each Tenant Administrator can register only one Integration Service. The configuration is stored in a database and generates a non-editable aeintegrationservice.conf file, which should be placed in the AE_INTG_HOME/conf directory on the integration service machine.
-
Navigate to Integration >Services
-
Click Download
 in the Actions column. It downloads the aeintegrationservice.conf file.
 -
Following are the contents of the aeintegrationservice.conf file:
{

  \"name\" : \"techedge\",

  \"uik\" :
\"YmFkYjE1NzQtOThkMy00MmNmLWEyNTctNTRiZjY1MzA0Mjk5MTU3ODkyMDI3MzEyMg==\",

  \"tenantOrgCode\" : null,

  \"aeServerUrl\" : \"http://localhost:8080\",

  \"aeServerVersion\" : \"7.1.0\",

  \"machineDetails\" : \[ {

    \"hostname\" : \"LPT-0782\",

    \"username\" : \"seemak\",

    \"clusterIp\" : \"10.41.7.15\",

    \"clusterPort\" : \"5900\"

  }, {

    \"hostname\" : \"VAE-PRD-Engine\",

    \"username\" : \"Administrator\",

    \"clusterIp\" : \"10.51.4.161\",

    \"clusterPort\" : \"5900\"

  } \],

  \"cleanupInputFileStorage\" : true,

  \"cleanupOutputFileStorage\" : true,

  \"verification\" :
\"**YmIyZTI4ZjhmODQ3ZDUzZTJhMzhhZTI0NTNmY2M2N2U=\"**

}
The contents of the integration configuration file aeintegrationservice.conf are listed in the table below,
Table: Integration configuration file contents
| Contents in Integration configuration file |
|---|
| Unique Identifier Key (UIK) (generated, encrypted) |
| Tenant OrgCode (if configured by Tenant Administrator) |
| AE Server URL (internally stamped) |
| AE Version (internally stamped) |
| Multiple pairs of the following: |
| - Machine Username and Hostname (the user-provided machine where |
| Integration Service will run) |
| - Cluster IP Address (user-provided in case of HA) |
| - Cluster Port (user-provided in case of HA) |
| Flag for cleanup of input files |
| Flag for cleanup of output files |
| Hash of the contents(in Maroon Color) for verification so that it is not modifiable |
| Conf Update Job Lower Limit (in Minutes) (user-provided) |
| Response Update Job Lower Limit (in Seconds) (user-provided) |
If you want to delete Integration services, go to Integration -> Services, click the Delete icon next to the Service you want to remove, confirm deletion in the pop-up, and see "Integration Service deleted successfully."
Integration Type
A group of integration connects to the same third-party service.Typically, one integration type maps to one code base.
Both System Administrators and Tenant Administrators can add, update, or remove integration types. Each integration type name must be unique across all tenants. Every integration type has its corresponding JAR file. Tenant Administrators can configure an integration type on any Integration Service provided by the System Administrator or on their own Integration Service.
Remedyforce REST type integration jar is available with the release 7.7.2.
Add Integration Type
Following are the steps to create an Integration Type,
-
Navigate to Integration->Types.
-
Click the Add New. The New Type configuration window opens.
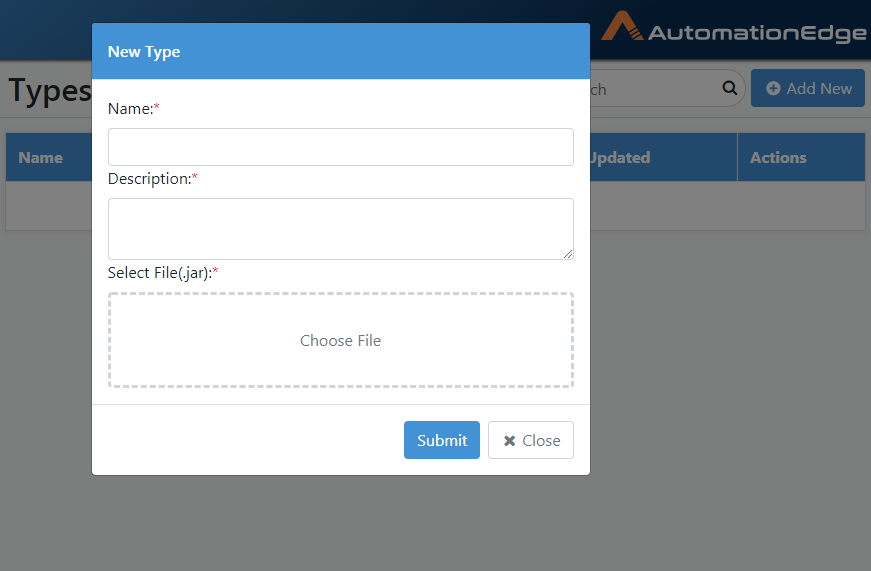
Figure 81: Integration Type Configuration
-
Provide desired configuration details. Browse the integration type jar file.
-
Click Submit. Integration Type is added.
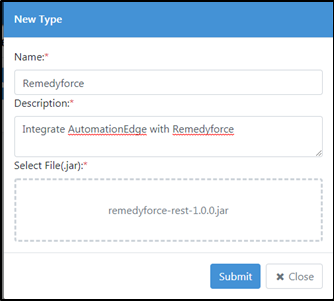
Figure 82: Integration Type Configuration Details
Click ![]() and edit the integration type details.
and edit the integration type details.
Click ![]() to delete the integration type
to delete the integration type