Work with Task Templates
Task Templates let Admins create standardized formats for approval and document review tasks that developers use in Human-in-the-Loop and Reject/Repair workflow steps. Without templates, every workflow would need its own custom task configuration, leading to inconsistency and duplicated effort. Templates are versioned automatically, can be exported and imported as JSON, and ensure consistent task handling across all your workflows.
You can design a template for two main purposes:
- Approval: For tasks where an approver needs to review and approve or reject. A template can include both Data Fields JSON and Action Buttons configuration.
- Document Review: For tasks where a reviewer verifies the extracted text from documents and makes changes if required. A template includes only Action Buttons configuration.
In a Human-in-the-Loop step, approvals are handled through action buttons. When an approver selects an action button, the workflow continues according to the selected action. Action buttons such as Approve, Reject, or Send for Review control how the workflow proceeds based on the user's choice, and can trigger target workflows for multi-step scenarios like Maker-Checker.
In addition to action buttons, Human-in-Loop steps can include input data fields and labels which are defined in a JSON format. These elements are displayed to the approver to provide context or to capture required information before the workflow continues. Templates support input controls like text boxes, drop-downs, checkboxes, date pickers, and tables, all defined in JSON format.
To create Approval templates:
-
In the menu, click Tasks → Templates. The Task Templates page appears.
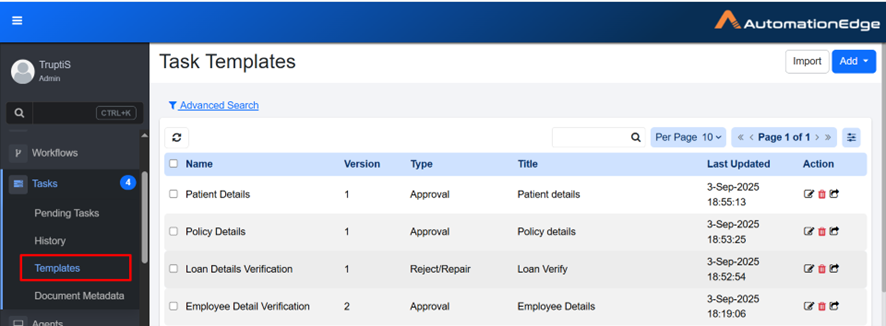
Task Templates page
-
View Task Templates:
Column name Description Name Displays the unique task template name. Version Displays version of the task. For more details, see Version. Type Displays the task type. This shows as Approval when the Approval template is selected, or Reject/Repair when the Document Review template is selected. Title Displays the default title specified in the template, which can be overridden by the plugin field Task Title. For more details, check Human in Loop step in the AutomationEdge Standard Plugins Reference Guide. Last Updated Displays date and time when the task was last updated. Action Click Edit  , Delete
  , or Export
  to manage the task. For more details, see Action.
Version
When you create a Task Template, it is assigned the default version number 1. You can then use the template to create tasks. Each task created refers to the template as its source. If you modify and save the template later, the version number is incremented (for example, from version 1 to version 2), because the template has already been used to create tasks.
Action
-
Edit Click
to open the task template in edit mode. This allows you to update the template details such as Data Fields, Action buttons and other configurations. After making changes, save the template to apply the updates. -
Delete Click
to delete the template. A confirmation dialog appears asking you to confirm the deletion. -
Export Click
to export the template in JSON format.
To add templates:
-
On the Task Templates page, click Add. A list of task template types appears.

Task template type selection
-
In the list, select Approval. The Task Templates details appear.
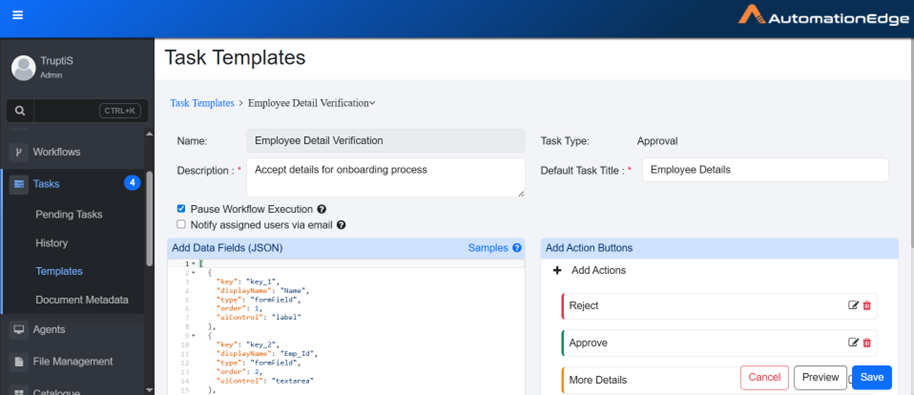
Task Templates details
-
Enter the following field details:
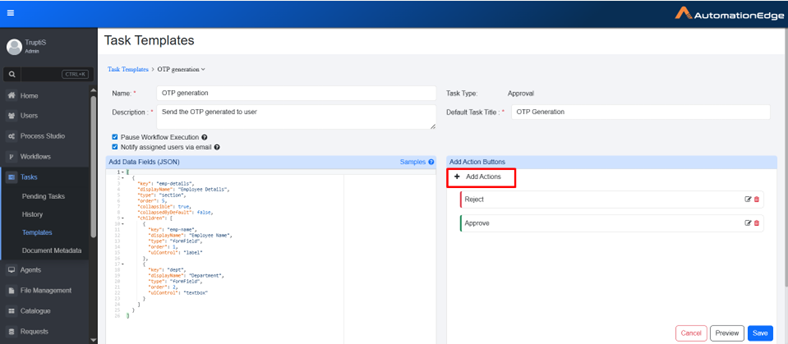
Field name Description Name Enter the unique task template name. Description Enter a brief description of what the task is for. Task Type When you select the Approval type, the Approval option is set by default. Default Task Title Enter the default title that will be automatically assigned to new tasks. This title is replaced by the title specified in the Human in the Loop step and is displayed in the Pending Task details. Pause Workflow Execution Select to pause the workflow until this task is completed by the user. Notify assigned users via email Select this to send email notification to the nominated user whenever a new pending task is created. Add Data Fields (JSON) Write a JSON code to create data fields. You can click Samples to get different sample code. For details, see Sample section. Add Action Buttons Click + to add action buttons. For details, see Add Action Buttons. -
Click Save. Template is created.
Note-
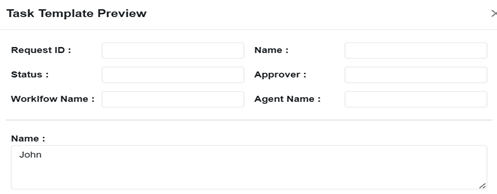
Click Preview to view the template.

Template preview
-
Click Cancel to cancel creating the template. The value key in the JSON Sample is used only for preview for Approval and Document Metadata. For example, if "value":"John" is specified in the sample, the template or Document Metadata Preview will show the value for the key as John. However, this value will not be reflected in the actual Pending Task. There, the value will be obtained at runtime during workflow execution.
Template preview with sample values
-
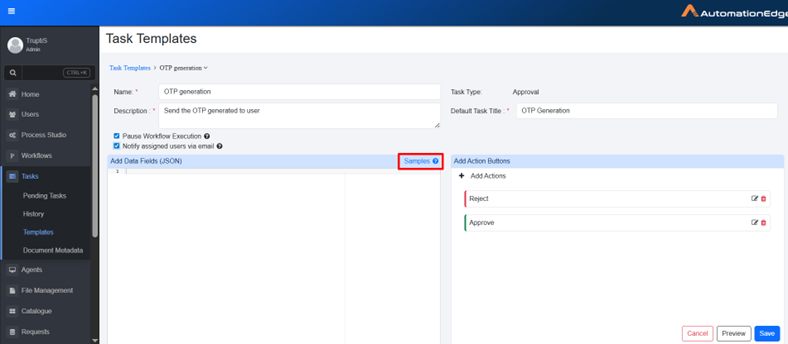
Samples
While creating task templates, you can add data fields in JSON format. You can also refer to predefined samples.
Samples option in Data Fields
To add samples in Data Fields:
-
On the Task Templates page, click Samples. The Samples dialog appears.
Select Sample dialog
-
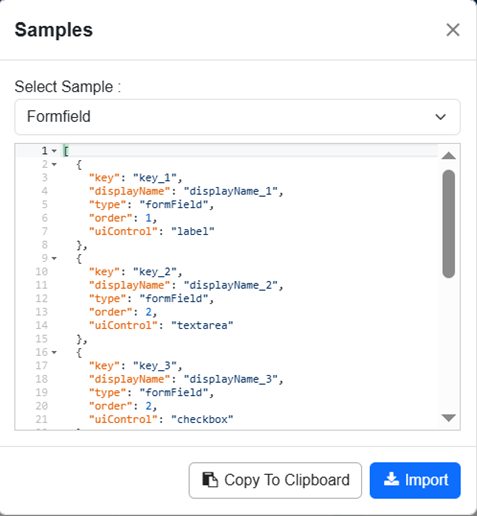
In the Select Sample list, select the sample you want to use. The following three samples are available, each of which represent different types of data.
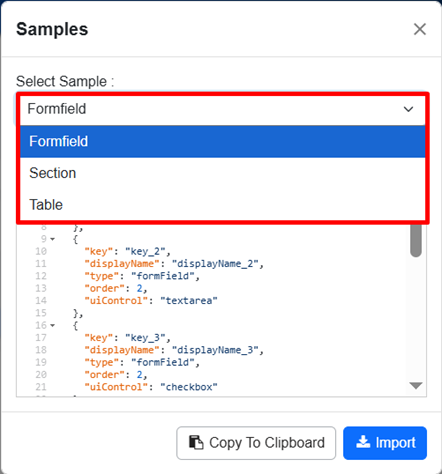
Formfield sample types
Formfield
Use the Formfield sample to build input forms that collect data from users — for example, a service request form, a feedback survey, or an onboarding checklist. Formfield sample provides a set of UI controls (text boxes, drop-downs, checkboxes, and more) that you can combine to create structured, validated forms.
The AE UI renders each control based on the uiControl property defined in the JSON template, and automatically applies any configured validations.
- The following UI controls are supported:
o label – Displays read-only text. Use it for headings, instructions, or contextual information within the form.
o textarea – A multi-line text input field. Ideal for comments or descriptions.
o checkbox – Checkbox will be displayed. If checked, the value will be set as “true”, or else as “false�”.
o textbox – A single-line input field for short text or numeric values, such as a name, email address, or quantity.
o radio – Single-choice selection. Mandatory Control: Users must select one option. The form cannot be submitted or saved until a value is selected.
o select – A drop-down list with fixed, non-editable options. Users must choose a value from the list before the form can be saved.
o combobox – Drop-down list that allows users to select an option or enter a custom value. Non-Mandatory Control: User can select one option, provide custom input, or leave it blank.
o date – Opens a calendar picker for date selection. The default format is YYYY-MM-DD unless you specify a different one using the dateFormat property.
Supported Date Formats If you use the date control, you can configure the display format by setting the dateFormat property in your JSON template. The following formats are supported:
| Format | Example |
|---|---|
| YYYY-MM-DD | 2026-02-16 |
| YYYY/MM/DD | 2026/02/16 |
| DD-MM-YYYY | 16-02-2026 |
| DD/MM/YYYY | 16/02/2026 |
| MM-DD-YYYY | 02-16-2026 |
| MM/DD/YYYY | 02/16/2026 |
| MMMM DD, YYYY | February 16, 2026 |
| DD-MMM-YYYY | 16-Feb-2026 |
| MMM DD, YYYY | Feb 16, 2026 |
| YYYY-MMM-DD | 2026-Feb-16 |
| DD/MMM/YYYY | 16/Feb/2026 |
- Section: Use the Section sample to group related form fields under a common heading. This is especially helpful for longer forms — for instance, you might group personal details, contact information, and preferences into separate sections to make the form easier to scan and complete.
- Table: Use the Table sample to display or capture data in a row-and-column format. Table format works well for structured, repeating data — such as a list of line items in a purchase order, a schedule of tasks, or a set of configuration parameters.
secret is only applicable for field controls, textbox and label. Values for fields that are marked as secret are kept in the encrypted format in the database. For example,
{
 "key": "id",
 "displayName": "Employee Id",
 "type": "formField",
 "secret": "true",
 "uiControl": "textbox",
 },
- In the dialog, do one of the following:
- Click Import. The sample is copied to the Add Data Field (JSON) section. OR
- Click Copy to Clipboard. The sample is copied, and you can paste it into the Add Data Field (JSON) section.
Add Action Buttons
Action buttons define the options that users can select while performing a task. These buttons control how the task proceeds based on the user's choice. For example, you can configure action buttons such as Approve, Reject, or Send for Review.
Action buttons section
To add Action button:
-
In Add Action Buttons section, click Add Actions. Details to Add Actions appear.
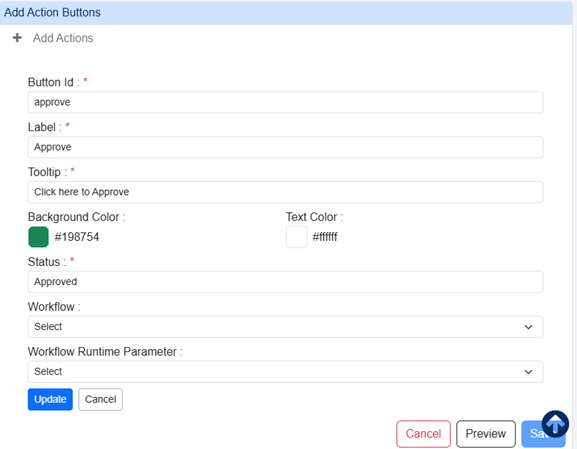
Add Actions details
-
Enter the following field details:
Field name Description Button Id Enter the button ID. Label Enter the label that you want to display on the button. Tooltip Enter a short message that appears when you hover over a button to explain its purpose. Background Color Select a color for the button. Text Color Select a color for text on the button. Status Enter the status that will appear on the Task History tab after the task is completed. Workflow Select the workflow that should be triggered when the button is selected. You can also search for the workflow. For more details, see Target Workflow section. Workflow Runtime parameter Select the runtime parameter defined in the target workflow. You can also search for the parameter. For more details, see Workflow Runtime Parameter section. -
Click Update. The button is added to the Add Actions Buttons.
Target Workflow
A target workflow is another workflow that is invoked from the current source workflow. You can use this option when the approval process requires multiple steps, such as a Maker-Checker scenario. The source workflow handles the initial processing. When the user clicks a specific action button, the target workflow is triggered. The target workflow performs additional processing based on the data from the source workflow and then decides.
Ensure that the target workflow in the template action has only one mandatory runtime parameter.
Workflow Runtime Parameter
To pass information from the source workflow to the target workflow:
- In the Approval Task Template, define a runtime parameter for the action.
- Map this runtime parameter to the target workflow. This parameter acts as an input container for the source workflow's metadata.
- The source workflow passes the metadata as a JSON object into this runtime parameter.
To create document review template:
-
In the menu, click Tasks → Templates. The Task Templates page appears.

Task Templates page
-
Click Add. A list of task template types appears.
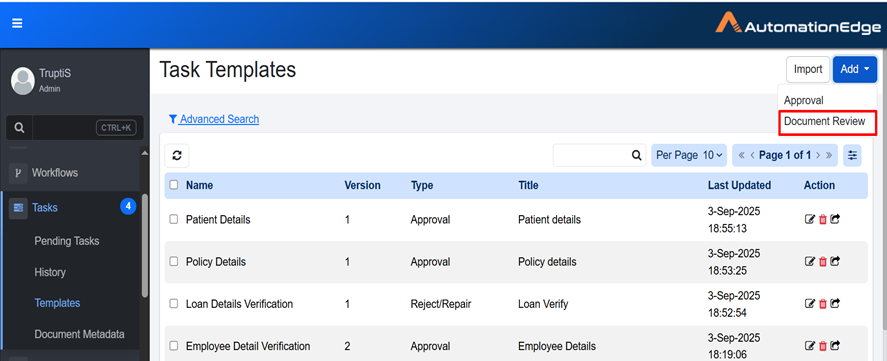
Document Review template type selection
-
Select Document Review. Add Document Metadata dialog appears.
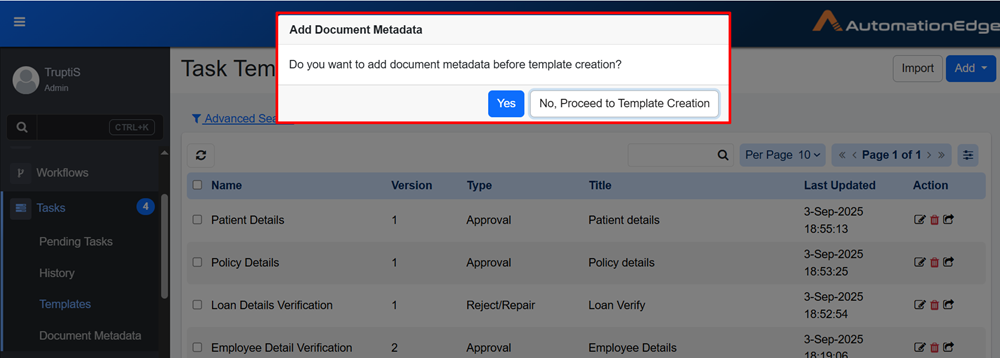
Add Document Metadata confirmation dialog
-
In the dialog, do one of the following:
- Click Yes. If Document Metadata has not been created, you are redirected to the Document Metadata tab. For details, see the [Document Metadata]. OR
- Click No, Proceed to Template Creation. If Document Metadata is already created, the Task Templates page appears.
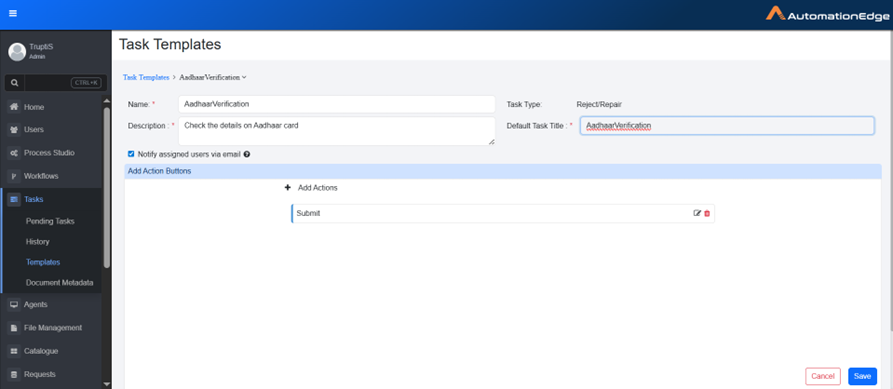
Document Review Task Templates page
-
Enter the following field details:
Field name Description Name Enter the unique task name. Description Enter the task description. Task Type Task type is selected Reject/Repair by default. Default Task Title Enter the task title. Notify Assigned user via email Select this to send email notification to the nominated user whenever a new pending task is created. Add Action Buttons Click Add Actions to add action buttons. For more details, see Add Action Buttons. -
Click Save. The template is created.
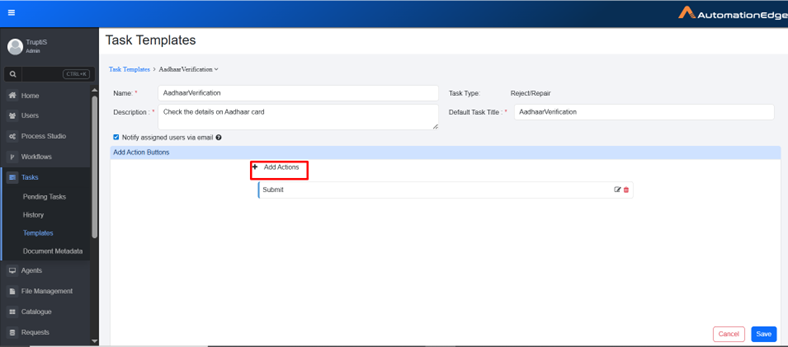
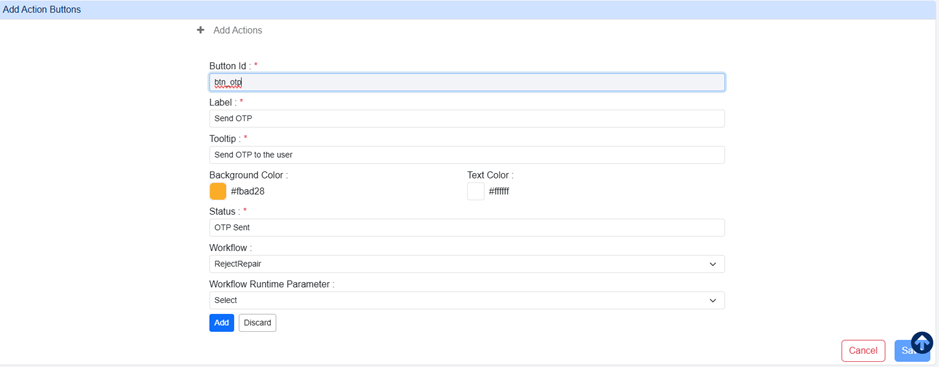
Add Action Buttons
Action buttons define the options that users can select while performing a task. These buttons control how the task proceeds based on the user's choice. For example, you can configure action buttons such as Submit, send OTP, Verify, and so on.
Action buttons for Document Review template
To add an action button:
-
In the Add Action Buttons section, click Add Actions. The fields to add the details appear.
Add Action button details
-
Enter the following field details:
Field name Description Button Id Enter the unique button ID. Label Enter the label that you want to display on the button. Tooltip Enter a short message that appears when you hover over a button to explain its purpose. Background Color Select a color for the button. Text Color Select a color for text on the button. Status Enter the status that will appear on the Task History tab after the task is completed. Workflow Select the workflow that should be triggered when the button is selected. Workflow Runtime parameter Select the runtime parameter defined in the target workflow. -
Click Add. The button is added to the template.