Assign dashboard permissions
Dashboard Permissions let dashboard owners control who can view or modify their personal dashboards by assigning permissions to specific users or groups. This feature applies only to owned dashboards — public dashboards are visible to all tenant users and don't require individual permission grants. You can approach the assignment from the Dashboard tab or the Users tab, and filter by users or groups to quickly find who needs access. This gives dashboard creators control over their reporting views while keeping public dashboards open for broad visibility across the organization.
To grant dashboard permissions to user and / or user groups:
- In the menu, click Permissions Manager → Dashboard Permissions. The Dashboard Permissions page appears.
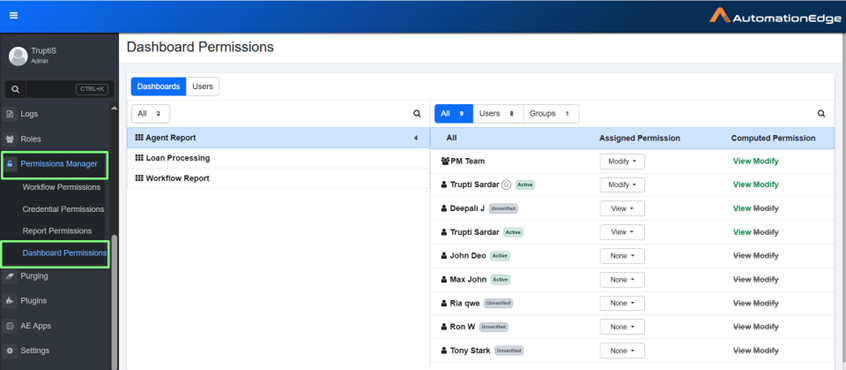
Dashboard Permissions - Dashboard - All tab view
- In the Dashboard tab, all dashboards appear in the left pane. The users and user groups appear in the right pane.
• To change the view, click the Users tab, users and user groups will appear in the left pane, and the dashboard will appear in the right pane.
- All: all users and user groups appear in the list.
- Users: all users under the tenant appear in the list.
- Groups: all user groups under the tenant appear in the list.
 : indicates that the user is member of a group.
- In the dashboard list, select the dashboard to which you want to grant permission, and in the left pane, select the users and /or user groups.
Permissions:
- View: Allows users to view dashboard in a read only mode.
- Modify: Allows users to add or remove reports and edit report properties. This does not include delete permissions, which are reserved for the dashboard owner.
- In the Assigned Permission column, select the permission you want to assign to the user and / or user group for the selected dashboard. Available options are View and Modify.
To remove the permissions granted to users and / or user group, click the respective permission. The permission is struck out and greyed indicating that the permissions are removed.
- Click Save. The permissions are saved successfully.