Web Spy
OS based Web-GUI [Classic] automation behavior
| Operating System (OS) | Automate mode | Behavior |
|---|---|---|
| Windows / Linux | Web | Detects all web elements. Notes: - If Web Spy [Classic] opens multiple browser windows, it is advisable to switch windows from the Web Spy [Classic] toolbar list as it will automatically display dialogue for confirmation to add a Web Switch Window step. - On the other hand, if you switch to another window manually, it does not show any Switch step creation dialogue, and you will have to add the step manually in the workflow. - Linux supports only Web mode. |
Web Spy [Classic] Toolbar
The compact Web Spy [Classic] Toolbar takes up minimal screen space, helping you easily turn everyday web browsing into automated tasks. As you click and type, the tool actively records your actions to build workflow steps. When you spy on a specific webpage element, the tool opens the Generate Step dialog, which displays Attributes and Step Generation sections. Here, you configure settings as needed and generate the final steps. This straightforward process allow to build reliable web automations quickly without writing into workflow.
See following table for detail understanding on tools.
![Web Spy [Classic] Toolbar](data:image/png;base64,iVBORw0KGgoAAAANSUhEUgAAAeoAAAAmCAIAAACEUk8WAAAAAXNSR0IArs4c6QAAAAlwSFlzAAASdAAAEnQB3mYfeAAAJSVJREFUeF7tXQd8FNXWn92Z7SXJZknvIZUqJEBoIaEZRFCKKEpVHxZQQX3IEwUs8ETAgvopnyIKRB4KIkZKABOa1NBLCum9l+07M7vfmd2w2Wy2zAZEfN/c3/z2t3Pvuefee+7Mf84999x7EYQJjAQYCTASYCTASICRACMBRgKMBBgJMBJgJMBIgJEAIwFGAowEGAkwEmAkwEiAkQAjAUYCjAQYCTAS+MslwPrLa3B3K7Br1667y5Dhdl9JYOrUqfdVfZjKMBL4CyXwXwjfCQkJf6FAmaL/PAmcP3+ege8/T7wM57+dBO4L+B42bFhaWtr4Bx9MGDjQIsGcCxcO7t+/b//+kydP0hcraN8MfNMX19+L8r8Yvkf06JHk5aUhSZse4bHZhWr1z5WV93lPjX9l4l2p4cGPM9ziExASGRweSRK40UjlAzhDOZzy4sKqskK3+Ngl7snnpcmk470kCSKhLwcDmlqcOK9SH2xW7GtqK9Tq7rwIKw4sjCsi9Eq3eLqGb08B5uvBzatR2+Ub4yesa9U3awi3SrUQjxkz5t133x0yZAg8tpdu3Cg+c0ZfUwOpXD+/8MGD+8fHowhy5syZ5cuXHz58mE4RDHzTkdLflKbb8M1C2aiEZzQaDSq9kTB0r/kcrkTsP5U0CliImxxYmEHfqKzdYzRoHRX9enT02sceMwiFRisEZ7HZbIPhu3375p461b06d83lHRie9MgcEocmmACvS0C52NWjB0qvuleic/gmWGxzYQA3mNGZ9GjCt7fMK3HUhFHjJkVGRcXFRAsFGBdDoQgcJ9U64ubNvOLiomOZGaeO7G1sau6G6PoI+atCAx6VeyAoihgMiMGItH8fWAibjbBZCEn+3Ni6oqTqqtphn7pV7vQX9viH9t28eqSytYJ+RhfwPbmP/KsnY3y9eBk59U98d0Op69AORFz0h7lxDw/0qWvWP5ee+/OVBvqlminXr1+/ZMmSBqPxxzVrkB07QvLygvR6qSmpDUEquNyymBjW449Pe+MNOZu9ZvXqf735pssiGPh2KaK/L4G78M0Wcr3SYqUjI/iRctRLwBZw2rILS5b80j0JeAQ84t3rf0m8jcXisdigV9AK8MkwGnRslF994TFt8wlHeRZFRn7yzDOkp6eB6NCEAL45JPnFtm0vnj1LqzAaRHFJ497cdVCnbocjmxyAUf5eSGmpYt2zDxdfPEqDXzuJXfgGcNGz2VoWKse1HABBgFc2u4HD5xtJrgEQ0U6gA98+/kEr1n7Wb+AgP7mHTMzRanUqLa7SUtAk4qMiAUfA4zUp8ZqGtkvnz6xcurC+2g1ABCYv+Mk3RAbxQN2GvrD/jTN/iDAdTiwprPiixm3os2n5I8/+MCj1cfiuVRTlbl03lj6Cu3gKt8+Oi/ITXi9V9AmW5JQpCuo1loLHxHi9OiaksEoV7iOI8hZs+qOafmcD5bfffvv888//lp19aPz4lB9/nNjcHM3n+wgEEj5fyuf78fkxKJpYU8M7dOin9PTmPn2enj07Ijx8z549zkuZMWNGQECAWzVhiP8uEqiqqtq5cyfN2som9w7bMMln/iBRvwC2kGPUk5iUr7lR23o4XzQgyCOlJyrisrmgCxqNOlpjR46oL182AiFbDdp8nSKf0JTQuYx4NRsFxZ+lrttPaIodVX6wTDa+Xz8DlwvwbQRoM10AsRhJnrt2bd/dM57I/EMGjJ+jUeB6DanX2l5qFRkqQPqE8OWJU/LO/9FSU0pT2j2HRNtQAr4pMY6XXvdSwdXnq65Pqy18pK44rb4ssrXthlTWyuFy7anhhafznZfYwy/wrXWbkkclB/cQsYzkues1J67VZ11paVNoy2pVRy43l9e2KVWaQLlA7imQB4SGRvU/fypbrVTQbMg7IX4fRIVgANukqzGWwYCxWQ/5yFCDIavVPaOHpTIcnnj687uSxk1RtiI6HeIfIo/sM6Pg8m8aVSOdCrvQvsfGeCl0pIYwcDH2lQqlzmrgycPYfQPFetIgwNgSHnooz41BChhMwB7yw3/+o5w582kEYUulGvPYpEsQsFgGhWKz0ShKT39ixozVq1e/6VQHZ7RvOr3+N6Whr30HLR/ruyCJxWa1nShu/vW66kIFXqdEULZRTxDNGtmk3pGbZ+D1SoMGJ1th8Gts3HW15ouT1BjZcRD7TZPHfmggmmsvTdMpi2jKkMsTBCXuJbCe9VfmaZqyHeUC7fujefNIDw8b7ZsH2veOHXdR+45OTFn87e96DRiL7TQWJ5G+/mhCIFquQbJutn363CSaOriN9k1hN4rFKFtXFp4NUqoQ0BLNSANlkkilSLQ0LqmMKxYZCJtKONe+5b4BK9Z/PW7MSLkYzS1tysypbdELxBIpxuWP7S0G9oeuKQm9Vqlo8+RoxiX4xobKGhWGA0eOrlryTGNdlcsue87P+39iwxGCtD82sZufxUIw9PmbxV/W0gLczjxYw9L+NWjMs6o2pYcshMMTNVTnCsT88oKLGd/P12vBBuEisJ2ks1msaB/hpidiTrzywMEX+n73VKyHgLLfQ+Bz2J9Pj8pc2A+SgCDGV4iCPYheSEpKAuzOPHFC+dRTz3K5uGPsBn4A67hE8gyXq3rqKcjyr3/9a+jQofTKYaj+n0og6M0x/ouGA0yXLs3If3xr/bYc9Y1avEGF1yogEoSiulalK2s2agl4ZLkBUl1ZS9PuK86x2yJKMIYQhJ6+ZA2AUEZa2j2KYTDtBhdmusz/EbjubQA4Ig1Gf55xdC/pK1/tjRiQ3I3yCRZLQJLLinIo7IYWAEiDLmu2t3OQQLXqrcLzAiMBZPSZe3l6rFz7eXLyMLkYO3ujZufxWlLgHxIcJPOUSATYiXwNXPAHbiGSFAb+eKIWyLwl7FEjh65cu9HL02yXdRhiBbyNkcFg1O6E3XbVSutI+E+QG3sGQ3b6bblNaTx75KOPXg3btKp3WcFRktB98/4Dn7weuXfzk4Te/lyjTRHO4PvrJ6I/mxvf20/IYbFEGHtGcuDMgb7m/LMTfZ8eGyJCWZAEBBvnxH/zRAzN2q9bt66FIC7Pn/+0waDj82Hw6jwjNbrl8+cbjVfmz2/GcchOsyCG7P+hBLweivN9fqi+Tln0wk8A3HbVKH1lG6WMw9CXi8KsZtPuq/oq15qORZgsFl3DN2QxEbsGKQGGGWtrdSUleGlpa1Fhc2Eh/NGXliIVFSKYK7snAWoJGhso4Crc2Ko1ShHD4J7ShZ/v9QmLdbd8DRsb3lwdqWyjsNuAnJD7vxY/FK7jcn8KxDEkpqVleHMNkNHnPDhlwgODhvhKsdzSxgMXm3r4h8o8xAYDaQBDk9GIsmFwBb1NGcNIjCOT8uU+AQcuNOeWNflIOQMGDR065hHnZX0YFoCBvdsyAoNPi1aLaNSUBdzymYE/cAuRkGSJBBsXB4Ps9NtiocRtYNoEhgShg68+HW4On4yEEMm84QG6Vp0GN5CgP0CrdGQPCSfYi+cr4fqIuYgepq+NkAQEQDZnmH9iqMRlkb169QL1+edPPnmwoIAllbrEbjNDIGNJJJAFMoLyHhcX57KgTgRZy0Ktw7Is97LTpoZypmwuoU1uQ1iyeUpo1/ymWOvQXoJNm0L/tEY5ag5VsXteqHPZwlyl/8sjWSxW5erDihMODc1g7NaVNmOeAm1xE9hP/BYNR8XdUJ2628/28mU3NLywe/eL27YtSk9//1rRv0saFqVvf3H79gU//LCjpNMTFdxndMyIWT2TZthcsclzeoQPuJM6AXKwWMbiJvJAPnHkFrE/j7hahnvIpF6+we6yJVmsnppW06uLlAvEKyITT3j6wbWyZ2K5UGz23IlStQIZfc7DRz8Ec5V6nASbiUQWIBRwyS5+lkaMS3KFgvyzotN7hUKBxDsg83wtTpKQcVhqmpOyQnncid6eCG4FmhoNMvZB5L11FExrNdSvGdDhFyIhCQg6YJiYKPcEJjSbA49oF0oqhv6UuDm7Q/geHCZBOKh1KVo1MW+w36V/JlxemjA/yQ9uLTWgSuZjwyM8XNZ+1qxZMPJUf/NNHw5H60rvtuYGxL05HM0334Cz5WOPPeayoNsEJvSbi2wptYQtM/OKuw2xtMt1n7Dk9wxk4MCcjN+7Vm6mVfVLd88Pu828I37LzPS5d/DlcL+292UOz7HRwr4BYO9u+OGi8wriNW0tmXkFT25TXa4S9fH3fJDu2PFPavfZxsYvS0u3VFRsrqzMNqDnMf7myiq43VRWdsDkSmsJPYc8On3xZ48t/mT6Kx9brhlLPp288GO/6KRuV4+DsWuatb+crtSTRi2OgCcwXEo9otcjBgLvNluwltTwhWoU8yT0cKnZWBVP5NCdw3ExIRExsXHxXiLsYn492Lu9pBIb7DayUZIvRlrr/fd+FLTjHdw7kEB5Xh6iFh3/Un6DlxiLio4OjrCdX7UU+LBMCibsjvIpkwiBpI5DJkxCPviYGj8BcMMFAW4hEpIovxQrywGKUkxcBXAmGjZhOcYR2BByeWK+ECJtYT0h5SVv316OuDqE700nqwe8c+bYrRY+r71VMEYJ8uBK+Ki3CAv25Fk8f4Ag61ZL2voL35+tdVV5ZNq0aZevXw/Lz0cEtg1wmReyQMbLV6/Onj3bNbGJomTzklXIiqOla1I6MqSssQJAmnzuAVnWV6uQiRsWzcxZ9VU3BgcpC1bYR/57UPP7pwjwJ2Fh7Kafr7qsUt2Wc8ULd5NtOpjYBJOBdFRPl1nuGYEIjDqOzeu4Vin3FPp6S31kEssFtx4iDqG30gfpVZfNZmEoBRlgSSqtU2v1BjEfbPAw6Us5N9Oez7JTmAo1GUZYiJ9OLSSJFowLl8BA+utUZoxSYW5YTvyDQmNjo8FHsLBGI5JIWZ2/ACwOD5BUdPbXxO1vDP5ju6L/GGX8cBahg3JEEo+iarVWp4uLjQkICnMklQleYCuycjUBvZXPR95eihzLQkamIhs+R+AbBhf8gVuIhCQgsFZvDUaKiasw/YVdg0a/bGszAaTK+/3a2d1g+LFhEByZNG9ZptgjyC5j+/DtL+UufzBszcPhsb4iPeXh3x7gy4yT4IJFXR2RuKG3v2jRiIBFyYEBUhfDh8jIyOJTpwJJ0uDOuMlcFmQJMhhKTp+OiIhwJSVzOkBizsxFHdpq11ydTBOdTQFOkjoMF1M2Zzm2IVhxcKkZZ2WmD5yYGkbBcHpmN/CbalpMuOXxdFS0daMszXXQUrN1xNzWdlrrhtvYJuyV2MHBSX8tWLCgpLN9gHq3VSpYE0Cvl9upALj5UXKiUQV+Ji4z6kxmEyBTglNKg4of6c3iuGHRdsn/Tghwvc4/JGrYuGldr6Fjp3jLe2i1GqJL6GpJcFkHgGkdbqht0YHJG4yjlY2aSH9RQ5teixvMmN7twDOQpz399BxY4YIEq5UrC88Na60d2lq78ta5ELUS4BvnsP/w8AMymkWQJC7iY+DfXdlEcLh8WEjTkZHD01cVBH/7zwkZ64dp6moC42tGPMEmKdUYzOIcHr+imVRrcCEfnDAdGpQHiYWd4Bu4w6Qx4PWrLyDHs5ARKcjajciHG6k/cAuRkGQzq2wwUEychkfBv3v0w8pWOz4wxzPe2fXlVLLLZ1vRUhkYETDrtcNij8CuvO3Ad5yv8PTrA9+eHDE+TtZDDO72rqYWDUa5iDOhl/eKRyIhY7yfyHkbyIYGMLLQ7TcrXpAFvm5kfT3NLkcAEpGZ46wUb5uMgC7Jq2JuGyaOrsibazHmOkkCCJubBxq9KSwqmLsqx259KA4ZE9vJtsSsSnZqJ25HbwQJS53YDfw2jzIWtDfVUdGdGnV0RZSp3k5aCql5GzOjqDZQwxcnDXfSWDMHJ122bNmyNWvWWCM4YPdbb701caJ767BREQ/M2USzGuCY7hMC00QNarJFg3kIUJjOuT8CzPSAV7TEw9POJfUEBxW7Pn/u1h0AGjxMdh4rzylo5nHYsFixSaGP8BOdzm3cebwc3vo7QXDA5Vyh52WBHAHAZCMjGqrX3zi54cbJkQ1VlL2WRK7wvXNFXvThG6wUHBRVaokwOXdcHwk4x7cv40Q5Ro3yzM+fSeP9I6ZNKVdqrw6aYvAOZBF6ICBIIxCHyTlKLcnloE7k5g2TljY4ByXwBZR+/dI/kMx9lLF7zIPUH7iF7w8k2dh+jUaKiYPA4QphXWVi6uMtDYind/iMhRnma9arGSMmvm2dKbr/I7Nfb08FgtgB05rqkMDwmLlLj3p4h9uwtwPfaydHhPgKVa16tQ6U5I42QW1hhCUUc+CCrrWuPJABMWQJ9hWufzTS+ZNErUfobgCVoNvPrpV6aEZSylyx4qjFrhI2f4NF83WWBGryig23NfqUNVtm2m2MiUMHmQul2oLe9vE7fW7H3KW1Hm+JX4Js6LCJOyraNBbZcru9YfPnU2jvpKWmdk1ccLupVB0dNNxpYzs42O/1sLAwawS3YHdqamp3H5Nu5INV0d3I9adk4fH4ZYU3Dvz4ddfr4K7NdTXVfL4A7RJggT392oCbL7yF6dnlKMoa+4APvFO1zToAJZmEl9rfB5Tx9KPl8OrT9wa2KRreUxQxfh8YYwAtHgQLAxuoHVzwx4gY2KzvgmJgNbq7Gr7Fd7y9OHC5xjgVZzL4XvyShFG/NSvOBfbR9B/LtjIi3Se9iqI8/9CBsFAJxhvg3x0Wm2q+wuNTfQL7WUtPKguOiG9PBQKJVyBkAV2/R2CkUCx3Ad9SPjY4VEqo8a62DS6HXd6sW7wjH66yJi3c2vYZjIlUeFKY1EvozKqF+frCnHQ3RqqQhcro40P/MbWmDJu/m9KXj65o3xaL0s2tzA1AGhYeg5imNZ0klRTndc4VHtWxzVZHcRSHnFXJFtRNvq2jWzuM3NbHSzZvNFlOzNlN+vfGTg4s1lOX1ob79vgtnQzmjoq2OxZx0lJTZToE5KThDhvbmYPjbrMg+PXr1816dzewm1TpCNCjPYWYt4vxn3VFMLkQ8xLijWpScXd3IOreQ0rlotzgzIZje4HDF2v0Rlgjbn0pYQkliaIcPp1SwaINJtBt2WWghM1KDYVJS3CEKG9Qe4k4Ai4b7manhkLU9qwy0F67bf4W4LpTUskeDxkCcrXgNPzRIb94ef0hlQIBndqaaQCOwIEE7CelDfihqwoMo/CJjfGUFfkNFZcDo6KP7tr99ZXKkodeQLl8lskmAwTQQCAubsDFfBRcVuz5e7RXoRF8Tmw+JmY/E9BSP92EjJuAHD6AHDpA/YFb+ARZOw7eriLFxEHQapo3r0mqKM7z8EYaqm+uXywzX6ufk+355gnrTBey/+e9f7SnAsGlE1+DCGGpwXcfpFWXnrNhbwvBIV68HlIu9C7QQRfC59fa5VGFk9kFLVkFLSq8w3YNBEAGhJAF/AulAizI06Eb1o3c3MikpCoUFsC5/V2ELJUoGjl06I2bN2l1PIWsd9vLpLjAvq3EToU6+Yu0GyCQlDUdPjDtijC4nORYYz0F9XYdUBw1mhoCpM+1Ns7YLZqWzBwSuWh490tsa6N8ri0IbsFuczz9AM6t2sIGzFsoTqDmedh8jBcuc5ld9EAQJhdp8+uNLhdJu+R1TwjKr2b99OVbO79466cvV1iunV8sz9j8TlO56znb9joab6+CNL2GYK4B+A7uITS/7eaRCPx1+xU1cSdwtV6nQDFesHfUoQlvNob3QSxTqhqkMaz3obTlwd7RGIeP6xQ016fA90ylJUR8TpCMjeu1lE0dhhtGpOhchk6vqM0v9AvoP3Te+2hAlEHfsYcUbBpD6LTBMmojFLCbs2H/KQfhrFJN7UVlHXAcdHtk/Rft9u7XFiH/XNRuB4dISAIC68BmU0wcB2VLxdZ1Y6pKSwUiGYFrLZfZ3h3df3JiyiI2GwOPb+tUFAX/SCT948lFNw505W0L3wEeXIBtcBgUijjgBg8mMAEHFQrhk4xodWTfYMnFVUMurRrSL0QCtxAJSUAAZEBMZYH+x9jhModawG979/aJjy+Nju7kNUnzuddoIGPfXr0yfv2VVo6w+c4cObqCu0XBdCfJPqy58eWg0HvgbVu6GdthhOAWfiOmGc92jd1R0XbjnbTURsRdKDsa7kZj7fSbVNo+Xw8Ivm3bNovebYmn1dcmotajhbBsw+vhXrC/YPjGKbDhicu83o/2MRJky5ECl5T3CcGt07su/LL28r5PbK6cPf+uunmcTiXBKsLBWE+OCiZJ49bfKRUbLJ8tSjxYTtlz9YTh+9/LYAQwc1QIvM+uZr5sCjTiepWvf0JC8rLkyZ+NTlvfc/Ti/bO+J8EhGhRiEjFwOQdmfRc5evHotHXJkz4bmLLMJzgBsjja/tDCvaqiFPYR5At4Ef4ilaLNCCojxq25klV69ZiHd1Rc6jMRqU+yeUKki0avUrZG+gt5PF5ubl51hcM5mH3NbZ3gG75qoF+/8wEyMgU59juy5EVqohLjUH/gFiIhyaybWwKbRTFxGgDBt/x7TEXRGfh02RAOGfvaxDmfslHbRbY6rWLr+llF1+1gN3Cwhe9YHxHCYcMYYPW+4qQNFx9YmzPq00ubjlVhGJvHxw5db9x6tGLb0crMa41wy0bZn2dXpHx6CciAePVvxdQWBhgrxtfh6PX7rVthhog7b941HOe743zCY7Gu4zhn7lzIvnXrVjqPKdCY9VL7a2nM4N4xo2g1/ecsCUwbOauW3LZtZC2bm26vLl05LHOwnseE3hbLiZkXZT9xz4HQXJ6pWo6Ktokv2bwZZgCctNSmWVYlUCnWDaffWJrd1l2y1oN56itVor7+UelPeT4Yy/V1sY5MPqO/dFSk6nxF298Hvh0u2xnpxrIdmKwCl8GZo4IBf7Ku1DcpcFC2fTwpT7jMC7WgdT8xKoTaFdU98DaCIhmX+PSwhz4Ijx8vEgeCUo+14eWR/U9NWkUp4Grk1KSVZT0HQCQkCcUB4bHjh6V9EJ/wjEkDdabrlxflFxTkNyuJ/lFy2M+kuVVt1KtVlQUJE1/sM+llgX8ErtMYyU7qMMwONLcoPbnaflFyyJiflw9MHD1Zvza1UcvlLYHayQRDfs9E9u1Flr5CRYObIFwQ4BYiIQkIrBGMICkmrkJLw609Xz8Oi0VtCHWaVrUSZGQrhOxf3rxxbpsjrrbwPbKnB3TZ/G25b/5anFOuyKtTH73VsmBH3geHyjievP03m2dvzZ219eb+G41wu/5w2cKdBdm3WoAMiN/MKJ677SZkH+x4+eW1a9dOnTr16Msv74+MRBQKs8nFZaBMOArFb+HhkPH06dPAxGWW2wSUsYLy+7CyQsfcnr6DNJO7iTlQfiIWw7LjJDChH12B3GaYOc5iS7epEnAwfTpuM4+6bdvuTEfNJ9qitxm/kQ4HQuupS4sTn215lOe3GcAdFd0pPjkDMc1jOxFClxY5bDjNxtLutW4Skkp99afH2XwOP1wG/iS8UC82z6ERWTI0DHa2Ah/YyvXZBnqbDnazWnc1m8NlO4vcW7ZD2bXZrMdGBA2JlRXWKGHnVRGPMhAPipZBJGA3ELhVcYAkvlAWFT8VJkX1Wj1J6sFzD/CIryZPj1ta3XtITa9Bp8Yvg1uTed8ABEAGjs49e03lC71dLhM/eWR/bX0r7AQDe1EpmypVKm3EmFm+D4wmYPU3pXR3qi1gt0qjUzRVAzG4rFTWNh8/vM9Jc0p1+oyGFhiVdNDAwhQwdi9/jVKxAbjh1/LnzdeoJOuVKxwso7EFmNCRGOxtYuj8pXGSCwc3ecfBFj1hC6ohPT0j3z5V2tRpG/IZA3x2LBnwbnru2/sAH5CVaaErnoyb9fHFbec7LdUB03nhu0PP3moZ9rHDZW+waB4O0NmXlVUxevQ/eDyX254AdvO02k06XeDhww+lpg4fPtzJ+Tv3fsdBmIvcGNWB+3T6j6HpngRc7jjI8ZOErnkIcBmOZTBrRnnTtmgLu2wFx0LkMwcEvTGa4yOueO9Q9UaH23Bb19O84yCJN1aee8igd71CzZwXlvIFD9lPcmKd7zhoXdDwcVP5IvHhn7+zK6Xhs/49bd6rLCMOTs0WAkAr8I3b+uFLN7M2O5etzY6DMGsFPgibM4sj/cXJvXtoYFtdk8HE7C4MWhOXz9kwN6UgJ9s5W9hxEJacsNjYiIc3ynuE6rTg2ddRPXDV9mgsBWe1FnkYhndgHItFjemb6sqO/brQYIQNrFAnOw7CnlPvfrJlZOroQC8u7EV18GKLWBbgJRWCiR50efPHhlpwxIZyWM2tSsDutIFeiXF+lc34kYMHViye16ZwBoWw59SVAXEc+HBZjzkAsruqmDaRLBa0ts+Fm7kaNyZjbeQ57bndkb3Hf7DQjVl34GCrfe+8WI96cP8zP75/ELUBIwTo4JQoz/cmwj6KhlsN7ZheCH9wctXE8AfjZRbvIsiyc34vTMr94UKdk87+448/3n///QkpKeLt278mCKy1FXaFdUQPSVhb2zcEIdq2DbAbHITdOjutezDhRi7KhuB8YZAbzBjSO5IAm+U9pS8vTAb7T8GrzOJj3GBPYR9/6q32FABSg0eKINZH/uSA6B2zwtZPYou55e9m0sRuc8VAAWOzUaFHHEcQRvPiiuMRFszku6HJgmoaGtXnHizbgRYB8Km1JJ+LhfmICNPkLeCgy6UedrsJwBf0ynO/v1NRcgZeaC6fy+FxwUIN03Fc0qCUhyp6hMEfuIVIcGwHApg/LS85ezZrFUFqXW4E1tzStvKfC7OzTzYoyEHxftOH+2DayrLy8oYWhUJDjIgRDo8Wwp+GJgVEYtrqGSN8E+P9gDg7+/j7yxc7x25oEYDvS4Xl1PE61nBkF5psCDB00a3ybmA3fB0TUhY9+szm8Y9/5hcygI1y02Z++fCcr8Y+toEncL2Ak/q+2vQEDKAyn+87dEAPpE1/vqStQUWAG0nvCCk4zX/8S+Gre4rMm0zBJ2rd5MjFkyMB068XtZa36LyFWGK4FJHyTuTUjvn8ivXO4HY7+7stW2bPmXPg+PEbzz035saNvjAzIBCAO4vZJkT5iUJBGs1VHM+MjY3/6qu0kSPB5O1yufw90L6p1Ssd9m7wuLBekX9H+MNkdi4Bl9q3OTuANfifcHwkvAiZJrdOlVMR+uHDcHoD2apBIUkmhK1iFWdKqz851naU7rbdwFbsP8M7Zo2RaAGd0aT50kFkeENZFOij0rprCzSNR+h0cWh0r9h+SXY1GkBWUURy4qhHuBg4bnfSvlU6Q/qGxe5q37c/S/Y3RXRL+zaxYpEEGHBZHt4Rcv8HZD3iJB4hXIGn9VoN0I516pa21rKW+pv11ZdaGgtBfUYx2EKDkqfL03ao4xo+3JQ8crivJ0YQhkv59YXV6vJmMsybmvQracTBzyTST9g/Wo5hWF0bkZV9/L3X/1FfQ/ewUDiu4a2IIMoOTsfuDziIou8WVbxd1mlfGjq9bKbxDer/1GuHA8O9m+spl3CTjyD4mcy6fnY7nQUudh4SOIfh9dHBTyT4wvJLFoet0xBnyxRfHKvc0UWnBovKCyMCwE+cB/uAE4YbNeodObUfHimHRbd0GgA6OOzfDdb+H9eu1W/dGpqfH2g6LA3qBJEVHA74mXBmzZq+dCms0gS9G4hdsr0H8O2yDgzBnyQBmvDdtfSQ99Ikw8MNsNS8Wa3NqwMHFQq43XRdlfqO8+71JYmrTdoZIJvTnbgptztqTE9VBmbwMKz28pOqpvN3Lhkwnkydu8Su8WTbupddwrfdw9Koytr7GEE8T4C8N2Vc7plDzmve6bgGMKOQsORPDwo1lyfhcEXWSASCA1cT8CwEKvCKg/Us1tquS/iGavTwC1rxwcYHEof4yqXUYWk6vUqjtzosjcvnceGwtOq6lpwzp1YvX1xXXe6W2K0OS3N8bgM1t4nelcPSxJ5Bs187FBAWS+2qQujSP3rEro+g3SY4tFpAQphcAFAO45HKVmc2nQAPHvh644ShqEFDRyGxrkdKSsrKFStGJifDY55z5UrZuXO4aX81jp9fMJwY368fTCUcO3Zs5cqVWVmmlZKuAgPfriT0N07vNnxTaiF4tgJIdfecYuBAGQHE0UaES0EdaOCYhzPXaHi9DbiBoM7oMoI9FlHD+Wp09CmX3ZPy7GdjpzxrIHXWq5fBpKM3sHd99vq1zC+cc/AOCBsyeQ4JJhIa7yq1pANDT+35rqm6xA34tiIFjKbqaQ0zIDzQwB3smU4HvoE9HFWcNHrSyHETw8MjYC8q6qhik083TJiqNcTN3LyiouJjmXtPHtrT0uraG6Rr06ijisMCHpV5UHMXpqkA26OKCdNRxaV356hisWfgvDeOyf0jYG0OfeymnmqXj8s9IEhMTJwKYfr0nlZ7URUWFf3044+7d+8+6845rQx834P++quKuBP4/qvqfNfLDR2QJvYO6bq3EbgS1xfl1N66a4cau1Vz5yfN02dFE74tDP1DIkLCo0ii/ew3UO1RjFNefKuqrJB+oY4oI/m8CTLpeE9JoljoY3JKqcWJ80rNwZa2fU1thdruT1R2LRF2pBJ7+NeUuTc+uy/g+84FbeHAwPddFOb9xoqB7/utR5j6/LUS+C+E779WoEzpf6oEYJD2p/JnmDMSYCTASICRACMBRgKMBBgJMBJgJMBIgJEAIwFGAowEGAkwEmAkwEiAkQAjAUYCjAQYCTASYCTASICRACMBRgLuSOD/AL3ZiAK/eM4AAAAAAElFTkSuQmCC)
Shortcut/Hot Keys/Tool icons
All web elements can be detected using Web Spy [Classic]. The following are the available shortcut keys:
| Shortcut Keys / Tools | Description |
|---|---|
| Ctrl + Alt + X | Press to open Web Spy [Classic] pop-up window. Notice the background of the lens, which is orange and signifies that the Web Spy [Classic] is not in active mode. |
| Spy | Click |
| Spying | When enabled, a blue border appears around a web element as you hover over it. Press Right Shift or the backtick (`) key to open the Generate Step dialog with the element details. Update the configuration if needed, then select the Type, Action, and Criteria, and click Generate to add the step to the workflow. |
| Web Record | You can generate and save the workflow with steps using Start and Stop record tool. |
| Start Recording | Click to record actions you performed on web application. Once you start the recording, it understands the mouse and the key actions. It considers every element as windows by default until there is a preference for detecting web application while recording. The GUI Recorder records the following actions. - Click: The recorder automatically detects click type on an actionable elements. - Set/Write a value: Recorder generates the set value step if a user, - Types in a text field or - Performs keyboard action ctrl +v on the text field - Read/Get value: To read the value of a particular element, hover the mouse on that element and press Ctrl + C. Like GUI spy, the recorder handles complex window/frame tree switching activities internally and generates appropriate steps during workflow creation. Note: In some cases, if GUI Recorder fails to highlight/record a few elements, use GUI Spy to generate steps for such element actions. |
| Stop Recording | Click to stop the recording. A Save Recorded Step popup appears with the following two options: - Generate Workflow- Click to generate the workflow with the recorded steps. - 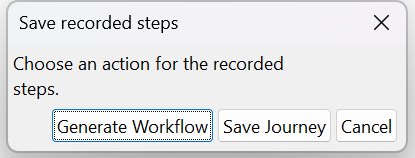 Save Journey- Click to save the journey in a selected directory (for example, D:\UserGuide). This saves the files in .json format. Open the saved .json file and verify that it contains all possible XPaths for each recorded element. |
| Refresh | To reload the web page. |
| Start Highlighting | Click to highlight the selection and resume spying. On a browser, specifically IE, if the page is changed by some actions the highlighting stops. Therefore, to resume spying, click the highlight icon on toolbar to start highlighting the elements again and continue spying. |
| Legacy Web Spy Frames | Important: Frame switching is automatic. Frame tree button should only be used in case of spy is not able to extract/highlight elements from a particular frame. In case you need to use Frames follow the steps: 1. If you want to spy on element which is contained in a frame, then you need to switch to that frame. To do that you need to click on the frame icon on Web Spy [Classic] toolbar. It opens a dialog with frame tree where you can select any frame to which you want to switch. 2. The Frame icon is highlighted in the screen below. Click the Frame icon. 3. The Frame Tree for the current window appears. 4. Let us now GUI Spy the following URL - https://automationedge.com 5. When the page is initialized the first time and all components are loaded. 6. Click on the Frames icon ( 7. GUI Spy can detect any number of frames. If the page contains frames a Frame Tree window appears. 8. Select any frame to which you want to switch. 9. Click on "Main Page" to expand the tree. Click on the nodes to expand the hierarchy.  10. Select a parent frame and a child frame underneath, and then hover over any frame element. In case web elements are not highlighted on hover click Spy (Spy button turns from orange to white) and then hover the mouse pointer to highlight elements. 11. The following snapshot displays the expanded frame hierarchy. In the example below we are on Frame#0 under Main Page. The frame is highlighted in a green box as seen in the snapshot below. 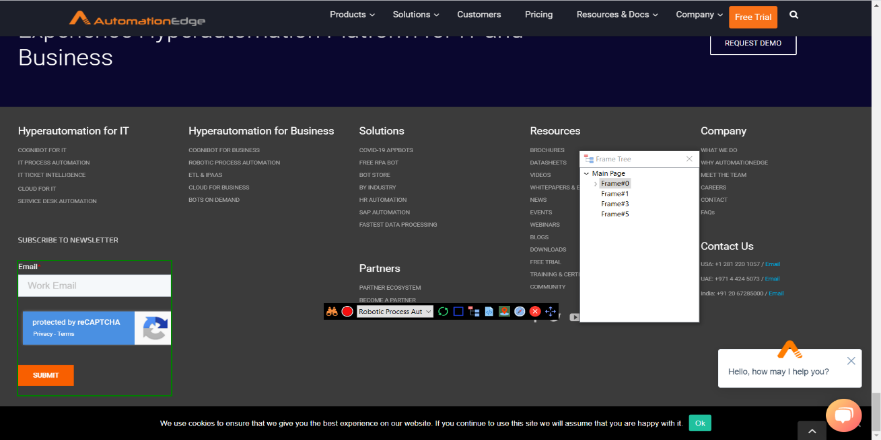 Note: If you switch to frame, spying on that will start automatically. To be able to spy on rest of the document select Main page from tree; you additionally need to manually add the Web Switch Frame step with the Locate By Default option. As soon as you select another frame spying from first frame stops. |
| Get Source | Download the source code of the current page using the Source icon on the Web Spy [Classic] toolbar. Click the Get Source icon on Web Spy [Classic]. |
| Locate Element | Locate Element locates an element on the web page based on an element attribute value. |
| Navigate to URL | While spying element on a web page, if there is a need to navigate to another URL, use the Navigate to URL icon. |
| Close Web Spy [Classic] | Close the Web Spy [Classic]. |
| Move the toolbar as required. |
Web Spy [Classic]: Limitations and Known Issues Limitations:
- Web Spy [Classic] does not yet support alerts.
- On Linux you need to manually add switch window step as there’s no desktop support.
- If a Link Text element locator contains the “&” sign, it shows it as &, so correct it before locating elements. Known Issues:
- Microsoft Edge browser cannot automate/spy select dropdown elements.
- Inside a frame, on a page, if we click a link that takes us to another page; on the second page, if Web Spy [Classic] does not highlight elements, toggle Web Spy [Classic] and highlight them.