Web GUI [Classic]
Web-GUI [Classic] plugin steps are used for automation of web applications, on Windows and Linux based OS.
Important:
-
AE has deprecated the Web-GUI [Classic] approach and recommends using it only for the following scenarios:
-
Design automation to run in the Internet Explorer browser or IE mode in Microsoft Edge browser.
-
Make changes to the existing (legacy) automations, which have not been migrated to the new approach.
-
-
You cannot create workflows, which have a combination of steps from both, Web-GUI [Classic] and new GUI Automation plugins.
Fix Chrome browser compatibility issue:
If you use Chrome version 137 or later, update the startup scripts for AE-Agent v7.x and Process Studio 7.x. Adding the ignoreDeprecatedExperimentalOptions flag prevents the agent from sending unsupported browser commands, ensuring it functions correctly with newer Chrome versions.
To Update Process Studio
- Open the process-studio.bat file.
- Add the WEB_GUI_CUSTOM_FLAG variable to the script. See the following screenshot:
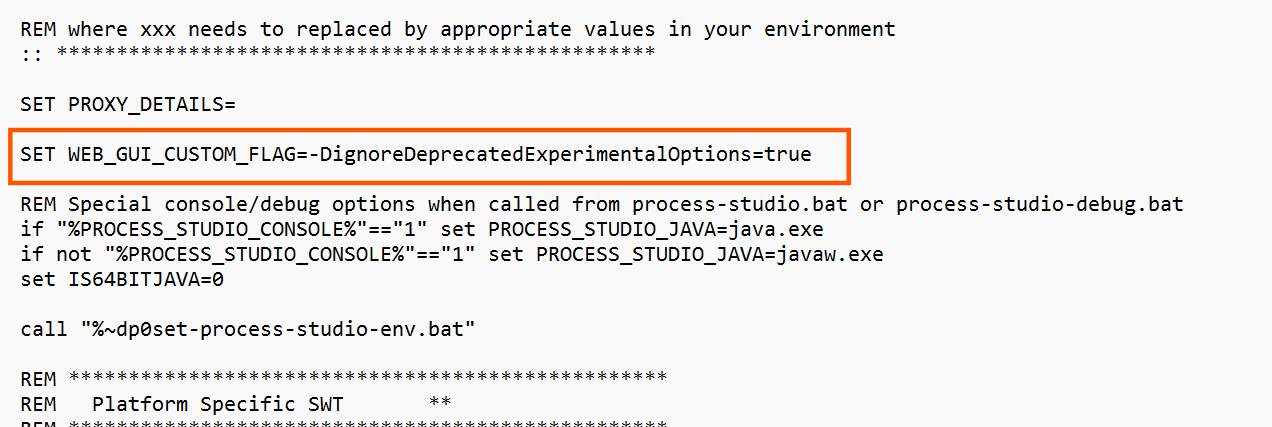
- Update the following in the file:

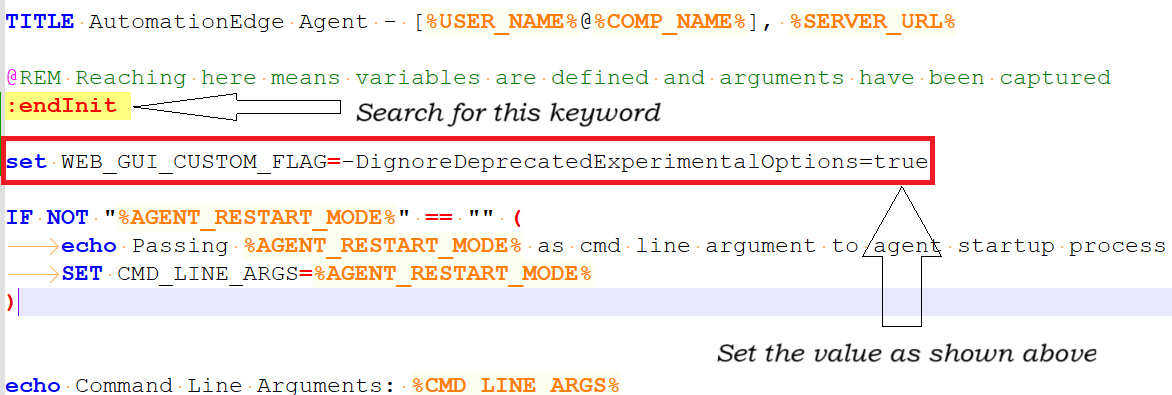
To Update AE-Agent:
Step 1:
For AE-Agent, update the flag in startup.bat file as follows:
- Open the startup.bat file.
- Search for the :endInit
- Set the custom flag by adding the following line
set WEB_GUI_CUSTOM_FLAG=-DignoreDeprecatedExperimentalOptions=true
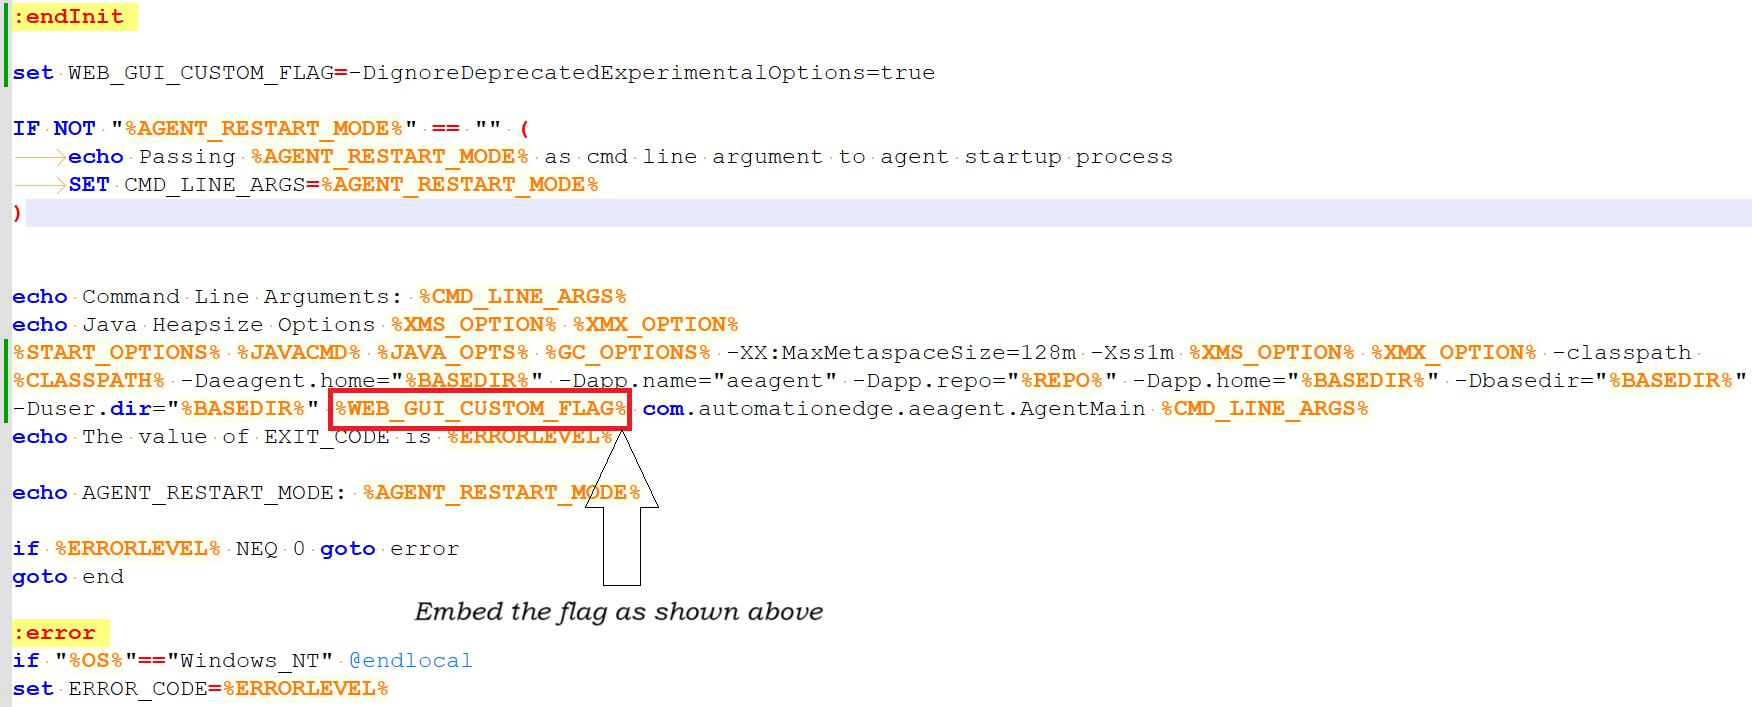
Step 2:
Embed the flag into the configuration sequence. See following image:
OR
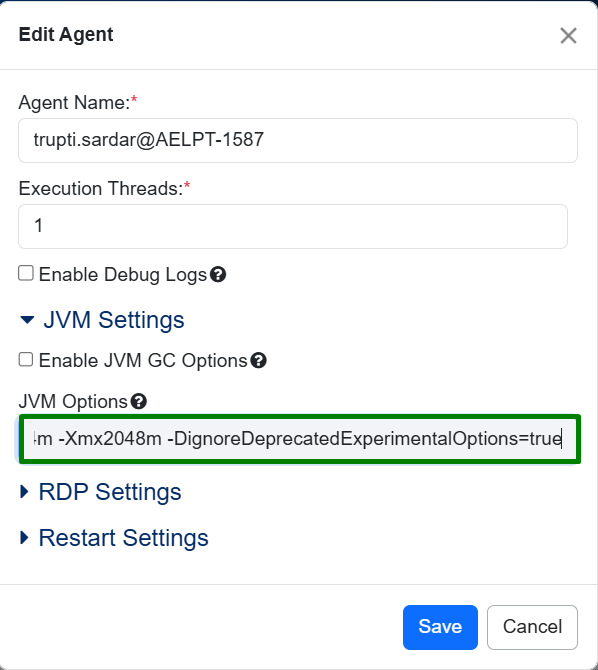
As a Tenant Admin, you can also set the flag, -DignoreDeprecatedExperimentalOptions=true directly through the Agent Settings option in the AE UI. For details, see section To view the agent details -> Edit agent field details in the AutomationEdge User's Guide.
Supported browsers:
The following browser versions are supported for Web-GUI [Classic] / Web Spy [Classic] in Release 4.5.
| Browser Support | OS | Chrome* | Firefox | IE | Microsoft Edge |
|---|---|---|---|---|---|
| Release 4.5 | Windows | 110 and above | 110 and above | 11 | 110 and above |
| Linux | 110 and above | 110 and above | - | - |
Driver Configuration:
Download the required Chrome and IE drivers from the EPD site. Administrators must upload these drivers to the AutomationEdge Server by navigating to File Management > Files.
Recommendation:
If Internet Explorer runs slowly on a 64-bit system, use the 32-bit browser IE mode to improve performance.
Configure the Chrome driver
To update the browser drivers for the Web-GUI [Classic] plugin, upload the required files directly through the AutomationEdge UI:
- Navigate to Plugin Management in the AutomationEdge UI.
- Upload the latest browser driver ZIP file (for example, CHROME<VERSION>.zip). Uploading the file automatically makes the driver available for the Agent.
- If you use Process Studio, sync your plugins to make the new driver available for automation.
Note: For detailed instructions on handling file uploads, see the File Management section in the AutomationEdge System Administrator Guide.
Web Spy [Classic]
Use Web Spy [Classic] to open a web application on selected web browser. Using Web spy [classic] toolbar, you can build a workflow with Web-GUI [Classic] plugin steps for web applications. For more information on tool icons, see section Appendix: Web Spy [Classic] > Web Spy [Classic] toolbar.
To open go to, Process Studio Toolbar > Tools > Spy > Web Spy [Classic], Web Spy [Classic] pop-up window opens.
![Navigate to Web Spy [Classic]](/plugins/gui/4.5/assets/images/webspy_navigate-d4c34c2de3bdbb8d8178343c719f7122.png)
How to Use
- Select required Browser from the list. Supported browsers are - Google Chrome, IE Mode 32-bit, IE Mode 64-bit, Internet Explorer, Microsoft Edge and Mozilla Firefox
- Enter URL of web application to spy and perform actions.
- Specify Profile directory path to save all the directories and click Go.
![Web Spy [Classic] dialog](/plugins/gui/4.5/assets/images/webspy_dialog-e93fdd4ce486c6539646cfdb93688e6d.png)
References:
The working of the Recorder feature of Web-Spy [Classic] and GUI Spy is the same. To understand how to work with the feature, see Project 8 in the AutomationEdge_R7.7.3_ProcesStudio_Activity_Guide.
Ensure that the Path system environment variable includes %SystemRoot%\System32\Wbem. If this path is missing, add it to the variable.
Common Buttons: The following actions are common across all steps:
Help : Click to see the Plugin description and configuration details.
OK : Click to accept configurations.
Cancel : Click to discard configurations.