Work with workflows and processes
A project consists of workflows and / or processes, and resources, such as input and output files. There are logical containers, such as Workflows and Processes, which hold the workflow and process, and Resources, which hold files, such as .xlsx, .xls, .xlm, and so on and sub-folders.
The chapter consists of the following topics:
Basic concepts of a workflow and process
Understand the concept of a workflow and process and their components, such as steps, entries, and hops.
Workflow
A workflow is a logical flow of steps that enable you to perform an end-to-end business flow or task, such as:
-
Data flow
-
RPA -- Web GUI, Desktop, and Surface Automation
-
IT Process Automation
-
Machine Learning
-
OCR -- integration with OCR tools with out-of-box plugins or customized integration with Execute a Process plugin.
The two components of the workflow are steps and hops. The workflow is saved with an extension .psw.
- Steps
Steps are the building blocks of a workflow. For example, if an input from an excel file needs to be added to a database, you can use the following steps, excel file input step, and table output step. Each step performs a specific task, such as reading data from a flat file, filtering rows, and updating the database table. Configure steps to perform the tasks as required.
All steps are started and run in parallel.
You can group the steps in following ways:
- Based on function, such as Input, Output, Scripting, and so on.
OR
- Based on the target system, such as MSSQL, Active Directory, Solar Winds, Microsoft Azure, and so on.
 To access the toolbar hover over the step.
| Tool | Description |
|---|---|
 | A step dragged-and-dropped from the Design tab on to the canvas. |
| Input hop, connects an input step to the next step in the workflow. | |
| Enter or modify the description of the step. | |
| Modify input step details. | |
| Open contextual menu. | |
| Output hop, connects a step to the output | |
| Displays a message about metadata injection compatibility. NOTE: The tool is available in certain steps. |
The  is also available for entries in a process.
- Hops (
 )
)
Hops connect the steps or entries in a workflow or process, respectively. A hop is represented as an arrow. Hops determine the direction and flow of data through the steps or entries, and act as conduits for data flow. You can connect the steps or entries using the hop in following ways:
-
Select the step or entry, and hover over it. In the toolbar, select
 and drag it to the next step or entry.
 -
Select the step or entry and press SHIFT, and then drag the mouse to draw the hop to the next step or entry.
-
Select two steps or entries using CTRL | left-click, and then open the contextual menu,
 . Select New Hop and join the two steps or entries.
 -
Select a step or entry in the workflow that you want to connect to another step entry, and then double-click on a step or entry in the Design tab. The step or entry appears on the canvas with a hop connected to the already selected step or entry.
To split a hop, insert a new step or entry between already connected step or entry. A message asking you to confirm that you want to split the hop appears. Select Yes.
- Select a hop, and you can also perform the following actions on it:
- Edit: Edit a hop |
- Disable: Disable a hop
- Delete: Delete a hop
- Flip Direction: Flip direction of a hop
- Hop Bulk Change: Enable bulk changes to hops, such as:
- Enable Between Selected Steps or Entries
- Disable Between Selected Steps or Entries
- Enable Downstream
- Disable Downstream
- Flip Direction: Change the direction of the hop.
- Evaluation: Evaluate if the flow of information needs to be:
- Unconditional (
 ): Executes the next process entry regardless of the result of the originating process entry
 - Follow When Result is True (
 ): Executes the next process entry if the result of the originating process entry is true.
 - Follow When Result is False (
 ): Executes the next process entry if the result of the originating process entry is false.
The Evaluation option is available for process entry only.
): Executes the next process entry if the result of the originating process entry is false.
The Evaluation option is available for process entry only.
- Unconditional (
Process
Processes are workflow-like models for coordinating resources, execution, and dependencies of IT or business process activities. The process is primary building blocks of an IT or business activity, and consists of process entries, such as Start and Get files via FTP, hops, and properties. Process properties contain the settings that control the behavior of a process and the method of logging its actions. The process is saved with an extension .psp.
Create a workflow or process
The section explains the steps to create a workflow or process.
- If you have multiple workflows and / or process tabs open in the canvas, you can shuffle the tabs, by dragging-and-dropping the tab to the required position in the canvas.
- For more information on steps, see AutomationEdge Plugins reference guide.
Create a workflow
The section explains the steps to create a workflow.
To create a new workflow:
-
In Process Studio, click File and select New. The sub-menu appears.
noteYou can also create a new workflow in the following ways:
- Select CTRL | N to create new workflow.
- On the toolbar, click
 and select Workflow.
 - In the Project Explorer, select the project and right-click on it. Select Workflow from the contextual menu.

-
Select Workflow. The Save As dialog appears.
-
Enter the name of the workflow and click OK. The workflow is listed under the selected project in the Project Explorer, and a tab displaying the empty canvas appears.
-
Select the Design tab and choose the step that you want to add to your workflow.
tipYou can search for steps through the Steps search box.
-
Drag-and-drop the selected step(s) on the canvas and connect them with hops. Select CTRL+S to save the workflow changes.
noteOn the toolbar, click
 to save the workflow.
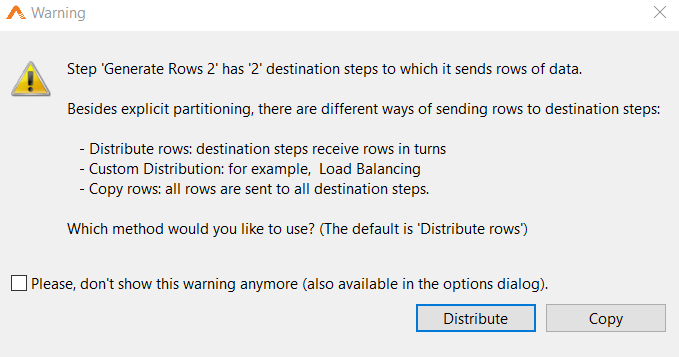
A warning appears if you try to create a workflow having mixed layouts, that is, input steps with varying data types or varying number of fields. The mixed layout will cause steps to fail because fields are not received as expected or the data type changes unexpectedly.
If a step sends outputs to more than one step, the data can be copied to each step or distributed among them.
to save the workflow.
A warning appears if you try to create a workflow having mixed layouts, that is, input steps with varying data types or varying number of fields. The mixed layout will cause steps to fail because fields are not received as expected or the data type changes unexpectedly.
If a step sends outputs to more than one step, the data can be copied to each step or distributed among them.
-
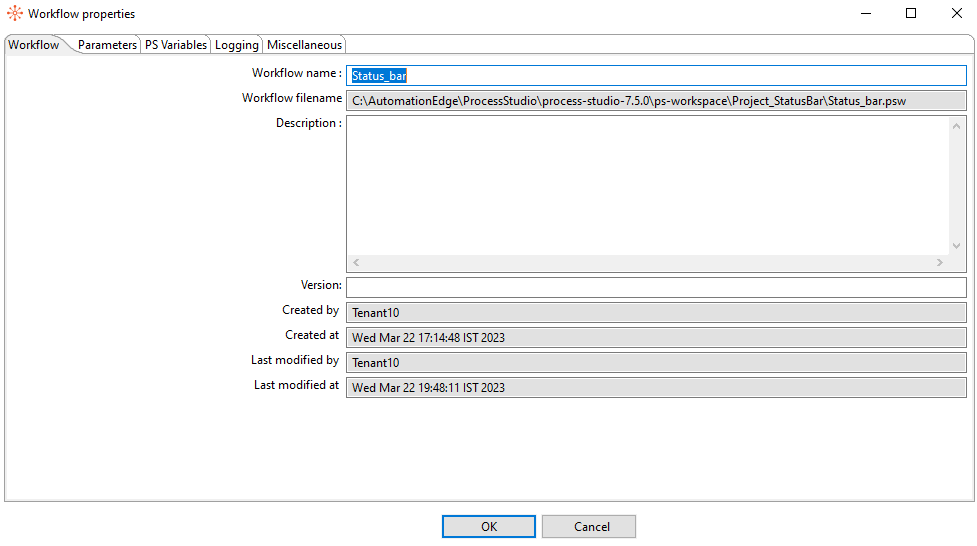
Right-click on the canvas and select Properties or select CTRL+T. The Workflow properties dialog appears.
 note
noteYou can also open the Workflow properties dialog through Edit 🡪 Settings... or double-click anywhere in the canvas.
-
Specify the required details in the following tabs: Workflow, Parameters, PS Variables, Logging, and Miscellaneous.
Field Description Workflow Workflow name Enter a new name of the workflow.
NOTE:
If you modify the name of an existing workflow, then the name is also updated in the Project Explorer.Workflow filename Displays the path of the workflow. Description Enter a description of the workflow. Version Enter a version number. Created by Displays the name of the user who created the workflow. Created at Displays the date and time of workflow creation. Last modified by Displays the name of the user who last modified the workflow. Last modified on Displays the last workflow modification date and time. Parameters Parameter Enter a name for the runtime parameter. Description Enter a description of the parameter. Type Select the data type from the list. UI Control Select the user interface control from the list. The UI control displayed depends on the data type selected.
For example, if the data type is Boolean, then checkbox is the available UI control.Runtime Select true to confirm that runtime parameters are passed. Secret Select true if you want to provide parameter value dynamically during execution at runtime. Optional Select true if you want the parameter to be optional in workflow execution. List of Values Displays the list of values set for the selected data type and UI control, set through List Of Values dialog.
NOTES: You can set the values for the following data type and UI control only:
- File 🡪 Text Box: Set file types, such as .csv, .xls, .xlsx and so on.
- List 🡪 Combo Box: Specify a list of values.
- List 🡪 Radio Buttons: Specify the list of labels of the radio buttons. You cannot specify more than five values if you select the option.
- List 🡪 Single Selection List: Specify the list of values.
- List 🡪 Multiple Selection List: Specify the list of values.Default Value Provide a default value for the parameter; the workflow uses the default value at runtime while running in the Process Studio.
NOTE: Select Type as Credential, and then click the Default Value field, to open the Credential Values dialog.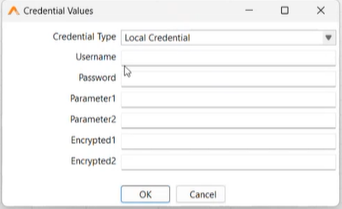
The Credential Type list contains the list of all AE server credentials. However, the default value is the current credential.
IMPORTANT:
- For all AE server credentials to be available in the list, ensure that you sync the cred entials.
- If you select an AE server credential, then the other fields in the dialog are read-only.
- If the AE server credential is deleted from the server or the permission is revoked for the tenant, then you will see a notification.Parameter Configuration (  )
)Order and group the parameters to be viewed during request submission.
The option is available only in the main workflow or process and is applicable only for runtime parameters.
NOTES: The settings you configure in Process Studio will appear in the AE UI in the following two menus:
- Catalogue 🡪 Submit Request
- Schedules
When you click , the Parameter Configuration dialog appears. It displays the list of parameters entered in the Workflow properties dialog. You can view the toolbar  in the dialog.
i. Select to add a new group. In the Add Parameter Group dialog, enter the name of the group.
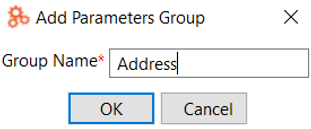
ii. Select the parameters to drag-and-drop to the group. You can create nested groups up to three levels.
iii. Right-click on the group name, the contextual menu appears. Select Rename or F2 or to rename the group and Delete or DEL or
  to delete the group.
iv. To expand or collapse the groups, select or
or  respectively on the toolbar.
If you want to view a single column layout of parameters in AE UI, select the Single Column Layout checkbox. The view in AE UI appears as follows:
Else, clear the checkbox to have a double column layout.
You can also group the parameters, if required. The view in AE UI appears as follows:
PS Variables Name Enter the name of the variable. Description Enter a short description of the variable. Scope Choose if the variable will be Local or Global. Default Value Enter a default value. Logging NOTE: Logging is enabled only if the selected workflow is the main workflow. Connection Select the database connection you are using for logging OR click New to configure a new connection. Log table schema Specify the schema name, if supported by your database. Else, leave blank to take default schema name. Log table name Displays the name of the log table. The data field is read-only.
NOTE: For the workflow or process metrics data, table name is Workflow_Process_Log and for the step metrics data, table name is Step_Entry_Log.Purge older records (in days) Specify the number of days for which the old log entries in the table will be kept before they are deleted. Logging interval (seconds) Specify the interval in which logs are written to the database.
NOTE: Logging interval is not available for step log table.Log size limit in lines Specify the number of lines that are stored in the LOG_FIELD (when selected under Fields to Log).
NOTES:
- The step log table stores Enable the LOG_FIELD The logging details in a long text field (CLOB) is stored When the LOG_FIELD is enabled, it will store the logging details in a long text field (CLOB).
- Logging interval is not available for step log table.In the Logging tab, the following two options are available in the left pane: Workflow and Step. Select either Workflow or Step, and view the list of fields and their description, respectively. The fields listed for Workflow or Step are available to log step metrics data.
Click Create Table and create a new database table, such as Workflow_Process_Log_Table and Step_Entry_Log_Table.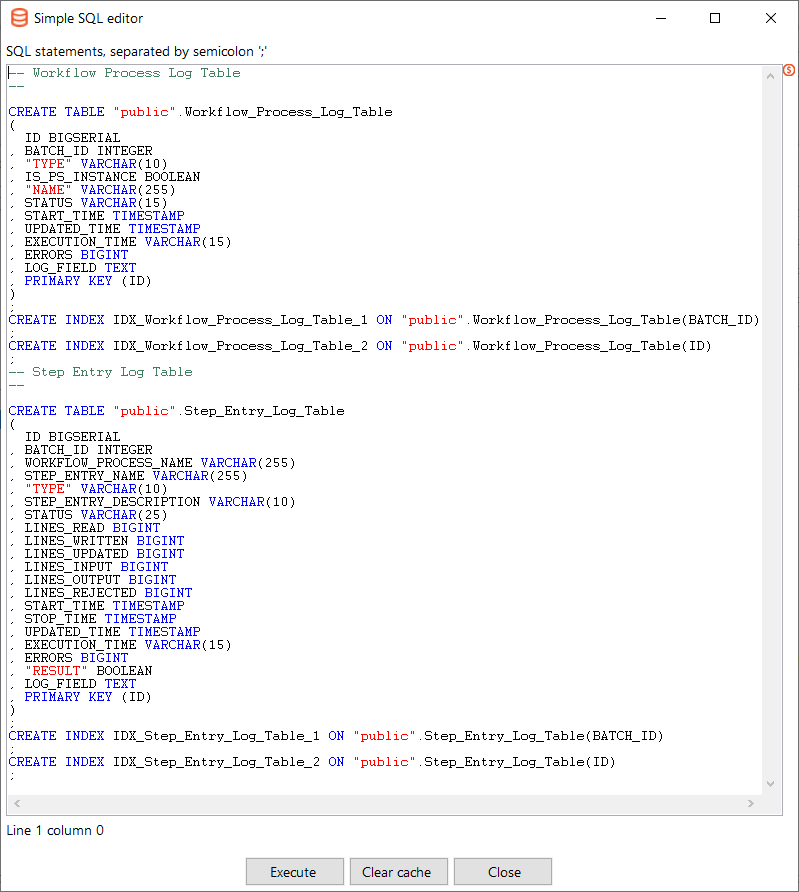
In the result window, click Execute. The tables are created.
NOTE: Creation of the tables is a one-time activity.Miscellaneous NOTE: This tab is available in the Workflow properties dialog only. Nr of rows in rowset Enter the size of the buffers between the connected steps in a workflow.
NOTE: Avoid changing this parameter unless running low on memory.Show a feedback row in workflow steps? Select the checkbox to add a feedback entry into the log file while the workflow is running. It is enabled and configured to display a feedback record every 5000 rows by default. Feedback size Enter the number of rows to process before entering a feedback entry into the log. Set this higher when processing large amounts of data to reduce the log file information amount. Make the workflow database transactional Select the checkbox to make the workflow database transactional. Transaction data always has a time dimension, a workflow ID, and refers to one or more objects, such as reference data like workflow configuration ID. -
After the workflow configuration is complete, run it in the following ways:
- Click Action and select Run or F9 to run the workflow.
OR
- Click
 , and select Run or F9 to run the workflow.
note- To debug a workflow, click
 on the toolbar and select the appropriate option.
 - To view the execution result pane, select View 🡪 Execution Results or click
 on the toolbar.
Create a process
The section explains the steps to create a process.
For more information on entries, see AE Plugins reference guide.
To create a process:
-
Click File, select New and then select Process. The Save As dialog appears.
noteYou can also create a new process in the following ways:
- Select CTRL+ALT+N to create new process.
- On the toolbar, click and select Process.
- In the Project Explorer, select the project and right-click on it. Select Process from the contextual menu.
-
Save the process. A tab displaying the empty canvas appears.
-
Select the Design tab and choose the entry that you want to add to your process.
noteYou can search for entries through the Entries search box.
-
Drag-and-drop the required entries on the canvas and connect them with hops. Select CTRL+S to save the process changes.
noteOn the toolbar, click
to save the process. -
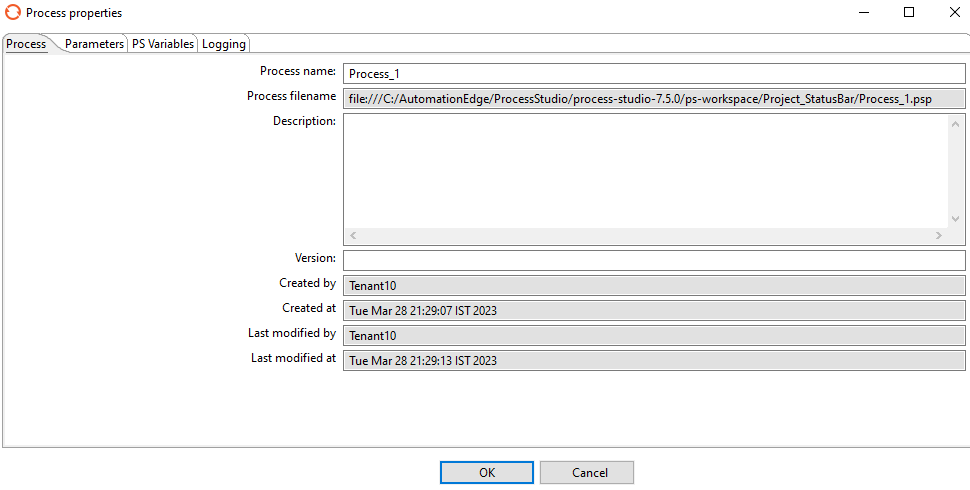
Right-click on the canvas and select Properties or select CTRL+T. The Process properties dialog appears.
 note
noteYou can also open the Process properties dialog through Edit 🡪 Settings... or double-click anywhere in the canvas.
-
Specify the required details in the following tabs: Process, Parameters, PS Variables, and Logging.
Field Description Process Process name Enter a new name of the process.
NOTE: If you modify the name of an existing process, then the name is also updated in the Project Explorer.Process filename Displays the path of the process. Description Enter a description of the process. Version Enter a version number. Created by Displays the name of the user who created the process. Created at Displays the date and time of process creation. Last modified by Displays the name of the user who last modified the process. Last modified at Displays the last process modification date and time. noteFor details about the Parameters, PS Variables, and Logging tabs, see Create a workflow.
-
After the process configuration is complete, run it in the following ways:
- Click Action and select Run or F9 to run the process.
OR
- Click , and select Run or F9 to run the process.
noteTo view the execution result pane, select View 🡪 Execution Results or click
on the toolbar.
Dynamic user input
There are various ways to capture following dynamic user inputs:
-
Variables (user defined)
-
Internal variables
-
Parameters
-
PS variables
The following table compares the different dynamic user inputs used in the Process Studio.
| Description | Define | Scope | Usability | |
|---|---|---|---|---|
| Variables (user defined) | Variables serve as placeholders for storing dynamically and programmatically supplied user values. | Defined in Set Variable/Get Variable. Modified Java Script. | • JVM that Process Studio is running in • Root Process and Workflow • Grand-parent Process and Workflow • Parent Process and Workflow | Use Variables as per the scope defined. Get Variable cannot be used in the same workflow where Set variable was used to define the variable. |
| PS variables | Variables serve as placeholders for storing dynamically and programmatically supplied user values. | In Workflow and Process Properties and defined in Set PS Variable and Get PS Variable values. | Variables are available in the same workflow or throughout the parent/root process's lifecycle as per the scope specified. | Use PS Variables as per scope defined. Get PS Variable can be used in the same workflow where Set PS variable was used to define the variable. |
| Internal variables | Variables serve as placeholders for Process Studio internal and external environment. | Pre-defined | These are Process Studio internal variables or Environment Variable | These are usable across Process Studio. |
| Parameters | Parameters are like local variables, provide dynamic inputs for workflows/processes, and can be assigned a default value. | In Workflow and Process Properties | Define parameters at workflow and process level | These are usable for parent-child workflows. |
Create a folder
The section explains the steps to create a folder.
To create a folder:
-
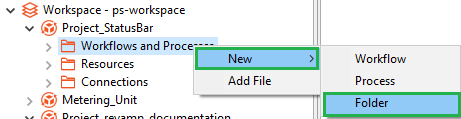
Under project, select Workflow and Processes and right-click. The contextual menu appears.
-
Select Folder, the Create Folder dialog appears.
-
Enter the name of the folder and click Create. The folder is created under the selected project.
note- Select the new folder and right-click on it. The contextual menu appears.
- If there is an existing folder the Delete option is also available in the contextual menu.
- You can also select Resources, and then select New Folder to create a new folder.
- Select the new folder and right-click on it. The contextual menu appears.
Add a file
The section explains the steps to add a file.
To add a file:
- Select Resources and right-click on it. The contextual appears.
- Select Add File. The Open dialog appears.
- Select the file you want to add to the project. The file is added to the Resources container.
Error handling
For simple workflows, it is a good practice to set an error-handling step for steps in the workflow. You can set custom error message for each step, if required. Adding a custom message allows you to perform error handling through a single step for steps that have error handling support.
Access the Set Custom Error Message and Error Handling… step through the contextual menu.
To add custom error message:
-
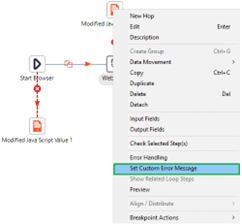
On the canvas, select and right-click the step to which you want to add the custom error message. The contextual menu appears.
-
In the contextual menu, select Set Custom Error Message. The custom error message dialog appears.

-
Enter the error message you want and click OK. The message is set for the step.
note- For simple workflows, it is a good practice to set an error-handling step for steps in the workflow. Access the Error Handling... step through the contextual menu.
- For complex workflows, use the Try-Catch
 step to group the steps and capture errors in it. With this step you need not add error-handling step for every step.
Group steps or entries
In case of huge workflows or processes with multiple steps or entries it becomes difficult to keep track or maneuver through the workflows or processes. Therefore, to enable users to work with complex workflow with
ease, Process Studio has the Create Group option. The ![]() icon
represents the grouped steps or entries.
icon
represents the grouped steps or entries.
Limitations
-
It may not be possible to copy-paste the group, if it contains, try-catch or looping steps.
-
Multi-level grouping is not supported.
To create a group:
-
In the workflow, select the steps that you want to group and right click on them. The contextual menu appears.
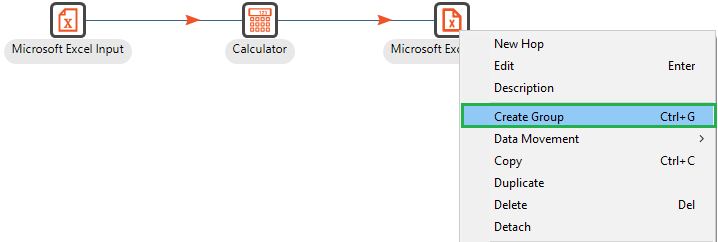
-
Select Create Group. The Group dialog appears.

-
Enter a name for the group, and then click OK. The selected steps are grouped together and a new group icon replaces them on the canvas.
 note
noteThe group appears in the View pane as follows:

To edit a group:
-
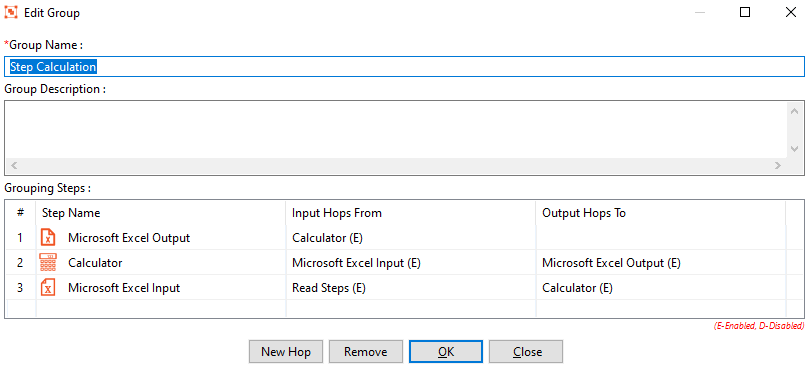
On the canvas, double-click the group icon. The Edit Group dialog appears.
-
Modify the field details.
Field Description Group Name* Modify the name of the group. Group Description Modify the description of the group. Grouping Steps Provides a list of steps grouped together.
Right-click on each step and check the menu options available.* indicates a mandatory field.
-
In the dialog, click New Hop to reset the existing hops.
-
To remove a step from the group, select a step and click Remove. The step is removed from the group but is not deleted from the workflow.

 note
note- Select the group and right-click on it. In the contextual menu:
- Select Ungroup to remove the grouping and view the steps and entries.
- Select View Group to view the group steps.
- Select Edit to modify the group details.
- Select Copy to copy the group.
- Select Delete to delete the group. Deleting the group will also delete the steps, entries, and hops in the group.

Set as main file
You can directly set a workflow or process as the main file without editing the project details.
To set as main file:
- In the Project Explorer, select the workflow or process in the project and right-click. The contextual menu appears.
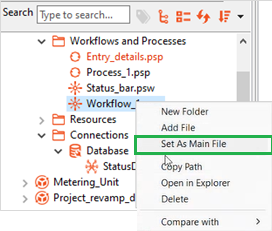
-
In the contextual menu, click Set As Main File. The main file color changes to red.
