Appendix: GUI Spy toolbar
GUI Spy toolbar is compact and occupies a minimum screen area to spy on a web page with ease. Upon spying, it opens the Generate Step dialog with two sections - Attributes and Step Generation for the web or java or Windows; make configuration changes if required and generate steps.
 OR
OR 
Shortcut/Hot Keys/Tool icons
GUI Spy detects all web, java, or Window elements. The following are the available shortcut keys:
| Shortcut Keys / Tools | Description |
|---|---|
| Ctrl + Alt + W | Press to open GUI Spy pop-up window. Notice the background of the lens, which is orange and signifies that the Web Spy [Classic] is not in active mode. |
| Spy | Click |
| Spying | When enabled, a blue border appears around a web element as you hover over it. Press Right Shift or the backtick (`) key to open the Generate Step dialog with the element details. Update the configuration if needed, then select the Type, Action, and Criteria, and click Generate to add the step to the workflow. |
| Record | Click Record to record actions you performed on web application. Once you start the recording, it understands the mouse and the key actions. It considers every element as windows by default until there is a preference for detecting web application while recording. The Recorder captures the following actions. - Click: The recorder automatically detects click type on an actionable element. - Set/Write a value: Recorder generates the set value step if a user, - Types in a text field OR - Performs keyboard action ctrl +v on the text field - Read/Get value: To read the value of a particular element, hover the mouse on that element and press Ctrl + C. |
| Stop | Click to stop the recording. A Save Recorded Step popup appears with the following two options: - Generate Workflow- Click to generate the workflow with the recorded steps. - 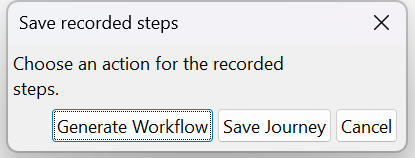 Save Journey- Click to save the journey in a selected directory (for example, D:\UserGuide). This saves the files in .json format. Open the saved .json file and verify that it contains all possible XPaths for each recorded element. The browser extension automatically captures all possible XPaths for an element and includes them in the journey file. |
| Click to highlight the selection and resume spying. On a browser, specifically IE, if the page is changed by some actions the highlighting stops. Therefore, to resume spying, click the highlight icon on toolbar to start highlighting the elements again and continue spying. | |
| Download the source code of the current page using Save HTML. | |
| While spying element on a web page, if there is a need to navigate to another URL, use the Navigate to URL icon. | |
| Click to close the GUI Spy. |