Manage a project
Manage a project using various options available in the Process Studio. The Process Studio allows you to compare your projects, run or debug or verify a project. In addition, you can also edit the project and view the unit consumption detail.
To manage a project, it must have workflows and / or processes. For more details on workflow and process, see Work with workflows and processes.
You can manage a project in the following ways:
- Compare project with…
- Edit a project
- Metering Units
- Run or debug or verify a project
- Inspect Project
- Additional actions to manage a project
Compare a project with...
You can compare the current project with any server workflow or a local project or a shared workflow and view the differences between the two versions. The differences can occur at project or workflow or process or resource level.
You can also compare processes using the appropriate menu.
Compare with a server workflow
Use the Server Workflow option if you want to compare the project and workflows on the AutomationEdge server to confirm the files added or removed before publishing or updating a workflow on server.
To compare the project with a server workflow:
-
In the Project Explorer, select the project you want to compare, and right-click on it. The contextual menu appears.
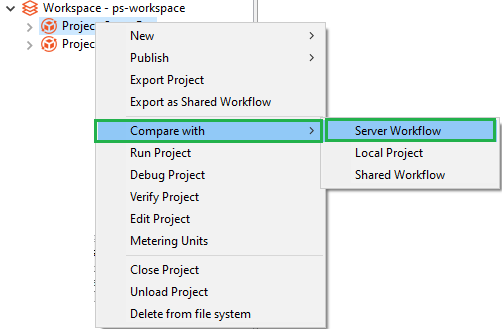
Compare with Server Workflow contextual menu
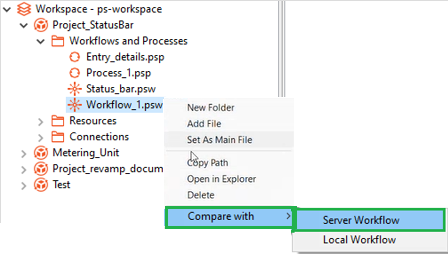
NoteYou can also compare the workflows at the workflow-level.
-
Select Compare with, and then select Server Workflow. The Select Workflow dialog appears.

Select Workflow dialog
-
In Workflow, select the server workflow, and then click Select. The Project Difference dialog appears.
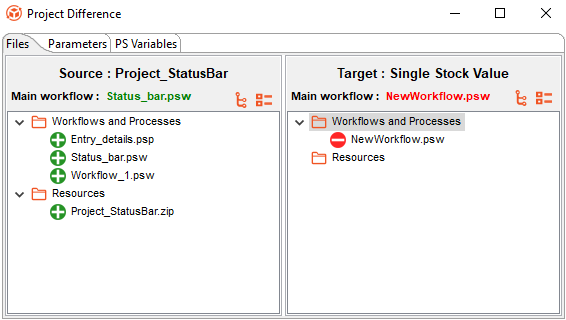
Project Difference dialog
The project from the Process Studio appears in the Source pane and projects from the AutomationEdge server or the selected local project appear in the Target pane.
-
 : Indicates newly added files.
 -
 : Indicates removed or deleted files.
 -
 : Indicates that the workflow or process or files with differences are available in both source and target projects. However, if the workflow or process or files with no differences, then the icon appears greyed out.
-
-
The Project Difference dialog has three tabs: Files, Parameters, and PS Variables.
-
Files tab: Lists the various workflows and processes, and other resource files available in the projects.
-
Parameters tab: Displays the configuration and runtime parameters of the main workflow or process. You will see the configuration and runtime parameters only if the main file is same in the source and target projects.
-
The Configuration Parameters and Runtime Parameters listed are:
-
Parameter
-
Display Name
-
Type
-
Secret
-
Optional (seen only in the Runtime Parameters)
-
-
PS Variables tab: Displays the Process Studio variables of the main workflow or process. You will see the Process Studio variables only if the main file is the same in the source and target projects.
-
The PS variables listed are:
-
Name
-
Description
-
Scope
-
Default Value
-
-
- Click Expand All to expand the project view.
- Click Collapse All to close the expanded project view.
If you click the workflow in the Source project pane, click View Diff in the contextual menu. The Workflow Difference dialog appears.
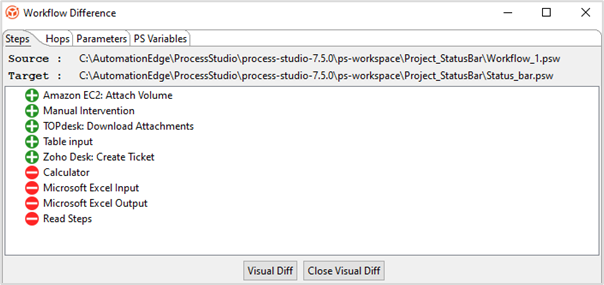
Workflow Difference dialog
- Steps: The tab lists the steps added or deleted or common in the two workflows.
- Hops: The tab lists the step connectivity added or deleted or common in the two workflows.
- Parameters: The tab lists the parameters added or deleted or common in the two workflows. You will see the configuration and runtime parameters only if the main file is same in the source and target projects.
- PS Variables: The tab lists the Process Studio variables added or deleted or common in the two workflows. You will see the Process Studio variables only if the main file is the same in the source and target projects.
- Click View Diff to open the target workflow, Status_bar.psw, in the canvas.
- Click Close Visual Diff to close the open workflow.
Compare with a local project
Use the Local Project option if you want to compare the project with another local project.
To compare the project with a local project:
-
In the Project Explorer, select the project you want to compare, and right-click on it. The contextual menu appears.
-
Select Compare with, and then select Local Project. The Select Project dialog appears.

Select Project dialog
-
In Project, select the local project, and then click Select. The Project Difference dialog appears.
NoteFor the Project Difference dialog details, see Server Workflow.
Compare with a shared workflow
Use the Shared Workflow option if you want to compare the project with a shared workflow.
To compare the project with a shared workflow:
-
In the Project Explorer, select the project you want to compare, and right-click on it. The contextual menu appears.
-
Select Compare with, and then select Server Workflow. The Select Workflow dialog appears.
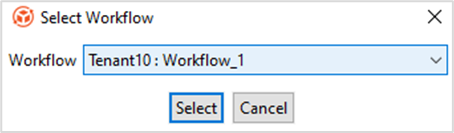
Select Shared Workflow dialog
-
In Workflow, select the shared workflow, and then click Select. The Project Difference dialog appears.
NoteFor the Project Difference dialog details, see Server Workflow.
Delete a project
You can delete a project and supporting resources permanently from the file system.
To delete a project:
- In the Project Explorer, select the project that you want to delete, and right-click on it. The contextual menu appears.
- Select Delete from file system, a confirmation dialog appears. Click Yes to delete the project folder and supporting resources permanently from the file system.
Edit a project
You can modify a project that you created or imported to your workspace.
Modify the project details through the Process Studio only.
To edit a project:
-
In the Project Explorer, select the project you want to edit, and right-click on it. The contextual menu appears.
-
Select Edit Project. The Edit Project dialog appears.
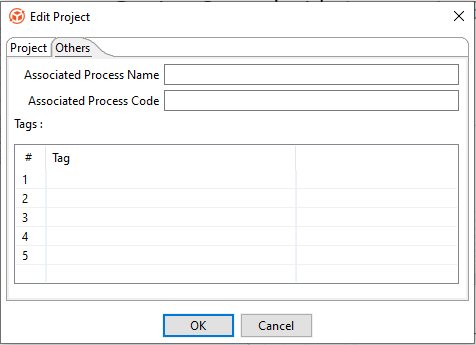
Edit Project dialog
-
In the Project tab, modify the project details and select the main workflow or process for the project.
NoteIt is recommended not to modify the name of the project after it is created in a workspace, as the change can render the project unusable.
-
In the Others tab, specify the following field details:
Field Description Associated Process Name Specify the name of the process that you want to associate with the project.
After publishing the workflow successfully, you can see the associated process name in the Update Workflow page in AE server. For more information, see the Workflows 🡪 Workflow List section in the AutomationEdge User’s guide.Associated Process Code Specify a process code based on which the user must name the step or entry in the workflow or process.
For more information on how to configure a process code rule, see the Workflows 🡪 Inspection section in the AutomationEdge User’s guide.Tags table NOTES:
- You can specify a maximum of five tags.
- Tags can contain alphanumeric characters, hyphens, and underscore. However, spaces in tag names are not supported.
For example:
Supported tag name: google-1.
Unsupported tag name: google 1.
- The tags added through the Process Studio are at project level and are available in the AE server after the workflow is published.
Important:
Tags on the AE server will not be updated during a workflow update.
Therefore, if you need to modify the tag details, then you can do so through AE server only. The tags are updated at the workflow level. For details, see Work with Workflows in the AutomationEdge User’s guide.
Tags edited directly on the AE server will not be synchronized with the Process Studio project.Tags Specify tags for the project. Providing tags can help with faster search of a project or workflow. -
Click OK. The details are saved.
Metering Units
Use Metering Units to view the units of steps or entries consumed in a workflow or process. You can view the details at the project level or at the workflow or process level.
- Ensure you set the main workflow or process for the project before using the feature.
- The feature is available depending on the type of license you are using.
To view the metering units of a workflow or process:
-
Select the project in the workspace and right-click. The contextual menu appears.
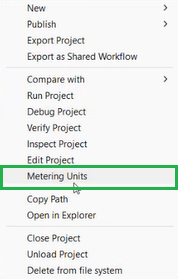
Metering Units contextual menu
-
In the contextual menu, select Metering Units. A pop up, displaying the total units consumed in the main (parent) workflow and all child workflows and / or processes appears.
NoteTo view the units consumed in individual workflows or processes, click
 on the status bar, and select Metering Units from the menu.
Run or debug or verify a project
Run or debug or verify a project to ensure that the workflow or process works as expected.
Debug Project is unavailable for processes.
To run or debug or verify a project:
-
In Process Studio, click Actions, and select Run Project or Debug Project or Verify Project.
-
If you select:
- Run Project or SHIFT + F9 or click
 and select Run project, then you can view the details in the Execution Results section.
OR
- Debug Project, then you can view the details in the pop-up.
OR
- Verify Project, then you can view the stepwise result of a workflow or process.
- Run Project or SHIFT + F9 or click
You can also run a project or debug or verify a project using the contextual menu.
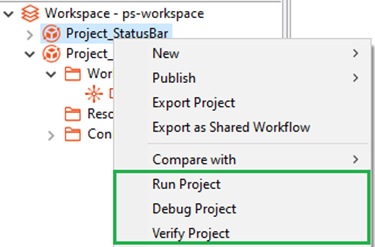
Inspect Project
Use Inspect Project feature to validate if the project or workflow rules configured in the AE server are applied as required. If rules are defined for a project, then you will either see a warning or error icon against the project.
- Sync all inspection rules configured on the AE server to ensure they are available in the Process Studio. To sync the inspection rules, go to Tools 🡪 Sync 🡪 Inspection Rules.
- For more information about configuring rules, see Workflows 🡪 Inspection section in the AutomationEdge User’s Guide.
To view the inspection rule report:
-
Select the project in the workspace and right-click. The contextual menu appears.
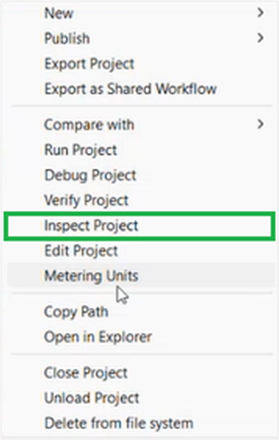
Inspect Project contextual menu
-
In the contextual menu, select Inspect Project. The Inspection Report dialog appears.
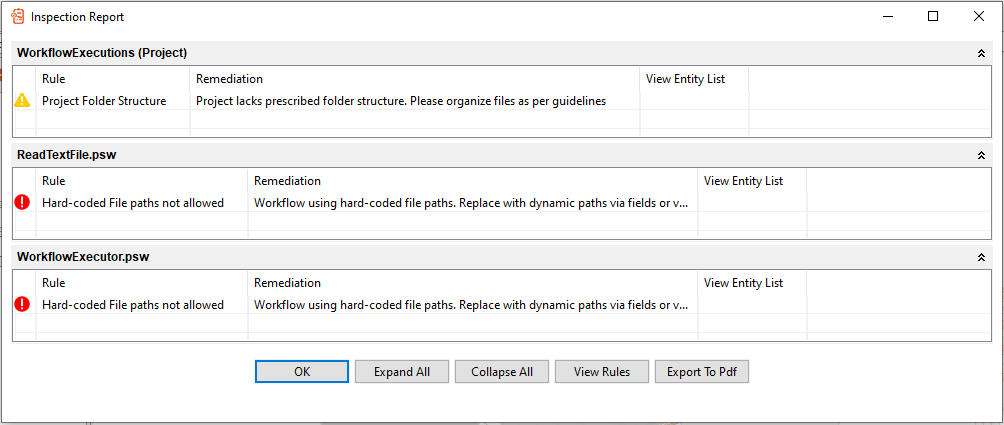
Inspection Report dialog
-
View the following field details:
Field Description Rule Displays the configured workflow rule. Remediation Displays a brief description of the rule. View Entity List Click  to view the list of entities attached with the rule. For more information about the dialog, see the following note on List of Entities:
Additional details about the List of Entities dialog:
The details listed in the List of Entities dialog depend on the configured inspection rule.
For example, if the rule is related to a workflow / step, then you may see the list of steps / entries used in them. See the following screenshot:
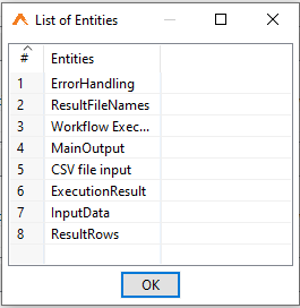
List of Entities dialog – showing steps used in the workflow
If you configure the No unused Workflow/Processes in a project inspection rule on the AE server all orphan (unused) workflows / processes in a project (folders and sub-folders) are listed in the dialog. The list allows you to easily identify and remove the unused workflows / processes if required.
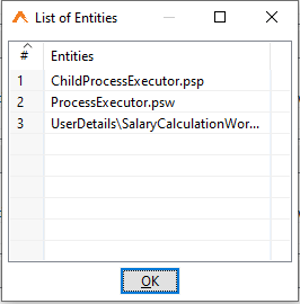
List of Entities dialog – showing orphan workflows / processes in a project
Orphan (unused) workflows / processes are excluded in the workflow publish validation process. Only those workflows / processes that are used in the project are included in the final zip that is published to the AE server.
-
Click OK. The Inspection Report dialog closes.
NoteTo expand or collapse the view, click Expand All or Collapse All, respectively. If there is only one rule, then the option to expand or collapse the view is unavailable. However, you can expand or collapse the view using
 .
.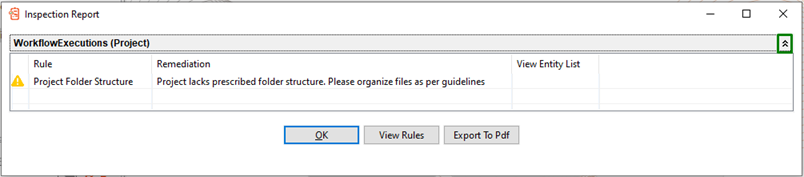
Inspection Report dialog with Expand All and Collapse All options
-
You can perform the following additional activities, if required:
-
Click View Rules. The Workflow Inspection Rules dialog appears.
The dialog displays the rule details, including the description, remediation message, where the rule is applied, the entity, and the definition.
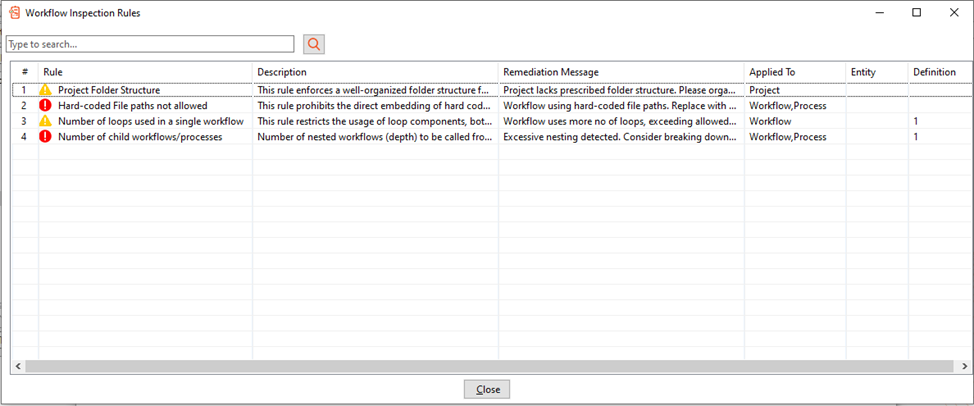
Workflow Inspection Rules dialog
-
Click Export To Pdf. Saves the inspection report as a PDF file on your machine.
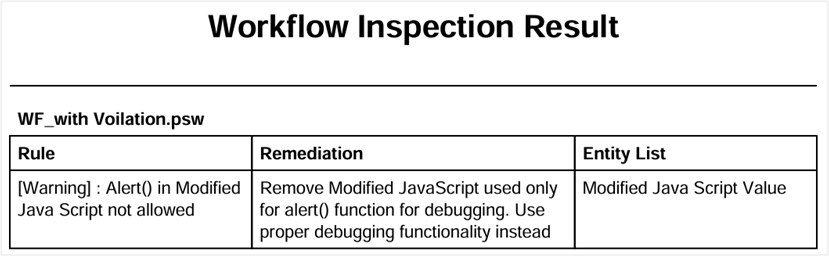
Workflow Inspection Report PDF view
-
If a workflow violates any inspection rule, then you will see either a warning or an error icon against the project. The following screenshot displays the project workflow rules are violated and have errors:
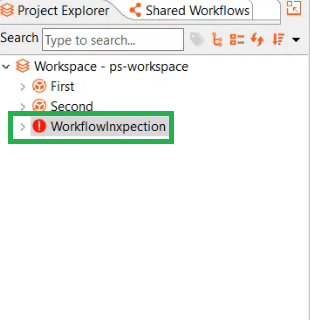
If an inspection rule is violated, you will see either of the following:
 : Indicates a warning. The project is published, but with warnings.
 : Indicates an error. The project is not published. You need to modify and republish the workflow.
For more information about inspection rules, see Workflows 🡪 Inspection in the AutomationEdge User’s Guide.
Additional actions to manage a project
You can perform additional actions on the project, such as copy the path of a folder or file and open in the File explorer, or close or open a project, load or unload a project. In addition, you can sort the list of projects using different options.
You can perform the following actions:
Copy Path
You can copy the path of the workspace, workflow or process, or resource file in the Process Studio, which allows you to easily navigate to the file location in the File explorer.
In the Process Studio's Project Explorer, select the file or folder you want to open in the File explorer, and right-click on the selection. In the contextual menu, click Copy Path. The path is copied, and you can paste the same in the path box in the File explorer. Press Enter and you can view the folder or file.
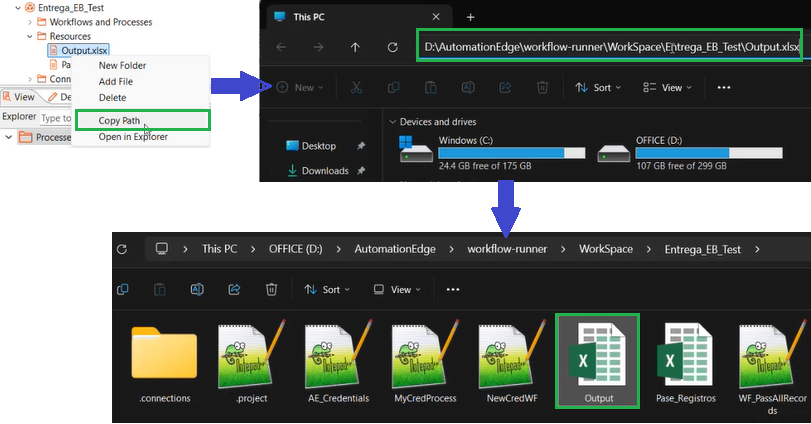
Copy Path in File explorer
Open in Explorer
You can directly open the folder or go to the file in the File explorer using the Open in Explorer option. In the Process Studio’s Project Explorer, select the file or folder you want to open in the File explorer, and right-click on the selection. In the contextual menu, click Open in Explorer. The selected folder or file appears in the File explorer.
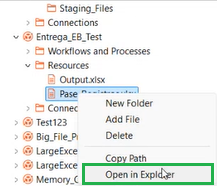
Open in Explorer option
Close or open a project
You can close all open workflows, processes, and files in the selected project through the contextual menu. The closed project appears greyed out in the Project Explorer. On closing the project, you can open it again, using the Open Project menu that appears on selecting the same project again.
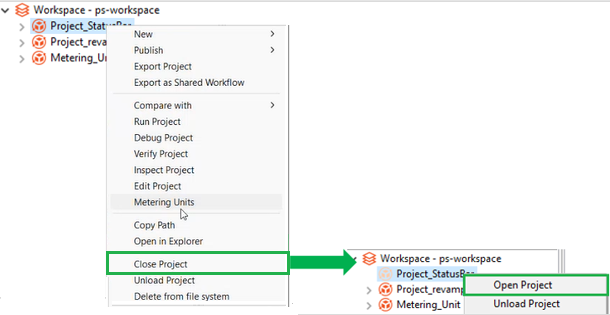
Close or Open Project contextual menu
To open or close multiple projects, right-click on the workspace and select Open Project or Close Project in the contextual menu. The Open Project or Close Project dialog appears. In the dialog, select all or multiple projects to open or close, and then click Open or Close.
For example, the following screenshot shows the Close Project dialog with multiple projects selected. After clicking Close, the selected projects appear faded out in the Process Studio’s Project Explorer.
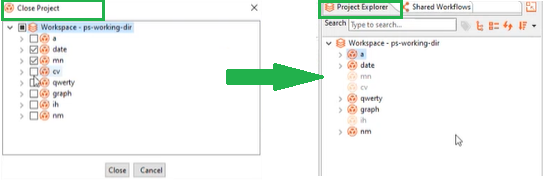
Unload or load a project
You can remove the project from the workspace list. However, the project is still available on your system, and you can load the project again to the Process Studio.
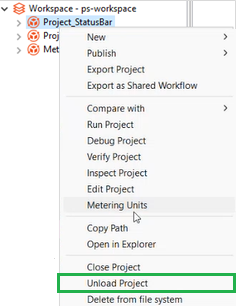
Unload Project contextual menu
To reload the removed project, use the Load Project menu that appears when you select the workspace.
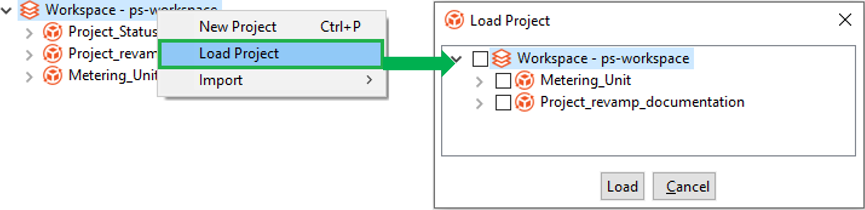
Load Project contextual menu
You can also load and unload multiple projects through the workspace contextual menu.
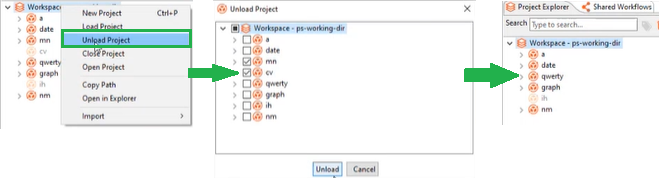
Sort projects
Sorting a project list allows you to keep the projects that you may require frequently at the top of the list, thus making them easily accessible.
To sort projects:
- In the Project Explorer, click Sort Projects on the Search toolbar. The sorting options appear.

Sort Projects options
-
Select the sorting option with which you want the projects to be listed.
-
Name [A-Z]: Sorts the project list in an ascending order.
-
Name [Z-A]: Sorts the project list in a descending order.
-
Newest First: Sorts the project based on the project creation date and time, with the newest project listed first.
-
Oldest First: Sorts the project based on the project creation date and time, with the oldest project listed first.
-