Work with workspace
The Project Explorer lists the workspaces. Workspace is a collection of projects that includes workflows, processes, resources, and connections.
It is recommended to avoid creating workspaces in shared locations, as you may be unable to select workflow or resources in the Workflow Executor step or entry and publish the workflow in Process Studio.
The chapter includes the following topic:
Default workspace
When you start the Process Studio, the Open Workspace dialog appears with the default workspace. For example, ps-workspace.

Figure 12: Open Workspace dialog -- Use this as default checkbox
If you do not want the Open Workspace dialog appearing every time you start Process Studio, set a default workspace for the instance, and select Use this as default checkbox.
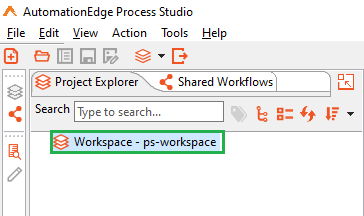
Figure 13: Default workspace
Create or switch a workspace
You can create a new workspace in the following ways:
- Create workspace when signing in to Process Studio.
It is recommended to avoid creating workspaces in shared locations, as you may be unable to select workflow or resources in the Workflow Executor step or entry and publish the workflow in Process Studio.
OR
- Switch workspace to open another workspace through Process Studio.
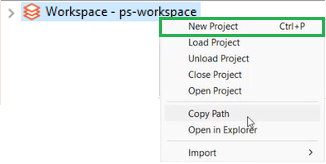
To create a new workspace:
- In the Open Workspace dialog, click Browse and select the folder path to create a new workspace, as you sign in to Process Studio for the first time.
- Click Launch, Process Studio opens, and the workspace name appears in the Project Explorer.

Figure 14: New workspace
To launch the already selected workspace every time you sign in to Process Studio, select Use this as default.
To switch workspace:
- Open Process Studio and click File. The menu options appear.

Figure 15: File menu🡪 Switch Workspace
-
Select Switch Workspace. The Open Workspace dialog appears.
-
Click Browse, and select the new folder path that you want to open as the workspace in Process Studio. Process Studio restarts and opens with the switched workspace.
Work with project
Projects appear in the Project Explorer under the opened workspace. Projects contain workflows, processes, resources, and connections.
The chapter includes the following topics:
Create a new project
Create a new project that will have workflows, processes, and files that you can use to complete your business tasks.
Create a new project through File menu
You can create a new project using the New option available in the File menu.
In addition, you can also click ![]() available on the status bar and create a project.
available on the status bar and create a project.
To create a new project:
-
In Process Studio, click File and select New. The sub-menu appears.
-
Select New Project. The Create Project dialog appears.
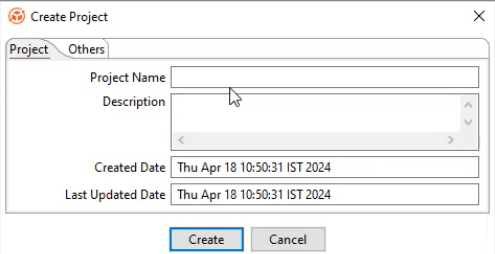
Figure 16: Create Project dialog
- In the respective tabs, enter the field details.
| Field | Description |
|---|---|
| Project tab: | |
| Project Name | Enter a name of the project. |
| It is recommended not to use special characters in your project name. | |
| Description | Enter a description for the project. |
| Created Date | Displays the project creation date and time. |
| Last Updated Date | Displays the date and time when the project was updated. |
| Others tab: | |
| Associated Process Name | Specify the name of the process that you want to associate with the project. |
| After publishing the workflow successfully, you can see the associated process name in the Update Workflow page in AE UI. For more information, see the Workflows Workflow List section in the AutomationEdge User’s Guide. | |
| Associated Process Code | Specify a process code based on which the user must name the step or entry in the workflow or process. For more information on how to configure a process code rule, see the Workflows Inspection section in the AutomationEdge User’s Guide. |
- Click Create. The new project appears under the open workspace in the Project Explorer.

Figure 17: New project in Project Explorer
You can also create a project through the contextual menu.
Export a project
Export a project for sharing the entire project setup or selected files or folders as a zip file within the team and import it into any Process Studio workspace.
To export a project:
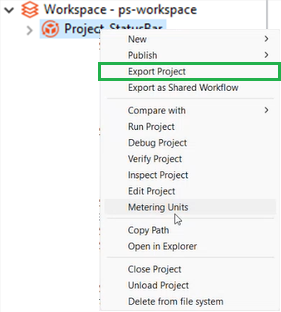
- In Process Studio, select File and then click Export Project. The Export Project dialog appears.

Figure 18: Export Project dialog
You can also export a project using any of the following ways:
The contextual menu:
 Click Project Options on the Status bar. The Export Project menu is available only if workflows or processes are open on the canvas.

- Enter the field details.
| Field | Description |
|---|---|
| Project | Select the project you want to export. |
| If you want to narrow down the project list, enter the text in Type filter text. | |
| Zip File | Enter or browse the folder path of the zipped |
| project file. | |
| A default zipped project file path appears in the field, which you can modify, if required. |
- Click Next. The Resources dialog appears.
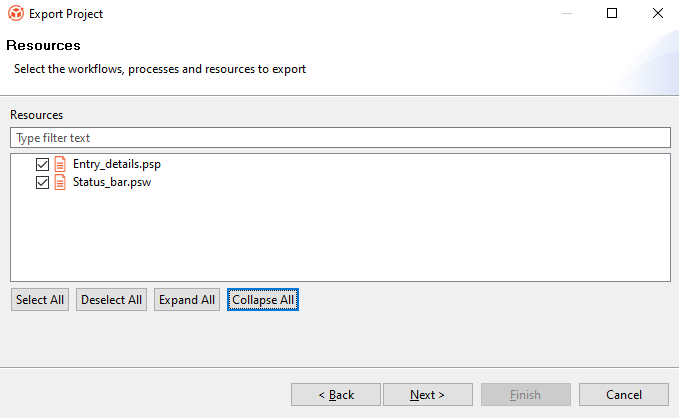
Figure 19: Export Project 🡪 Resources dialog
- In the Resources dialog, select the required checkboxes. The selected workflows, processes, and resources are added to the zipped project file.
Click Select All if you want to export all available resources with the project. Click Deselect All if you want to clear all selection. Click Expand All if you want to expand the view. Click Collapse All if you want to collapse the view.
- Click Next. The Connections dialog appears.

Figure 20: Export Project 🡪 Connections dialog
- In the Connections dialog, select the connections you want to export. The selected connections are added to the zipped project file.
Click Select All if you want to export all available resources with the project. Click Deselect All if you want to clear all selection. Click Expand All if you want to expand the view. Click Collapse All if you want to collapse the view.
- Click Next. The Breakpoints dialog appears.

Figure 21: Export Project 🡪 Breakpoints dialog
- In the Breakpoints dialog, select the breakpoints you want to export. The selected breakpoints are added to the zipped project file.
Click Select All if you want to export all available resources with the project. Click Deselect All if you want to clear all selection. Click Expand All if you want to expand the view. Click Collapse All if you want to collapse the view.
- Click Finish. A message confirming that the project is successfully exported appears.
Import
Process Studio allows you to import sample projects or projects from other workspaces into the currently open workspace. You can also import workflows as a new project or import a workflow from the AutomationEdge server.
You can import projects in the following ways:
Import sample projects
Before creating a new project, you can work with sample projects. Sample projects are bundled with your Process Studio and are available in the ps-home/samples directory. You can import the projects using the Import 🡪 Import Sample Projects option in the contextual menu.
The Import Sample Projects option is unavailable, if the ps-home/samples directory is not present or is empty.
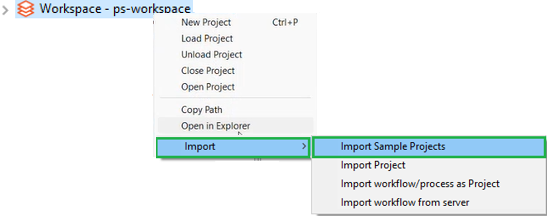
Figure 22: Contextual menu: Import 🡪 Import Sample Projects
If the project already exists in the currently open workspace, then the imported project is added to the workspace with a number suffixed after the project name. For example, existing project name, HelloWorld, the imported project name will be HelloWorld_1.
You cannot import projects from the AutomationEdge server as project samples.
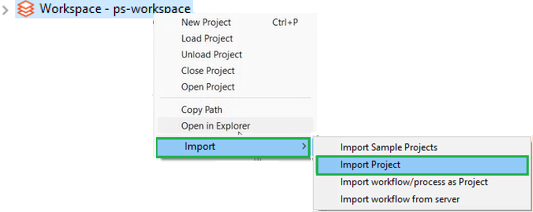
Import project
You can also import existing projects from other workspaces to your current workspace.
To import existing project from other workspaces:
- In Process Studio, click File and select Import. The sub-menu appears.
You can also import a project using any of the following ways:
-
The contextual menu:
-
Click Project Options on the Status bar. The Import Project menu is available only if no workflows or processes are open on the canvas.

- Click Import Projects. The Import Project dialog appears.

Figure 23: Import Project dialog
- Click Browse, and select the zipped project file that you want to open in your workspace. For example, D:\GUIDES\ExerciseProjects\DataProcessing\ Project_StatusBar.zip.
Ensure you have selected a valid zip file else you will be unable to import the project.
- Click Next. The Project Details dialog appears.
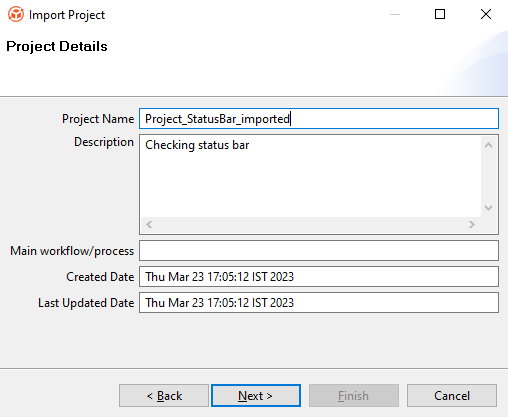
Figure 24: Import Project 🡪 Project Details dialog
- Enter the field details.
| Field | Description |
|---|---|
| Project Name | Enter a unique name for the project. |
| - If a project with the same name already exists in the current workspace, then you will see an error message. | |
| Description | Enter a description of the project. |
| Main workflow/process | Displays the path of the folder in which you want to save the workflow or process. |
| Created Date | Displays the month, date, and time when the project was created. |
| Last Updated Date | Displays the month, date, and time when the project was last updated. |
- Click Next. The Resources dialog appears.

Figure 25: Import Project 🡪 Resources dialog
-
In the Resources dialog, select the required checkboxes. The selected workflows, processes, and resources are added to the zipped project file.
-
Click Next. The Connections dialog appears.

Figure 26: Import Project 🡪 Connections dialog
Click Select All if you want to export all available resources with the project. Click Deselect All if you want to clear all selection. Click Expand All if you want to expand the view. Click Collapse All if you want to collapse the view.
- Click Next. The Breakpoints dialog appears.

Figure 27: Import Project 🡪 Breakpoints dialog
- Click Finish. A message confirming that the project is imported successfully appears.
Import workflows or processes as project
You can also import workflows or processes as a project from other workspaces to your current workspace.
To import workflows or processes as project:
-
In Process Studio, click File and select Import. The sub-menu appears.
-
Click Import Projects. The Import As Project dialog appears.

Figure 28: Import Project 🡪 Breakpoints dialog
- In the Import As Project dialog, you can select:
- Normal zip to upload workflows, processes, and supporting files.
OR
- Exported zip from server to upload a zip exported from the AutomationEdge server.
-
Click Next. The Project Details dialog appears.
-
Enter the project name, description, and main workflow or process name in the respective fields.
-
Click Next. The Resources dialog appears.
-
Select the workflows, processes, and files you want to import.
-
Click Finish. A message confirming that the project is imported successfully appears.
Import workflow from server
You can directly import workflows from the AutomationEdge server using the Import workflow from the server feature.
To import workflow from AutomationEdge server:
-
In Process Studio, click File and select Import. The sub-menu appears.
-
Click Import workflow from server. The Import AutomationEdge Workflow dialog appears.

Figure 29: Import AutomationEdge Workflow dialog
-
Select the workflow you want to import, and then click Next. The Project Details dialog appears.
-
Enter the project name, description, and main workflow or process name in the respective fields.
-
Click Next. The Resources dialog appears displaying the resources that are available in the workflow.
-
Click Finish. The workflow is imported successfully as a project in the Process Studio.
Export as Shared Workflow
Share the workflow with other users of the tenant using the Export as Shared Workflow feature. The tenant users can use the shared workflow to create their workflows, as required.
You can also share processes using the Export as Shared Workflow feature. Ensure that you select the main workflow or process for your project before you proceed with exporting the workflow.
To export a project as shared workflow:
- In the Project Explorer, select and right-click on the project from which you want to share the workflow. The contextual menu appears.
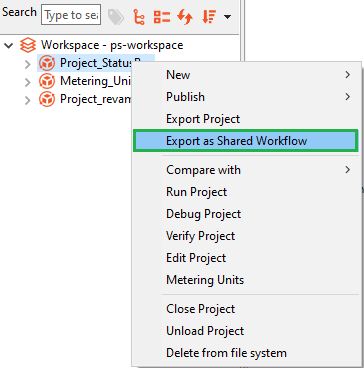
Figure 30: Export as Shared Workflow contextual menu
- Click Export as Shared Workflow. The Configuration dialog appears.
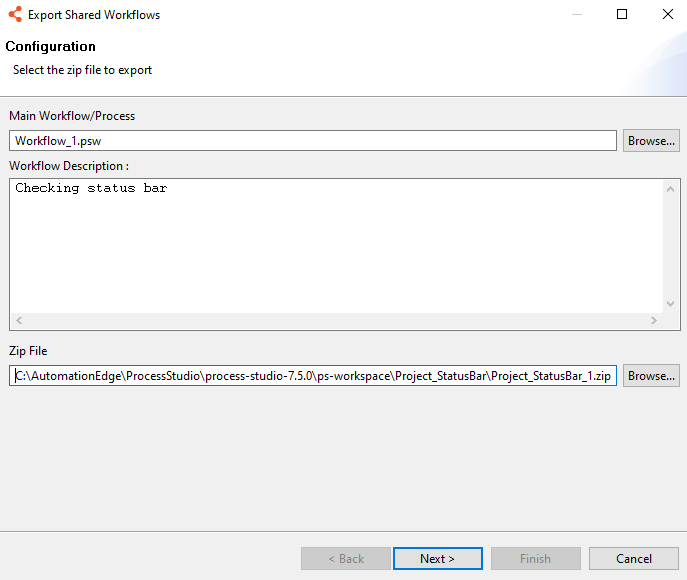
Figure 31: Export Shared Workflows 🡪 Configuration dialog
- Enter the field details.
| Field | Description |
|---|---|
| Main Workflow/Process | Displays the main workflow name already set for the project. |
| - To modify the detail, click Browse and select another workflow or process from the project. | |
| Workflow Description | Enter a description about the workflow. |
| Zip File | Displays the zipped project folder path of the workflow you want to export. |
| - To modify the detail, click Browse and select another zipped project folder. |
- Click Next. The Resources dialog appears.
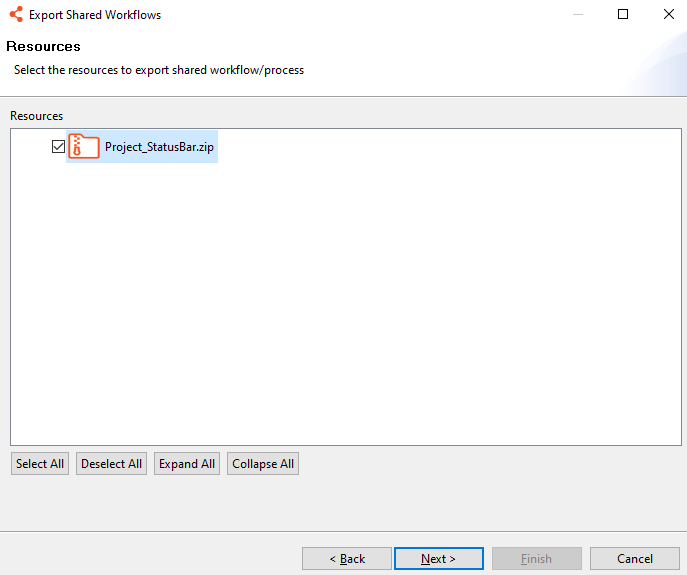
Figure 32: Export Shared Workflows 🡪 Resources dialog
- Select the resources you want to export with the workflow.
Click Select All if you want to export all available resources with the project. Click Deselect All if you want to clear all selection. Click Expand All if you want to expand the view. Click Collapse All if you want to collapse the view.
- Click Next. The Workflow Information dialog appears.
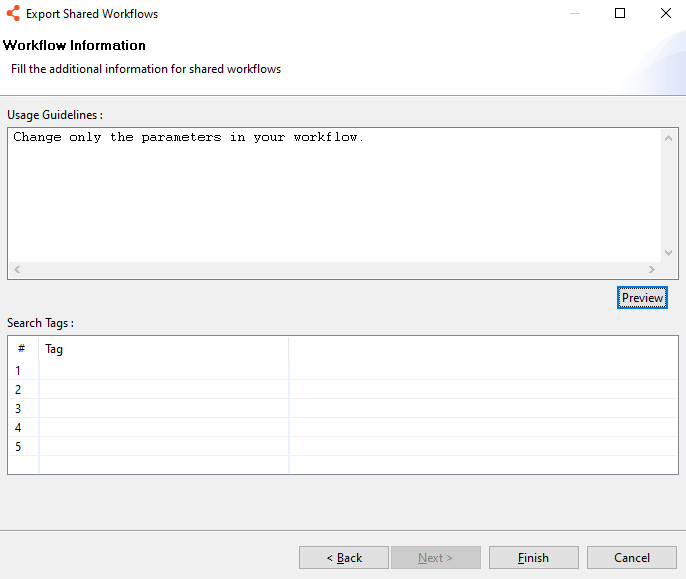
Figure 33: Export Shared Workflows 🡪 Workflow Information dialog
- In the Usage Guidelines field, enter the instructions for using the workflow, and in the Search Tags field enter the tags for searching the shared workflow in the Process Studio or the AutomationEdge UI.
Click Preview, to view the guidelines. The tenant user must follow the guidelines provided by the workflow or process owner when using the workflow in the projects.
- Click Finish. A message confirming that the workflow is exported successfully appears.
The shared workflows appear in the Shared Workflows tab in the Process Studio. After syncing the shared workflows, you can drag-and-drop the shared workflows on to the canvas and it appears as a workflow or process executor. For details about uploading the shared workflows to the AutomationEdge UI, see Workflows 🡪 Shared in the AutomationEdge user’s guide.
Sync Shared Workflows
After uploading shared workflow through the AutomationEdge UI, you can sync the shared workflows using the Sync Shared Workflows feature. The shared workflows appear in the Shared Workflows tab.
Similarly, you can also sync and work with shared processes.
To sync and use the shared workflow:
- In the Process Studio, click the Sync Shared Workflow pane. The list of shared workflows that need to be synced appears.
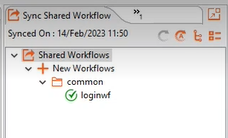
Figure 34: Sync Shared Workflows pane
- Click Tools 🡪 Sync 🡪 Shared Workflows. The workflows are synced.
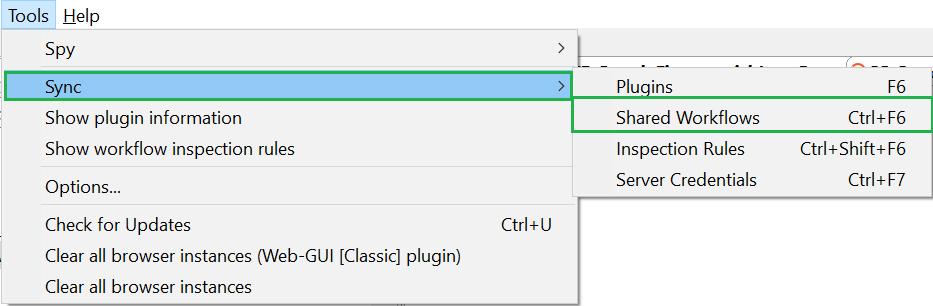
Figure 35: Tools 🡪 Sync Shared Workflows
- Drag-and-drop the shared workflow on to the canvas, which becomes the workflow executor step.
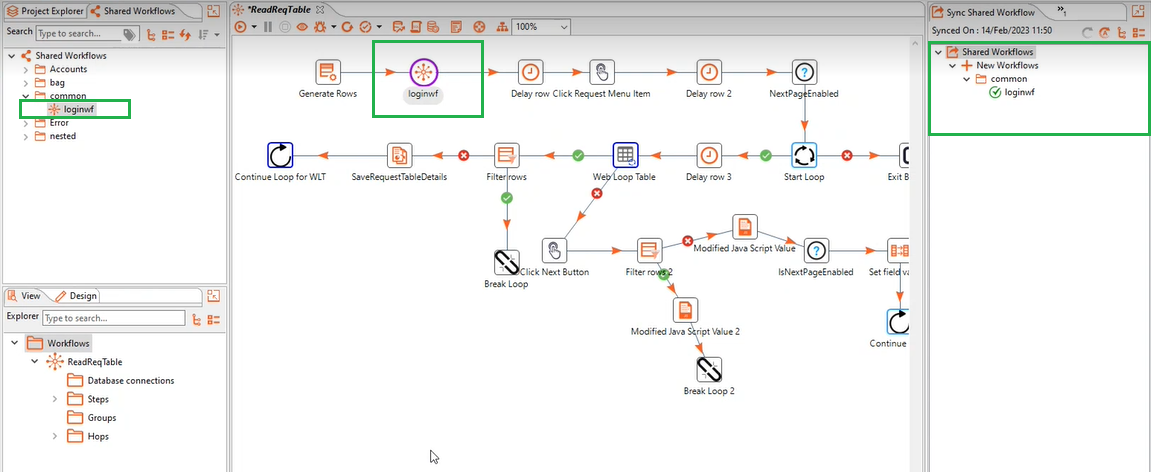
Figure 36: Tools 🡪 Sync Shared Workflows
Manage a project
Manage a project using various options available in the Process Studio. The Process Studio allows you to compare your projects, run or debug or verify a project. In addition, you can also edit the project and view the unit consumption detail.
To manage a project, it must have workflows and / or processes. For more detail on workflow and process, see Work with workflows and processes.
You can manage a project in following ways:
- Compare project with...
- Delete project
- Edit a project
- Metering Units
- Run or debug or verify a project
- Additional actions to manage a project
Compare a project with...
You can compare the current project with any server workflow or a local project or a shared workflow and view the differences between the two versions. The differences can occur at project or workflow or process or resource level.
You can also compare processes using the appropriate menu.
Compare with a server workflow
Use the Server Workflow option if you want to compare the project and workflows on the AutomationEdge server to confirm the files added or removed before publishing or updating a workflow on server.
To compare the project with a server workflow:
- In the Project Explorer, select the project you want to compare, and right-click on it. The contextual menu appears.
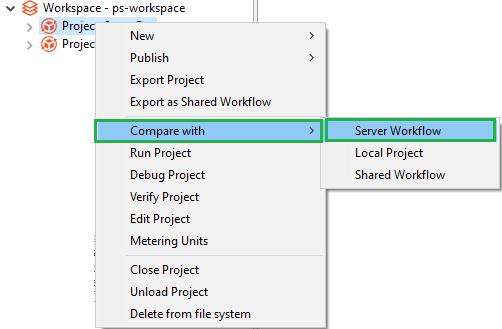
Figure 37: Compare with 🡪 Server Workflow
- Select Compare with, and then select Server Workflow. The Select Workflow dialog appears.

Figure 38: Select Workflow dialog
- In Workflow, select the server workflow, and then click Select. The Project Difference dialog appears.
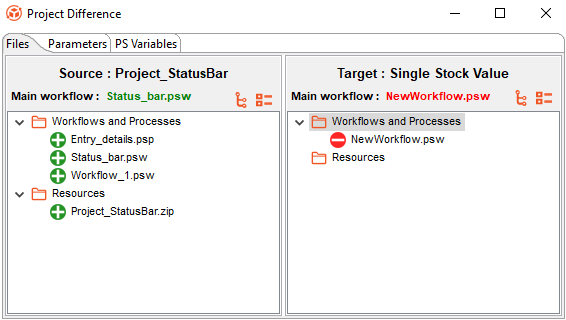
Figure 39: Project Difference dialog
The project from the Process Studio appears in the Source pane and projects from the AutomationEdge server or the selected local project appear in the Target pane.
![]() : Indicates newly added files.
: Indicates newly added files.
![]() : Indicates removed or deleted files.
: Indicates removed or deleted files.
![]() :
Indicates that the workflow or process or files with differences are
available in both, source and target projects. However, if the workflow
or process or files with no differences, then the icon appears greyed
out.
:
Indicates that the workflow or process or files with differences are
available in both, source and target projects. However, if the workflow
or process or files with no differences, then the icon appears greyed
out.
- The Project Difference dialog has three tabs: Files, Parameters, and PS Variables.
-
Files tab: Lists the various workflows and processes, and other resource files available in the projects.
-
Parameters tab: Displays the configuration and runtime parameters of the main workflow or process. You will see the configuration and runtime parameters only if the main file is same in the source and target projects.
-
The Configuration Parameters and Runtime Parameters listed are:
-
Parameter
-
Display Name
-
Type
-
Secret
-
Optional (seen only in the Runtime Parameters)
-
-
PS Variables tab: Displays the Process Studio variables of the main workflow or process. You will see the Process Studio variables only if the main file is same in the source and target projects.
-
The PS variables listed are:
-
Name
-
Description
-
Scope
-
Default Value
-
Click Expand All to expand the project view.
Click Collapse All to close the expanded project view.
If you right click the workflow in the Source project pane, click View Diff in the contextual menu. The Workflow Difference dialog appears.
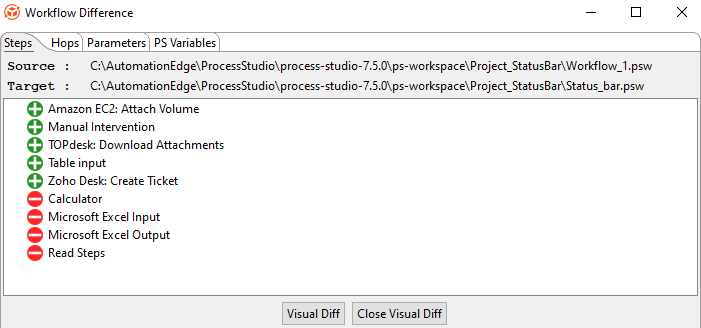 Steps: The tab lists the steps added or deleted or common in the two workflows.
Hops: The tab lists the step connectivity added or deleted or common in the two workflows.
Parameters: The tab lists the parameters added or deleted or common in the two workflows. You will see the configuration and runtime parameters only if the main file is same in the source and target projects.
PS Variables: The tab lists the Process Studio variables added or deleted or common in the two workflows. You will see the Process Studio variables only if the main file is same in the source and target projects.
Click View Diff to open the target workflow, Status_bar.psw, in the canvas.
Click Close Visual Diff to close the open workflow.
Steps: The tab lists the steps added or deleted or common in the two workflows.
Hops: The tab lists the step connectivity added or deleted or common in the two workflows.
Parameters: The tab lists the parameters added or deleted or common in the two workflows. You will see the configuration and runtime parameters only if the main file is same in the source and target projects.
PS Variables: The tab lists the Process Studio variables added or deleted or common in the two workflows. You will see the Process Studio variables only if the main file is same in the source and target projects.
Click View Diff to open the target workflow, Status_bar.psw, in the canvas.
Click Close Visual Diff to close the open workflow.
Compare with a local project
Use the Local Project option if you want to compare the project with another local project.
To compare the project with a local project:
- In the Project Explorer, select the project you want to compare, and right-click on it. The contextual menu appears.\
- Select Compare with, and then select Local Project. The Select Project dialog appears.

Figure 40: Select Project dialog
- In Project, select the local project, and then click Select. The Project Difference dialog appears.
For the Project Difference dialog details, see Server Workflow.
Compare with a shared workflow
Use the Shared Workflow option if you want to compare the project with a shared workflow.
To compare the project with a shared workflow:
-
In the Project Explorer, select the project you want to compare, and right-click on it. The contextual menu appears.
-
Select Compare with, and then select Server Workflow. The Select Workflow dialog appears.

Figure 41: Select Workflow dialog
- In Workflow, select the shared workflow, and then click Select. The Project Difference dialog appears.
For the Project Difference dialog details, see Server Workflow.
Delete a project
You can delete a project and supporting resources permanently from the file system.
To delete a project:
-
In the Project Explorer, select the project that you want to delete, and right-click on it. The contextual menu appears.
-
Select Delete from file system, a confirmation dialog appears. Click Yes to delete the project folder and supporting resources permanently from the file system.
Edit a project
You can modify a project that you created or imported to your workspace.
Modify the project details through the Process Studio only.
To edit a project:
-
In the Project Explorer, select the project you want to edit, and right-click on it. The contextual menu appears.
-
Select Edit Project. The Edit Project dialog appears.
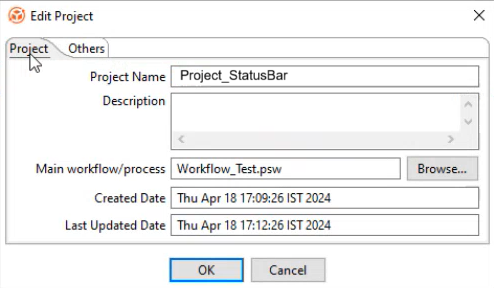
Figure 42: Edit Project dialog
- In the Project tab, modify the project details and select the main workflow or process for the project.
It is recommended not to modify the name of the project after it is created in a workspace, as the change can render the project unusable.
- In the Others tab, specify the following field details:
| Field | Description |
|---|---|
| Associated Process Name | Specify the name of the process that you want to associate with the project.After publishing the workflow successfully, you can see the associated process name in the Update Workflow page in AE UI. For more information, see the Workflows Workflow List section in the AutomationEdge User’s Guide. |
| Associated Process Code | Specify a process code based on which the user must name the step or entry in the workflow or process.For more information on how to configure a process code rule, see the Workflows Inspection section in the AutomationEdge User’s Guide. |
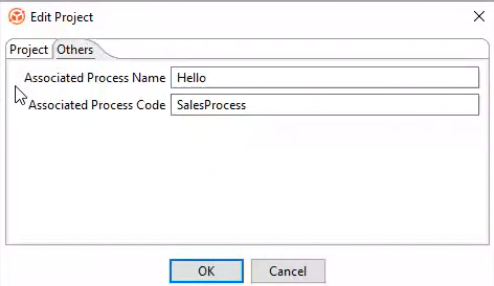
Figure 43: Edit Project dialog 🡪 Others tab
- Click OK. The details are saved.
Metering Units
Use Metering Units to view the units of steps or entries consumed in a workflow or process. You can view the details at the project level or at the workflow or process level.
Ensure you set the main workflow or process for the project before using the feature. The feature is available depending on the type of license you are using.
To view the metering units of a workflow or process:
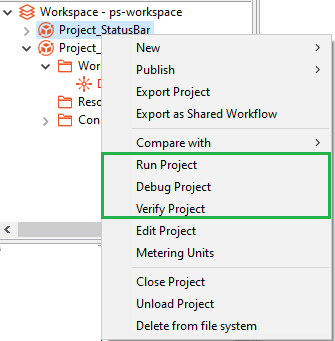
- Select the project in the workspace and right-click. The contextual menu appears.
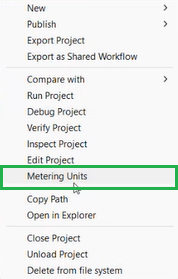
Figure 44: Workspace 🡪 Project 🡪 Contextual menu
- In the contextual menu, select Metering Units. A pop up, displaying the total units consumed in the main (parent) workflow and all child workflows and / or processes appears.
To view the units consumed in individual workflows or processes, click ![]() on the status bar, and select Metering Units from the menu.
on the status bar, and select Metering Units from the menu.
Run or debug or verify a project
Run or debug or verify a project to ensure that the workflow or process works as expected.
Debug Project is unavailable for processes.
To run or debug or verify a project:
-
In Process Studio, click Actions, and select Run Project or Debug Project or Verify Project.
-
If you select:
- Run Project or SHIFT | F9 or click
 and select Run project, then you
can view the details in the Execution Results section.
and select Run project, then you
can view the details in the Execution Results section.
OR
- Debug Project, then you can view the details in the pop-up.
OR
- Verify Project, then you can view the stepwise result of a workflow or process.
You can also run a project or debug or verify a project using the contextual menu.
Inspect Project
Use Inspect Project feature to validate if the project or workflow rules configured in the AE UI are applied as required. If rules are defined for a project, then you will either see a warning or error icon against the project.
Sync all inspection rules to ensure that all rules are available in Process Studio. For more information about configuring rules, see Workflows 🡪 Inspection section in the AutomationEdge User's Guide.
To view the inspection rule report:
- Select the project in the workspace and right-click. The contextual menu appears.
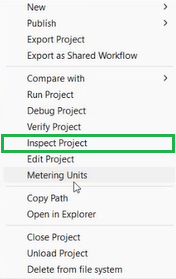
Figure 45: Workspace 🡪 Project 🡪 Contextual menu
- In the contextual menu, select Inspect Project. The Inspection Report dialog appears.
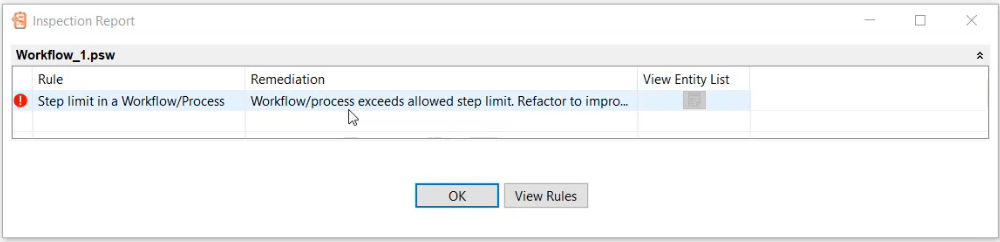
Figure 46: Workflow Inspection Report dialog
- View the following field details:
| Field | Description |
|---|---|
| Rule | Displays the configured workflow rule. |
| Remediation | Displays a brief description of the rule. |
| View Entity List | View the list of entities attached with the rule. |
If a workflow violates any inspection rule, then you will see either a warning or an error icon against the project. The following screenshot displays the project workflow rules are violated and has errors:
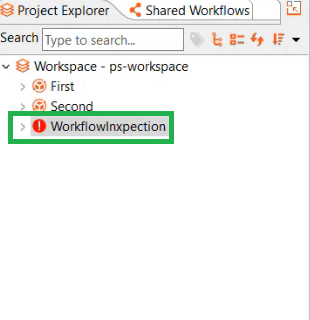 If an inspection rule is violated, you will see either of the following:
![]() : Indicates a warning. The project is published, but with warnings.
: Indicates a warning. The project is published, but with warnings.
![]() : Indicates an error. The project is not published. You need to modify and republish the workflow.
For more information about inspection rules, see Workflows 🡪 Inspection in the AutomationEdge User’s Guide.
: Indicates an error. The project is not published. You need to modify and republish the workflow.
For more information about inspection rules, see Workflows 🡪 Inspection in the AutomationEdge User’s Guide.
Additional actions to manage a project
You can perform additional actions on the project, such as copy the path of a folder or file and open in the File explorer, or close or open a project, load or unload a project. In addition, you can sort the list of projects using different options.
You can perform the following actions:
Copy Path
You can copy the path of the workspace, workflow or process, or resource file in the Process Studio, which allows you to easily navigate to the file location in the File explorer.
In the Process Studio's Project Explorer, select the file or folder you want to open in the File explorer, and right-click on the selection. In the contextual menu, click Copy Path. The path is copied, and you can paste the same in the path box in the File explorer. Press Enter and you can view the folder or file.
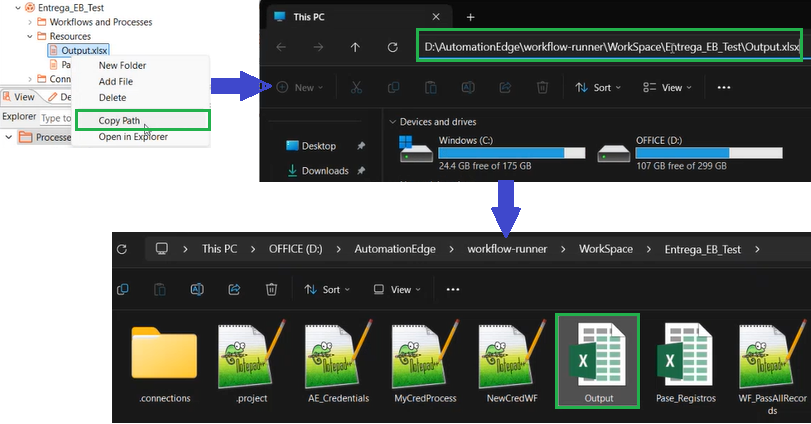
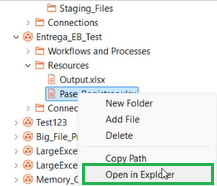
Figure 48: Open in Explorer
Close or open a project
You can close all open workflows, processes, and files in the selected project through the contextual menu. The closed project appears greyed out in the Project Explorer. On closing the project, you can open it again, using the Open Project menu that appears on selecting the same project again.
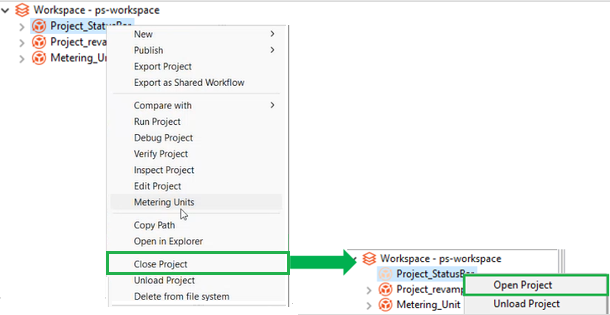
Figure 49: Workspace 🡪 Project 🡪 Contextual menu
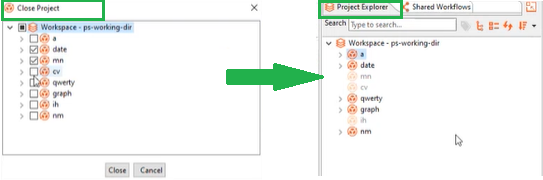
To open or close multiple projects, right-click on the workspace and select Open Project or Close Project in the contextual menu. The Open Project or Close Project dialog appears. In the dialog, select all or multiple projects to open or close, and then click Open or Close.
For example, the following screenshot shows the Close Project dialog with multiple projects selected. After clicking Close, the selected projects appear faded out in the Process Studio’s Project Explorer.
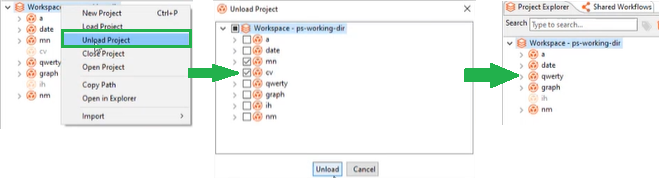
Unload or load a project
You can remove the project from the workspace list. However, the project is still available on your system, and you can load the project again to the Process Studio.
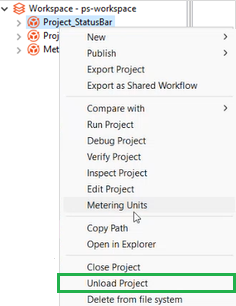
Figure 50: Workspace 🡪 Contextual menu 🡪 Unload Project
To reload the removed project, use the Load Project menu that appears when you select the workspace.
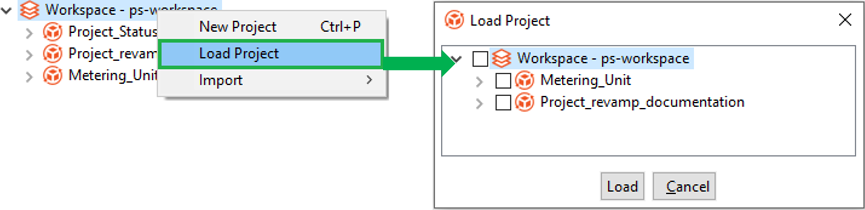
Figure 51: Workspace 🡪 Contextual menu 🡪 Load Project
You can also load and unload multiple projects through the workspace contextual menu.
Sort projects
Sorting a project list allows you to keep the projects that you may require frequently at the top of the list, thus making them easily accessible.
To sort projects:
- In the Project Explorer, click Sort Projects on the Search toolbar. The sorting options appear.

Figure 52: Workspace 🡪 Sort Projects 🡪 Sorting options
- Select the sorting option with which you want the projects to be listed.
-
Name [A-Z]: Sorts the project list in an ascending order.
-
Name [Z-A]: Sorts the project list in a descending order.
-
Newest First: Sorts the project based on the project creation date and time, with the newest project listed first.
-
Oldest First: Sorts the project based on the project creation date and time, with the oldest project listed first.
Publish a project
You can publish your project as a zip to AutomationEdge server.
For details on how to view, modify, and activate the workflow on an AE instance after it is published through Process Studio, see AutomationEdge user’s guide.
You can publish the project from Project Studio in the following ways:
- Ensure that you select the main workflow or process for your project before you publish it.
- You can also create or update a workflow for publishing through the contextual menu.
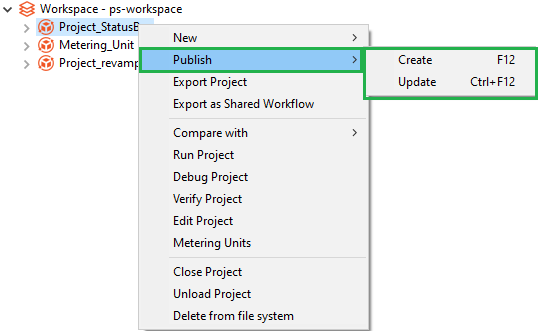
Publish project through Create
Use to publish a project for the first time.
If workflow inspection rules are configured for the selected project, then you will see appropriate warning or error messages. You can also review if the project has any warnings or errors through the Inspect Project option before publishing.
To publish project using Create:
-
In the Project Explorer, select the project that you want to publish.
-
Click File and select Publish. The sub-menu appears.
-
Select Create. The Publish confirmation (psp/psw) pop-up appears.

Figure 53: Publish confirmation (psp/psw) pop-up
- If you select the Add resource file(s) to ZIP archive checkbox, and click Yes. The Add resource files to ZIP archive dialog appears.
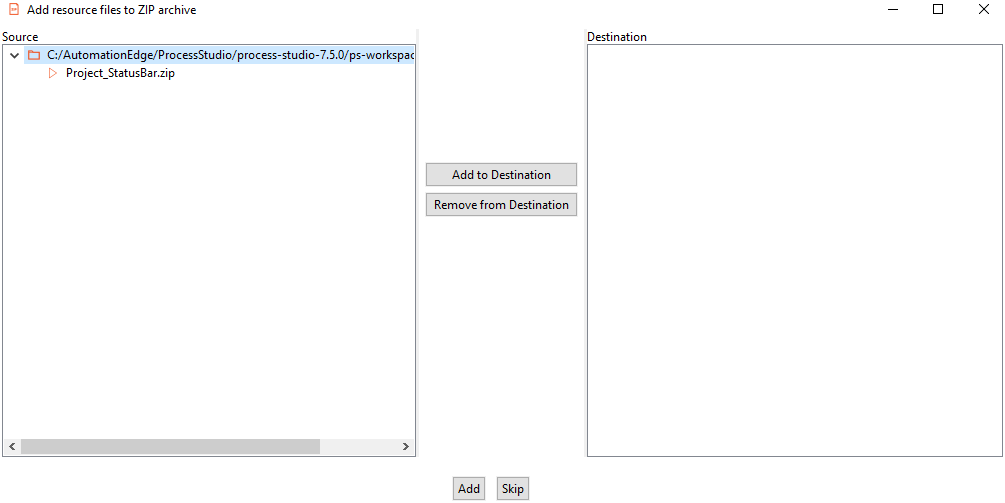
Figure 54: Add resource files to ZIP archive
To add the resource files to ZIP archive:
i. Select the resource files in the Source pane, and then click Add to Destination. The files are added to the Destination pane.
Click Remove from Destination, to remove the files from the Destination pane.
ii. Click Add, to add the selected files to the ZIP archive. Else, click Skip. The Workflow Details dialog appears.
However, if you do not select the Add resource file(s) to ZIP archive checkbox, then the Workflow Details dialog appears.

Figure 55: Workflow Details dialog
- Enter the field details.
| Field | Description |
|---|---|
| Name | Enter a name for the workflow to be published. |
| Description | Enter a description about the workflow. |
| Category | Select the category of the workflow. |
| Version Tag | Enter a version number for the project. |
| Checkboxes | |
| Assisted | Select the checkbox if the selected workflow or process is an assisted workflow. |
| RDP Enabled | Select the checkbox if the selected workflow or process will run on Controller Agent machine. |
| Set default value(s) as Configuration parameter value(s) | Select the checkbox if you want to set default values as configuration parameter values. |
Publish project through Update
Use to update a published project and republish it.
If workflow inspection rules are configured for the selected workflow, then you will see appropriate warning or error messages. To understand the impact of rules on publishing, see the following screenshot:
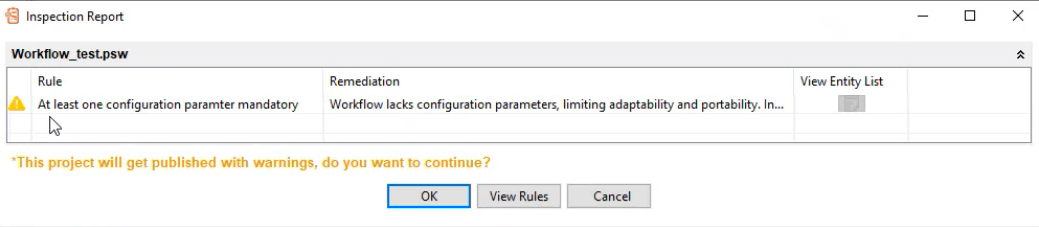 For more information about inspection rules, see Workflows Inspection in the AutomationEdge User’s Guide.
To publish project using Update:
-
In the Project Explorer, select the project that you want to republish.
-
Click File and select Publish. The sub-menu appears.
-
Select Update. The Publish confirmation (psp/psw) pop-up appears.
If you select the Add resource file(s) to ZIP archive checkbox in the pop-up, the Add resource files to ZIP archive dialog appears. For details, see Publish project through Create.
- Click Yes. The Workflow Details dialog appears.

Figure 56: Workflow Details dialog
- Enter the field details.
| Field | Description |
|---|---|
| Select workflow | Select the updated workflow that you want to republish. |
| Version Tag | Enter a version number for the project. |
| Set default value(s) as configuration parameter value(s) | Select the checkbox if you want to set default values as configuration parameter values. |
- Click Update. A message confirming that the workflow is updated successfully appears.