Export and Import Projects
Export a project
Export a project for sharing the entire project setup or selected files or folders as a zip file within the team and import it into any Process Studio workspace.
To export a project:
-
In Process Studio, select File and then click Export Project. The Export Project dialog appears.

Export Project dialog
NoteYou can also export a project using any of the following ways:
- The contextual menu:
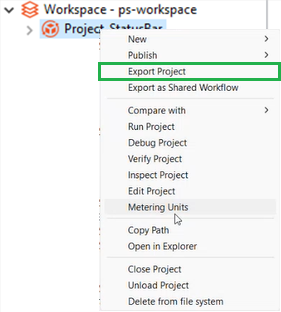
- Click Project Options on the Status bar. The Export Project menu is available only if workflows or processes are open on the canvas.

- The contextual menu:
-
Enter the field details.
Field Description Project Select the project you want to export.
NOTE: If you want to narrow down the project list, enter the text in Type filter text.Zip File Enter or browse the folder path of the zipped project file.
NOTE: A default zipped project file path appears in the field, which you can modify, if required. -
Click Next. The Resources dialog appears.
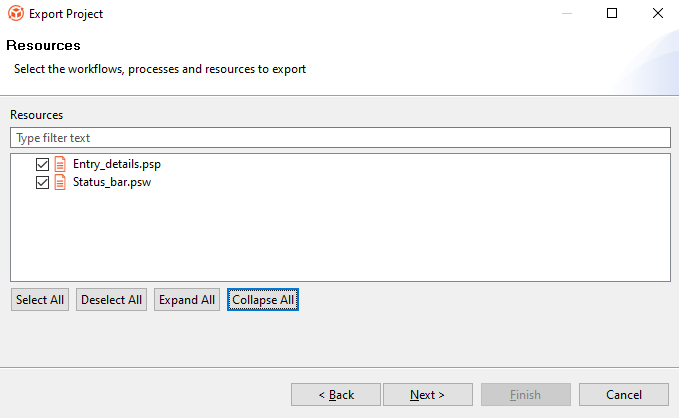
Export Project – Resources dialog
-
In the Resources dialog, select the required checkboxes. The selected workflows, processes, and resources are added to the zipped project file.
Note- Click Select All if you want to export all available resources with the project.
- Click Deselect All if you want to clear all selection.
- Click Expand All if you want to expand the view.
- Click Collapse All if you want to collapse the view.
-
Click Next. The Connections dialog appears.

Export Project – Connections dialog
-
In the Connections dialog, select the connections you want to export. The selected connections are added to the zipped project file.
Note- Click Select All if you want to export all available connections with the project.
- Click Deselect All if you want to clear all selection.
- Click Expand All if you want to expand the view.
- Click Collapse All if you want to collapse the view.
-
Click Next. The Breakpoints dialog appears.

Export Project – Breakpoints dialog
-
In the Breakpoints dialog, select the breakpoints you want to export. The selected breakpoints are added to the zipped project file.
Note- Click Select All if you want to export all available connections with the project.
- Click Deselect All if you want to clear all selection.
- Click Expand All if you want to expand the view.
- Click Collapse All if you want to collapse the view.
-
Click Finish. A message confirming that the project is successfully exported appears.
Import
Process Studio allows you to import sample projects or projects from other workspaces into the currently open workspace. You can also import workflows as a new project or import a workflow from the AutomationEdge server.
You can import projects in the following ways:
Import sample projects
Before creating a new project, you can work with sample projects. Sample projects are bundled with your Process Studio and are available in the ps-home/samples directory. You can import the projects using the Import 🡪 Import Sample Projects option in the contextual menu.
The Import Sample Projects option is unavailable, if the ps-home/samples directory is not present or is empty.
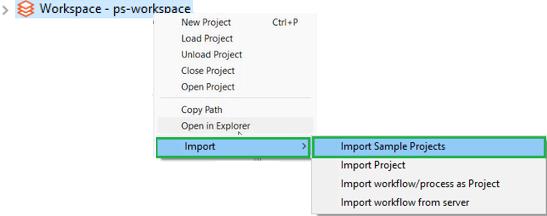
Import Sample Projects contextual menu
If the project already exists in the currently open workspace, then the imported project is added to the workspace with a number suffixed after the project name. For example, the existing project name, HelloWorld, the imported project name will be HelloWorld_1.
You cannot import projects from the AutomationEdge server as project samples.
Import project
You can also import existing projects from other workspaces to your current workspace.
To import existing project from other workspaces:
-
In Process Studio, click File and select Import. The sub-menu appears.
NoteYou can also import a project using any of the following ways:
- The contextual menu:
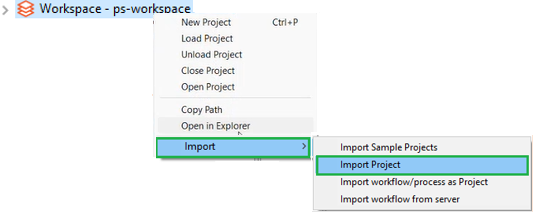
- Click Project Options on the Status bar. The Import Project menu is available only if no workflows or processes are open on the canvas.

- The contextual menu:
-
Click Import Projects. The Import Project dialog appears.

Import Project dialog
-
Click Browse, and select the zipped project file that you want to open in your workspace. For example, D:\GUIDES\ExerciseProjects\DataProcessing\ Project_StatusBar.zip.
Ensure you have selected a valid zip file else you will be unable to import the project.
-
Click Next. The Project Details dialog appears.
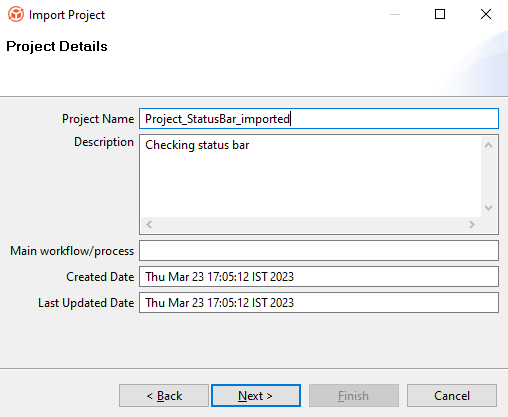
Import Project – Project Details dialog
-
Enter the field details.
| Field | Description |
|---|---|
| Project Name | Enter a unique name for the project. |
| - If a project with the same name already exists in the current workspace, then you will see an error message. | |
| Description | Enter a description of the project. |
| Main workflow/process | Displays the path of the folder in which you want to save the workflow or process. |
| Created Date | Displays the month, date, and time when the project was created. |
| Last Updated Date | Displays the month, date, and time when the project was last updated. |
-
Click Next. The Resources dialog appears.

Import Project – Resources dialog
-
In the Resources dialog, select the required checkboxes. The selected workflows, processes, and resources are added to the zipped project file.
Note- Click Select All if you want to import all available resources with the project.
- Click Deselect All if you want to clear all selection.
- Click Expand All if you want to expand the view.
- Click Collapse All if you want to collapse the view.
-
Click Next. The Connections dialog appears.

Import Project – Connections dialog
Note- Click Select All if you want to import all available connections with the project.
- Click Deselect All if you want to clear all selection.
- Click Expand All if you want to expand the view.
- Click Collapse All if you want to collapse the view.
-
Click Next. The Breakpoints dialog appears.

Import Project – Breakpoints dialog
-
Click Finish. A message confirming that the project is imported successfully appears.
Import workflows or processes as project
You can also import workflows or processes as a project from other workspaces to your current workspace.
To import workflows or processes as project:
-
In Process Studio, click File and select Import. The sub-menu appears.
-
Click Import Projects. The Import As Project dialog appears.

Import As Project dialog
-
In the Import As Project dialog, you can select:
- Normal zip to upload workflows, processes, and supporting files.
OR
- Exported zip from server to upload a zip exported from the AutomationEdge server.
-
Click Next. The Project Details dialog appears.
-
Enter the project name, description, and main workflow or process name in the respective fields.
-
Click Next. The Resources dialog appears.
-
Select the workflows, processes, and files you want to import.
-
Click Finish. A message confirming that the project is imported successfully appears.
Import workflow from server
You can directly import workflows from the AutomationEdge server using the Import workflow from the server feature.
To import workflow from AutomationEdge server:
-
In Process Studio, click File and select Import. The sub-menu appears.
-
Click Import workflow from server. The Import AutomationEdge Workflow dialog appears.

Import AutomationEdge Workflow dialog
-
Select the workflow you want to import, and then click Next. The Project Details dialog appears.
-
Enter the project name, description, and main workflow or process name in the respective fields.
-
Click Next. The Resources dialog appears displaying the resources that are available in the workflow.
-
Click Finish. The workflow is imported successfully as a project in the Process Studio.
Export as Shared Workflow
Share the workflow with other users of the tenant using the Export as Shared Workflow feature. The tenant users can use the shared workflow to create their workflows, as required.
You can also share processes using the Export as Shared Workflow feature. Ensure that you select the main workflow or process for your project before you proceed with exporting the workflow.
To export a project as shared workflow:
-
In the Project Explorer, select and right-click on the project from which you want to share the workflow. The contextual menu appears.

Export as Shared Workflow contextual menu
-
Click Export as Shared Workflow. The Configuration dialog appears.
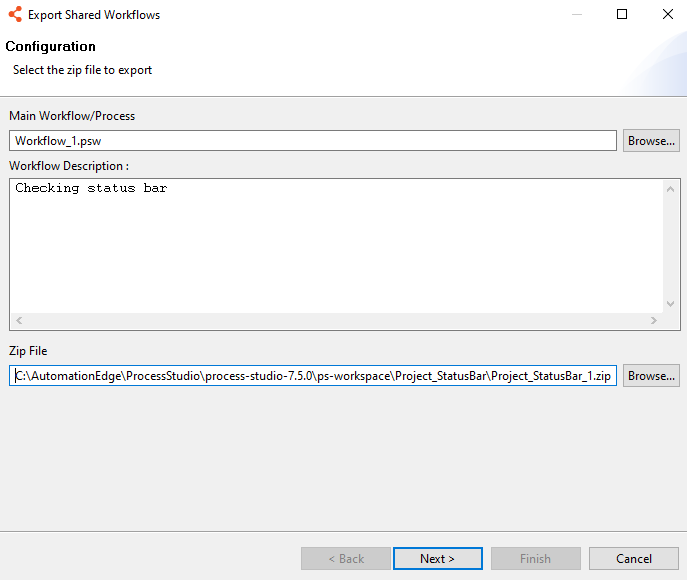
Export Shared Workflows – Configuration dialog
-
Enter the field details.
Field Description Main Workflow/Process Displays the main workflow name already set for the project.
NOTE: To modify the details, click Browse and select another workflow or process from the project.Workflow Description Enter a description about the workflow. Zip File Displays the zipped project folder path of the workflow you want to export.
NOTE: To modify the details, click Browse and select another zipped project folder. -
Click Next. The Resources dialog appears.

Export Shared Workflows – Resources dialog
-
Select the resources you want to export with the workflow.
Note- Click Select All if you want to export all available resources with the project.
- Click Deselect All if you want to clear all selection.
- Click Expand All if you want to expand the view.
- Click Collapse All if you want to collapse the view.
-
Click Next. The Workflow Information dialog appears.

Export Shared Workflows – Workflow Information dialog
-
In the Usage Guidelines field, enter the instructions for using the workflow, and in the Search Tags field enter the tags for searching the shared workflow in the Process Studio or the AutomationEdge UI.
NoteClick Preview, to view the guidelines. The tenant user must follow the guidelines provided by the workflow or process owner when using the workflow in the projects.
-
Click Finish. A message confirming that the workflow is exported successfully appears.
tip- The shared workflows appear in the Shared Workflows tab in the Process Studio.
- After syncing the shared workflows, you can drag and drop the shared workflows on to the canvas, and it appears as a workflow or process executor.
- For details about uploading the shared workflows to the AutomationEdge UI, see Workflows 🡪 Shared in the AutomationEdge user’s guide.
Sync Shared Workflows
After uploading shared workflow through the AutomationEdge UI, you can sync the shared workflows using the Sync Shared Workflows feature. The shared workflows appear in the Shared Workflows tab.
Similarly, you can also sync and work with shared processes.
To sync and use the shared workflow:
-
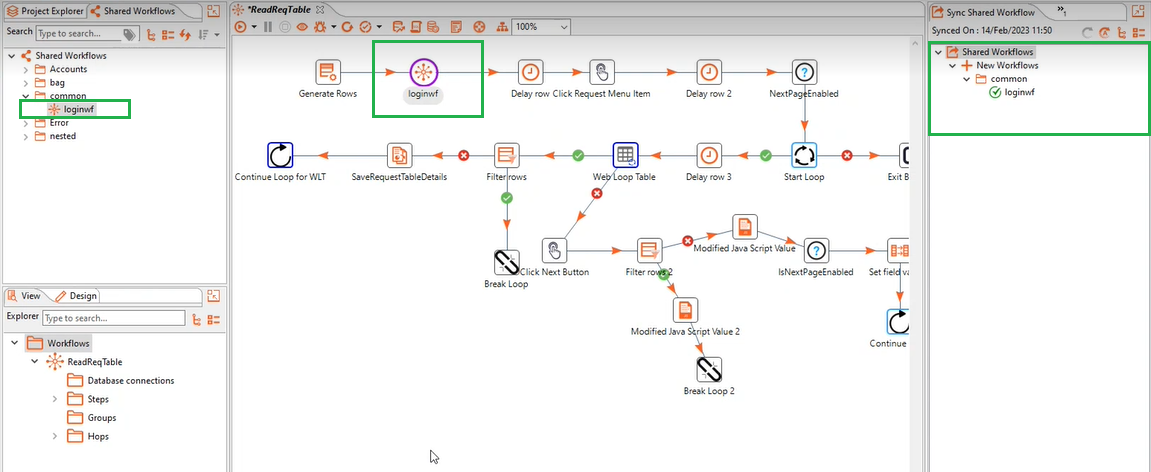
In the Process Studio, click the Sync Shared Workflow pane. The list of shared workflows that need to be synced appears.
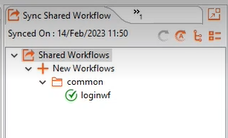
Sync Shared Workflows pane
-
Click Tools 🡪 Sync 🡪 Shared Workflows. The workflows are synced.
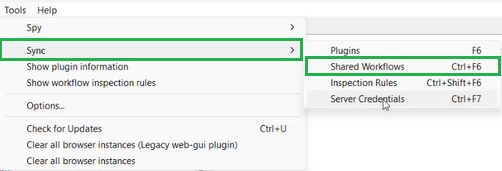
Sync Shared Workflows via Tools menu
-
Drag-and-drop the shared workflow on to the canvas, which becomes the workflow executor step.
Shared workflow as workflow executor on canvas