Create & Manage Database Connections
In this section, you will learn to configure database connections in workflows and processes. If you need to get or send data to or from a database, you can do so by configuring a database connection in your workflow or process. There are steps or entries that can enable you to set the connection.
Create a database connection
You can configure database connection through Process Studio.
File menu
You have the option of configuring database connection through the File menu.
To configure a database connection:
-
Click File and select New. The sub-menu appears.
-
In the sub-menu, select Database Connection. The Database Connection dialog appears.
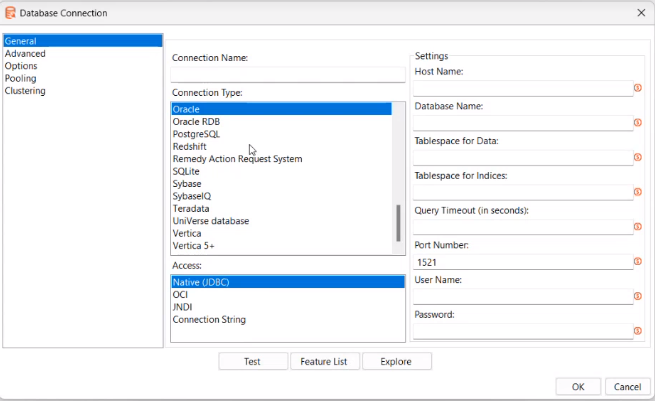
Database Connection dialog
NoteYou can also configure database connection in the following ways:
- Go to Tools → Wizard → Create Database Connection... or F3.
- In the View tab:
- Select Database Connection and right-click. In the contextual menu, select New or New Connection Wizard.

- Select existing database and right-click. In the contextual menu, select New.

- In addition, use other menu options in the following ways:
Edit: Click to modify the database connection details.
Duplicate: Click to duplicate the existing database connection.
Copy to clipboard: Click to copy the existing database connection.
Delete: Click to remove selected database connection from the project.
-
In the first pane, select the connection you want, that is, General or Advanced or Options or Pooling, or Clustering. The fields in the second and third pane of the dialog change depending on the connection selected.
-
Enter or select the details in the fields, as required.
Field name Description Connection Name Enter a name for the database connection. Connection Type Select the type of connection you want for the database. For example, PostgreSQL. Access Select the type of access you want for the database. Available options are:
- Native (JDBC)
- OCI
- JNDI
- Connection String
Note:
The availability of options depends on the type of connection selected. For example, when you select Connection String, the Connection String dialog appears.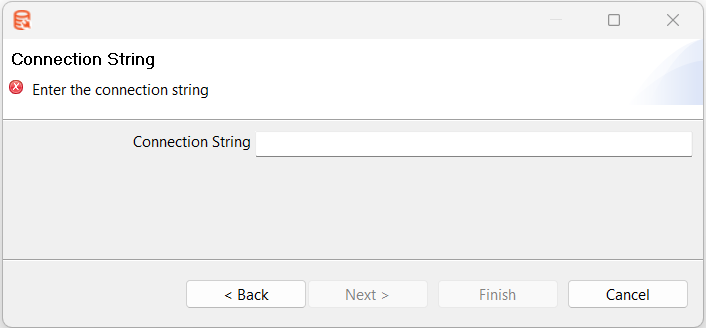 Enter the connection string and click Finish.
Settings Enter the field details, as required.
Note:
- The fields available under Settings change depending on the type of connection and access selected.
- The Query Timeout (in seconds) field is available only if you select Native (JDBC) or Connection String access option. -
Click Test to verify that the database connection is complete.
-
Click Feature List to view the list of features.
-
Click Explore to view the components, such as tables and views, of the selected database.
NoteIt may be possible to read from unsupported databases by using the generic database driver through JDBC connection. Contact AutomationEdge if you want to access a database type that is not yet in the list of supported components.
Connections
You can also configure shared database connections through Connections available in the Project Explorer.
Connections hold the project-level shared database connections. The shared database connections can be used across the workflows and processes under the selected project.
Configure new shared database
You can configure new shared database connections using any one of the following ways:
-
In the Project Explorer, select Project → New → Database Connection
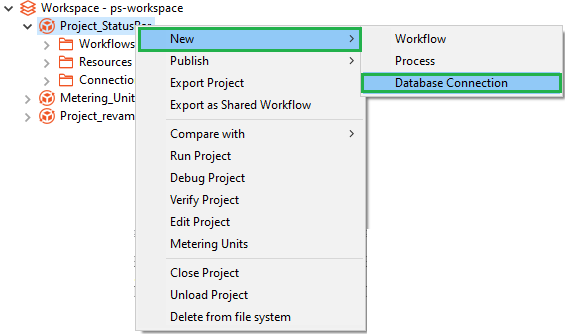
Project → New → Database Connection
OR
-
In the Project Explorer, select Workspace → Project → Right click on Connections → New Database Connection

Workspace → Project → Connection → New Database Connection
OR
-
In the Project Explorer, select Workspace → Project → Connections → Right click on Database connection → New Database Connection
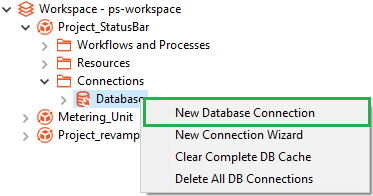
Workspace → Project → Connections → Database → New Database Connection
OR
-
In the Project Explorer, select Workspace → Project → Connections → Database → Right click on database connection → New

Workspace → Project → Connections → Database → Database connection → New
NoteFor details about configuring the database connection, see File menu
Edit shared database connection
To edit a shared database connection, in the Project Explorer go to Workspace → Project → Connections → Database → select database connection and right click the connection. In the contextual menu, select Edit and modify the details.
Updating or modifying the database connection will also update the shared database in all workflows and processes.
Delete shared database connection
To delete a shared database connection, go to the Project Explorer and click Workspace → Project → Connections, and right click on database. In the contextual menu, select Delete all DB Connections.
Updating or modifying the database connection will also update the shared database in all workflows and processes.
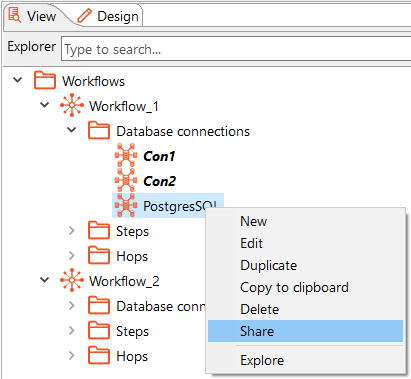
Share a local database connection
To share a local database connection, right click on local connection -> Share.
Share a local database connection
If you duplicate a local connection and make it a shared database connection, then the shared database connection overrides across the connection in workflows and processes in the project.