Security Hardening
Security Hardening is the process of enhancing a server's or application's security by following the best practices and standards, which results in a very secure operating environment.
For more information, see https://docs.bmc.com/docs/security/basic-tomcat-security-configuration-recommendations-924057229.html.
Configure Tomcat with TLS (HTTPS)
For configuring Tomcat with TLS(HTTPS), see the Apache Tomcat documentation at https://tomcat.apache.org/tomcat-10.1-doc/index.html.
Following are links to some useful topics in the documentation:
Set up Tomcat with client authentication
Client authentication adds an extra layer of security to your Tomcat server. It ensures that clients such Agents, Process Studios, or browsers must present a valid client certificate in order to connect to applications hosted on Tomcat.
Prerequisite: To enable client authentication, you must first configure SSL (HTTPS) and then configure Tomcat to verify client certificates using a Truststore. For illustration purposes, we use the example of setting up Tomcat 11.
Step 1: To configure SSL in Tomcat, add the following certificate tag in the server.xml file located in the bin folder of Tomcat 11. When enabling HTTPS in Tomcat 11, your connector configuration should look like this:
<Connector port="8443" protocol="org.apache.coyote.http11.Http11NioProtocol"
           SSLEnabled="true">
  <SSLHostConfig>
    <Certificate certificateKeystoreFile="tomcat.p12"
                 certificateKeystorePassword="tomcat"
                 type="RSA"
                 certificateKeystoreType="PKCS12" />
  </SSLHostConfig>
</Connector>
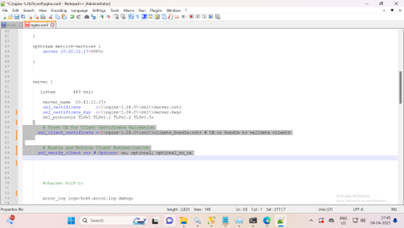
Step 2: Enable client authentication and add the following in server.xml file. The Truststore path specified in the server.xml file must contain all client certificates required to connect to the applications on this Tomcat server. To enable client authentication, update the connector as follows:
<Connector port="8443" protocol="org.apache.coyote.http11.Http11NioProtocol"
           SSLEnabled="true">
  <SSLHostConfig certificateVerification="required"
                 truststoreFile="client-truststore.jks"
                 truststorePassword="client"
                 truststoreType="JKS">
    <Certificate certificateKeystoreFile="tomcat.p12"
                 certificateKeystorePassword="tomcat"
                 type="RSA"
                 certificateKeystoreType="PKCS12" />
  </SSLHostConfig>
</Connector>
When using self-signed certificates for client authentication, one needs to manually add the certificate to the trust store. The public key or the full self-signed certificate (usually in .crt format) is imported into the trust file. In case of non-self-signed certificate, the trust file typically contains a list of trusted Certificate Authorities (CAs). Common clients include Agents, Process Studios, and browsers that access the AutomationEdge User Interface (AEUI) or other web applications. If a client connects without a valid certificate that is not available in the truststore, a bad certificate error appears.
Configure clients to provide certificates
All clients (Agents, Process Studios, browsers) must provide valid certificates while connecting to Tomcat applications. Steps to add client certificate to browser
- Open Browser Settings. For example, Chrome.
- Go to Privacy & Security, click Security.
- Scroll down and click Manage certificates under the Advanced section.
- In the Certificate Manager window, go to the Your Certificates tab.
- Click Import, browse and select the client certificate file (for example, .p12 or .pfx format).
- Enter the certificate password if prompted, click OK to complete the import.
- Upload Client Certificate When you import a client certificate into your browser, the certificate itself (public key) and the private key are imported.
The Manage Certificates section may vary depending on the browser you are using.
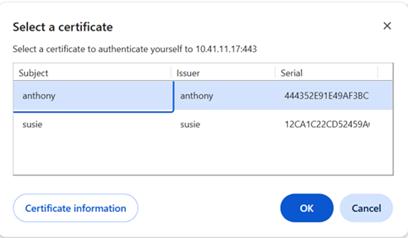
When you visit a Tomcat application, the browser will prompt you to select a certificate. If the certificate is trusted by the Tomcat server (present in its truststore), the connection will be allowed. Use the same steps for other browsers. For example, select a certificate-Chrome browser
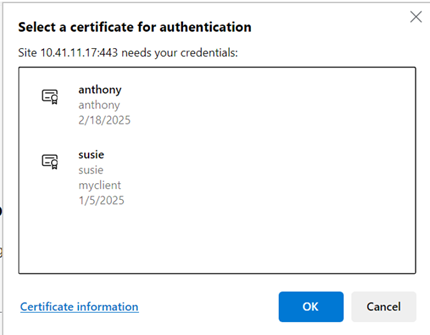
Select certificate- Edge browser.
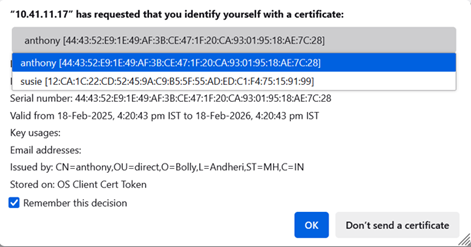
Select a certificate – Firefox browser
Add client certificate to Agent and Process Studio
For Agent, you must pass the certificate information using JVM options. Add the following JVM options:
-Djavax.net.ssl.keyStorePassword=<password of client certificate>
-Djavax.net.ssl.keyStoreType=PKCS12
Instead of providing a hardcoded path for the client certificate, the user can place the certificate in a folder within the Agent Home and specify the path as follows: -Djavax.net.ssl.keyStore=AGENT-HOME/ssl/AEclient.p12
For Agent: You can add these JVM options from the Agent UI in the Agent JVM Options section, available under the Agents tab in Agent Settings on the AEUI. These settings are retained even after the Agent is upgraded.
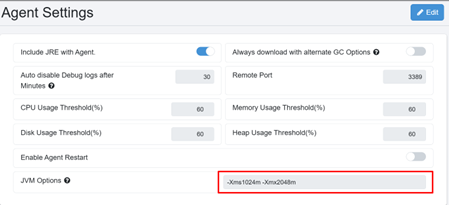
Alternatively, click Edit Agent under the Agent List on the Agents tab, and add the options in the JVM Options section.
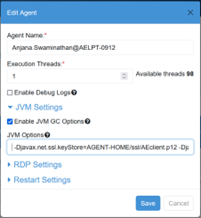
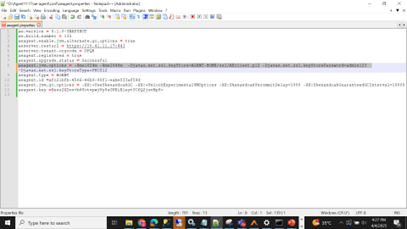
When you configure JVM settings from the user interface, they are saved in the aeagent.properties file located in the AGENT_HOME/conf directory. After the client certificate details are added to the agent properties file, the agent includes the client certificate information each time agent communicates with the server.
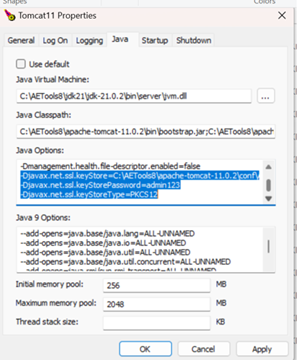
For Process Studio: Add the jvm options to the setenv.bat file which is in bin folder of tomcat. Ensure that this file is not overwritten during future upgrades.
It is recommended to always take a backup of this file before performing an upgrade.
For example, for client auth configuration in set-process-studio-env.bat see the following:
set OPT=-Djavax.net.ssl.keyStore=..\ssl\AEclient.p12 -Djavax.net.ssl.keyStorePassword=admin123 -Djavax.net.ssl.keyStoreType=PKCS12
After applying the settings, the Agent or Process Studio will present the client certificate to the Tomcat server. If the certificate is valid and trusted, register and start agent.
Setup nginx with client authentication
The ssl_client_certificate in nginx specifies the location of the trusted Certificate Authorities (CAs) that NGINX uses to verify client certificates.
If you are using self-signed certificates, this CA list typically consists of a bundle of trusted public client certificates.
To create a bundle of client certificates:
type client1.crt client2.crt client3.crt > clients_bundle.crt
The ssl_client_certificate directive accepts only a single file. If you have multiple client certificate files (.crt), you must concatenate them into a single file.
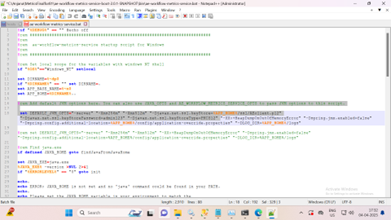
Add the client certificate details to the DEFAULT_JVM_OPTS variable in the ae-workflow-metrics-service.bat file. This enables the Metrics Service to include the client certificate when communicating with the NGINX server.
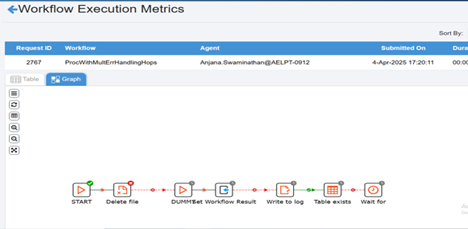
You must specify the client authentication details in the Tomcat service configuration to retrieve workflow metrics data on the Workflow Monitoring page. In this scenario, tomcat acts as a client to the NGINX server and must send the client certificate during communication.
Once all the required client authentication configurations are done in the Agent, Metrics Service, NGINX, and Tomcat, the metrics data is successfully retrieved and displayed in AEUI.
Security settings for ActiveMQ
For configuring Apache ActiveMQ security settings, see the following links:
-
https://activemq.apache.org/components/classic/documentation/how-do-i-use-ssl
-
https://activemq.apache.org/components/classic/documentation/security
-
https://activemq.apache.org/components/classic/documentation/encrypted-password
-
https://activemq.apache.org/components/classic/documentation/using-activemq-classic
After completion of security hardening activities configure the ActiveMQ authentication setup for AE.
ActiveMQ authentication for AE
ActiveMQ authentication is not enabled by default for AE. Configure the following settings in the AE engine.
- Simple authentication plugin is used to set authentication for ActiveMQ. Encrypt the password and store it safely in configuration files. Following is the encrypt password command:
$bin/activemq encrypt --password activemq --input mypassword
-
Where the password you want to encrypt is passed with the input argument, the password arguments is a secret used by the encryption.
-
You get an encrypted password in the output. For example, Encrypted password: K6lz7RKJg9DzGiX8eRbvUw==
-
In the \ ActiveMQ home\ /conf/credentials-enc.properties file, add the following:
aeuser.password=ENC(K6lz7RKJg9DzGiX8eRbvUw==) -
You need to edit the \ ActiveMQ home\ /conf/activemq.xml file.
-
You need to enable scheduler support to true. For example
<broker xmlns="http://activemq.apache.org/schema/core" brokerName="localhost" dataDirectory="${activemq.data}" useJmx="true" schedulerSupport="true">
- Delete the following bean definition:
<bean class="org.springframework.beans.factory.config.PropertyPlaceholderConfigurer">
<property name="locations">
<value>file:${activemq.conf}/credentials.properties</value>
</property>
</bean>
- Add the following bean definitions:
<bean id="environmentVariablesConfiguration" class="org.jasypt.encryption.pbe.config.EnvironmentStringPBEConfig">
<property name="algorithm" value="PBEWithMD5AndDES" />
<property name="passwordEnvName" value="ACTIVEMQ_ENCRYPTION_PASSWORD"/>
</bean>
<bean id="configurationEncryptor" class="org.jasypt.encryption.pbe.StandardPBEStringEncryptor">
<property name="config" ref="environmentVariablesConfiguration" />
</bean>
<bean id="propertyConfigurer" class="org.jasypt.spring4.properties.EncryptablePropertyPlaceholderConfigurer">
<constructor-arg ref="configurationEncryptor" />
<property name="location" value="file:${activemq.conf}/credentials-enc.properties"/>
</bean>
- Add **\ simpleAuthenticationPlugin\ ** tag under broker element in the activemq.xml file.
<plugins>
<simpleAuthenticationPlugin anonymousAccessAllowed="false">
<users>
<authenticationUser username="admin" password="${aeuser.password}" groups="users,admins"/>
</users>
</simpleAuthenticationPlugin>
</plugins>
- Set up ACTIVEMQ_ENCRYPTION_PASSWORD.
After you have configured the authentication for ActiveMQ, set the ACTIVEMQ_ENCRYPTION_PASSWORD environment variable.
- To set environment variable on Windows machine:
a. Under System Variables, add New variable.
b. Enter the variable name as ACTIVEMQ_ENCRYPTION_PASSWORD and enter activemq as the variable value. For example, ACTIVEMQ_ENCRYPTION_PASSWORD=activemq.
- To set environment variable on Linux machine:
Ensure you have the root privilege to create a file under /etc/profile.d.
i. Create new file under directory /etc/profile.d which will set the environment variable. Following is the syntax for creating a file:
$cd /etc/profile.d/
$sudo touch automationedge.sh
Creating the new file enables all users using Linux machines to access the environment variable with ease.
ii. Edit automationedge.sh and add the following:
export ACTIVEMQ_ENCRYPTION_PASSWORD=activemq
iii. Save the file and restart the machine.
- To edit ae.properties file in **\ AE home\ **.
i. Open ae.properties file and find properties mq.username and mq.password.
mq.username and mq.password properties are empty by default.
ii. Enter the following details under ActiveMQ credentials.
#ActiveMQ credentials
mq.username=aeuser
mq.password=mypassword
- Restart services for ActiveMQ and Tomcat.
ActiveMQ: Enable JMX with authentication
To enable JMX follow the instructions at https://activemq.apache.org/components/classic/documentation/jmx
You must ensure that only the owner has read and write permissions on the JMX file, since it contains the passwords in clear text. For security reasons, the system checks that the file is only readable by the owner and exits with an error if it is not. Therefore, in a multiple-user environment, you should store the password file in private location such as your home directory.
- Linux
chmod 600 jmx.password
- Windows
https://docs.oracle.com/javase/1.5.0/docs/guide/management/security-windows.html
AE with SSL
AE supports secure URL. As AE is hosted on Apache Tomcat, modify the configuration to secure Tomcat server with TLS.
mq.username and mq.password properties are empty by default.