Migrate from previous release
In the chapter, you will learn about migrating AutomationEdge fromrelease 7.*.* to the current release.
For migration scenarios from releases prior to 7.. to release 7.., see the AutomationEdge_R7.7.3_Installation guide.
The chapter includes the following topics:
Pre-migration activities
Before you start the migration process, ensure that you:
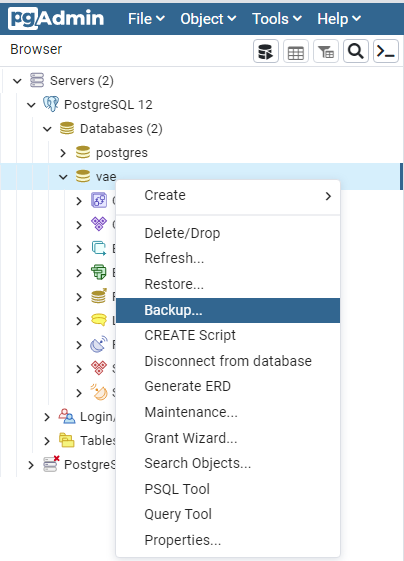
- Take the backup of your database. For example, if your database is PostgreSQL, then:
Sign in to the database with your username and password, and then go to the database → right-click and select Backup.
Save the database backup in a location of your choice.
- Ensure that none of the Requests are in New or Execution Started status.
If a workflow is in Execution Started state, then we recommend that the execution is completed before you start with the migration.
i. Stop Tomcat before proceeding with the software installations.
ii. Upgrade the following software:
- Upgrade to Java version 21.
Setup the environment with OpenJDK 21 JRE for Tomcat/ActiveMQ for AutomationEdge R8.0.0 onwards. For details, see Install Java.
-
Upgrade the database version. For installation details, see Install database.
-
Upgrade the Apache ActiveMQ version.
If ActiveMQ is using RDBMS storage, follow the steps as mentioned in ActiveMQ about adding 4 jars from https://mvnrepository.com/.
-
Start ActiveMQ and test by storing sample message from the admin console.
-
Upgrade the Apache Tomcat version. For installation details, see Install Apache Tomcat.
If ActiveMQ is using RDBMS storage, follow the steps as mentioned in ActiveMQ about adding 4 jars from https://mvnrepository.com/.
-
Start ActiveMQ and test by storing sample message from the admin console.
-
Upgrade the Apache Tomcat version. For installation details, see Install Apache Tomcat. If Tomcat services have not been configured for JRE 21 perform the following: Tomcat Services need to be either recreated or reconfigured after migration to JRE 21 version. Following are the steps to reconfigure Tomcat:
-
Stop Tomcat if not already stopped.
-
Locate and open execute Tomcat Monitor Application \TomcatServiceName\w.exe available at \Tomcat Home\bin. For example, tomcar10w.exe or AE-Tomcat-10.1.30w.exe in case AE is installed using the AE installer in E:\tools\apache-tomcat-10.1.30\bin\.
-
It opens the Tomcat Monitor Application.
-
Following dialog appears, change the Java Virtual Machine Path to point to the JRE 21 jvm.dll available in \JRE_HOME/bin/server.
ii. Pre-migration activities for Agents:
- Approach 1: Agents can be bundled with JRE 21 from the AutomationEdge Server.
OR
- Approach 2: Agents can use system JRE 21.
We recommend you follow Approach 1, where the bundled JRE in Agent is automatically upgraded from JRE binaries on AE server in future upgrades as well.
- Following are the actions so that Agents are bundled with JRE 21 from AutomationEdge server:
i. In the AE UI, navigate to Agents 🡪 Agent Settings page. On the page toggle the Include JRE with Agent switch to enable the bundling of JRE with the Agent.
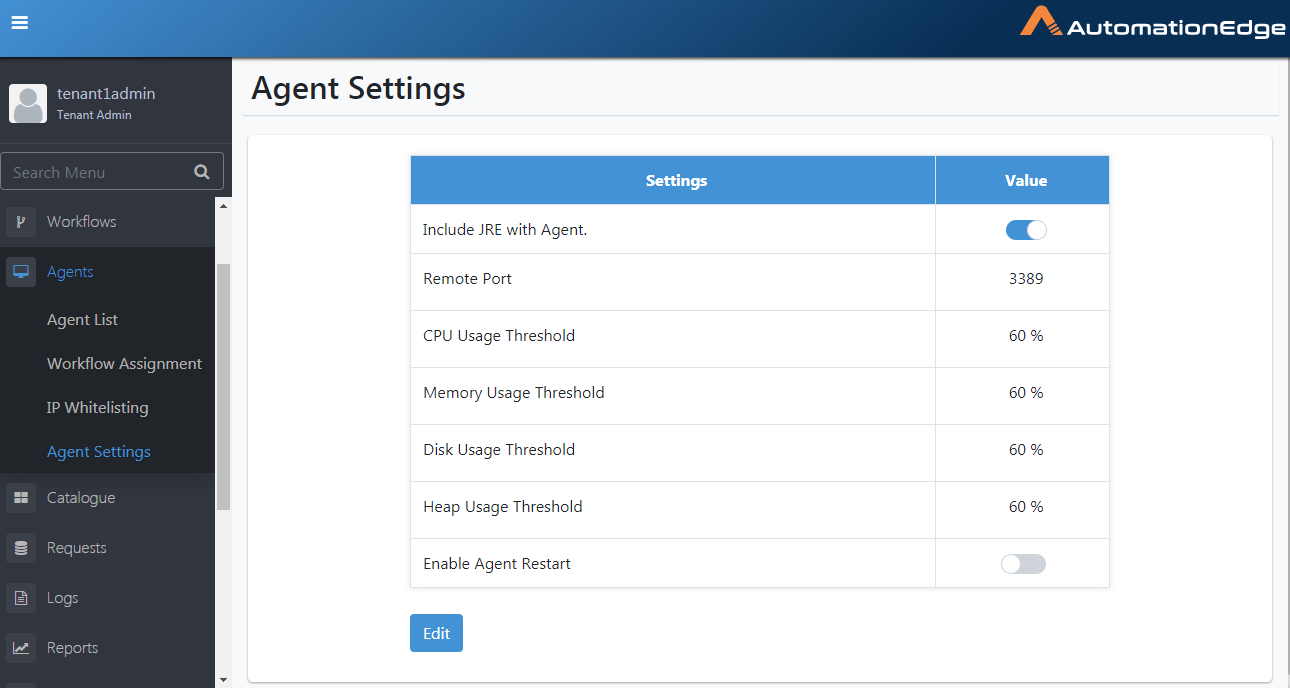
When the system migrates to 8.0.0, Agents will automatically upgrade and migrate to JRE21 supplied by AE.
ii. Stopping Agents:
-
For AutomationEdge releases prior to 5.4.0, stop all Agents manually as a first step of migration.
-
For Release 5.4.0 onwards Stopping Agents is optional - provided 'Include JRE with Agent' (option under Agents 🡪 Agent Settings) is enabled.
-
Artefacts: Make sure you have all the artefacts of the latest AE release and a valid AE license.
AutomationEdge Server migration
War Files Deployment
Backups
You must take backup of the following:
- Backup AutomationEdge database. See the AutomationEdge_R8.0.0_Postgre_SQL_Backup guide for Postgres database backup.
- Backup AutomationEdge home.
- Backup AutomationEdge internal configuration files from Tomcat home/webapps/aeengine/WEB-INF/classes, especially if they were modified to suit the customer environment. restvalidation.json
Delete files
-
Delete vae.war/aeengine.war, vaeinterface.war/remedyforceinterface.war , aeintegrationservice.war and aeui.war from \Tomcat home\webapps directory.
-
Delete remedyforceinterface.war (if present. Relevant only if remedyforceinterface.war is deployed) from \Tomcat home\webapps directory.
-
Delete directories vae/aeengine, vaeinterface/remedyforceinterface and aeui from \Tomcat home\webapps
Copy Files
Once all the war files and the corresponding directories are deleted, copy the new war files aeengine.war and aeui.war to \Tomcat home\webapps
Start Tomcat
Start the Tomcat Service so that the war files are extracted in webapps directory.
Update Files
Update the following internal properties files in \Tomcat home/webapps/aeengine/WEB-INF/classes.
-
application.properties
-
restvalidation.json
-
configuration.properties
Do not replace these files from the backup. It may result in unstable application deployment.
Restart Tomcat
Restart the Tomcat service if there are any updates to the internal properties files above to make the changes effective.
Security Hardening
If settings are not done previously, for details, see Security Hardening.
Post Migration Steps
In the section, we discuss the post migration steps required with respect to - License, Agents, Plugins & Workflows and Workflow Schedules.
License
In case you do not have a compatible license, sign in as an Admin and upload and apply the AE license, compatible with the current release to use license features like Advanced Agents, Turbo Agents, and Assisted Agents.
Agents
Post migrations steps for Agents are required only if the Pre-migration activities for Agents are not performed.
In case of Agent upgradation failure, use any of the following two options.
We recommend Option 1.
Option 1 (Agent is bundled with JRE from AE server - preferred option)
Complete the following settings in AE UI, if Include JRE with Agent is not enabled:
-
In the AE UI, navigate to Settings 🡪Agent Settings and toggle the Include JRE with the Agent switch.
-
If case Agents throw an error during upgradation, then set the following property-
-
Open the application.properties file present under AGENT_HOME/conf folder
-
Change the property agent.upgrade.status value to Successful
Option 2 (Agent uses System JRE)
We recommend you follow Option 1, where the bundled JRE in Agent is automatically upgraded from JRE binaries on AE server in future upgrades as well.
If "Include JRE with Agent" is disabled before and even after AE Server migration, then Agent can use System JRE.
Complete the following steps:
-
Setup JRE 21 on the Agent machines manually. For details, see Install Java.
-
Open the application.properties file present under AGENT_HOME/conf folder.
-
Check agent.upgrade.status*.* If the value is other than Successful, change the value to Successful.
Start Agents
Any stopped Agents prior to upgrade should be started.
Post Agent Startup
-
All Agents start as Standard Agents. You may edit the Agents to Advanced or Turbo Agents. You may change Agent Mode depending on availability in license subscribed. However, Agent Mode cannot be changed when an Agent is in Unknown state.
-
Agents acquire Tenant level Proxy settings if any during upgrades, discarding the Agent level proxy settings. The required changes need to be done manually.
-
If you are running Agent as Administrator during restart after upgrade, it does not start Agent as Administrator. If you wish to run the Agent as Administrator, once all the Agents are upgraded you need to shut the Agent and restart Agent as Administrator.
Plugins & Workflows
-
As a part of a migration to this Release 8.0.0, all the Process Studio workflows are made inactive.
-
This is due to framework changes. If server is updated such that plugins do not match supporting framework versions on AE server, all the workflows using such plugins are disabled. User will be able to enable these workflows after new plugins are uploaded.
-
User should upload the new zip of Plugins 4.0 or higher provided in the release package. Until the new plugins are uploaded onto the server, user will not be able to make the workflows active again. Once new plugins are uploaded the workflows can be enabled*.
-
Login with System Administrator and upload Plugins zip files.
-
Now activate all workflows.
When uploading PS-plugins using zip, you may get errors for OOTB, Advanced Rest Client, or WebGUI plugins, stating Duplicate step or process entry name. Workaround:
- Plugins distribution contains the following zip files:
- Data-plugins-4.0.zip
- IT-plugins-4.0.zip
- ITSM-plugins-4.0.zip
- MachineLearning-plugins-4.0.zip
- PS-plugins-4.0.zip
- Script-plugins-4.0.zip
- Cloud-Storage-4.0.zip
- The PS-plugins-4.0.zip contains several jars, including:
- gui-automation-4.0.jar
- advanced-rest-client-4.0.jar For PS-plugins.zip you might get errors while uploading. There are two possible workarounds as follows. You may follow any one of these.
- Upload two new plugin jars followed by PS-plugins.zip
- Upload gui-automation plugin Jar (gui-automation-4.0.jar) independently
- Then upload advanced rest client plugin jar (advanced-rest-client-4.0.jar)
- Then use the PS-plugins-4.0.zip to update rest of the plugins
- Upload PS-plugins-4.0.zip again and again, until all plugin specific errors are resolved. Typically, you might have to upload it thrice.
Schedules
Repeat interval values for minutes from Release 5.4.0 onwards, is restricted to 1, 2, 3, 4, 5, 10, 15, 20, 30, 45. As a part of AE Server migration, Schedules having minute's interval other than the allowed values mentioned previously are disabled. Users need to update the interval with valid values after migration and then enable such schedules.
Database Drivers
We ship JDBC jars for all three databases we support, that is, PostgreSQL, Oracle, and MSSQL Server with the application.