Install AE Server
In the chapter, you will learn how to install Java, database, ActiveMQ, and Apache Tomcat.
The chapter includes the following topics:
For Linux installation, the path is /home/user/AutomationEdge.
Install Java
You need to install Java to work with AE Server.
Setup Eclipse Temurin Java 21
You need to setup Eclipse Temurin Java 21.
To setup Eclipse Temurin Java 21:
-
Access the binaries for the JDK at https://adoptium.net/en-GB/temurin/releases/?version=21.
-
Identify the JRE binaries for the operating system, such as Windows and Linux with desired architecture (x64 or x86) and download.
On the site page, select as follows:
- Operating System: Windows or Linux
- Architecture: x64 or x86
- Package Type: JRE
- Version: 21-TLS Click on the selection to download the JRE zip file.
- On your system, unzip the JRE binaries into the \preferreddrive\AutomationEdge\tools folder.
Setup JRE_HOME
Set the JRE_HOME environment variable to point to the JRE installation directory.
To set environment variable:
-
Access the System Properties dialog, and then click Environment Variables.... The Environment Variables dialog appears.
-
In the System variables section, click New..., the New System Variable dialog appears. Enter the following details in the dialog:
-
Variable name: Enter as, JRE_HOME.
-
Variable value: Enter path of the JRE installation directory. For example, preferreddrive\AutomationEdge\tools
From AE release 8.0.0 onwards, point JRE_HOME to the JRE21 path. If you install AE using the installer you must ensure that the AE_JRE_HOME environment variable points to the JRE installation directory.
Edit Path environment variable
After creating the JRE_HOME variable, edit the Path environment variable.
To edit Path environment variable:
-
In the Environment Variables dialog, select Path in the System variables section and click Edit.
-
In the Edit environment variable dialog, enter %JRE_HOME%bin at the start of the path.
If you installed AE using installer your path variable must point to %AE_JRE_HOME%/bin.
Verify installed Java
Verify the installed Java, using the following command:
java --version
For Eclipse Temurin Java 21, the following details appear:
openjdk version "21.0.4" 2024-07-16 LTS OpenJDK Runtime Environment Temurin-21.0.4|7 (build 21.0.4|7-LTS) OpenJDK 64-Bit Server VM Temurin-21.0.4|7 (build 21.0.4|7-LTS, mixed mode, sharing)
Install database
Install any or all the following databases, as required:
Install PostgreSQL database
Install PostgreSQL database, which you have downloaded from https://www.enterprisedb.com/downloads/postgres-postgresql-downloads.
For PostgreSQL installation and administration details, see https://www.postgresql.org/docs/.
Best practice: Create a dedicated database user with appropriate privileges for accessing the AE database, rather than using default administrative accounts, such as the postgres or admin.
A dedicated database user provides security, isolation, and limited scope to the database.
To create a database and database user:
-
After installing PostgreSQL, create a blank database, vae.
-
Create a user and role with granular access permissions, read-write.
Use the master user created when installing PostgreSQL for creating other users, roles, and databases only.
- After creating the AE user, update ae.properties file with the user credentials.
Approach for setting up fine-grained access control in PostgreSQL
Following is the recommended approach for setting up fine-grained access control in PostgreSQL:
-
Use the master user to create roles per application, such as read-write and read-only roles.
-
Add permissions to allow these roles to access various database objects. For example, the read-only role can only run SELECT queries.
-
Grant the roles the least possible permissions required for the functionality.
-
Create new users for application or specific functionality. For example, ae_app_user and reporting_user.
-
Assign the applicable roles to these users to quickly grant them the same permissions as the role. For example, grant the read-write role to ae_app_user and grant the read-only role to reporting_user.
-
Revoke user permissions by removing the user's role.
Install Oracle
Install Oracle database, if required.
To install Oracle database:
- Install Oracle database.
For Oracle installation and administration details, see https://docs.oracle.com/en/database/oracle/oracle-database/index.html.
- Create a user, vae and grant appropriate permission. For example, read-write.
Install Microsoft SQL Server
Install Microsoft SQL Server, if required.
We recommend using SQL Server 2019|.
To install Microsoft SQL Server:
-
Download Microsoft SQL Server and apply the required service packs to install the MSSQL Server.
-
Create a database, vae on MSSQL Server.
The default database collation on SQL Server is SQL_Latin1_General_CP1_CI_AS. If you need Unicode support, you will need to create the database with Latin1_General_100_CI_AS_SC_UTF8 collation.
Install Apache ActiveMQ
- Install or upgrade Apache ActiveMQ.
- If you have the Apache ActiveMQ 5.18.x version on your system, then upgrade to the latest ActiveMQ Classic 6.1.x version. For release 8.0.0, the latest version of ActiveMQ Classic is 6.1.3. For Windows: Download apache-activemq-6.1.3-bin.zip For Linux: Download apache-activemq-6.1.3-bin.tar.gz
- For Apache ActiveMQ installation and administration details, see https://activemq.apache.org/components/classic/documentation/getting-started.
- Configure username and password for ActiveMQ.
We highly recommend enabling JMX on Apache ActiveMQ with password protection. If you enable JMX, then you can monitor the health of the ActiveMQ. To enable JMX follow the instructions at https://activemq.apache.org/components/classic/documentation/jmx.
Install Apache Tomcat
Install Apache Tomcat and configure the details.
To install Apache Tomcat:
-
Download Apache Tomcat for 64-bit from from https://archive.apache.org/dist/tomcat/tomcat-10/v10.1.30/bin/(file:///C:\Users\swami\Desktop\from%20https:\archive.apache.org\dist\tomcat\tomcat-10\v10.1.30\bin\).
-
Install Apache Tomcat and configure the details, as required.
For Apache Tomcat installation and administration details, see https://tomcat.apache.org/tomcat-10.1-doc/index.
After Apache Tomcat installation and configurations, complete the following configurations:
Delete Tomcat OOTB applications
Before deploying AE apps, user must delete the out-of-the-box apps, such as ROOT, manager, docs, and so on that Tomcat installation packages provide.
To delete the apps:
-
Go to <Tomcat home>/webapps.
-
Delete following directories: docs, examples, host-manager, manager, and ROOT.
Make aeui the default application
Configure Tomcat's default settings to make aeui the default application.
To configure the default application settings:
- Add docBase detail in the <Tomcat home>/conf/server.xml file. In the <Host></Host> tags, enter:
<Context path=\"\" docBase=\"aeui\"/\>
- (Only) for SSL setup, edit <TOMCAT_HOME>/conf/web.xml file to redirect to the aeui application. Before the </web-app> tag, enter:
<!-- Require HTTPS for everything except /img (favicon) and css -->
> \<security-constraint\> \<web-resource-collection\> \<web-resource-name\>HTTPSOnly\</web-resource-name\> \<url-pattern\>/\*\</url-pattern\> \</web-resource-collection\> \<user-data-constraint\> \<transport-guarantee\>CONFIDENTIAL\</transport-guarantee\> \</user-data-constraint\> \</security-constraint\> \<security-constraint\> \<web-resource-collection\> \<web-resource-name\>HTTPSOrHTTP\</web-resource-name\> \<url-pattern\>\*.ico\</url-pattern\> \<url-pattern\>/img/\*\</url-pattern\> \<url-pattern\>/css/\*\</url-pattern\> \</web-resource-collection\> \<user-data-constraint\> \<transport-guarantee\>NONE\</transport-guarantee\> \</user-data-constraint\> \</security-constraint\>
- After all the steps are complete, start or restart Tomcat server.
To check if the application is running on SSL and is redirecting the http request to https automatically, enter the URL as https://application URL.
Hide server name and version
Hide the Tomcat server name and version. Complete the process of hiding the details and then restart the Tomcat server.
To hide Tomcat server name and version:
-
Go to <Tomcat home>/lib and create the directory org/apache/catalina/util under lib.
-
In the new directory, create a ServerInfo.properties file, and add an entry for server.info property in the file.
Keep the value for this property blank. For example, server.info=.
- Edit server.xml configuration file available under <Tomcat home>/conf, and add the following details in the Connector node:
The step is optional.
server="AutomationEdge"
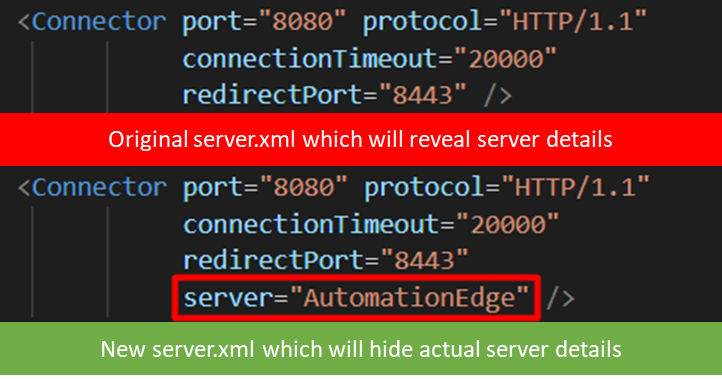
Figure 2: Connector node view
Tomcat: Access Log Format configurations
Customize the access log format with a specific pattern for better tracing and logging details. Modify the AccessLogValve configuration in server.xml.
\<Valve className=\"org.apache.catalina.valves.AccessLogValve\" directory=\"logs\" maxDays=\"30\" prefix=\"localhost_access_log\" suffix=\".txt\" pattern=\"%{yyyy-MM-dd\'T\'HH:mm:ss.SSSXXX}t \[%{X-Trace-Id}o\] \[%I\]\[%h\] - %{u}i "%r" %s %b %F %{ms}T "%{Referer}i""%{User-Agent}i"\" /\>
The configuration will produce an access log entry. For example,
2024-09-24T17:25:47.346|05:30 [66f2a8c302140f88f1e8c64fd917db55] [http-nio-8080-exec-5] [127.0.0.1] - - "GET /aeengine/rest/system/health HTTP/1.1" 200 893 149 152 "-" "Mozilla/5.0 "
Tomcat: Logging configuration
To minimize unnecessary console logging in Tomcat, you can configure logging to avoid output to catalina.out by removing the java.util.logging.ConsoleHandler and using only org.apache.juli.AsyncFileHandler. The configuration will help reduce redundant logging in the console while maintaining file-based logging.
Configure Tomcat logging
To configure the Tomcat logging configure the logging.properties file and ensure that file-based logging is configured properly.
To edit the logging.properties file:
-
Go to the Tomcat installation's conf/ folder and open the logging.properties file, that is, $TOMCAT_HOME/conf/logging.properties.
-
Modify the Root Logger Handlers: By default, Tomcat is configured to log on to both, the console and a file. To prevent logging to the console, catalina.out, replace:
.handlers = 1catalina.org.apache.juli.AsyncFileHandler,java.util.logging.ConsoleHandler
with
.handlers = 1catalina.org.apache.juli.AsyncFileHandler
The change will ensure that logging is handled only by AsyncFileHandler and not by ConsoleHandler, effectively preventing unnecessary console output.
Configure file-based logging:
Make sure that org.apache.juli.AsyncFileHandler is properly configured to log messages to a file. Verify or set the following properties in the same logging.properties file:
1catalina.org.apache.juli.AsyncFileHandler.level = FINE 1catalina.org.apache.juli.AsyncFileHandler.directory =\${catalina.base}/logs 1catalina.org.apache.juli.AsyncFileHandler.maxDays = 90
The settings will direct the logging to a file under the **\${catalina.base}/logs** directory with a retention period of 90 days.
Tomcat: Configure CATALINA OPTS
First create the setenv.bat and setenv.sh files for Windows and Linux, respectively. Configure CATALINA_OPTS to point to ae.properties and relevant log location, that is, $TOMCAT_HOME/logs.
| Windows | Linux |
|---|---|
Under **\${CATALINA_HOME}\\bin** folder: | **Under \${CATALINA_HOME}/bin** folder: |
| setenv.bat | setenv.sh |
set CATALINA_OPTS=-Dspring.config.additional-location="%AE_HOME%/conf/ae.properties" -DLOG_DIR=”%CATALINA_HOME%/logs” | CATALINA_OPTS="-Dspring.config.additional-location=\"$AE_HOME/conf/ae.properties\" -DLOG_DIR=\"$CATALINA_HOME/logs\"" |
Tomcat: Memory Settings
You can set Tomcat memory settings in the following two ways:
- Memory settings for Tomcat as service
OR
- Memory settings for Tomcat using command line
The memory setting for Tomcat is mandatory.
Memory settings for Tomcat as service
When running Tomcat as service, modify the memory settings, as required.
To configure Tomcat as service details:
-
Stop Tomcat service, if it is up.
-
Open the command prompt, go to %TOMCAT_HOME%/bin execute service.bat install. The Tomcat service is installed.
-
Go to %TOMCAT_HOME%/bin, and select the Tomcat executable, and run it. For example, tomcat10w.exe. Running the executable will allow you to make changes to the Tomcat properties, if required.
-
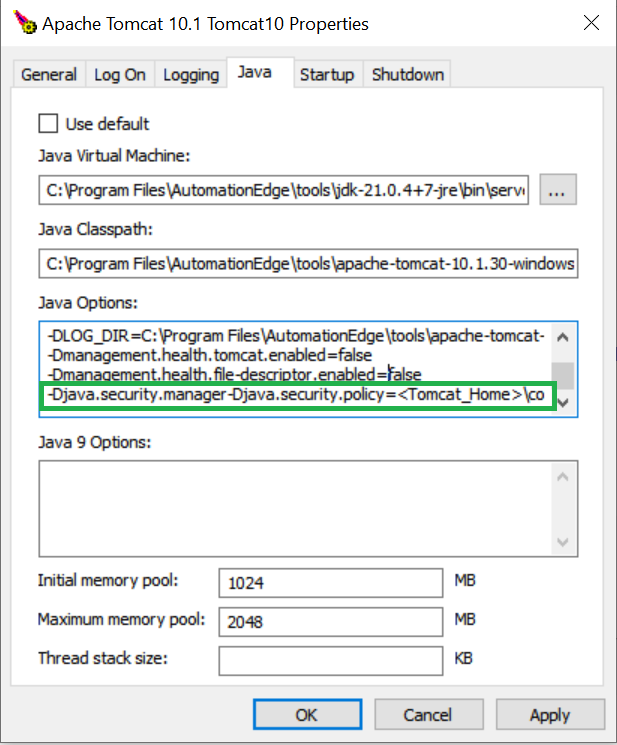
In the Java tab, make the following changes:
Java Options section, enter:
`-Djava.util.logging.config.file=<yourPath>\conf\logging.properties
-Dspring.config.additional-location=<yourPath>\AutomationEdge\aehome\conf\ae.properties
-DLOG_DIR=<yourPath>\AutomationEdge\tools\apache-tomcat-10.1.30-windows-x64\apache-tomcat-10.1.30\logs ` -Dmanagement.health.tomcat.enabled=false
-Dmanagement.health.file-descriptor.enabled=false
Change the following properties:
-
Initial memory pool: 1024 MB*
-
Maximum memory pool: 2048 MB*
You can increase the allocated memory to higher values depending upon the load on the AE server. For example, if a machine has 8 GB RAM set, the Initial memory pool: 2048 MB* and Maximum memory pool: 4096 MB*.

Figure 3: Apache Tomcat 10.1 Tomcat10 Properties dialog
Remove all details from the Java 9 Options section.
- Start or restart the Tomcat Service.
For details about starting the Tomcat Security Manager, see https://tomcat.apache.org/tomcat-10.0-doc/security-manager-howto.html.
You can also see Enable Apache Tomcat Security Manager.
Ensure you use the absolute path to the policy file. For example, see the following screenshot:
Memory settings for Tomcat using command line
When running Tomcat using command line, modify the memory settings, as required.
To configure Tomcat memory settings:
-
Stop Tomcat service, if it is up.
-
Edit setenv.bat or setenv.sh for Windows and Linux respectively in %TOMCAT_HOME%/bin.
-
Add the following detail to the setenv file:
-
For Windows set JAVA_OPTS=-Xms1024m -Xmx2048m.
-
For Linux export JAVA_OPTS="-Xms1024m -Xmx2048m".
You can increase the allocated memory to higher values depending upon the load on the AE server.
- Start or restart Tomcat.
Verify and start services
Change the Startup Type to Automatic for the following Windows services and start them in the following order:
-
Database installed for AE, such as PostgreSQL
-
ActiveMQ
-
ApacheTomcat, the version installed for AE