Publish: Create
Workflows may be published on AutomationEdge by using Process Studio Publish -> Create option for creating new workflows on AutomationEdge or Publish -> Update option to update existing workflows on AutomationEdge.
Publish Sales Revenue to Trial instance
In the exercise, publish Sales Revenue project for the first time using Process Studio Publish -> Create option. Following are the steps to publish an AutomationEdge workflow using Process Studio Publish option:
Publish: Create
-
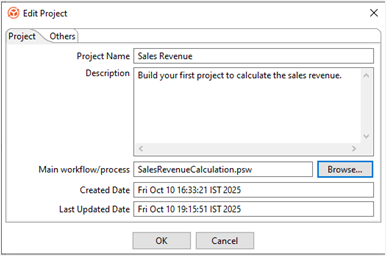
Open Sales Revenue project, and then right-click and select Edit Project. In the Edit Project dialog, select the SalesRevenueCalculation workflow file to set as the main workflow.
Notes:- Always select the workflow or process file as the main file before publishing. Else, you will see an error message.
- If the project has multiple workflows or processes, then set the parent workflow or process as the main workflow or process.
-
Again, right-click on the project and select Publish -> Create. The Publish confirmation (psp/psw) dialog appears.
Note:If you have not saved the password for the current session, then AutomationEdge Connection Details dialog appears. Provide the password.
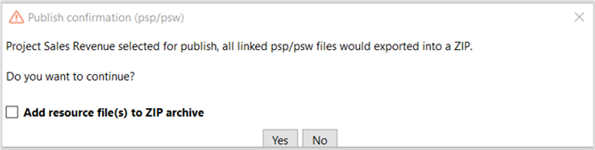
In the example, we do not have any supporting .csv, .txt, .xlsx, or other files. Therefore, do not select the checkbox, and click Yes.
Note:If you want to export the supporting files along with the workflow or process, then select the Add resource file(s) to ZIP archive checkbox. A corresponding dialog appears.
-
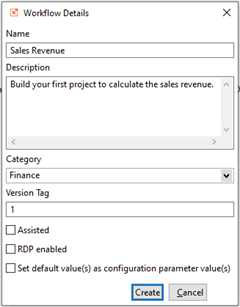
A Workflow Details dialog appears with the following details:
- Assisted: Enable Assisted for attended workflows.
- RDP enabled: Enable RDP enabled if working on Controller Agent machine.
- Set default value(s) as configuration parameter value(s): Enable the checkbox, if you wish to set default values as configuration parameter values.
Note:In case of most GUI workflows and workflows with particular steps the workflow is internally marked for sequential execution. Else, if one of the workflows running as non-sequential workflow is terminated, then all the subsequent requests remain in the New state.
For the workflows, after publishing, the Enable Sequential Execution checkbox is automatically selected on the AutomationEdge UI workflow edit page.
-
In the Workflow Details dialog, click Create. A message appears confirming that the workflow is created successfully.
-
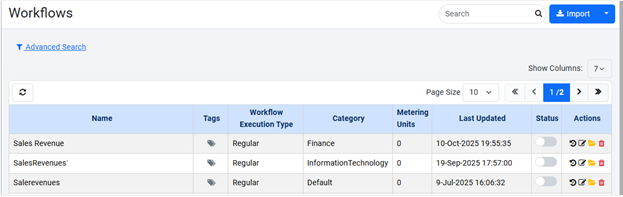
Now, logon to AutomationEdge instance on which you created the workflow. In the Workflow List menu, you can see the newly published Sales Revenue workflow.
 Note:
Note:If you want to export the supporting files along with the workflow or process, then select the Add resource file(s) to ZIP archive checkbox. A corresponding dialog appears.
-
After publishing the workflow to AutomationEdge server, you need to configure and then activate the workflow. In the Actions column, click
 . The Configure Workflow Details page appears.
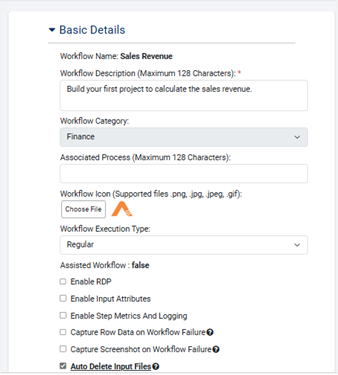
Details provided when publishing through Process Studio appear in the respective fields. Enter other details, such as Expected Completion Time, Maximum Completion Time, Cleanup Requests older than, and Manual Execution Time, as required.
i. In the Agentic AI Tool Configuration section, configure the details. The section is available only if the ae.feature.agentic-ai-tools.enabled property is set as true in the ae.properties file.

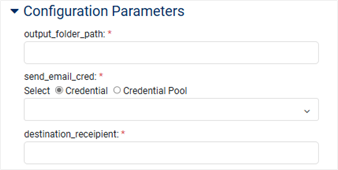
ii. In the Configuration Parameters section, configure the details, if required.
iii. In the Tags section, configure the details, if required.

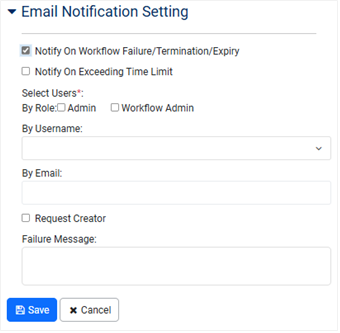
iv. In the Email Notification Setting section, configure the details, and then click Save. Workflow updated successfully message appears.
-
In the Status column, toggle the switch to activate the workflow. The process of publishing workflow to AutomationEdge (Development instance) using Publish -> Create in Process Studio.