Workflow Executor
Description
Workflow Executor is a step in the Flow Plugin for Process Studio Workflows. The workflow executor executes a Process Studio workflow. It is like the Process Executor step but works on workflows. By default, the specified workflow is executed once for each input row. This row can be used to set parameters and variables, and it is passed to the workflow in the form of a result row. A group of records can also be passed based on the value in a field (when the value changes the workflow is executed) or on time. In these cases, the first row of the group or rows is used to set parameters or variables in the process.
Configurations
| Field Name | Description |
|---|---|
| Step name | Specify the name of the step as it appears in the workflow workspace. The name must be unique in a single workflow. |
| Workflow | Use this section to specify the workflow to execute. You have the following options to specify the workflow: - Use a file for the workflow: when this option is enabled, you can enter the .psw file that is to be used as workflow. The filename may contain variables (for example, you can use the built-in. Internal.Workflow.Filename.Directory variable to construct a filename relative to the current workflow), or you can use the Browse to select a file using a file browser. - Use a workflow from the repository: This option is unavailable currently. - Specify by reference: This option is unavailable currently. The following two buttons in this section makes it easier to work with the workflow: - New workflow: Click to create a new workflow, which will open in a new tab. - Edit workflow: Click to open the currently selected workflow in a new tab to modify the details. |
| Parameters Tab: | Specify which field to use to set a certain parameter or variable values. If multiple rows are passed to the process, the first row is taken to set the parameters or variables. |
| Variable / Parameter name | The Parameters tab allows you to define or pass stream fields as variables down to the workflow. |
| Field to use | Specify which field to use to set a certain parameter or variable value. If you specify an input field to use, the static or variable input value is not used. |
| Static input value | Instead of using a field, specify a static value here To map a parent parameter to a child parameter: 1. Press Ctrl+Space to view the available parent parameters and variables. 2. Select the required variable, such as ${parent_param}. How parameter mapping works: - Non-credential parent parameter to a child parameter: The step passes the parameter's value. - Whole credential ( ${parent_cred}) to a child credential parameter: The step passes the full credential. - Credential sub-attribute ( ${parent_cred.Username}) to a child credential parameter: The system still passes the full credential. - Credential to a non-credential child parameter: The system displays a warning when selecting OK. Proceeding sends the credential as a JSON value Notes: - Credential parameters: Map an entire parent credential parameter to a child credential parameter. For example, select ${parent_cred} for the child's credential parameter. The step passes the complete credential object (username, password, and all other attributes) to the child. - Alternatively, select a single attribute of the parent credential, such as ${parent_cred.Username}. When the child parameter uses the credential data type, the system still passes the full credential to the child (not just the selected single attribute). Passing the full credential ensures the child authenticates correctly. Mapping a credential to a non-credential parameter: Mapping a credential to a child parameter that does not use a credential type triggers a warning upon selecting OK: - Select No to return and fix the mapping. - Select Yes to proceed. The system sends the credential to the child as a JSON value. |
| Description | Displays the use of the parameter, which will help you make informed mapping decisions. Note: The field is Read-only and will be populated when you click Get Parameters to fetch all parameters associated with the child workflows or process. |
| Inherit all variables from the workflow? | Select checkbox, to pass all workflow parameters to the specified child workflow in the step. |
| Get Parameters | Click to add the parameters. If you click again then the following dialog appears:  Figure: Get Parameters confirmation dialog. Add all: Click to again add the parameters associated with the workflow or process to the existing list (parameters are appended to the list). Clear and add all: Click to remove the existing list of parameters in the tab and add the parameters again. Cancel: Click to close the dialog without any changes. |
| On error execute only error path | Select the checkbox, if required. If you select the checkbox, then only the step that is connected through the error handling hop is executed. Else, when the checkbox is clear, then even if the executor step fails all connected steps will execute. |
| Row grouping Tab: | Specify the amount of input rows that are passed to the workflow in the form of result rows. You can use the result rows in Get rows from result step in a workflow. |
| The number of rows to send to the workflow | Specify a number say X. After every X rows the workflow will be executed and these X rows will be passed to the workflow |
| Field to group rows on | Rows will be accumulated in a group if the field value stays the same. If the value changes the workflow will be executed and the accumulated rows will be passed to the workflow. |
| The time to wait collecting rows before execution | This is maximum time in Milliseconds the step will spend accumulating rows prior to the execution of the workflow. |
| Execution results Tab: | |
| The target step for the execution results | Choose the target step for the execution results from a list. |
| Fieldname of the execution time(ms) | Enter the fieldname to store the execution time(ms). |
| Fieldname of the Execution Result | Enter the fieldname to store the Execution Result. |
| Fieldname of the number of errors | Enter the fieldname to store the number of errors. |
| Fieldname of the number of rows read | Enter the fieldname to store the number of rows read. |
| Fieldname of the number of rows written | Enter the fieldname to store the number of rows written. |
| Fieldname of the number of rows input | Enter the fieldname to store the number of rows input. |
| Fieldname of the number of rows output | Enter the fieldname to store the number of rows output. |
| Fieldname of the number of rows rejected | Enter the fieldname to store the number of rows rejected. |
| Fieldname of the number of rows updated | Enter the fieldname to store the number of rows updated. |
| Fieldname of the number of rows deleted | Enter the fieldname to store the number of rows deleted. |
| Fieldname of the number of rows retrieved | Enter the fieldname to store the number of rows retrieved. |
| Fieldname of the exit status | Enter the fieldname to store the exit status. |
| Fieldname of the execution logging text | Enter the fieldname to store the execution logging text. |
| Fieldname of the log channel ID | Enter the fieldname to store the log channel ID. |
| Result rows Tab: | |
| The target step for the result rows | Specify the target step for the result rows in the parent workflow. |
| Expected Layout of result rows: | |
| Field name | Specify the names of the fields that are part of the result. |
| Data type | Specify the data type. |
| Length | Specify the length, - For Number: Total number of significant figures in a number. - For String: total length of string. - For Date: length of printed output of the string. |
| Precision | Specify the precision, - For Number: Number of floating point digits. - For String, Date, Boolean: unused. |
| Result files Tab: | |
| The step to send the result files information to | Choose the step to send the result files information to from the list. |
| The result filename field | Specify the fieldname to store the result filename |
| Logging settings Tab: | |
| Specify logfile? | Select the checkbox to create a custom log file, in addition, to the default log file. |
| Append logfile? | Select the checkbox to append to the existing log file instead of creating a new file. |
| Name of logfile | Browse the file path and specify the file name. |
| Create parent folder | Create the parent folder for the log file if it does not already exist. |
| Extension of logfile | Specify the file name extension, for example, .log' or '.txt'. |
| Include date in logfile? | Select the checkbox to add the system date to the file name with the format 'YYYYMMDD', for example '_20051231'. |
| Include time in logfile? | Select the checkbox to add the system time to the file name with the format 'HHMMSS', for example, '_235959' |
| Loglevel | Select the type of log details you want. Available options are: - Nothing - Error - Minimal - Basic - Detailed - Debug - Row Level (very detailed) - Warning |
| Note | The custom log file is also available in the AE UI in the Requests page. |
| Common | |
| On error execute only error path Note: This option is only available in Process Studio 5.6.0 onwards. | Enable checkbox to execute only the step connected with 'Error Handling of step' path in the workflow. By default, if you leave this checkbox unchecked all the steps following this step in the workflow, connected with any of the below options are executed. 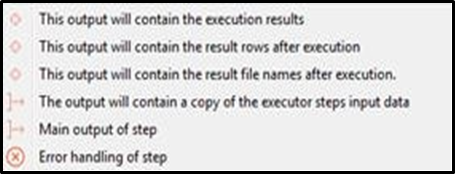 Figure: Error handling path options for workflow steps. |
| Button: OK | On click of this button. It will check the field values. If any required field values are missing, then it will display validation error message. If all the required field values are provided, then it will save the field values. Note: Displays a warning message if a credential variable maps to a non-credential child parameter. This alerts a potential type mismatch but allows the configuration to proceed if intentional. |
| Button: Cancel | On click of this button, it will cancel the window and do not save any values. |