Microsoft Excel Output
Description
Microsoft Excel Output is a step in the Output plugin for Process Studio Workflows.
The Microsoft Excel Output step writes your workflow data to a classic .xls file (Excel 97–2003). The step uses the JXL library and supports only the .xls format — it does not create .xlsx files.
Each sheet supports up to ~65,536 rows and provides basic cell values and simple formatting only. It performs well for small datasets.
Key Capabilities:
- Create new files, append data to existing spreadsheets, or generate output using a predefined Excel template.
- Configure headers and footers, auto-size columns for readability, and define specific encoding requirements.
- Split large datasets into multiple files and toggle the retention of null values.
- Apply sheet protection to prevent unauthorized edits to the generated output.
Note: For writing .xlsx files (Excel 2007 and above), use the Microsoft Excel Writer step.
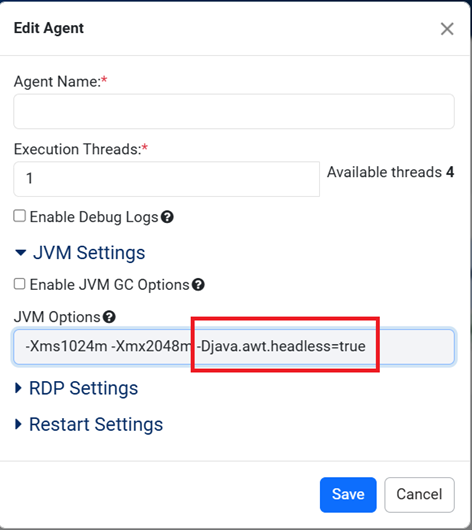
When executing the step on a Linux agent, configure the Linux agent JVM with -Djava.awt.headless=true to ensure images are added successfully to the Excel output file.
- Log in to the AutomationEdge server and navigate to Agent → Agent List. The Agent Details page appears.
- In the Actions column, click Edit
 , The Edit Agent dialog box appears.
 - Add -Djava.awt.headless=true in the JVM Settings field.
- Save the changes. See following image
Configurations
| Field Name | Description |
|---|---|
| Step name | Specify a unique name for the step, which will help you identify and reference it easily when debugging or linking steps in the workflow. For example, Read Employee Excel File The field is mandatory. |
| File tab: | Use the File tab to configure output locations, naming conventions, and file creation behaviors for the Excel (.xls) file. |
| Filename | Specify the directory path and name for the output file. Or Click Browse to locate the directory.Note: Do not manually add a file extension. The step appends the extension automatically. |
| Create Parent folder | Select Create Parent folder to generate the parent directory if it does not already exist. Note: You must include the full directory path in the Filename field for this function to work; otherwise, the step fails. |
| Do not create file at start | Check Do not create file at start to delay file creation until the step writes the first line of data. This prevents the generation of empty files when the input stream contains no rows. |
| Extension | Specify the file extension. Note: You must specify extension as .xls only. |
| Include stepnr in filename | Select Include stepnr in filename to append the step copy number to the filename (for example, _0). Use this feature when running multiple copies of the step simultaneously (parallel execution) to prevent file lock conflicts. Note: The appended number (such as _0, _1, _2) indicates the step instance (thread), not the row number or execution count. |
| Include date in file name | Select Include date in file name to append the system date to the filename (for example, _20101231). This ensures unique, date-based output files. |
| Include time in file name | Select Include time in file name to append the system time (24-hour format) to the filename (for example, _235959). This ensures unique, time-based output files. |
| Specify Date time format | Select the format to apply a custom timestamp format to the filename. If selected the Include date in file name and Include time in file name disabled. |
| Date time format | Select date time format from the list: - yyyyMMddHHmmss - yyyy-MM-dd - yyyyMMdd - MM-dd-yyyy - MM-dd-yy - dd-MM-yyyy |
| Show file name(s) | Click Show filenames button to preview the final list of files. The list displays the result of combining manually added files, dynamic filenames from previous steps, and any applied regular expression filters. |
| Add filenames to result | Select this checkbox to add the filename of each processed file to the Workflow Result stream. This allows subsequent steps to access the list of processed files for logging or auditing purposes. |
| Content Tab: | Use the Content tab to control how data is formatted and written to the Excel sheet. This includes settings for headers, data encoding, memory management, and template usage. |
| Append | Check Append to add new data to the end of the specified file. If the file does not exist, the step creates a new file automatically. |
| Header | Select Header to include column headers at the top of the spreadsheet before writing the data. |
| Footer | Select Footer to include column footer at the bottom of the spreadsheet before writing the data. |
| Encoding | Select the text character encoding from the list. - Default: In most cases, retain the default UTF-8. - When to change: Select a different encoding only if the target system requires it or if you observe unreadable characters (such as �) in the output. Note: Process Studio automatically populates this list with encodings supported by your system on the first use. |
| Split every ... rows | Specify the maximum number of rows per output file. When the data exceeds this limit, the step creates a new spreadsheet file for the remaining rows. |
| Sheet name | Specify the name of the worksheet within the Excel file where the step writes the data. |
| Protect sheet? | Select Protect sheet? Checkbox to enable password protection for the worksheet. You must enter the password in the Password field. |
| Auto size columns | Select Auto size columns checkbox to automatically adjust the width of each column to fit the widest value contained in that column. |
| Retain NULL values | Select to write NULL values directly to the output. - Selected: NULL values are preserved. - Cleared: NULL values are converted to empty strings. |
| Use temporary file | Select to generate the workbook using a temporary file on the disk rather than holding the entire workbook in system memory and reduces memory usage when processing large datasets. Else, the entire workbook is created in memory, which may be faster but requires more system resources. |
| Temporary files directory | Specify the directory path where the step saves the temporary file. Or Click Browse to select a location. |
| Template: | |
| Use Template | Select Use Template to generate the output file based on an existing Excel template. |
| Excel Template | Specify the file path of the template to use. Or Click Browse to locate it. |
| Append to Excel Template | Select Append to Excel Template to append the output data directly into the specified Excel template file instead of creating a new output file based on the template. |
| Custom Tab: | Use the Custom tab to define the visual formatting of the Excel output. You can configure distinct font styles, colors, and layouts for the headers and data rows to match your reporting requirements. |
| Header font: | |
| Header font name | Select the desired font family for the header text from the list. |
| Header font size | Specify the point size for the header text. |
| Header font bold? | Select to apply bold formatting to the header text. |
| Header font italic? | Select this option to italicize the header text. |
| Header font underline | Select the underline style for the header text. Available options are: - No underline - Single - Single accounting - Double - Double accounting |
| Header font orientation | Select the rotation alignment of the header text. Available options are: - Horizontal - Minus 45 - Minus 90 - Plus 45 - Plus 90 - Stacked - Vertical |
| Header font color | Select the text color for the header. |
| Header background color | Select the background fill color for the header cells. |
| Header height | Specify the row height for the header. Default value: 255 |
| Header alignment | Select the text alignment for the header: - Left - Right - Center - Fill - General - Justify |
| Add Image | Specify the file path of an image to display in the header, Or Click Add an image to browse for the file. |
| Row font: | |
| Row font name | Select the desired font family for the data rows from the list. |
| Row font size | Specify the point size for the data rows. |
| Row font color | Select the text color for the data rows. |
| Row background color | Select the background fill color for the data rows. |
| Fields Tab: | Use the Fields tab to map the input data to specific columns in the Excel output. You can define data types and apply formatting masks to ensure the spreadsheet matches your reporting requirements. |
| Name | Select the name of the input field to write to the Excel column. |
| Type | Select the data type for the field. Options include: - Number - String - Date - Boolean - Integer - BigNumber - Binary - Timestamp - Internet Address |
| Format | Specify the format mask to apply to the value (primarily for Number types). |
| Get Fields | Click Get Fields to automatically retrieve and populate the list of available fields from the specified file. |