Process Executor
Description
Process Executor runs a separate Process Studio process from within the current workflow. By default, the child process executes once for each incoming row, with that row available to set parameters, variables, and result rows in the child process. Use this step when your workflow needs to delegate a discrete task — such as a data load, file processing, or notification sequence — to a reusable process. You can also group rows by a field value or a time window so that the child process receives batches of records instead of one at a time. Execution results, including row counts, exit status, and log output, can be captured as fields for downstream steps.
Configurations
| Field Name | Description |
|---|---|
| Step name | Specify the name of the step as it appears in the workflow workspace. This name has to be unique in a single workflow. |
| Workflow | Use this section to specify the process to execute. You have the following options to specify the process: - Use a file for the process: when this option is enabled, you can enter the the .psw file that is to be used as process. The filename may contain variables (for example, you can use the built-in Internal.Workflow.Filename.Directory variable to construct a filename relative to the current workflow), or you can use the "Browse" button to select a file using a file browser. - Use a process from the repository: This option is available when connected to a repository. When enabled, you can enter the name and the repository path in the two fields corresponding to this option. Alternatively you can use the "Select" button to browse the repository and point to the workflow stored in the repository. This feature is currently not enabled. - Repository by reference: This feature is currently not enabled. - The following two buttons in this section makes it easier to work with the process: - New process: create a new workflow to be used. The new process will be opened in a new tab. - Edit process: open the currently selected process in a new tab so you can edit it. |
| Parameters Tab: | Specify which field to use to set a certain parameter or variable value. If multiple rows are passed to the process, the first row is taken to set the parameters or variables. |
| Variable / Parameter name | The Parameters tab allows you to define or pass stream fields as variables down to the Process Studio process. |
| Field to use | Specify which field to use to set a certain parameter or variable value. If you specify an input field to use, the static input value is not used. |
| Static input value | Instead of a field to use you can specify a static value here. |
| Inherit all variables from the workflow? | Select check box, to pass all workflow parameters to the specified child process in the step. |
| Button: Get parameters | Click this button to get all the parameters of the workflow in the Variable / Parameter name column. |
| Row grouping Tab: | specify the amount of input rows that are passed to the workflow in the form of result rows. You can use the result rows in a Get rows from result step in a workflow. |
| The number of rows to send to the workflow | Specify a number say X. After every X rows the process will be executed and these X rows will be passed to the process. |
| Field to group rows on | Rows will be accumulated in a group as long as the field value stays the same. If the value changes the process will be executed and the accumulated rows will be passed to the process. |
| The time to wait collecting rows before execution | This is the maximum time in Milliseconds the step will spend accumulating rows prior to the execution of the process. |
| Execution results Tab: | |
| The target steps for the execution results | Choose the target step for the execution results from a drop down list |
| Fieldname of the execution time(ms) | Enter the fieldname to store the execution time(ms) |
| Fieldname of the ExecutionResult | Enter the fieldname to store the ExecutionResult |
| Fieldname of the number of errors | Enter the fieldname to store the number of errors |
| Fieldname of the number of rows read | Enter the fieldname to store the number of rows read |
| Fieldname of the number of rows written | Enter the fieldname to store the number of rows written |
| Fieldname of the number of rows input | Enter the fieldname to store the number of rows input |
| Fieldname of the number of rows output | Enter the fieldname to store the number of rows output |
| Fieldname of the number of rows rejected | Enter the fieldname to store the number of rows rejected |
| Fieldname of the number of rows updated | Enter the fieldname to store the number of rows updated |
| Fieldname of the number of rows deleted | Enter the fieldname to store the number of rows deleted |
| Fieldname of the number of rows retrieved | Enter the fieldname to store the number of rows retrieved |
| Fieldname of the exit status | Enter the fieldname to store the exit status |
| Fieldname of the execution logging text | Enter the fieldname to store the execution logging text |
| Fieldname of the log channel ID | Enter the fieldname to store the log channel ID |
| Result rows Tab: | |
| The target step for the result rows | The target step for the result rows in the parent workflow. |
| Expected Layout of result rows: | |
| Field name | Names of the fields that are part of the result. |
| Data type | Type of data. |
| Length | For Number: Total number of significant figures in a number; For String: total length of string; For Date: length of printed output of the string. |
| Precision | For Number: Number of floating point digits; For String, Date, Boolean: unused. |
| Result files Tab: | |
| The step to send the result files information to | Choose the step to send the result files information to from the drop down list. |
| The result filename field | The fieldname to store the result filename |
| Common | |
| On error execute only error path Note: This option is only available Process Studio 5.6.0 onwards. | Enable checkbox to execute only the step connected with ‘Error Handling of step’ path in the workflow. By default if you leave this checkbox unchecked all the steps following this step in the workflow, connected with any of the below options are excuted. 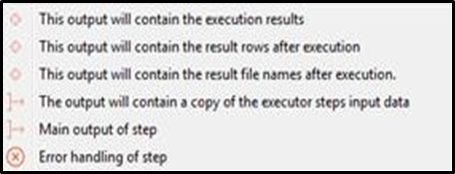 |
| Help | Click Help for a description of plugin step configuration details, |
| Button: OK | On click of this button. It will check the field values. If any required field values are missing then it will display validation error message. If all the required field values are provided then it will save the field values. |
| Button: Cancel | On click of this button, it will cancel the window and do not save any values |